Caching in Node.js applications
Caching is the process of storing data in a high-speed storage layer so that future requests for such data can be fulfilled much faster than is possible through accessing its primary storage location. An example of caching that you may be familiar with is the browser cache, which stores frequently accessed website resources locally so that it does not have to retrieve them over the network each time they are needed. By maintaining a cache of objects on the user's hardware, retrieval of the cached data is almost instantaneous, leading to increased speed and user satisfaction.
In the context of server-side applications, caching aims to improve the application's response times by reusing previously retrieved or computed data. For example, instead of repeating network requests for data that do not change often or at all (such as a list of banks in your country), you could store the data in the cache after the initial request and retrieve it from there in subsequent requests. This makes the subsequent requests for that data an order of magnitude faster leading to improved application performance, decreased costs, and faster transactions.
This article aims to provide an overview of caching, caching strategies, and the solutions currently available on the market. After reading this post, you should have a better idea of when to cache, what to cache, and the appropriate techniques to use in your Node.js applications, depending on the use–case.
Benefits of caching
The primary benefit of caching is that it improves the speed of data retrieval by reducing the need to recompute a result or access the underlying processing or storage layer. Faster data access significantly boosts application responsiveness and performance without adding new hardware resources. Other benefits include the following:
-
Reduced server load: Certain requests can require considerable processing time on the server. If the result of the query is already present in the cache, this processing can be skipped entirely so that the response time is faster, which frees up server resources to do other work.
-
Increased reliability: Higher latencies when retrieving data is the usual effect of spikes in application usage causing slower performance across the board. Redirecting a significant portion of the load to the cache layer helps performance become much more predictable.
-
Decreased network costs: Placing frequently accessed objects in the cache reduces the amount of network activity that has to be performed beyond the cache. This results in far less data being transferred to and from the content origin, leading to lower transfer costs, less congestion in the queues at network switches, fewer dropped packets, etc.
-
Improved database performance: A common finding when investigating application performance is that a significant portion of the overall response time is spent in the database layer. Even if the queries are efficient, the cost of processing each query (especially for frequently accessed objects) can quickly add up to higher latencies. A great way to mitigate this issue is to bypass the query processing altogether and use a precomputed result from the cache.
-
Increased availability of content: Caching can be used as a way to preserve the availability of certain data, even when the origin data storage is down temporarily.
When should you cache?
Caching is a great tool for improving performance, as evidenced by the benefits discussed in the previous section. So, when should you consider adding a cache layer to your application architecture? There are several factors to consider.
Most applications have data hot spots that are queried regularly but seldom updated. For example, if you are running an online forum, there may be a steady stream of new posts, but old posts will remain the same and many old threads will stay unchanged for a long time. In this scenario, the application can receive hundreds or thousands of requests for the same unchanged data, which makes it an ideal candidate for caching. Generally speaking, data that are accessed frequently and do not change often or at all should be stored in a cache.
Another consideration when deciding what to cache is whether the application needs to perform complex queries or calculations before returning or rendering some data. For high-volume websites, even the simple act of rendering some HTML output after retrieving and computing the required data can consume a significant amount of resources and increase latency. If the returned output, once computed, can be reused across multiple queries and operations, it is usually a good idea to store it in a cache.
The rate at which a piece of data changes and how long outdated data can be tolerated also contribute to how cachable it is. If the data changes frequently such that it cannot be reused for subsequent queries, then it is likely not worth the overhead required to place it in a cache. Other types of optimizations should be considered in this case.
Caching can be a great way to improve application performance, but it's not necessarily the right thing to do in every scenario. As with all performance optimization techniques, it's important to measure first before making substantial changes to avoid wasting time optimizing the wrong thing.
The first step is to observe the state and performance of the system in question at a given request rate. If the system cannot keep up with the anticipated load, or if it throttles or suffers high latency, it might be a good idea to cache the data that the system is working with if such a cache would yield a high hit-ratio across several requests.
Caching strategies to consider
A caching strategy is a pattern employed to manage cached information, including how the cache is populated and maintained. There are several strategies to explore, and choosing the right one is crucial to getting the greatest performance benefits. The strategy employed for a gaming service that aggregates and returns a real-time leaderboard will differ considerably from a service that provides other types of data, such as COVID-19 statistics, which are updated a few times a day.
Before you choose a caching solution, there are three three main things consider:
- The type of data being cached.
- How the data is read and written (the data access strategy).
- How the cache evicts old or outdated data (the eviction policy).
In the next section, we’ll discuss the various data access strategies that can be employed depending on the type of data being cached.
Data access patterns
The data access pattern employed determines the relationship between the data source and the caching layer. Therefore, it's important to get this part right, as it can make a significant difference in the effectiveness of your caching. In the rest of this section, we'll discuss common data access patterns, along with their advantages and disadvantages.
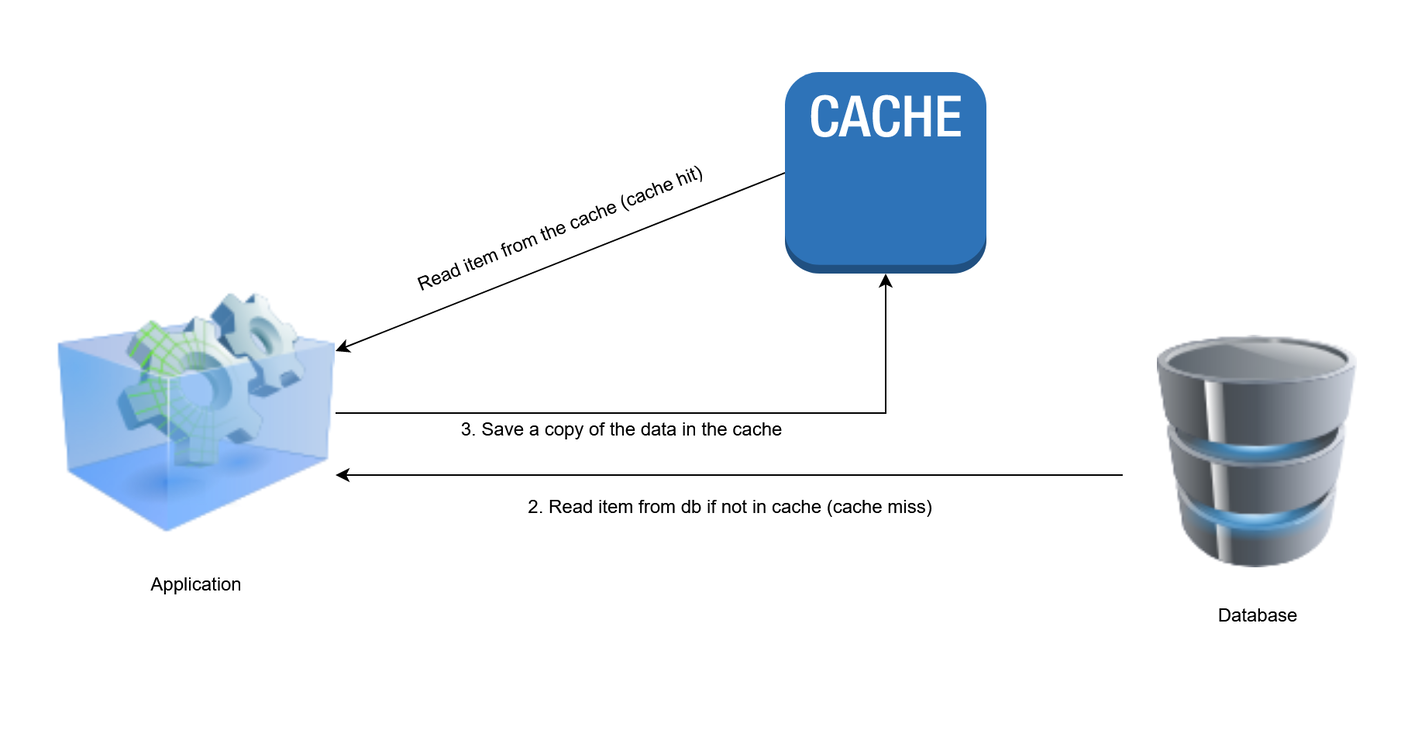
1. Cache-aside pattern
In the cache-aside pattern, data is loaded to the cache only when necessary. Whenever a client requests data, the application checks the cache layer first to see if the data is present. If the data is found in the cache, it is retrieved and returned to the client. This is known as a cache hit. If the data is not present in the cache (a cache miss), the application will query the database to read the requested data and return it to the client. Afterwards, the data is stored in cache so that subsequent requests for the same data can be resolved more quickly.
The following is a pseudocode example of cache-aside logic.
function makeAQuery(key) {
  // Try to get the entity from the cache.
  let data  = cache.get(key);

  // If there's a cache miss, get the data from the original store and cache it.
  if (data == null) {
    data = db.get(key)

    // then store the data to cache with an appropriate expiry time
    // to prevent staleness
    cache.set(key, data, cache.defaultTTL)
  }

  // return the data to the application
  return data;
}

// application code that gets the data
const data = makeAQuery(12345)
Advantages
- Only the requested data is cached. This means that the cache is not filled up with data that never get used.
- It works best for read-heavy workflows in which data is written once and read several times before being updated again (if at all).
- It is resilient to cache failures. If the cache layer is not available, the system will fall back to the data store. Bear in mind that an extended period of cache failure can lead to increased latency.
- The data model in the cache does not have to map to the one in the database. For example, the results of multiple database queries can be stored under the same id in the cache.
Disadvantages
- A cache miss may increase latency because three operations are performed:
- Request data from the cache.
- Read data from data store.
- Write the data to the cache.
- It does not guarantee consistency between the data store and the cache. If data is updated in the database, it may not be reflected in the cache immediately, which leads to stale data being served up by the application. To prevent this from happening, the cache-aside pattern is often combined with the write-through strategy (discussed below), in which the data is updated in the database and the cache simultaneously to prevent the cached data from going stale.
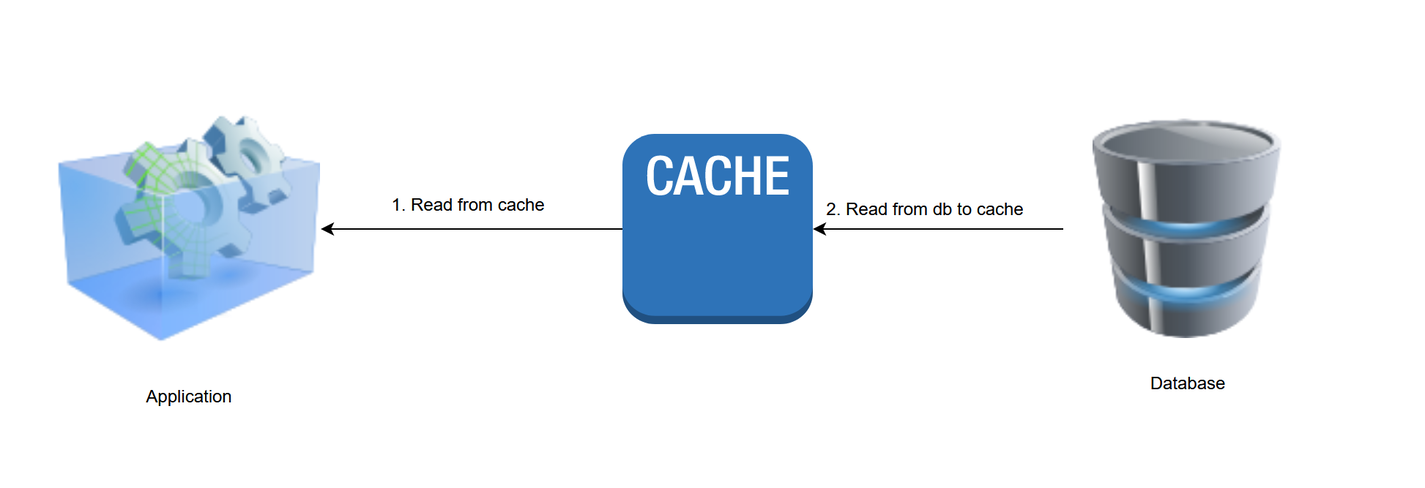
2. Read-through pattern
In read-through caching, data is always read from the cache. When an application asks the cache for an entry, and it is not already in the cache, it is loaded from the underlying data store and added to the cache for future use. Unlike the cache-aside pattern, the application is relieved of the responsibility of reading and writing directly to the database.
In most cases, you need to implement a read-through handler provided by the cache, which allows it to read data directly from the database in the event of a cache miss. Here's some pseudocode that demonstrates how it may be done:
// register the function that will be executed on cache misses.
cache.onmiss = (key) => {
  return db.get(key) // return data from the database
};

// Actual data from the cache or onmiss handler
// A cache entry is created automatically on cache misses
// through the key and time-to-live values after the data
// is retrieved from the database
const data = cache.readThrough(key, data, ttl);
Advantages
- Like cache-aside, it works well for read-heavy workloads where the same data is requested many times.
- Only requested data is cached, supporting the efficient use of resources.
- This model allows the cache to auto-refresh an object from the database when the data is updated or when the cache entry expires.
Disadvantages
- The data model in the cache cannot be different from the data model in the database.
- It is not resilient to cache failures, unlike cache-aside.
- Latency may be increased when the requested data is not present in the cache.
- It's possible for the cached data to become stale, but this problem can be solved by using one of the write strategies considered below.
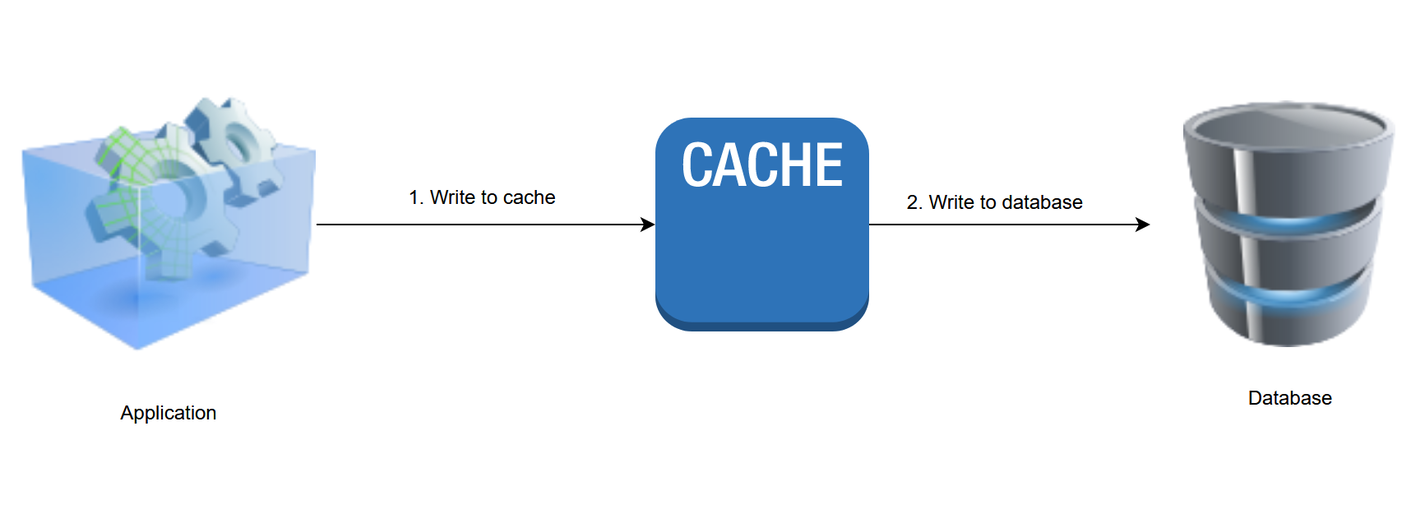
3. Write-through pattern
When the write-through strategy is employed, the cache layer is treated as the main data store for the application. This means that new or updated data is added or updated directly to the cache while the task of persisting the data to the underlying data store is delegated to the cache layer. Both write operations must be completed in a single transaction to prevent the cached data from going out of sync with the database.
The following is a pseudocode example of write-through logic.
function updateCustomer(customerId, customerData) {
  // the callback function will be executed after updating the
  // record in the cache
  cache.writeThrough(customerId, customerData, cache.defaultTTL, (key, value) => {
    return db.save(key, value) // save updated data to db
  });
}

// A variant is of this pattern is when updated in the db first
// and immediately updated in the cache
function updateCustomer(customerId, customerData) {
  // update the record in the database first
  const record = db.findAndUpdate(customerId, customerData)

  // then set or update the record in the cache
  cache.set(customerId, record, cache.defaultTTL)
}
Advantages
- Data in the cache are never stale by virtue of it being synchronized with the database after each write operation.
- It is suitable for systems that cannot tolerate staleness in the cache.
Disadvantages
- It adds latency when writing data because more work is being done by writing to the data store first and then to the cache.
- The write operation will fail if the cache layer becomes unavailable.
- The cache may accumulate data that are never read, which wastes resources. This can be mitigated by combining this pattern with the cache-aside pattern or by adding a time-to-live (TTL) policy.
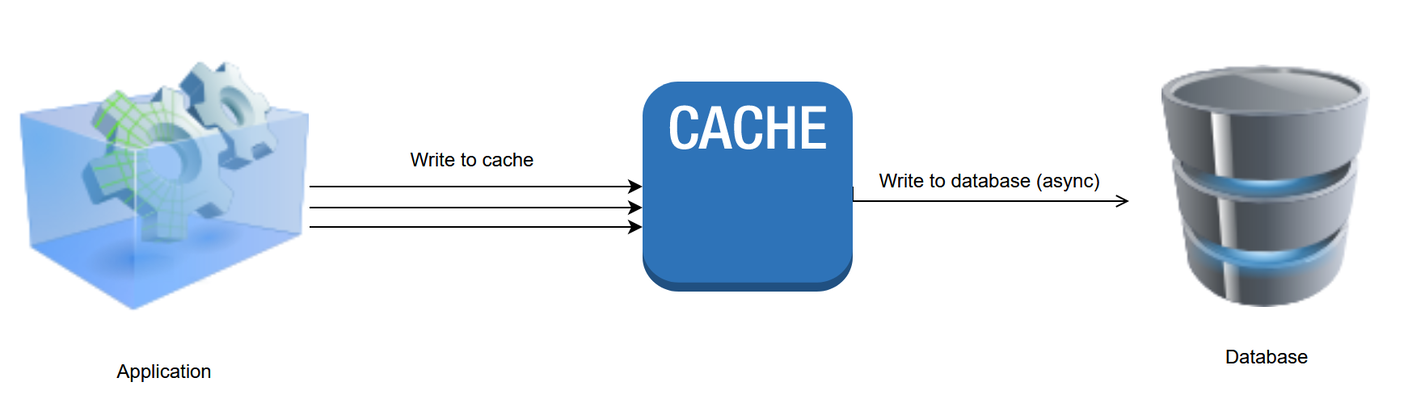
4. Write-behind pattern
In the write-behind pattern (also known as write-back), data is inserted or modified directly in the cache and later asynchronously written to the data source after a configured delay, which could be as brief as a few seconds or as long as several days. The main implication of adopting this caching pattern is that database updates are applied sometime after the cache transaction is completed, which means you have to guarantee that the database writes will be completed successfully or provide a way to roll back the updates.
Advantages
- Improved write performance compared to write-through since the application does not have to wait for the data to be written to the underlying data store.
- The database load is reduced since multiple writes are often batched into a single database transaction, which can also reduce costs if the number of requests is a factor in the pricing of the database provider.
- The application is somewhat protected against temporary database failures since failed writes can be re-queued.
- It is best suited for write-heavy workloads.
Disadvantages
- If there's a cache failure, the data may be lost permanently. Therefore, it may not be suitable for sensitive data.
- Operations performed directly on the database may utilize stale data since the cache and data store cannot be guaranteed to be consistent at any given point in time.
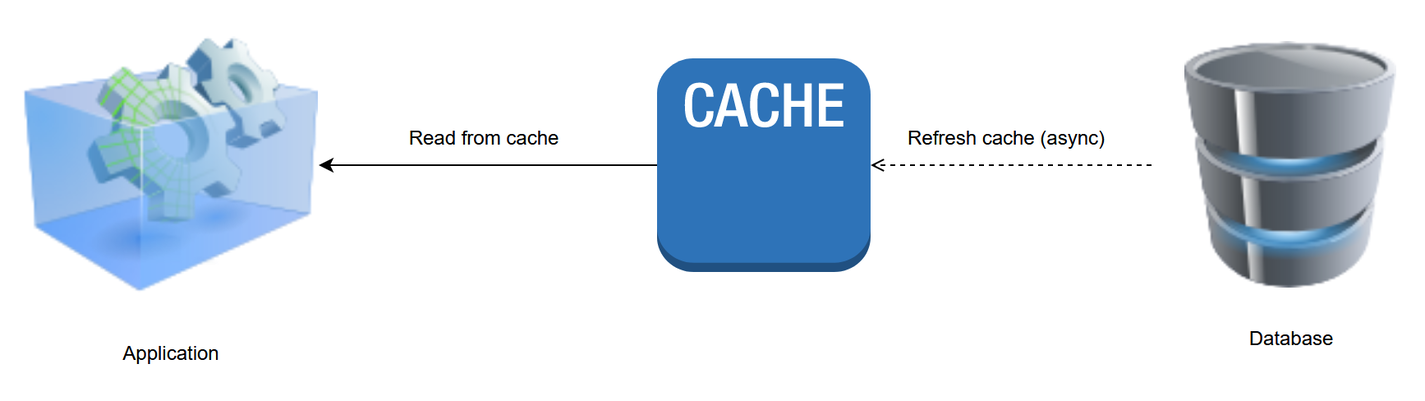
5. Refresh-ahead pattern
In the refresh-ahead pattern, frequently accessed cached data is refreshed before they expire. This happens asynchronously so that the application does not feel the effect of a slow read when an object is being retrieved from the data store in the event of its expiry.
Advantages
- Ideal when reading data from the data store is costly.
- Helps to keep frequently accessed cache entries always in sync.
- Ideal for latency sensitive workloads, such as live sports scoring sites and stock market financial dashboards.
Disadvantages
- The cache needs to accurately predict which cache items are likely to be needed in the future because inaccurate predictions can incur unnecessary database reads.
Cache Eviction Policy
The size of a cache is usually limited compared to the size of the database, so it is necessary to store only the items that are needed and remove redundant entries. A cache eviction policy ensures that the cache does not exceed its maximum limit by removing older objects from the cache as new ones are added. There are several eviction algorithms to choose from, and the best one will depend upon the needs of your application.
When choosing an eviction policy, keep in mind that it isn't always appropriate to apply a global policy to every item in the cache. If a cached object is very expensive to retrieve from the data store, it may be beneficial to retain this item in the cache, regardless of whether is meets the requirements for eviction. A combination of eviction policies may also be required to achieve the optimal solution for your use case. In this section, we'll take a look at some of the most popular algorithms used in production environments.
1. Least Recently Used (LRU)
A cache that implements the LRU policy organizes its items in the order of use. Therefore, the most recently used items will be at the top of the cache, while the least recently used ones will be at the bottom. This makes it easy to identify which items should be evicted when it’s time to clean up the cache.
Every time you access an entry, the LRU algorithm will update the timestamp on the object and move it to the top of the cache. When it's time to evict some items from the cache, it will analyze the state of the cache and remove items at the bottom of the list.
2. Least Frequently Used (LFU)
The least frequently used algorithm evicts items from the cache based on how frequently they are accessed. The analysis is performed by incrementing a counter on a cached object each time it is accessed so that it can be compared to other objects when it’s time to evict items from the cache.
LFU shines in cases where the access patterns of the cached objects do not change often. For example, assets are cached on a CDN based on usage patterns so that the most frequently used objects are never evicted. It also helps to evict items that see a spike in requests at a certain period but whose access frequency drops drastically thereafter.
3. Most Recently Used (MRU)
The Most Recently Used eviction policy is essentially the reverse of the LRU algorithm because it also analyzes the cache items based on the recency of their last access. The difference is that it discards the most recently used objects from the cache instead of the least recently used ones.
A good use case for MRU is when it is unlikely that a recently accessed object will be used again soon. An example could be removing booked flight seats from the cache immediately after booking, as they are no longer relevant for a subsequent booking application.
4. First In, First Out (FIFO)
A cache that implements FIFO evicts items in the order they were added, without any regard for how often or how many times they were accessed.
Cache expiration
The expiration policy employed by a cache is another factor that helps determine how long a cached item is retained. The expiration policy is usually assigned to the object when it is added to the cache and is often customized for the type of object being cached. A common strategy involves assigning an absolute time of expiration to each object when it is added to the cache. Once that time elapses, the item is expired and removed from the cache accordingly. This expiration time is chosen based on client requirements, such as how quickly the data change and how tolerant the system is to stale data.
A sliding expiration policy is another common way to invalidate cached objects. This policy favors the retention items frequently used by the application by extending their expiration time by a specified interval each time they are accessed. For example, an item whose sliding expiration time is 15 minutes will not be removed from the cache as long as it is accessed at least once every 15 minutes.
You need to be deliberate when choosing a TTL value for cache entries. After the initial implementation of the cache, it is important to monitor the effectiveness of the chosen values so that they may be re-evaluated if necessary. Note that most caching frameworks may not removed expired items immediately for performance reasons. They normally use a scavenging algorithm, which is typically invoked when referencing the cache, looks for expired entries, and flushes them. This prevents having to constantly track expiration events to determine when items should be removed from the cache.
Caching solutions
There are multiple ways to implement caching in a web application. Often, once the need to cache is identified, an in-process cache is employed for the task since it is conceptually straightforward, relatively simple to implement, and can yield significant performance improvements with minimal effort. The major downside of in-process caches is that cached objects are limited to the current process alone. If employed in a distributed system with several instances that are load balanced, you'd end up with as many caches as application instances, leading to a cache coherence problem since requests from a client may use newer or older data depending on which server was used to process it. This problem does not apply if you're only caching immutable objects.
Another shortcoming of in-process caches is that they utilize the same resources and memory space as the application itself. This can cause out-of-memory failures if the upper limits of the cache are not carefully considered while setting it up. In-process caches are also flushed whenever the application is restarted, which causes the downstream dependency to receive more load while the cache is being repopulated. This is an important consideration if a continuous deployment strategy is utilized in your application.
Many of the issues with in-process caches can be solved by employing a distributed caching solution that offers a single view into the cache, even if it is deployed on a cluster of multiple nodes. This means that cached objects are written to and read from the same place, regardless of the number of servers employed, reducing the occurrence of cache coherence issues. A distributed cache also remains populated during deployments since it is independent of the application itself and uses its own storage space so that you are not limited to the available server memory.
With that being said, the use of a distributed cache presents its own challenges. It increases system complexity by adding a new dependency that needs to be monitored and scaled appropriately, and it is slower than an in-process cache due to network latency and object serialization. A distributed cache may also be unavailable from time to time (for example, due to maintenance and upgrades), leading to notable performance degradations, especially during periods of prolonged outages. This issue can be mitigated by falling back to an in-process cache if the distributed cache is unavailable.
In-process caching may be implemented in a Node.js application through libraries, such as node-cache, memory-cache, api-cache, and others. There is a wide variety of distributed caching solutions, but the most popular ones are Redis and Memcached. They are both in-memory key-value stores and optimal for read-heavy workloads or compute-intensive workloads due to their use of memory rather than the slower on-disk storage mechanisms found in traditional database systems.
In-process Caching with Node-cache
Below is an example that demonstrates how effective in-process caching can be performed without requiring a convoluted setup process. This simple NodeJS application utilizes node-cache and the cache-aside pattern discussed earlier in this post to speed up subsequent requests for a list of posts from an external API.
const express = require('express');
const fetch = require('node-fetch');
const NodeCache = require('node-cache');

// stdTTL is the default time-to-live for each cache entry
const myCache = new NodeCache({ stdTTL: 600 });

// retrieve some data from an API
async function getPosts() {
  const response = await fetch(`https://jsonplaceholder.typicode.com/posts`);

  if (!response.ok) {
    throw new Error(response.statusText);
  }

  return await response.json();
}

const app = express();
app.get('/posts', async (req, res) => {
  try {
    // try to get the posts from the cache
    let posts = myCache.get('allPosts');

    // if posts does not exist in the cache, retrieve it from the
    // original source and store it in the cache
    if (posts == null) {
      posts = await getPosts();
      // time-to-live is set to 300 seconds. After this period
      // the entry for `allPosts` will be removed from the cache
      // and the next request will hit the API again
      myCache.set('allPosts', posts, 300);
    }

    res.status(200).send(posts);
  } catch (err) {
    console.log(err);
    res.sendStatus(500);
  }
});

const port = 3000;
app.listen(port, () => {
  console.log(`Server listening on http://localhost:${port}`);
});
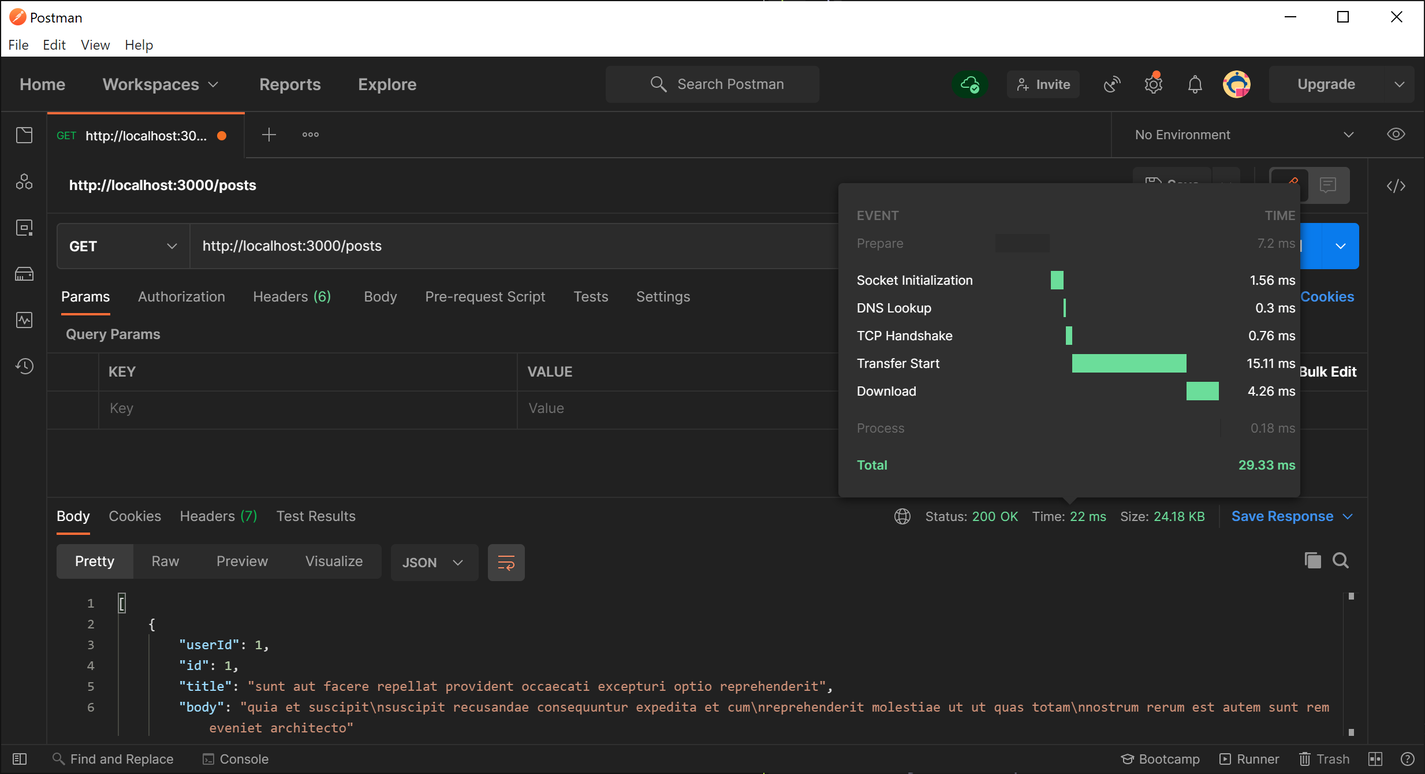
When the first request is made to the /posts route, the cache is empty, so we have to reach out to an external API to retrieve the necessary data. When I tested the response time for the initial request, it took about 1.2 seconds to receive a response.

After data is retrieved from the API, it is stored in the cache, which causes subsequent requests to take significantly less time to be resolved. In my tests, I consistently got about 20-25 ms response times on subsequent requests, which represents approximately 6,000% performance improvement over making a network request for the data.
Caching with Redis
Redis is pretty much the go-to distributed caching solution for not only Node.js but also other languages. This example showcases how a cache layer may be added to a Node.js application using Redis. Similar to the previous example using node-cache, the data to be cached will be retrieved from an API.
Ensure that you have Redis installed before trying out the sample code below. You may follow the official quickstart guide to learn how to get it up and running. Furthermore, make sure to install the necessary dependencies before running the program. This example utilizes the node-redis library.
const express = require('express');
const fetch = require('node-fetch');
const redis = require('redis');
const { promisify } = require('util');

const redisClient = redis.createClient();
const redisGetAsync = promisify(redisClient.get).bind(redisClient);

async function getCovid19Stats() {
  const response = await fetch(`https://disease.sh/v3/covid-19/all`);

  if (!response.ok) {
    throw new Error(response.statusText);
  }

  return await response.json();
}

const app = express();
app.get('/covid', async (req, res) => {
  let stats = null;

  try {
    // try to get the data from the cache
    stats = await redisGetAsync('covidStats');
  } catch (err) {
    console.log(err);
  }

  // if data is in cache, send data to client
  if (stats != null) {
    res.status(200).send(JSON.parse(stats));
    return;
  }

  try {
    // otherwise, fetch data from API
    stats = await getCovid19Stats();

    // and store it in Redis. 3600 is the time to live in seconds
    redisClient.setex('covidStats', 3600, JSON.stringify(stats));
    res.status(200).send(stats);
  } catch (err) {
    console.log(err);
    res.sendStatus(500);
  }
});

const port = 3000;
app.listen(port, () => {
  console.log(`Example app listening at http://localhost:${port}`);
});
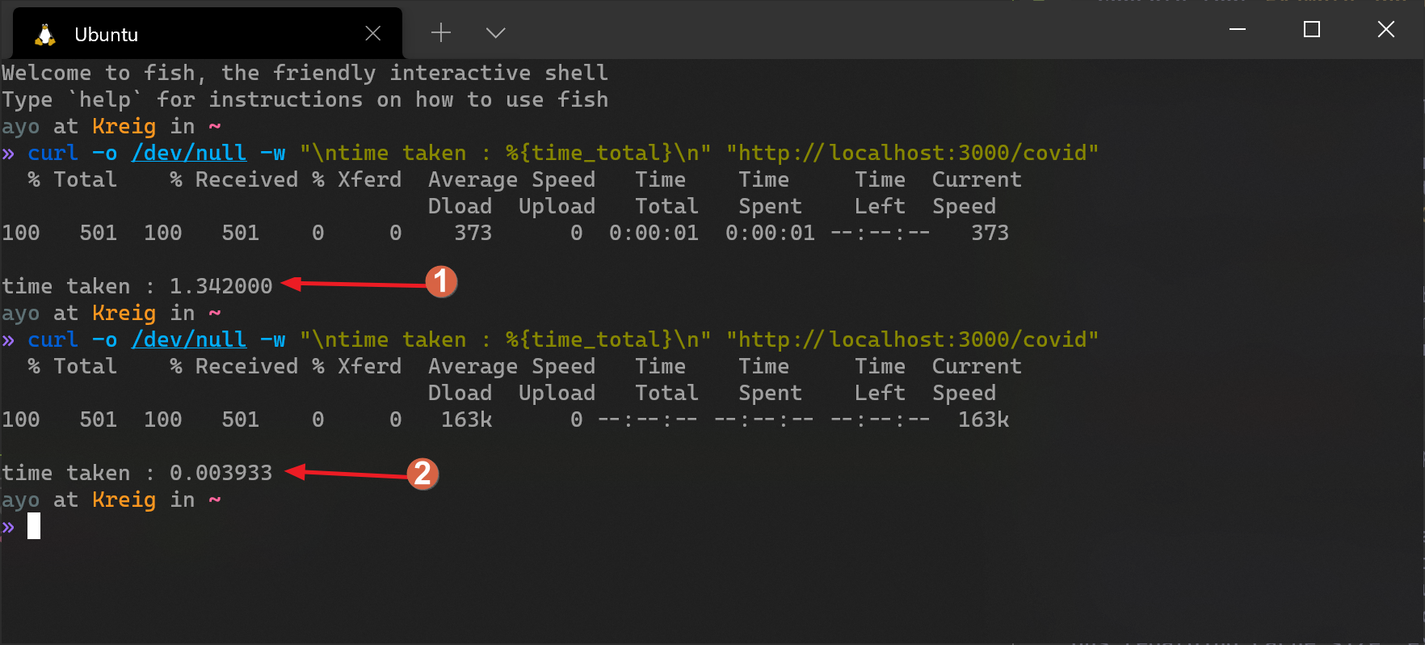
In the example above, global COVID-19 statistics are retrieved from an API and returned to the client via the /covid route. These statistics are cached in Redis for 1 hour (3,600 seconds) to ensure that network requests are kept to a minimum. Redis stores everything as a string, so you have to convert objects to a string with JSON.stringify() when storing it in the cache and then back to an object with JSON.parse() after retrieving it from the cache, as shown above.
Notice how the setex method is used to store data in the cache instead of the regular set method. It's preferred here because it allows us to set an expiration time for the cached object. When the set amount of time elapses, Redis will automatically get rid of the object from the cache so that it may be refreshed by calling the API again.
Other considerations
Here are some general best practices to consider before implementing a cache in your application:
- Ensure that the data is cachable and will yield a hit rate high enough to justify the additional resources used to cache it.
- Monitor the metrics of your caching infrastructure (such as hit rates and resource consumption) to ensure that it is appropriately tuned. Use the insights gained to inform subsequent decisions regarding cache size, expiration, and eviction policies.
- Ensure that your system is resilient to cache failure. Deal with scenarios like cache unavailability, cache put/get failures, and downstream errors directly in your code.
- Mitigate security risks by utilizing encryption techniques if sensitive data is retained in the cache.
- Ensure that your application is resilient to changes in the storage format used for cached data. New versions of your app should be able to read the data that a previous version wrote to the cache.
Conclusion
Caching is a complex topic that should not be treated lightly. When implemented correctly, you will reap huge rewards, but it can easily be a source of grief if you adopt the wrong solution. I hope this article has helped steer you in the right direction regarding setting up, managing, and administering your application cache.
Thanks for reading, and happy coding!

Written by
Ayooluwa IsaiahAyo is a developer with a keen interest in web tech, security and performance. He also enjoys sports, reading and photography.