How to build a React rich text editor with CKEditor 5
Creating a dynamic, user-friendly interface for your React application can be a challenging task. One of the most important aspects of many modern web applications is the ability for users to easily create and edit text content. That's where a WYSIWYG (What You See Is What You Get) editor comes in. A WYSIWYG text editor provides a rich text-editing experience for users, allowing them to easily format text, add images and links with embedded media, and more. Rich text editors are important for any blog post that wants to display more than plain text.
In this article, you will learn how to build a React WYSIWYG editor for your application. We'll build a React rich text editor so that users can edit content in a friendly and approachable way. If you are trying to build a blog, you will not need to touch the code when you want to publish an article. Here, we will build a note application that stores its data on the local storage and then displays the created notes.
You can find the complete code on GitHub if you want to compare your work building this simple rich text editor.
Introduction to CKEditor 5
For our example, we'll be using CKEditor 5 to speed up the process of making a WYSIWYG editor. CKEditor 5 is a JavaScript-based rich text editor that provides a user-friendly interface for creating and editing content. It is designed to be easily integrated into web applications and can be customized to suit the specific needs of a project. CKEditor 5 offers a wide range of features, such as text formatting, embedded media, undo/redo, and more. It also supports a variety of languages and can be used on both desktop and mobile devices. It's an open-source project that can be easily integrated into your web application and customized according to your needs. It's the perfect starting point for making a rich text editor.
Features of CKEditor 5
CKEditor 5 has a number of incredible features that make it a powerful and versatile rich text editor. Let's take a quick look at some of the most helpful features for users and developers.
Advanced text formatting
A rich text editor built with CKEditor 5 allows users to apply a wide range of text formatting options, including bold, italic, underline, and more. It can also be configured to support font family and font size. If you're a developer (and if you're reading this article, you probably are!), you're probably comfortable using markdown to make text appear how you intend. Sure, some popular applications support markdown, but most good web applications allow users to point and click on text options to format their text. A good React rich text editor supports this kind of text formatting, and CKEditor 5 will help us build it!
Embedded media
Media embedding is an important feature for many text boxes, especially in media-rich applications. Sometimes it's enough to support attaching an image or video, but some use cases call for allowing a user to insert their chosen media in-line. In rich text editors built with CKEditor 5, users can easily insert images, videos, and other media into their content and align, resize, and caption them. For this blog website example, the option for embedded media is very important.
Undo/Redo
Supporting undo and redo is an important but thankless task. If your text editor does not support a quick undo and redo, it's likely to frustrate users pretty quickly. Fortunately, CKEditor 5 makes it simple to support users easily undoing and redoing any changes they make to their content.
Customizable interface
CKEditor 5 has a customizable interface that can be tailored to the specific needs of a project. Not every rich text editor should feel the same, so it's a nice bonus that you can customize the appearance for your application's needs and style.
Collaboration
CKEditor 5 has a built-in collaboration feature, allowing multiple users to work on the same document in real-time. You don't have to leverage this, but it's a great head start on a really complicated (and useful!) feature set.
Plugins and add-ons
CKEditor 5 has a wide range of available plugins and add-ons, which can be used to extend its functionality. Features like notifications, dialogs, or even integrations with other text platforms like Google Docs can all be expedited with publicly available plugins.
Multilanguage support
CKEditor 5 supports a variety of languages, making it easy for users around the world to use your application. This is important for every application, even those that don't have a large international user base.
Mobile support
CKEditor 5 is fully responsive and can be used cross-platform on both desktop and mobile devices. You won't have to make changes to the rich text editor to support different screen sizes!
Developing a React rich text editor
Let's dive right in and make a sample app to demonstrate! We'll make a React CKEditor component called "App" that acts as a simple note-taking application. The component will use the CKEditor library to provide a rich text editor for users to create and edit notes. It will also store the notes in the browser's local storage so that they persist even if the user closes the application or refreshes the page.
Start by creating a new project using create-react-app:
npx create-react-app app
cd app
Now install the necessary dependencies for CKeditor 5:
npm install --save @ckeditor/ckeditor5-react @ckeditor/ckeditor5-build-classic
Next, remove what you have in the App.js file. Then your component will begin by importing the necessary libraries and modules, including React, the CKEditor library, and a specific version of the CKEditor called ClassicEditor. It also imports a CSS file called App.css, which is used to style the component.
import React, { Component } from 'react';
import { CKEditor } from '@ckeditor/ckeditor5-react';
import ClassicEditor from '@ckeditor/ckeditor5-build-classic';
import './App.css';
The component's constructor method initializes the component's state with an empty array called notes to store the notes and an empty string called currentNote to store the note currently being edited.
class App extends Component {
    constructor(props) {
        super(props);
        this.state = {
            notes: [],
            currentNote: ""
    }

}
The component's componentDidMount() method is called when the component is first rendered, and it retrieves any notes that were previously saved in local storage and sets the component's "notes" state accordingly.
componentDidMount() {
    // Retrieve notes from local storage
    let storedNotes = localStorage.getItem("notes");
    if (storedNotes) {
        this.setState({ notes: JSON.parse(storedNotes) });
    }
}
The handleEditorChange method updates the component's currentNote state with the latest data from the CKEditor whenever the user makes changes to the note being edited.
handleEditorChange = (event, editor) => {
    this.setState({ currentNote: editor.getData() });
}
The handleSaveNote method is called when the user clicks the "Save Note" button. It adds the current note to the component's notes state and saves the updated notes to local storage. Then, it clears the currentNote state so that the user can start writing a new note.
handleSaveNote = () => {
    // Add the current note to the notes array
    let newNotes = [...this.state.notes, this.state.currentNote];
    this.setState({ notes: newNotes });

    // Save the notes array to local storage
    localStorage.setItem("notes", JSON.stringify(newNotes));

    // Clear the current note
    this.setState({ currentNote: "" });
}
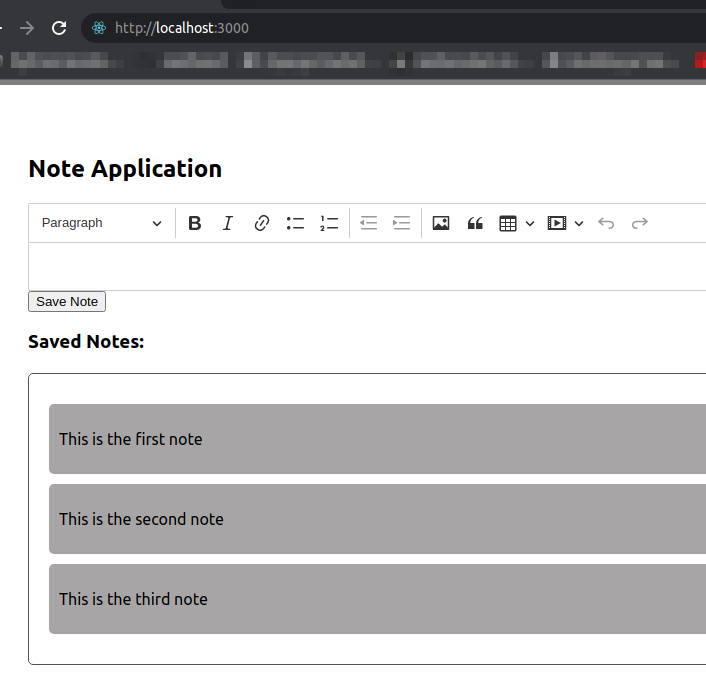
Rendering notes
The next step in building our rich text editor is to render the notes array in the UI. This is done in the render() method of the App component. Inside the render() method, we have a div element with the class of notes-container. Inside this div, we use the map() function to iterate through the notes array and create a new div element for each note. The key prop is set to the index of the note in the array to ensure that React can keep track of the elements.
render() {
    return (
      <div className="App">
          <h2>Note Application</h2>
          <CKEditor
              editor={ ClassicEditor }
              data={this.state.currentNote}
              onChange={ this.handleEditorChange }

          />
          <button onClick={this.handleSaveNote}>Save Note</button>
          <h3>Saved Notes:</h3>
          <div className="notes-container">
              {this.state.notes.map((note, index) => {
                  return <div key={index} className="note" dangerouslySetInnerHTML={{__html: note}} />
              })}
          </div>
      </div>
  );
}
The dangerouslySetInnerHTML prop is used to render the HTML content of the note inside the div. This is a React feature that should be used with caution, as it can introduce security vulnerabilities if not used properly.
Finally, at the bottom of the code, the App component is exported so that it can be used in other parts of the application.
export default App;
Now, paste the following code in App.css. This is just basic styling for the note application.
.notes-container {
  margin: 20px 0;
  padding: 20px;
  border: 1px solid rgb(88, 80, 80);
  border-radius: 5px;
}

.note {
  margin: 10px 0;
  padding: 10px;
  border-radius: 5px;
  background-color: #a7a5a5;
}

.App {
  border: 5px solid gray;
  padding: 50px;
  border-radius: 5px;
}
Now, you can run your rich text editor application with the following command:
npm start
Building your own rich text editor
This code creates a simple note-taking application with a React rich text editor that allows the user to create and save notes using the CKEditor5 rich text editor. The notes are stored in the browser's local storage so that they persist even when the user closes the browser or refreshes the page. The notes are displayed in a list in the UI and can be rendered with their original formatting. A WYSIWYG editor can be a very useful tool - we hope this guide will be of use in making your own.
You can learn more about CKEditor 5 by reading the official documentation and see everything it provides and its limitations. To expand on this guide, consider adding the option for embedded media, which is explained in the documentation.
Editor's note: This post was originally published in June 2023 and has been updated for accuracy.

Written by
Muhammed AliMuhammed is a Software Developer with a passion for technical writing and open source contribution. His areas of expertise are full-stack web development and DevOps.