React is a popular JavaScript library for building user interfaces. One of the challenges of building an application for a global audience is supporting multiple languages. Fortunately, several libraries are available that make it easy to add multi-language support to a React application. One such library is react-i18next.
In this article, we'll walk through the process of building a weather application with multi-language support using react-i18next. We'll start by creating a basic React application. Then, we'll add multi-language support to our application using react-i18next. The complete project can be found on GitHub.
Set up the development environment and create a new React project
To get started, open your terminal or command prompt and run the following commands to create a new directory for your project:
mkdir weather-app
cd weather-app
Initialize a new React project using the Create React App command:
npx create-react-app .
Now you can install the necessary packages for our weather app. Open your terminal, navigate to the root directory of your project (weather-app), and run the following command:
npm install axios react-i18next i18next
This command will install the Axios library for making HTTP requests to the weather API, as well as the react-i18next and i18next libraries for multi-language support.
Create the WeatherApp component
Now, let's create the main component for our weather app. Create a new file called WeatherApp.js in the src directory and add the following code, which will do the following:
- Import the necessary dependencies, including React, useState, useEffect from React, Axios for making API requests, useTranslation from react-i18next for translation support, and i18n from i18next for initializing translations.
- Next, we define the translation resources for different languages by importing translation files from the
localesdirectory (this will be created later). - We initialize
i18nwith the translation resources, default language, and interpolation configuration. - Inside the
WeatherAppcomponent, we use theuseTranslationhook fromreact-i18nextto access the translation functions. - We set up two state variables:
cityto hold the city name entered by the user andweatherDatato store the fetched weather data. - The
useEffecthook is used to fetch the weather data whenever thecitystate changes. - In the
handleCityChangefunction, we update thecitystate with the new city entered by the user. - Finally, the component renders an input field for entering the city name, as well as the weather data displayed in the chosen language using the translation keys.
import React, { useState, useEffect } from "react";
import axios from "axios";
import { useTranslation } from "react-i18next";

import i18n from "i18next";
import { initReactI18next } from "react-i18next";
import translationEN from "./locales/en/translation.json";
import translationFR from "./locales/fr/translation.json";
import translationES from "./locales/es/translation.json";

const resources = {
  en: {
    translation: translationEN,
  },
  fr: {
    translation: translationFR,
  },
  es: {
    translation: translationES,
  },
};

i18n.use(initReactI18next).init({
  resources,
  lng: "en",
  fallbackLng: "en",
  interpolation: {
    escapeValue: false,
  },
});

const WeatherApp = () => {
  const { t } = useTranslation();
  const [city, setCity] = useState("");
  const [weatherData, setWeatherData] = useState({});

  useEffect(() => {
    const getWeatherData = async () => {
      const res = await axios.get(
        `https://api.openweathermap.org/data/2.5/weather?q=${city}&appid=9ba6ce0196b42b189d5a8a33aaa888f9`
      );
      setWeatherData(res.data);
    };
    getWeatherData();
  }, [city]);

  const handleCityChange = async (e) => {
    const newCity = e.target.value;
    setCity(newCity);

  };
  console.log(weatherData)
  return (
    <div>
      <input type="text" value={city} onChange={handleCityChange} />
      <h2>{t("weather_forcast_for")}: {weatherData.name}</h2>
      <p>{t("current_temperature")}: {weatherData.main?.temp}</p>
      <p>{t("feels_like")}: {weatherData.main?.feels_like}</p>
      <p>{t("humidity")}: {weatherData.main?.humidity}</p>
    </div>
  );
};

export default WeatherApp;
Create translation files
To support multi-language functionality, we need to create translation files for each language. In this tutorial, we will create translation files for English, French, and Spanish. Create the following files in the src/locales directory, which will represent the text on the site we would like to have in multiple languages.
en/translation.json (For English):
{
  "weather_forcast_for": "Weather forecast for",
  "current_temperature": "Current temperature",
  "feels_like": "Feels like",
  "humidity": "Humidity"
}
fr/translation.json (For French):
{
  "weather_forcast_for": "Prévisions météo pour",
  "current_temperature": "Température actuelle",
  "feels_like": "Ressenti",
  "humidity": "Humidité"
}
es/translation.json (For Spanish):
{
  "weather_forcast_for": "Pronóstico del tiempo para",
  "current_temperature": "Temperatura actual",
  "feels_like": "Sensación térmica",
  "humidity": "Humedad"
}
These translation files contain the translation key-value pairs for the app's interface in each respective language.
Wrap the app with I18nextProvider
To provide the translation data to our app, we need to wrap the App component with the I18nextProvider component. Open the src/index.js file and replace its contents with the following code. The I18nextProvider component accepts a prop called i18n, which is an instance of the i18next library. This prop is used to pass the translation resources and configuration to the provider.
By wrapping the App component with the I18nextProvider, the translation functionality becomes available to all the components rendered within the App component.
import React from "react";
import ReactDOM from "react-dom";
import App from "./App";
import reportWebVitals from "./reportWebVitals";
import { I18nextProvider } from "react-i18next";
import i18next from "i18next";

i18next.init({
  interpolation: { escapeValue: false }, // React already does escaping
});

ReactDOM.render(
  <React.StrictMode>
    <I18nextProvider i18n={i18next}>
      <App />
    </I18nextProvider>
  </React.StrictMode>,
  document.getElementById("root")
);

reportWebVitals();
Create the LanguageSwitcher Component
Allowing users to switch between different languages requires the creation of a LanguageSwitcher component. Create a new file called LanguageSwitcher.js in the src directory and add the following code:
import React from "react";
import { useTranslation } from "react-i18next";

const LanguageSwitcher = () => {
  const { i18n } = useTranslation();

  const handleLanguageChange = (e) => {
    const newLang = e.target.value;
    i18n.changeLanguage(newLang);
  };

  return (
    <select value={i18n.language} onChange={handleLanguageChange}>
      <option value="en">English</option>
      <option value="fr">Français</option>
      <option value="es">Español</option>
    </select>
  );
};

export default LanguageSwitcher;
This component uses the useTranslation hook to access the i18n object and the changeLanguage function. When the user selects a different language from the drop-down menu, the handleLanguageChange function is triggered, and the chosen language is applied by calling i18n.changeLanguage(newLang). This function updates the language setting in the i18n object, causing the translation data to be reloaded for the chosen language.
Update the WeatherApp component
We need to update the WeatherApp component to include the LanguageSwitcher component. Open the src/WeatherApp.js file and replace the existing return statement with the following code:
...
return (
  <div>
    <LanguageSwitcher />
    <input type="text" value={city} onChange={handleCityChange} />
    <h2>
      {t("weather_forcast_for")}: {weatherData.name}
    </h2>
    <p>
      {t("current_temperature")}: {weatherData.main?.temp}
    </p>
    <p>
      {t("feels_like")}: {weatherData.main?.feels_like}
    </p>
    <p>
      {t("humidity")}: {weatherData.main?.humidity}
    </p>
  </div>
);
In this updated code, we import the LanguageSwitcher component and add it as the first child element inside the div container. This ensures that the language switcher is displayed at the top of the app. The rest of the code remains the same.
Finally, we can update the src/App.js file to run our application.
import './App.css';
import WeatherApp from './WeatherApp';

function App() {
  return (
    <div className="App">
      <header className="App-header">
      <WeatherApp/>
      </header>
    </div>
  );
}

export default App;
Run the weather app
To run the weather app, go to your terminal or command prompt and make sure you are in the root directory of your project (weather-app). Run the following command:
npm start
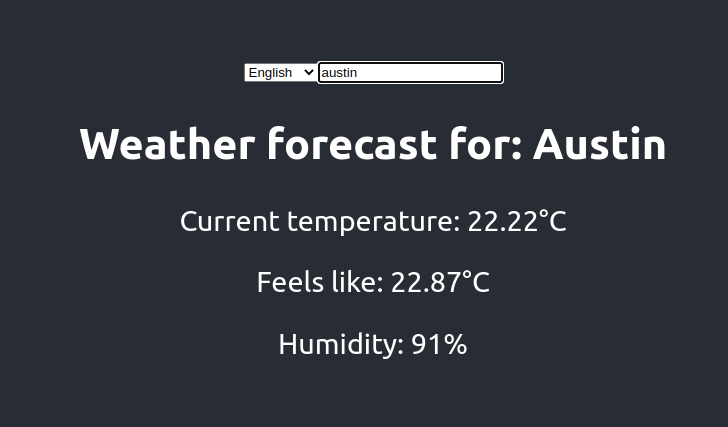
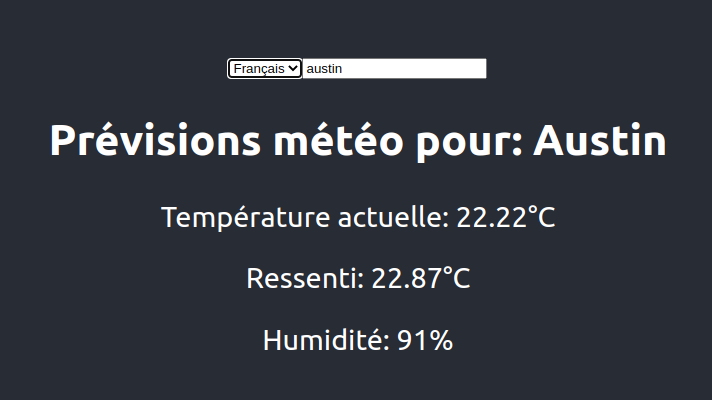
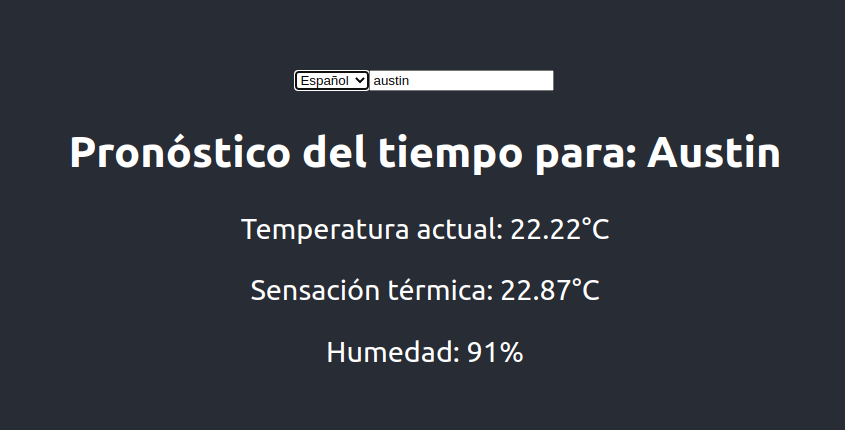
This command will start the development server, and the app will open automatically in your default browser. You should be able to enter a city name, view the weather information in the chosen language, and switch between different languages using the language switcher.
Conclusion
Building a multi-language React application can seem daunting at first, but with the help of libraries, such as react-i18next, it becomes much simpler. By defining translation files and using the useTranslation hook, we can easily make our application translatable. Additionally, the LanguageSwitcher component provides an easy way for the user to switch between languages.
One way to optimize our multi-language React application is to implement lazy loading. Lazy loading is a technique where we only load the translation files for the user's selected language, rather than all the translation files at once. This can significantly reduce the initial load time of the application, especially if we have a large number of translation files.
Another way to improve our multi-language React application is to use a service like Google Translate to automatically translate the content. While automatic translations are not always perfect, they can be useful in providing a basic translation for users who don't speak the available languages.
To use Google Translate, we can make an API call to the Google Translate API with the content to be translated and the target language. We then replace the original content with the translated content. However, keep in mind that Google Translate is a paid service, so we need to ensure that we have the necessary budget to cover the costs.
In conclusion, building a multi-language React application is a necessary step for creating a global and accessible application. With the help of libraries like react-i18next and techniques like lazy loading and automatic translation, we can build an efficient and effective multi-language application that meets the needs of users around the world.


