A complete guide to authentication in JavaScript
Authentication is a strategy used in computer science to limit access to an application to a group of verified individuals. Users are verified based on the credentials provided before granting the user access to the program. In this article, you'll learn how to implement authentication using JavaScript. By the end of the tutorial, you'll have developed an API to authenticate a user and allow access to the contents. Let’s get started.

Here's the source code if you want to dive directly into the code.
Prerequisites
You must have a basic understanding of JavaScript and be familiar with some of the features of ES6, the most recent version of JavaScript, to follow this tutorial. More information is available here if you’re unfamiliar with ES6. If you are more familiar with the older version of JavaScript, you might find the babel REPL more helpful to see how ES6 code is translated.
A quick note: You will be building this API with Node.js and Express. Make sure that Node.js is installed on your machine. If not, go ahead and download it from the official website.
Now open your favorite code editor, and let's get started.
Table of Contents
- What Are We Going to build?
- What is Authentication?
- Step 0: Getting Started
- Step 1: Connecting to the Database
- Step 2: Building API Routers
- Creating a User
- Logging in a User
- Logging out a User
- Refresh Access Token
- Creating Protected Routes
- One Step Further
- Reset Password
- Step 3: Testing the API
What Are We going to build?
By the end of this tutorial, you'll have the following:
- A REST API for authentication using JavaScript;
- A database to store user information;
- A JSON Web Token system to authenticate users;
- An email system to send verification emails using Node.js.
What Is Authentication?
As you may know, authentication restricts application access to only verified users. There are many types of authentication mechanisms, but password authentication is the most common. Password authentication is an approach to authenticating users using a username (or email address) and password. You'll take the input from the user and compare it to information stored in the database. If the information is correct, access is granted to the user; otherwise, access is denied. For password authentication, the username or the email may be public, but the password must be kept private.
You will use Node.js, Express and MongoDB to create the API. JSON Web Tokens will also be used to store user data. Users can create an account with their email address and then use their password for authentication. You will also use Node.js to send the password reset email message.
Step 0: Getting Started
To help you out, I've provided some starter code in the following files:
index.js- the main file for the API;/routes- the folder for the routes;package.json- this file contains all the dependencies;README.md- this file contains a description of the API.
You can also fork this code sandbox and start coding right away. Install all dependencies with the npm install command. You'll find the basic code inside the app.js file.
You can skip this section if you are already familiar with Express.
Basic Express Code
Don't be overwhelmed if you don't know what is inside the app.js file. It's just the basic express code for starting a server. To understand what is going on, read the comments in the code below.
/app.js
// for using environment variables
require("dotenv").config();
// importing dependencies
const express = require("express");
const cookieParser = require("cookie-parser");

// importing the routes
const indexRouter = require("./routes/index");
const authRouter = require("./routes/auth");

// 1. this is the port on which the server will run
const port = process.env.PORT || 8080;

// creating the express app
const app = express();

// 2. adding middleware to parse the cookies and more
app.use(express.json());
app.use(express.urlencoded({ extended: false }));
app.use(cookieParser());

// 3. adding the routes
app.use("/", indexRouter);
app.use("/auth", authRouter);

// 4. starting the server
app.listen(port, function () {
  console.log(`🚀 Listening on port ${port}`);
});
As you can see, the code is pretty simple.
- The
PORTis set by the hosting provider as an environment variable. For running locally; you can set it to8080. - A middleware function is called before the request is processed. It can change the request object. It can, for example, parse the request body and add it to the request object. Since you'll be working with
JSONdata, we added theexpress.json()middleware to parse the request's body asJSON. Similarly, we included theexpress.urlencoded()middleware to parse the request's body as a query string. Refer to this stackoverflow question for more information about the two middleware. Additionally, the[cookieParser()](http://expressjs.com/en/resources/middleware/cookie-parser.html)middleware parses the cookies. - We’ve also added the
indexRouterandauthRouterto theapp.use()function. The[app.use()](https://masteringjs.io/tutorials/express/app-use)function takes two arguments. The first argument is the route'spath, and the second is therouter. The router is responsible for processing the request and sending the response. You'll create the routers in the next section. - The
[app.listen()](https://www.geeksforgeeks.org/express-js-app-listen-function/)function is used to start the server. It requires two arguments. The first argument specifies the port on which the server will run, and the second argument specifies a function that will be called when the server is started. It's good practice to log the message when the server is started.
Now, let's see what a router is. Go to the routes folder and open the index.js file. You'll find the following code:
/routes/index.js
const express = require("express");

// creating a router
const router = express.Router();

// configuring routes
router.get("/", function (_req, res) {
  // console.log("request", req)
  // console.log("response", res)
  // sending the response
  res.send("Hello Express!! 👋");
});
module.exports = router;
Initiate the router using the [express.Router()](https://expressjs.com/en/guide/routing.html) function, which takes the request and response objects as arguments. The router.get() function is used to handle GET requests. Similarly, you can also handle several HTTP requests using the router.post(), router.put(), router.delete(), etc.
A router function takes two arguments. The first argument is the path of the route("/" - index route), and the second argument is a function called when the request is handled. If you're curious about the request and response objects, try logging them into the console. You'll see that the request object has a body containing information sent by the user. The response object is used to send the response back to the client. Here, we just send a message (string) as the response. You can also send a JSON object back to the client using [res.json()](https://developer.mozilla.org/en-US/docs/Web/API/Response/json).
To do: Now that you have seen a basic router, try to create a simple router that handles the GET request for the
/route inside the/routes/auth.jsfile.
Start the server by running the following command in the terminal.
npm run dev
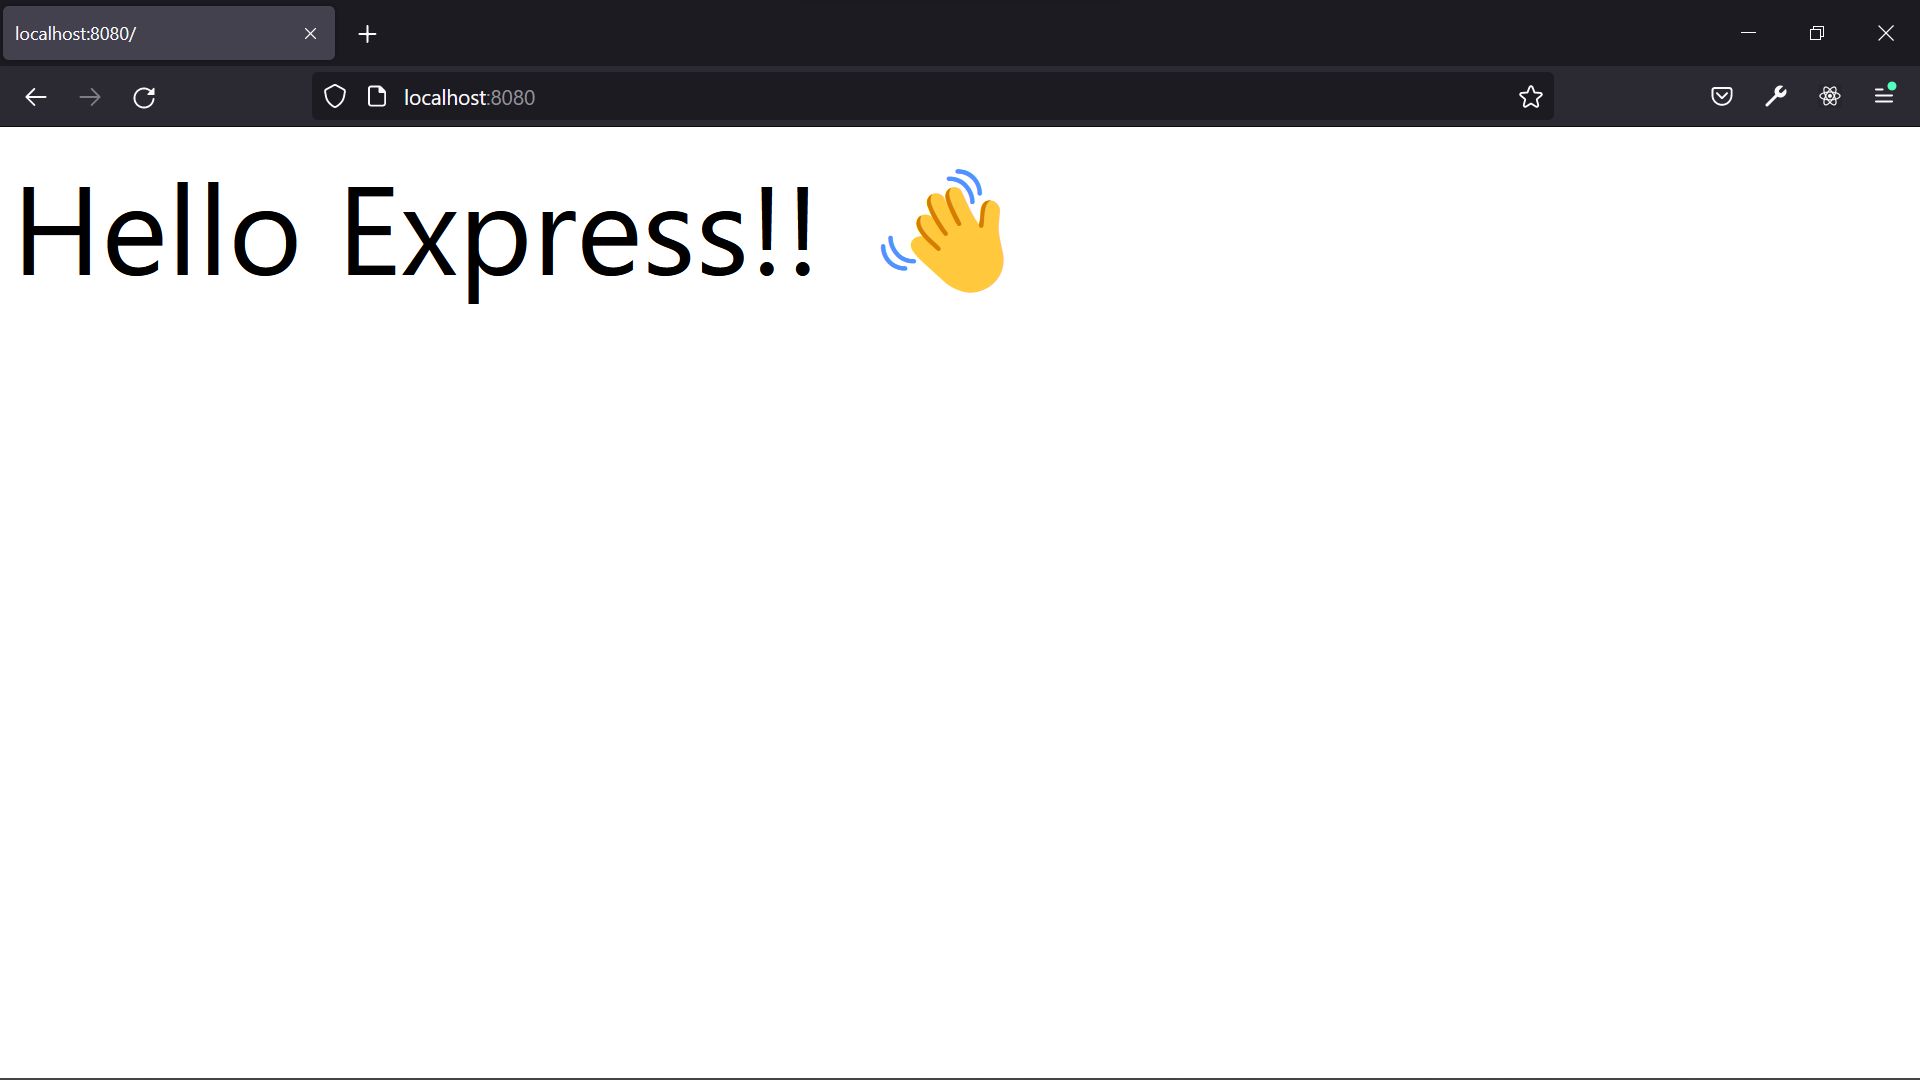
If you can see the message 🚀 Listening on port 8080, the server has started running without any errors. Open the browser and navigate to http://localhost:8080. You'll see the message Hello Express!! 👋.
Step 1: Connecting to the Database
I prefer to use MongoDB, a NoSQL database, to store data. It stores data in JSON format and is easy to use. You can also use another database, such as PostgreSQL, MySQL, or Redis.
If you're new to MongoDB, I strongly recommend reading this tutorial to set up a MongoDB atlas (database hosted on the cloud). You can also set up MongoDB locally by following this tutorial.
Create an .env file in the root folder and add a MONGO_URI variable with your MongoDB connection string. We'll use the [mongoose](https://mongoosejs.com/) module to connect to the database.
/app.js
...

// importing the mongoose module
const mongoose = require("mongoose");
// connecting to the database
mongoose
  .connect(process.env.MONGO_URI, {
    useNewUrlParser: true,
    useUnifiedTopology: true,
  })
  .then(() => {
    console.log("MongoDB connection is established successfully! 🎉");
  });

...
After importing the mongoose module, use the [mongoose.connect()](https://mongoosejs.com/docs/api/mongoose.html#mongoose_Mongoose-connect) function to connect to the database. The first argument is the connection string, and the second argument is an object that contains the options, which are used to configure the connection. The above code logs the message, MongoDB connection is established successfully! 🎉, once the connection is successful.
MongoDB is a document-based database. It stores data in JSON format inside a collection, similar to a relational database table. You must define the data structure to be held in the collection using the [Schema](https://masteringjs.io/tutorials/mongoose/schema) object. Let's create a schema for storing user data in the collection. Create a user.js file in the new /models folder.
Note: You can create files anywhere inside the project, but it is a best practice to create similar files inside their specific folders.
/models/user.js
const { Schema, model } = require("mongoose");

// defining the user schema
const userSchema = new Schema({
  email: {
    type: String,
    // specifies that the field is required
    required: true,
    // specifies that the field is unique
    unique: true,
  },
  password: {
    type: String,
    required: true,
  },
  verified: {
    type: Boolean,
    // specifies the default value of the field
    default: false,
  },
  refreshtoken: {
    type: String,
  },
});

// exporting the user model
module.exports = model("User", userSchema);
Add the above code to the models/user.js file. The above code is the schema for the user collection. We define the necessary fields, their types, and other options. Then, we export the model.
Import this module into the routes/auth.js file and re-run the server. After getting connected with MongoDB, open the Collections tab in your MongoDB Atlas. You'll see the user collection. We're going to use this collection to store user data.
Step 2: Building API Routers
Creating a User
So far, the basic setup and configuration have been completed. Now, let's start creating the necessary endpoints. To sign in and sign up, you'll get the email and password along with the request. Therefore, we should create them as a POST request.
/routes/auth.js
const express = require("express");
const router = express.Router();
const { hash } = require("bcryptjs");
// importing the user model
const User = require("../models/user");
// Sign Up request
router.post("/signup", async (req, res) => {
  try {
    const { email, password } = req.body;
    // 1. check if user already exists
    const user = await User.findOne({ email: email });

    // if user exists already, return error
    if (user)
      return res.status(500).json({
        message: "User already exists! Try logging in. 😄",
        type: "warning",
      });
    // 2. if user doesn't exist, create a new user
    // hashing the password
    const passwordHash = await hash(password, 10);
    const newUser = new User({
      email: email,
      password: passwordHash,
    });
    // 3. save the user to the database
    await newUser.save();
    // 4. send the response
    res.status(200).json({
      message: "User created successfully! 🥳",
      type: "success",
    });
  } catch (error) {
    res.status(500).json({
      type: "error",
      message: "Error creating user!",
      error,
    });
  }
});
module.exports = router;
Logic
As you can see, the signup endpoint is pretty simple. It checks whether the user already exists in the database. If the user exists, it returns an error. If the user doesn't exist, we must first hash the password. Then, we create a new user object and save it to the database. Hashing the password is good practice to prevent someone from getting the password directly.
You can also take more inputs, such as a username or phone number. You just need to change the user's model with incoming fields.
Note: You'll wrap the code in a try-catch block to handle the error. Additionally, if you're not aware of the async/await syntax, you can read about it here.
Logging In a User
Before creating the endpoint, let's make some helper functions to help us sign JWT tokens. JSON Web Tokens are used to exchange data between clients and servers in a secure manner. We will store the users’ information inside the browser's cookie storage as a JWT token for security reasons. JWTs contain user information encrypted and signed with a secret key. For more information about JWTs, you can read this article.
Creating JWT Tokens
You'll be signing two JWTs: one for the user's access token and another for the refresh token. The access token is used to authenticate the user, and the refresh token generates the new access token. Create two new secrets for signing the JWTs inside the .env file.
.env
...
ACCESS_TOKEN_SECRET=<your-access-token-secret>
REFRESH_TOKEN_SECRET=<your-refresh-token-secret>
Anyone can decode the JWT token using only the secret key. Thus, you'll need to store these keys securely. Don’t forget to ignore .env if you’re using version control.
/utils/tokens.js
const { sign } = require("jsonwebtoken");
// signing the access token
const createAccessToken = (id) => {
  return sign({ id }, process.env.ACCESS_TOKEN_SECRET, {
    expiresIn: 15 * 60,
  });
};

// signing the refresh token
const createRefreshToken = (id) => {
  return sign({ id }, process.env.REFRESH_TOKEN_SECRET, {
    expiresIn: "90d",
  });
};

// sending the access token to the client
const sendAccessToken = (_req, res, accesstoken) => {
  res.json({
    accesstoken,
    message: "Sign in Successful 🥳",
    type: "success",
  });
};

// sending the refresh token to the client as a cookie
const sendRefreshToken = (res, refreshtoken) => {
  res.cookie("refreshtoken", refreshtoken, {
    httpOnly: true,
  });
};

module.exports = {
  createAccessToken,
  createRefreshToken,
  sendAccessToken,
  sendRefreshToken,
};
Add the above code to the tokens.js file. The code is pretty straightforward. You'll create a JWT using the sign function of the jsonwebtoken module. You should pass the payload and the secret key. You'll also give some options. The expiresIn option specifies the time in seconds after which the JWT will expire. Furthermore, you'll need to send the access token to the client. Note that the lifetime of the access token is significantly less than the refresh token. The short life of access token helps secure the API, even if it is stolen. Hence, to secure the API, you'll need to send the refresh token as a cookie to the client.
To do: Try creating another function,
createEmailVerifyToken, to generate another JWT token to verify the user's email. You'll need this token to reset the password in further steps. Don't forget to add a new secret key to the.envfile.
Authenticating a user
Now, let's start creating the signin endpoint.
/routes/auth.js
...

const { hash, compare } = require("bcryptjs");
// importing the helper functions
const {
  createAccessToken,
  createRefreshToken,
  sendAccessToken,
  sendRefreshToken,
} = require("../utils/tokens");
...

// Sign In request
router.post("/signin", async (req, res) => {
  try {
    const { email, password } = req.body;
    // 1. check if user exists
    const user = await User.findOne({ email: email });

    // if user doesn't exist, return error
    if (!user)
      return res.status(500).json({
        message: "User doesn't exist! 😢",
        type: "error",
      });
    // 2. if user exists, check if password is correct
    const isMatch = await compare(password, user.password);

    // if password is incorrect, return error
    if (!isMatch)
      return res.status(500).json({
        message: "Password is incorrect! ⚠️",
        type: "error",
      });

    // 3. if password is correct, create the tokens
    const accessToken = createAccessToken(user._id);
    const refreshToken = createRefreshToken(user._id);

    // 4. put refresh token in database
    user.refreshtoken = refreshToken;
    await user.save();

    // 5. send the response
    sendRefreshToken(res, refreshToken);
    sendAccessToken(req, res, accessToken);
  } catch (error) {
    res.status(500).json({
      type: "error",
      message: "Error signing in!",
      error,
    });
  }
});
Logic
To sign the user in, you'll need to check whether the user exists in the database. If the user exists, you'll check if the password is correct. We'll use the compare function to compare the password to the hash. You'll create the tokens and send them to the client if the password is valid.
Logging Out a User
Let's create an endpoint, logout, for logging out the user.
/routes/auth.js
...

// Sign Out request
router.post("/logout", (_req, res) => {
  // clear cookies
  res.clearCookie("refreshtoken");
  return res.json({
    message: "Logged out successfully! 🤗",
    type: "success",
  });
});
Here we will just clear the refresh token cookie. The refresh token is used to generate the new access token. Therefore, when the user logs out, you'll need to clear the refresh token cookie to prevent logging in.
Refresh Access Token
Now, let's create an endpoint for getting a new access token using a refresh token.
/routes/auth.js
...

const { verify } = require("jsonwebtoken");
// Refresh Token request
router.post("/refresh_token", async (req, res) => {
  try {
    const { refreshtoken } = req.cookies;
    // if we don't have a refresh token, return error
    if (!refreshtoken)
      return res.status(500).json({
        message: "No refresh token! 🤔",
        type: "error",
      });
    // if we have a refresh token, you have to verify it
    let id;
    try {
      id = verify(refreshtoken, process.env.REFRESH_TOKEN_SECRET).id;
    } catch (error) {
      return res.status(500).json({
        message: "Invalid refresh token! 🤔",
        type: "error",
      });
    }
    // if the refresh token is invalid, return error
    if (!id)
      return res.status(500).json({
        message: "Invalid refresh token! 🤔",
        type: "error",
      });
    // if the refresh token is valid, check if the user exists
    const user = await User.findById(id);
    // if the user doesn't exist, return error
    if (!user)
      return res.status(500).json({
        message: "User doesn't exist! 😢",
        type: "error",
      });
    // if the user exists, check if the refresh token is correct. return error if it is incorrect.
    if (user.refreshtoken !== refreshtoken)
      return res.status(500).json({
        message: "Invalid refresh token! 🤔",
        type: "error",
      });
    // if the refresh token is correct, create the new tokens
    const accessToken = createAccessToken(user._id);
    const refreshToken = createRefreshToken(user._id);
    // update the refresh token in the database
    user.refreshtoken = refreshToken;
    // send the new tokes as response
    sendRefreshToken(res, refreshToken);
    return res.json({
      message: "Refreshed successfully! 🤗",
      type: "success",
      accessToken,
    });
  } catch (error) {
    res.status(500).json({
      type: "error",
      message: "Error refreshing token!",
      error,
    });
  }
});
Logic To create a new access token, you'll need to check if the refresh token is valid and if the user exists. If the user exists, you'll check whether the refresh token is correct. If the refresh token is valid, you'll create and send the new tokens back to the client.
Creating Protected Routes
Now let's create a protected route. Only a logged-in user can access this route. Create a new file inside the /utils folder called protected.js. You'll create a new middleware function to check whether the user is logged in. As mentioned previously, a middleware function is called before the request is processed.
/utils/protected.js
const { verify } = require("jsonwebtoken");
const User = require("../models/user");
const protected = async (req, res, next) => {
  // get the token from the header
  const authorization = req.headers["authorization"];
  // if we don't have a token, return error
  if (!authorization)
    return res.status(500).json({
      message: "No token! 🤔",
      type: "error",
    });
  // if we have a token, you have to verify it
  const token = authorization.split(" ")[1];
  let id;
  try {
    id = verify(token, process.env.ACCESS_TOKEN_SECRET).id;
  } catch {
    return res.status(500).json({
      message: "Invalid token! 🤔",
      type: "error",
    });
  }
  // if the token is invalid, return error
  if (!id)
    return res.status(500).json({
      message: "Invalid token! 🤔",
      type: "error",
    });
  // if the token is valid, check if the user exists
  const user = await User.findById(id);
  // if the user doesn't exist, return error
  if (!user)
    return res.status(500).json({
      message: "User doesn't exist! 😢",
      type: "error",
    });
  // if the user exists, we'll add a new field "user" to the request
  req.user = user;
  // call the next middleware
  next();
};
module.exports = { protected };
In the above middleware function, you'll verify the access token from the request and check if the user exists. If the user exists, you'll add a new field "user" to the request. Otherwise, you'll return an error.
Let's add the middleware to the router and the protected route.
/routes/auth.js
const { protected } = require("../utils/protected");
// protected route
router.get("/protected", protected, async (req, res) => {
  try {
    // if user exists in the request, send the data
    if (req.user)
      return res.json({
        message: "You are logged in! 🤗",
        type: "success",
        user: req.user,
      });
    // if user doesn't exist, return error
    return res.status(500).json({
      message: "You are not logged in! 😢",
      type: "error",
    });
  } catch (error) {
    res.status(500).json({
      type: "error",
      message: "Error getting protected route!",
      error,
    });
  }
});
Logic We check if the user is logged in by verifying that the user exists in the request. If the user exists, we'll send the data. Otherwise, we'll return an error. Similarly, you can create more protected routes using the same middleware.
One Step Further
Now you have the basic authentication and refresh token system. Let's create a new endpoint to send a password reset email. Before making the endpoint, let's create a util function to send the email.
First, install the nodemailer module using the following command.
npm install nodemailer
Then, create a new file inside the utils folder called email.js.
/utils/email.js
const { createTransport } = require("nodemailer");

const createPasswordResetUrl = (id, token) =>
  `${process.env.CLIENT_URL}/reset-password/${id}/${token}`;

const transporter = createTransport({
  service: process.env.EMAIL_HOST,
  auth: {
    user: process.env.EMAIL_USER,
    pass: process.env.EMAIL_PASSWORD,
  },
});
To send emails, you'll need to create a transporter object using the createTransport function. A transporter is simply the email service you are sending the email message from. You'll need to pass in the service name and the credentials of the service. I personally use Gmail for this. You can your favorite email service.
Note: For sending emails from Gmail, you'll need to create an app password for your Google mail. Head to your account security settings, scroll down to "Signing into Google", and click on "App Passwords". Create a password for your mail app and use the 16-digit string as a password for
nodemailer. This providesnodemaileraccess to your Gmail account. I personally prefer to create a new Gmail account for this purpose. I don't want to share my personal Gmail account with anyone or make it less secure. If you still encounter any issues, try troubleshooting using the[nodemailer](https://nodemailer.com/about/)documentation.
The above createPasswordResetUrl function is used to create an URL that will be used to send the email. You'll use the JWT token in the URL to make sure the user is not tampering with the URL. Additionally, store the client URL (for now, http://localhost:8080) inside an environment variable(CLIENT_URL).
Now, let's create the mailOptions or the mail template to be sent. The email template you'll use to send the email is the mailOptions.
/utils/email.js
...
const passwordResetTemplate = (user, url) => {
const { username, email } = user;
return {
from: `Mail - <${process.env.EMAIL_USER}>`,
to: email,
subject: `Reset Password`,
html: `
<h2>Password Reset Link</h2>
<p>Reset your password by clicking on the link below:</p>
<a href=${url}><button>Reset Password</button></a>
<br />
<br />
<small><a style="color: #38A169" href=${url}>${url}</a></small>
<br />
<small>The link will expire in 15 mins!</small>
<small>If you haven't requested password reset, please ignore!</small>
<br /><br />
<p>Thanks,</p>
<p>Authentication API</p>`,
};
};
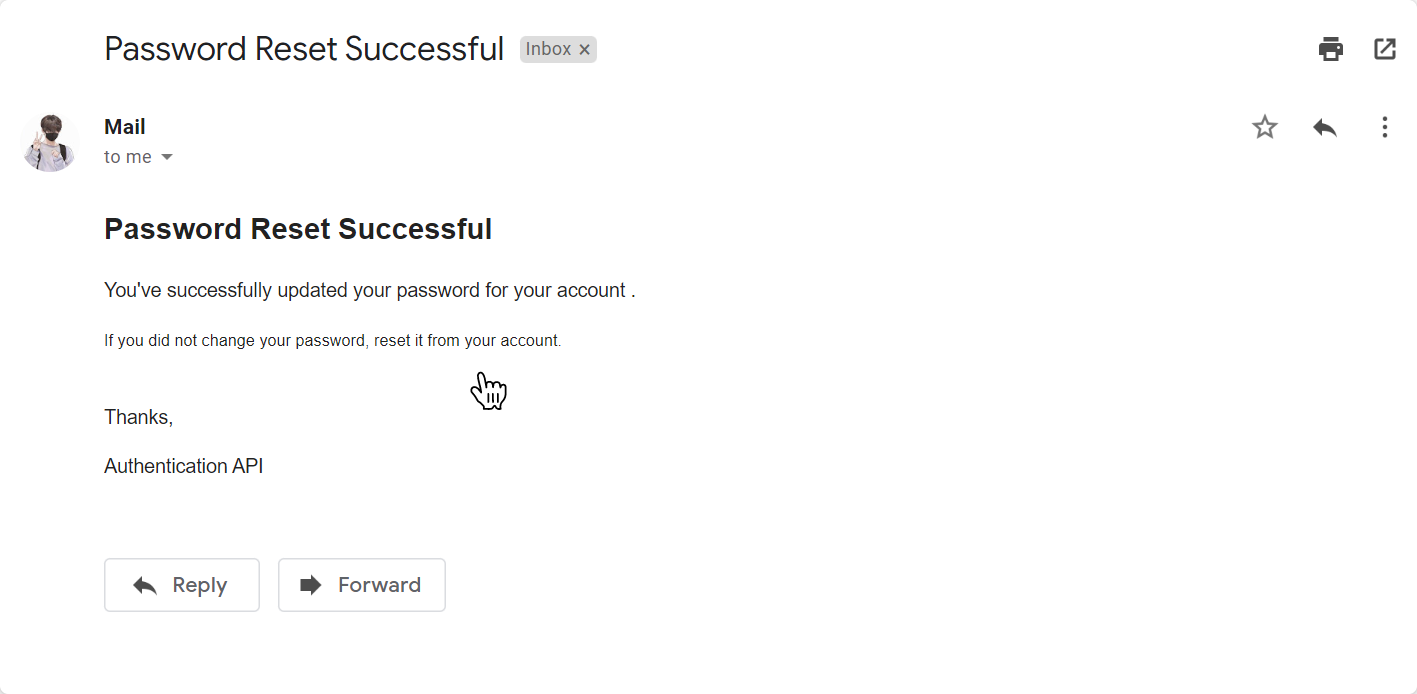
const passwordResetConfirmationTemplate = (user) => {
const { email } = user;
return {
from: `Mail - <${process.env.EMAIL_USER}>`,
to: email,
subject: `Password Reset Successful`,
html: `
<h2>Password Reset Successful</h2>
<p>You've successfully updated your password for your account <${email}>. </p>
<small>If you did not change your password, reset it from your account.</small>
<br /><br />
<p>Thanks,</p>
<p>Authentication API</p>`,
};
};
module.exports = {
transporter,
createPasswordResetUrl,
passwordResetTemplate,
passwordResetConfirmationTemplate,
};
Here, the two options are as follows: one for sending email with password reset link and another for sending the confirmation.
Reset Password
You need to create two endpoints for resetting the password: one for sending the email and the other for resetting the password. First, create a new function to generate the password reset token. If you did not make it before, add the following code to the utils/token.js file.
/utils/token.js
...

// password reset token
const createPasswordResetToken = ({ _id, email, password }) => {
  const secret = password;
  return sign({ id: _id, email }, secret, {
    expiresIn: 15 * 60, // 15 minutes
  });
};
To make this token usable only once, you'll create the secret using the old password. This helps to reset the password only one time using this link.
Let's import this function into the routes/auth.js file to send the email to reset the password.
/routes/auth.js
const { createPasswordResetToken } = require("../utils/tokens");
const {
  transporter,
  createPasswordResetUrl,
  passwordResetTemplate,
  passwordResetConfirmationTemplate,
} = require("../utils/email");
// send password reset email
router.post("/send-password-reset-email", async (req, res) => {
  try {
    // get the user from the request body
    const { email } = req.body;
    // find the user by email
    const user = await User.findOne({ email });
    // if the user doesn't exist, return error
    if (!user)
      return res.status(500).json({
        message: "User doesn't exist! 😢",
        type: "error",
      });
    // create a password reset token
    const token = createPasswordResetToken({ ...user, createdAt: Date.now() });
    // create the password reset url
    const url = createPasswordResetUrl(user._id, token);
    // send the email
    const mailOptions = passwordResetTemplate(user, url);
    transporter.sendMail(mailOptions, (err, info) => {
      if (err)
        return res.status(500).json({
          message: "Error sending email! 😢",
          type: "error",
        });
      return res.json({
        message: "Password reset link has been sent to your email! 📧",
        type: "success",
      });
    });
  } catch (error) {
    res.status(500).json({
      type: "error",
      message: "Error sending email!",
      error,
    });
  }
});
Logic
You'll need to first verify that the user exists in our database. If the user exists, you'll create a password reset token. You'll then create the password reset URL and send the email using the transporter.sendMail function. After sending the email, you'll return a success message to the user.
When the user clicks on the password reset link, you'll need to verify the token. If the token is valid, you'll update the user's password.
/routes/auth.js
...

// reset password
router.post("/reset-password/:id/:token", async (req, res) => {
  try {
    // get the user details from the url
    const { id, token } = req.params;
    // get the new password the request body
    const { newPassword } = req.body;
    // find the user by id
    const user = await User.findById(id);
    // if the user doesn't exist, return error
    if (!user)
      return res.status(500).json({
        message: "User doesn't exist! 😢",
        type: "error",
      });
    // verify if the token is valid
    const isValid = verify(token, user.password);
    // if the password reset token is invalid, return error
    if (!isValid)
      return res.status(500).json({
        message: "Invalid token! 😢",
        type: "error",
      });
    // set the user's password to the new password
    user.password = await hash(newPassword, 10);
    // save the user
    await user.save();
    // send the email
    const mailOptions = passwordResetConfirmationTemplate(user);
    transporter.sendMail(mailOptions, (err, info) => {
      if (err)
        return res.status(500).json({
          message: "Error sending email! 😢",
          type: "error",
        });
      return res.json({
        message: "Email sent! 📧",
        type: "success",
      });
    });
  } catch (error) {
    res.status(500).json({
      type: "error",
      message: "Error sending email!",
      error,
    });
  }
});
Logic You'll need to verify the token if the user visits the URL to reset the password. If the token is valid, you'll update the user's password. You'll also send the email to the user to confirm the password reset.
This repository contains the entire source code. If you encounter any errors, try to troubleshoot them by referring to the source code or using the internet.
Step 3: Testing the API
Now that we have a working authentication system, let's test it. In this section, I'll use Postman (my favorite tool for testing APIs); you can any use other software of your choice, such as Insomnia or Curl.
Create and Register a New User
Send your email and password in the body to create a user.
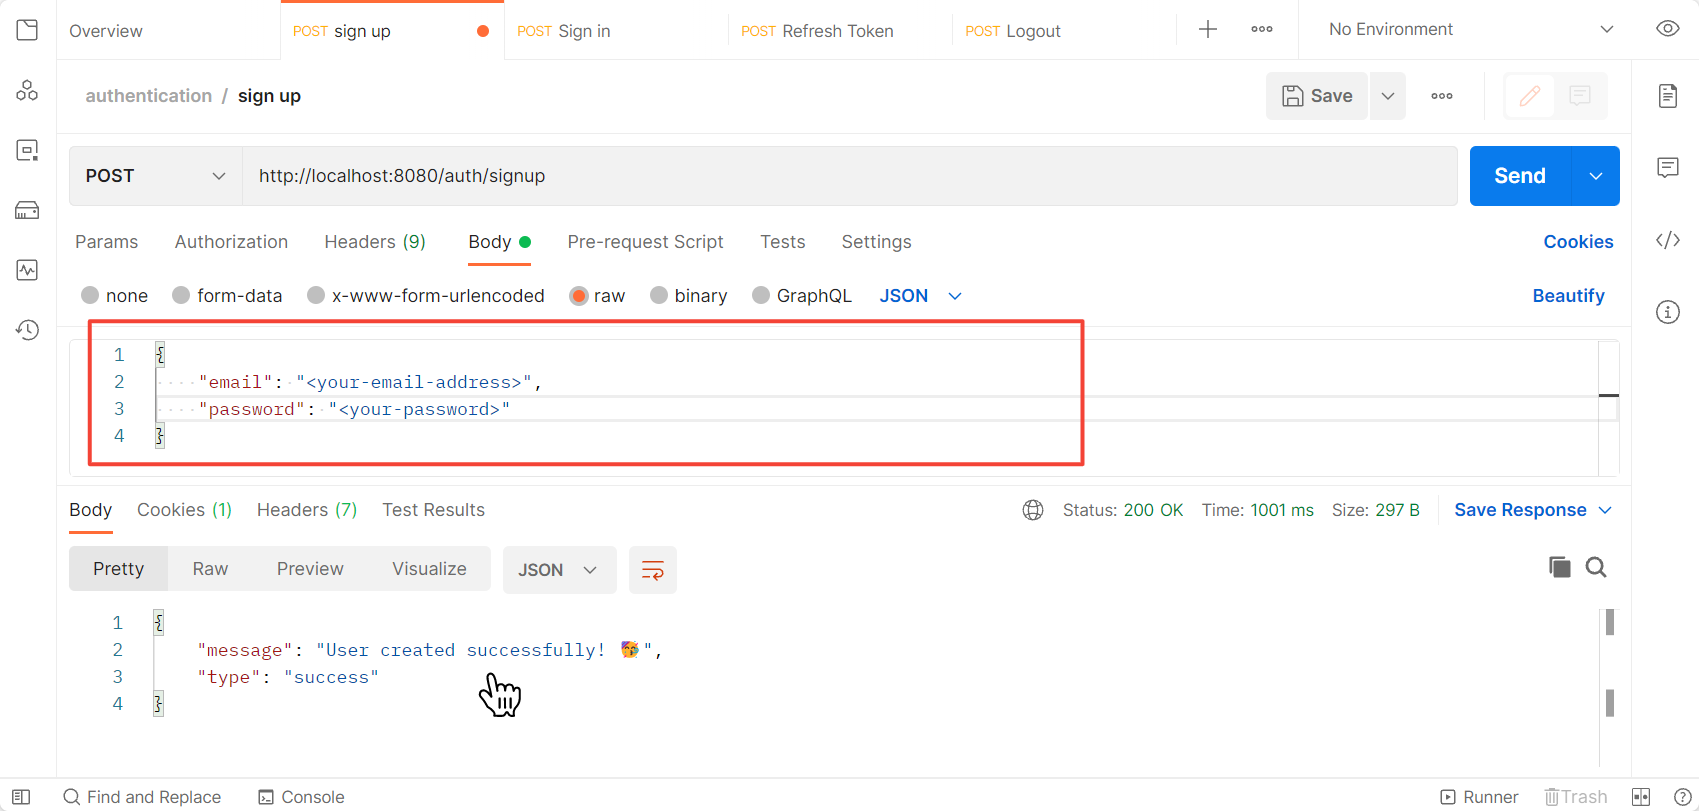
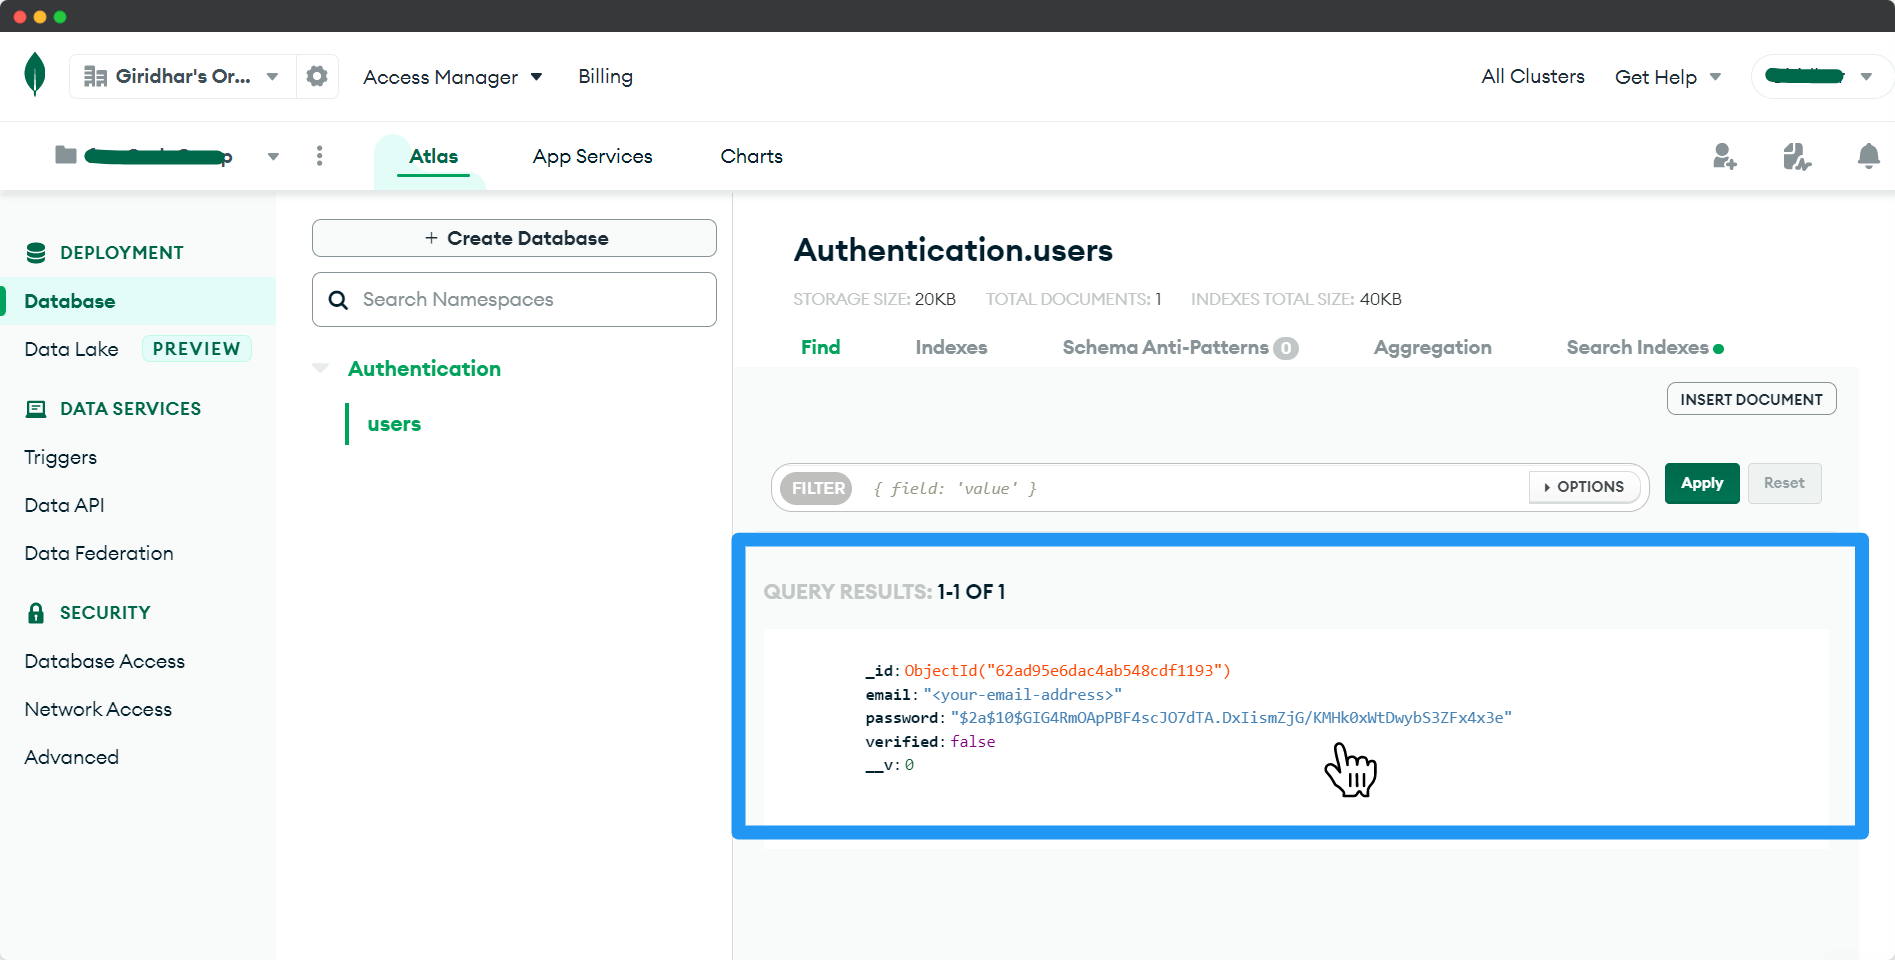
You can see the newly created user inside your database.
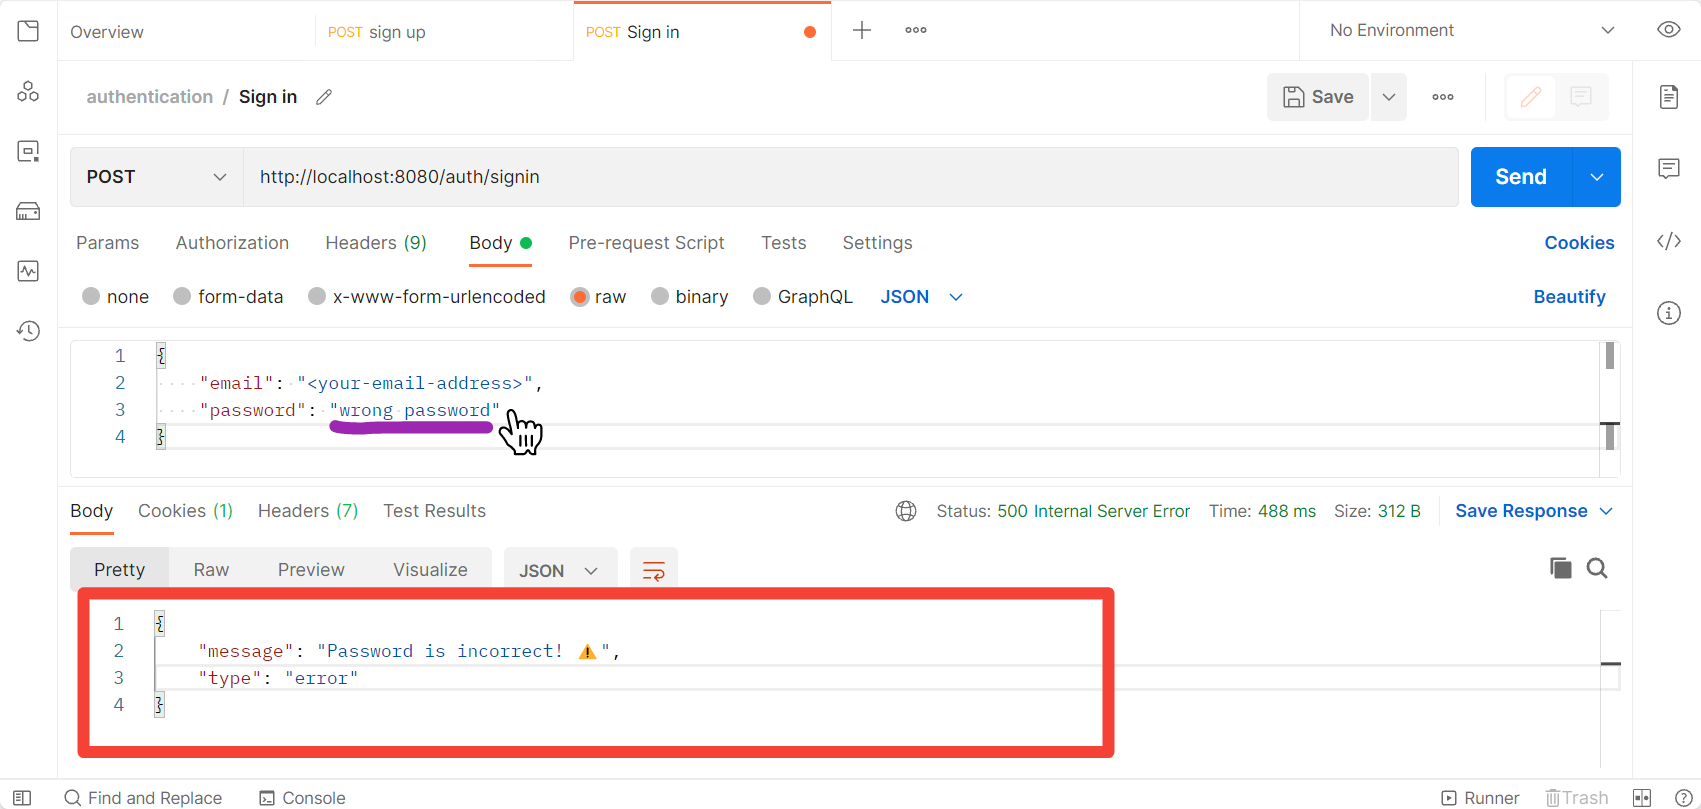
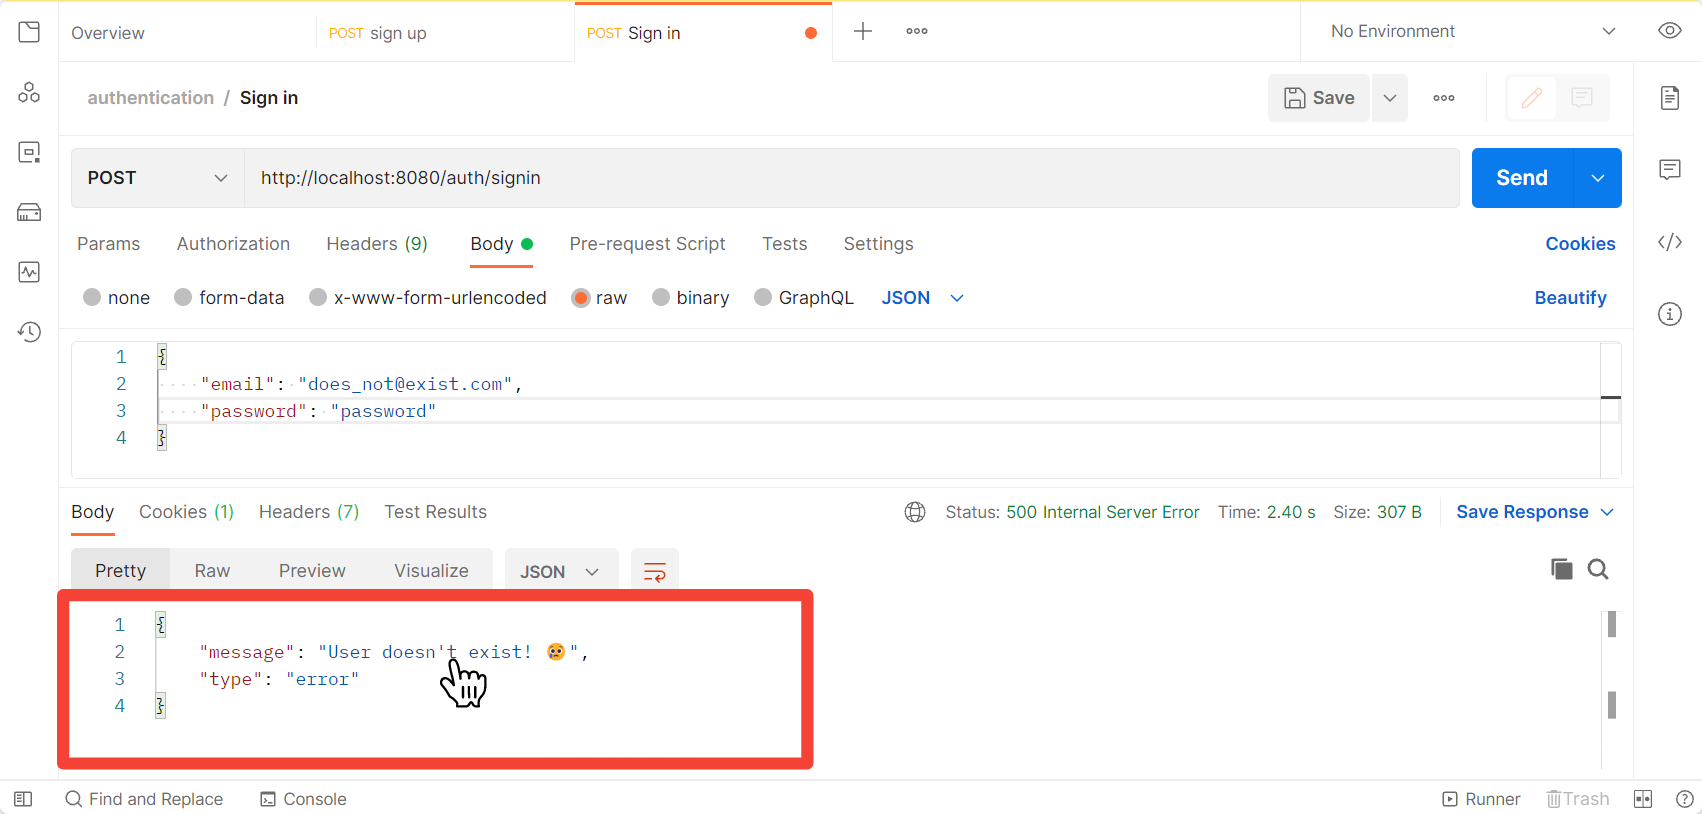
Log In with the New User
Use the email and password to log in.
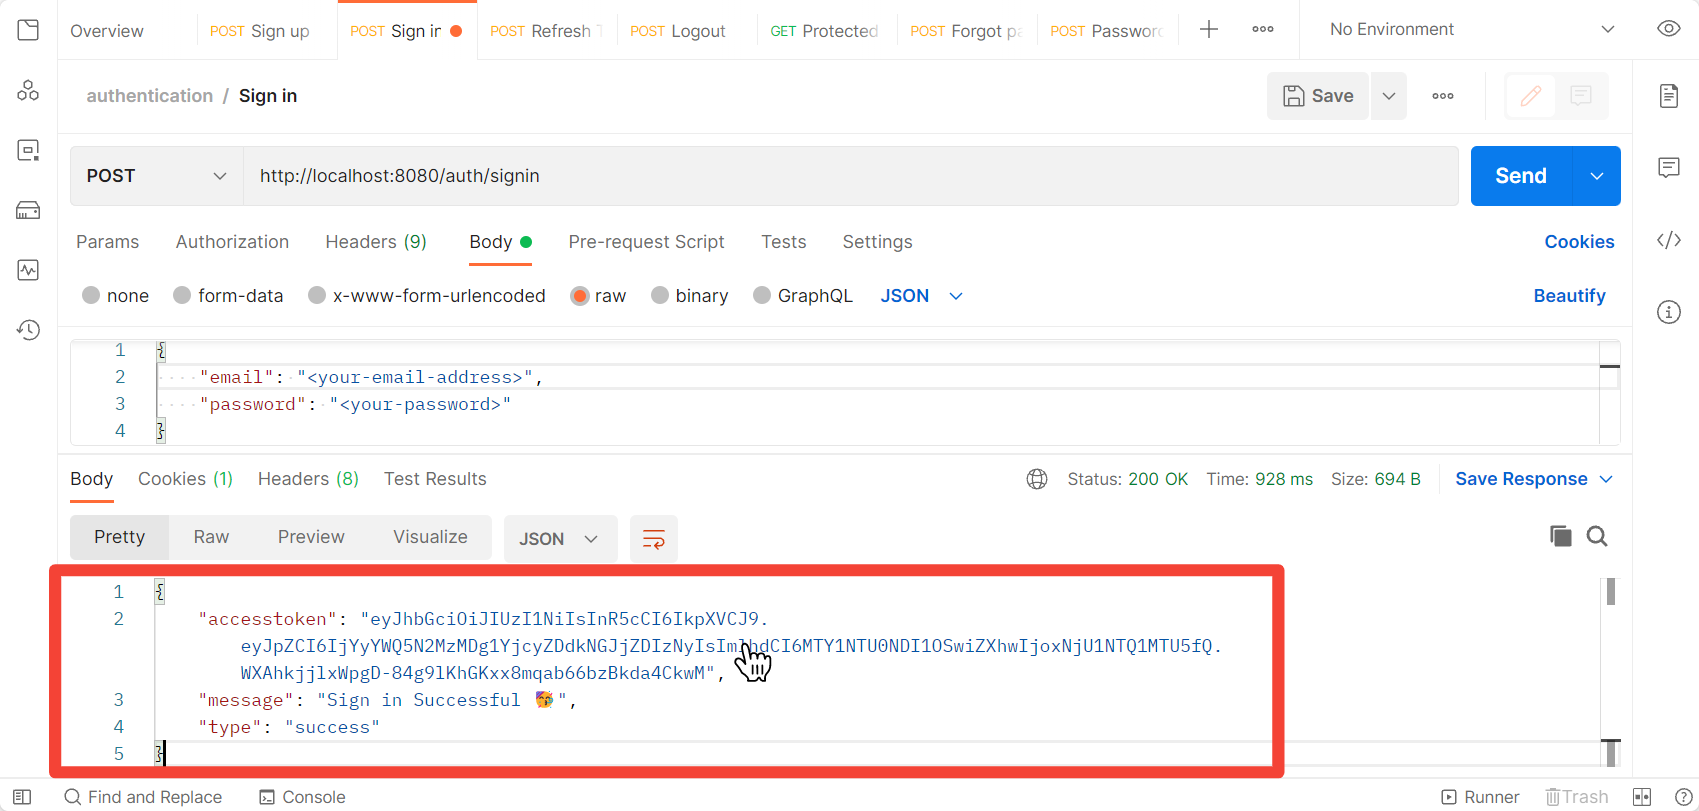
As you can see, you'll get the access token along with the response. You should use this token to access protected routes. The refresh token will be stored in the cookies.
If you enter the wrong email address or password, you'll get the error messages accordingly.
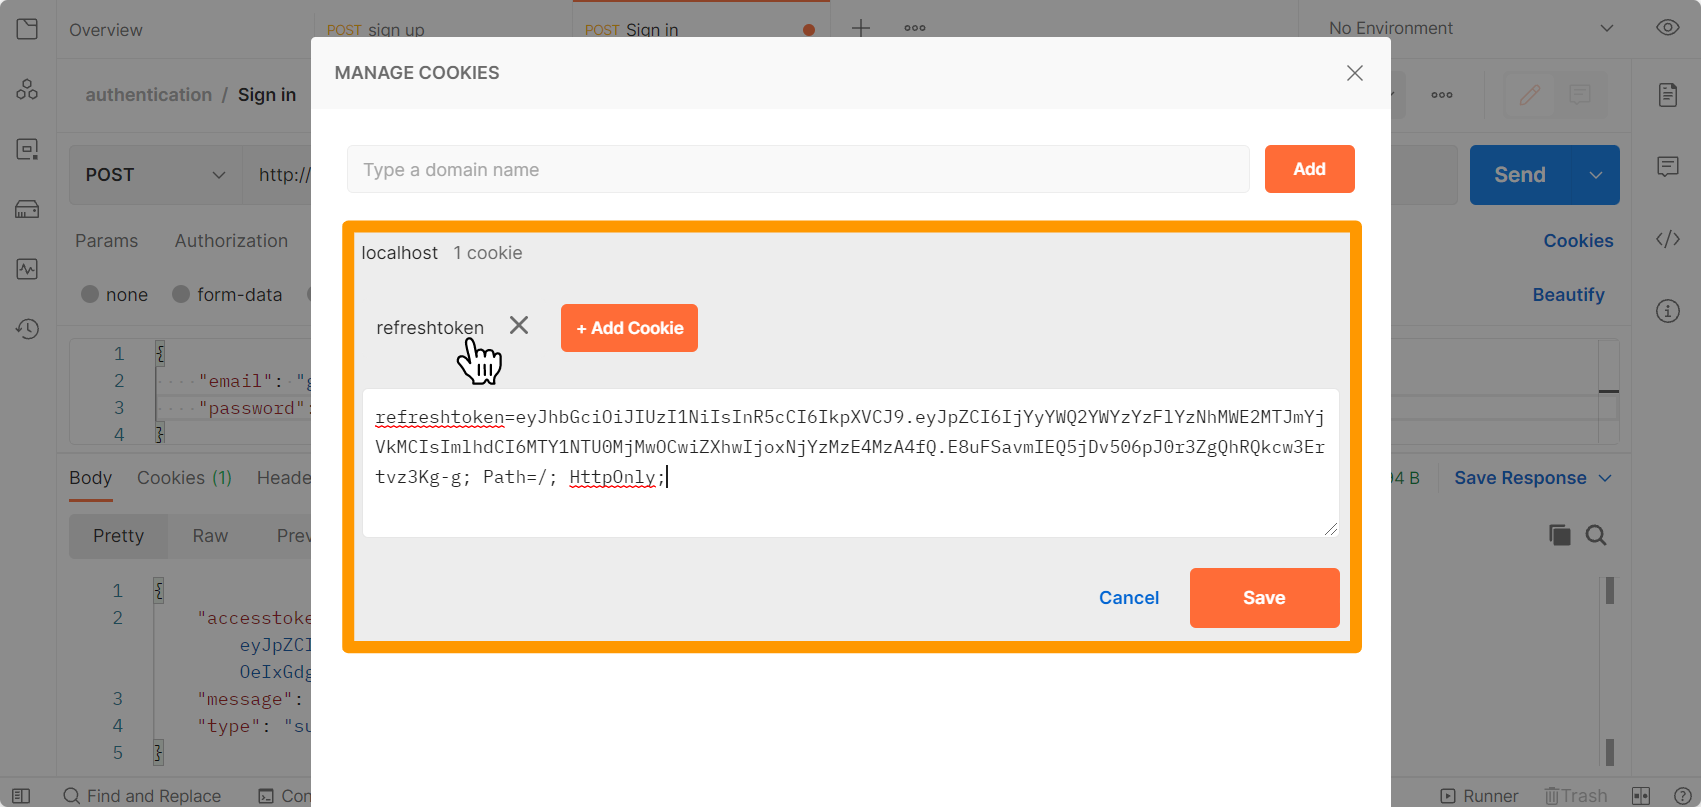
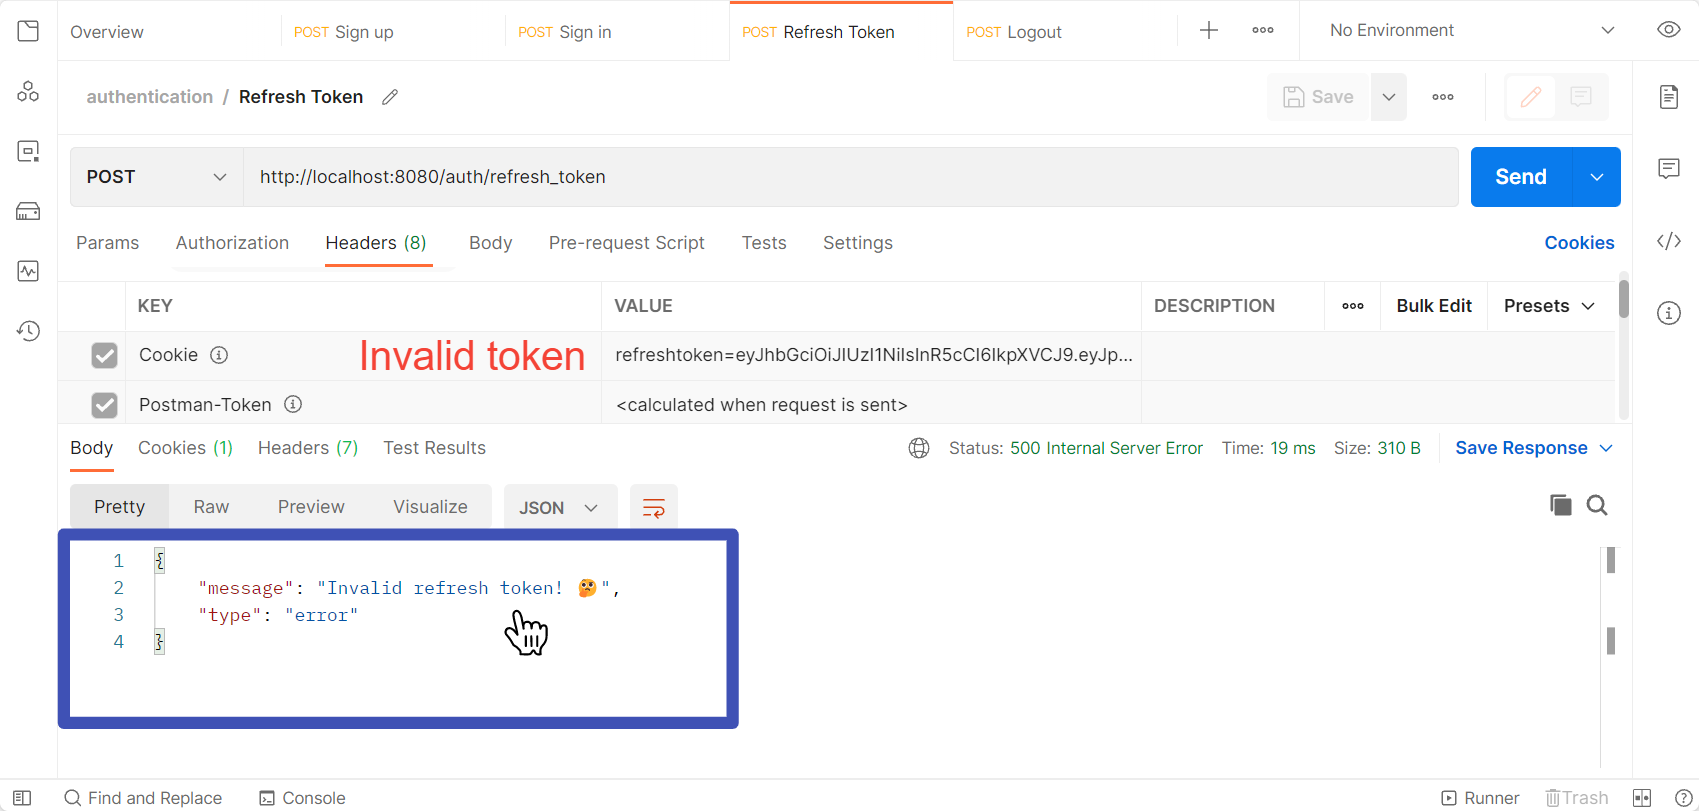
Refresh the Access Token
Use the refresh token to refresh the access token.
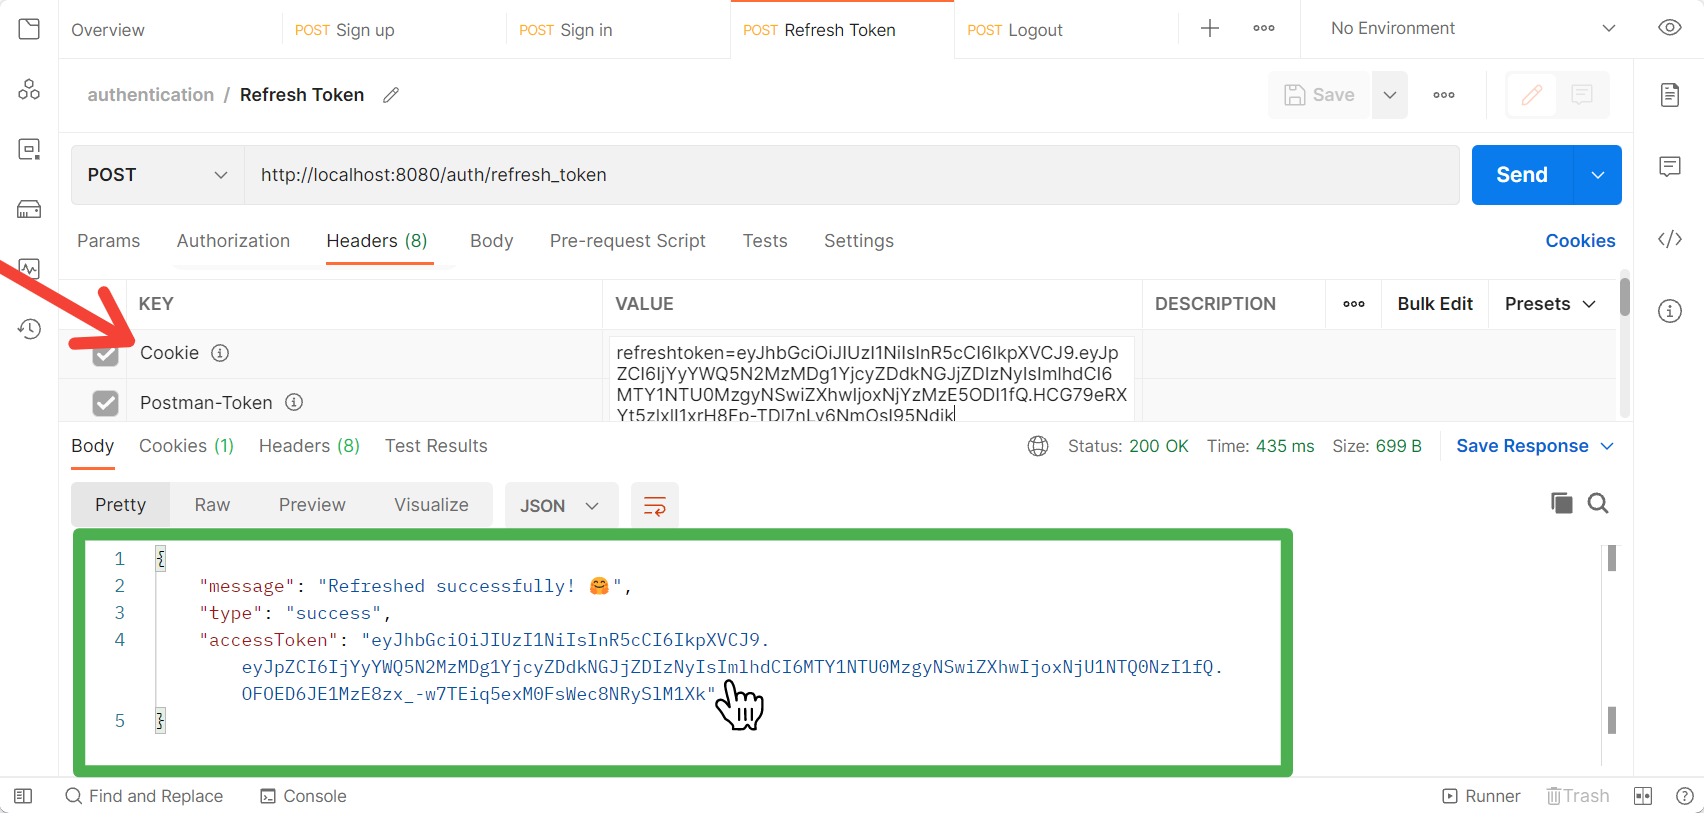
If the refresh token in your cookies is expired or invalid, you'll get the Invalid Token message.
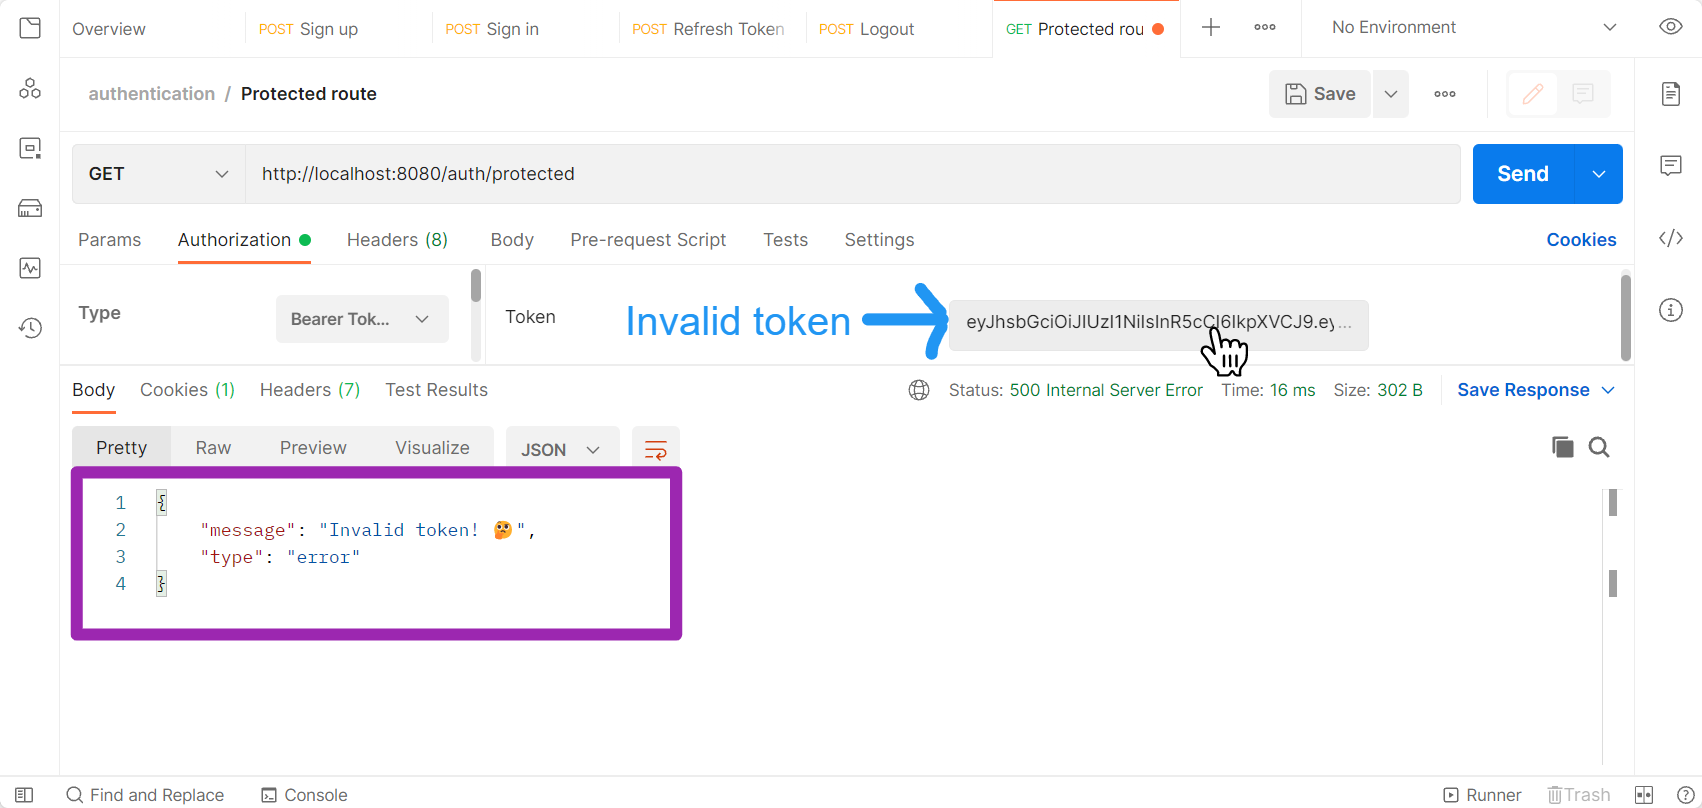
Access the Protected Route
Copy the access token from the login response and paste it to send it along with the request header with the ‘authorization’ name as Bearer Token.

If you try to access the protected route with an expired token, you'll get an error message.
Reset the Password
Send a request to the /send-password-reset-email route with the email address.
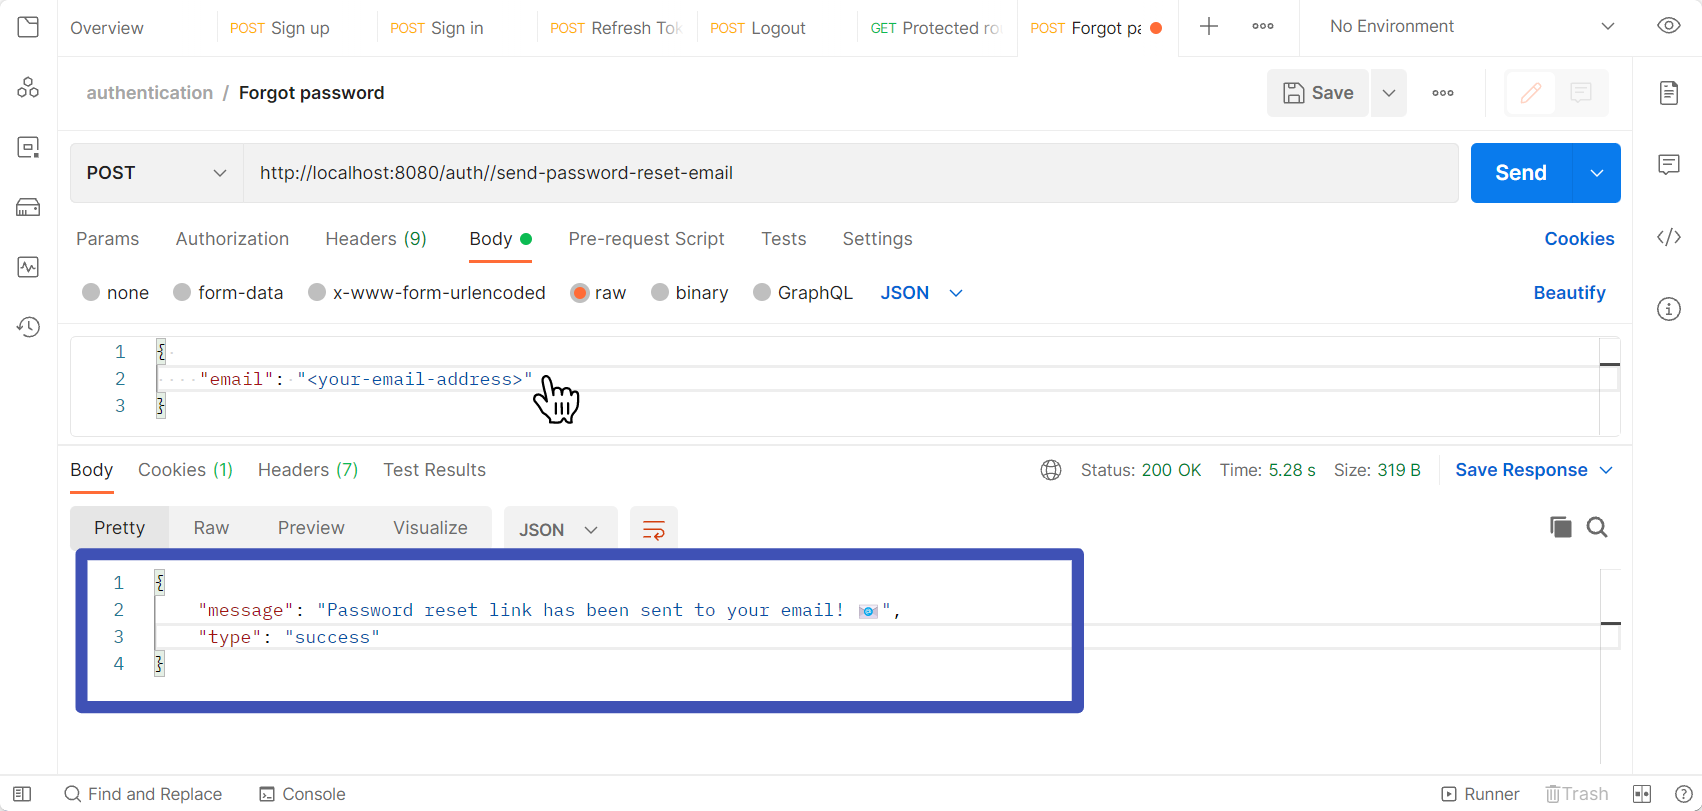
Check your email after getting the confirmation message.
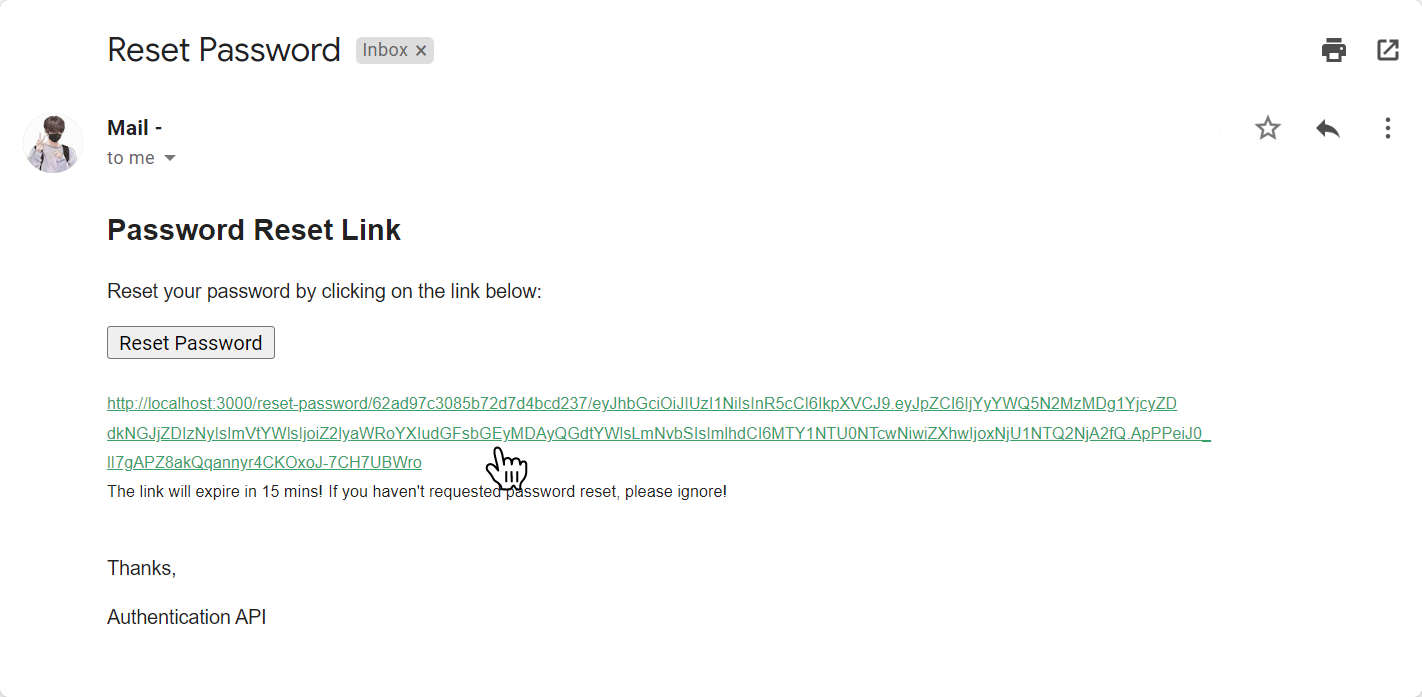
Copy the password reset email link and send a post request with the new password
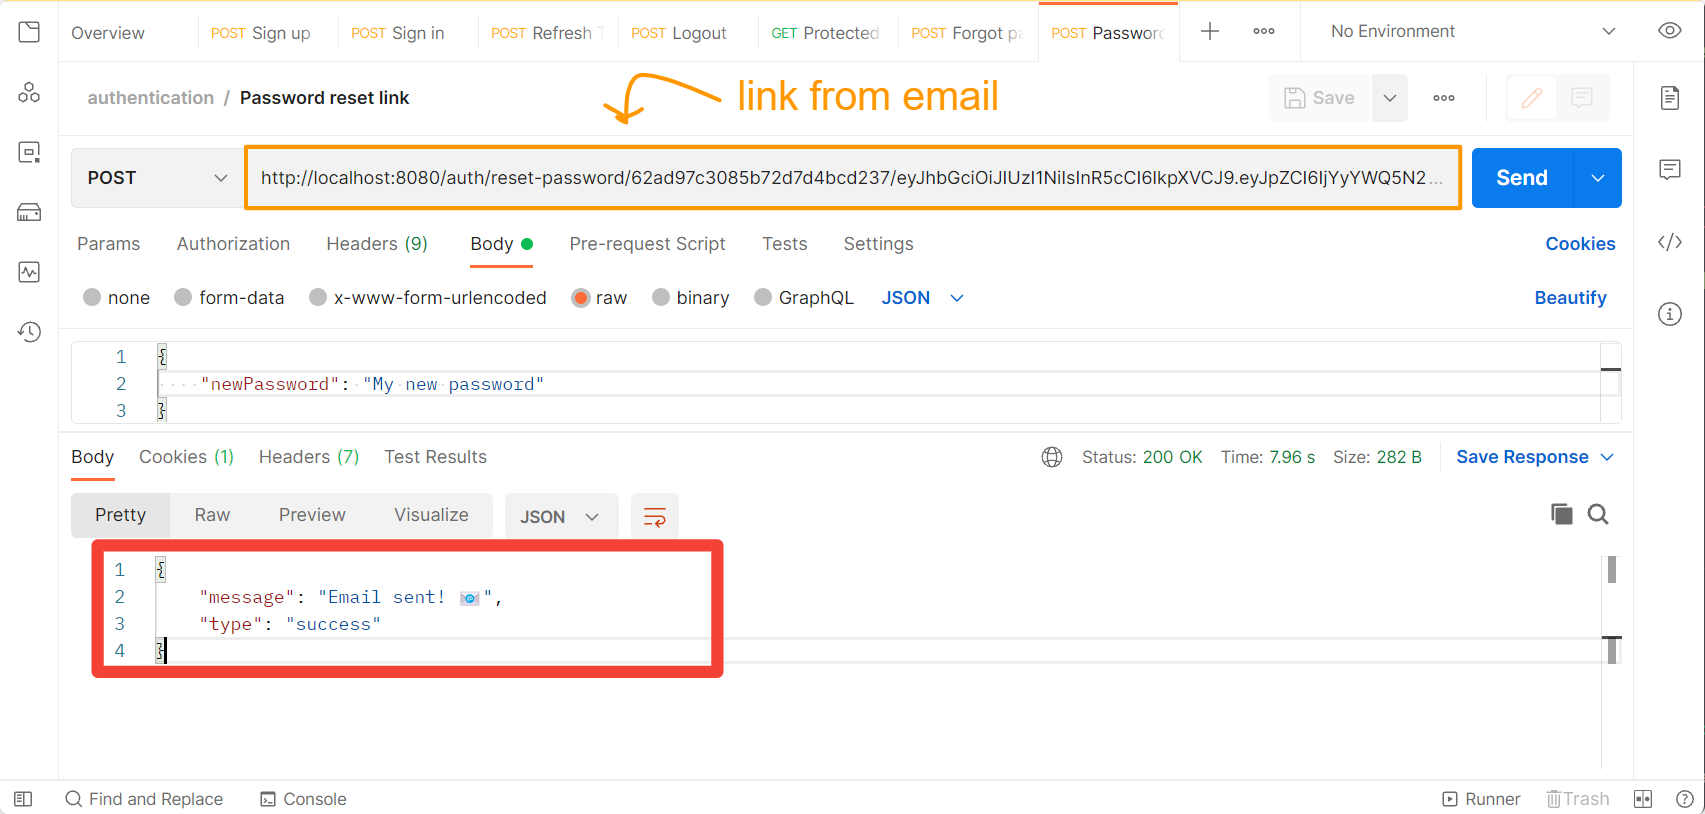
Once you see the success message in the response, check your email to see if the password has been changed.
Now you can try to log in with the new password.
Conclusion
In this article, you learned what authentication is and how to use JavaScript to implement authentication and authorization. It adds an extra layer of security to the API. You've built a REST API with endpoints for registering and signing in users, as well as one for resetting forgotten passwords. You've also learned how to send password reset email messages to users, allowing them to reset their passwords using a one-time link. You’ve learned how to securely persist user data with cookies and log in users by refreshing the access token with a refresh token, as well as used middleware to implement authorization in the protected route. Most people (including myself before I learned about it) confuse authentication and authorization. They have different meanings, however. Authentication is the process of verifying the user's identity, whereas authorization is the process of granting specific file access. In this case, we implemented authentication for signing in the user, as well as authorization for providing access to the protected routes. There are numerous other third-party authentication service providers available, including Auth0 and Auth Rocket. Implementing your own authentication system, however, gives you greater control over user data and privacy.
Next Steps
You’ve completed the tutorial. Now, you can start using the authentication system in your own way. These are some of the things you can do with this authentication system:
- Try to send the verification email to the user. To avoid spam users, send an email with the verification link to the user. You can create a one-time link like you used for sending password reset emails.
- Try to set up the form validation using express. Validate the email and password fields. Also, try to check whether the email address already exists in real time. This helps you improve the user experience.
- Try to implement two-factor authentication, which adds extra security to your application. This can be done by sending a code (a one-time password) to the user's phone or email address. The user will then have to enter the code to log in.
- Try to integrate this authentication system with a frontend of your choice. You can use React, Vue, Angular, etc.

Written by
Giridhar TallaGiridhar loves programming, learning, and building new things. He enjoys working with both JavaScript and Python.