When ES modules was first introduced in ECMAScript 2015 as a way to standardize module systems in JavaScript, it was implemented by mandating the specification of a relative or absolute path in import statements.
import dayjs from "https://cdn.skypack.dev/dayjs@1.10.7"; // ES modules

console.log(dayjs("2019-01-25").format("YYYY-MM-DDTHH:mm:ssZ[Z]"));
This was slightly different from how modules worked in other common module systems, such as CommonJS, and when using a module bundler like webpack, where a simpler syntax was used:
const dayjs = require('dayjs') // CommonJS

import dayjs from 'dayjs'; // webpack
In these systems, the import specifier was mapped to a specific (and versioned) file through the Node.js runtime or the build tool in question. Users only needed to apply the bare module specifier (usually the package name) in the import statement, and concerns around module resolution were taken care of automatically.
Since developers were already familiar with this way of importing packages from npm, a build step was needed to ensure that code written in this manner could run in a browser. This problem was solved by import maps. Essentially, it allows the mapping of import specifiers to a relative or absolute URL, which helps to control the resolution of the module without the application of a build step.
How Import Maps Work
<script type="importmap">
{
  "imports": {
    "dayjs": "https://cdn.skypack.dev/dayjs@1.10.7",
  }
}
</script>
<script type="module">
  import dayjs from 'dayjs';

  console.log(dayjs('2019-01-25').format('YYYY-MM-DDTHH:mm:ssZ[Z]'));
</script>
An import map is specified through the <script type="importmap"> tag in an HTML document. This script tag must be placed before the first <script type="module"> tag in the document (preferably in the <head>) so that it is parsed before module resolution is carried out. Additionally, only one import map is currently allowed per document, although there are plans to remove this limitation in the future.
Inside the script tag, a JSON object is used to specify all the necessary mappings for the modules required by the scripts in the document. The structure of a typical import map is shown below:
<script type="importmap">
{
  "imports": {
    "react": "https://cdn.skypack.dev/react@17.0.1",
    "react-dom": "https://cdn.skypack.dev/react-dom",
    "square": "./modules/square.js",
    "lodash": "/node_modules/lodash-es/lodash.js"
  }
}
</script>
In the imports object above, each property corresponds to a mapping. The left-hand side of a mapping is the name of the import specifier, while the right-hand side is the relative or absolute URL to which the specifier should map. When specifying relative URLs in the mapping, make sure they always begin with /, ../, or ./. Note that the presence of a package in an import map does not necessarily mean that it will be loaded by the browser. Any module that is not utilized by a script on the page will not be loaded by the browser, even if it is present in the import map.
<script type="importmap" src="importmap.json"></script>
You can also specify your mappings in an external file, and then use the src attribute to link to the file (as shown above). If you decide to use this approach, ensure the file is sent with its Content-Type header set to application/importmap+json. Note that the inline approach is recommended for performance reasons, and it's how the examples will be presented for the remainder of this article.
Once you've specified a mapping, you can use the import specifier in an import statement as shown below:
<script type="module">
  import { cloneDeep } from 'lodash';

  const objects = [{ a: 1 }, { b: 2 }];

  const deep = cloneDeep(objects);
  console.log(deep[0] === objects[0]);
</script>
It should be noted that the mappings in an import map do not affect URLs in places like the src attribute of a <script> tag. Therefore, if you use something like <script src="/app.js">, the browser will attempt to download a literal app.js file at that path, regardless of what’s in the import map.
Mapping a Specifier to an Entire Package
Aside from mapping a specifier to a module, you can also map one to a package that contains several modules. This is done by using specifier keys and paths that end with a trailing slash.
<script type="importmap">
{
  "imports": {
    "lodash/": "/node_modules/lodash-es/"
  }
}
</script>
This technique allows you to import any module in the specified path instead of the entire main module, which causes all component modules to be downloaded by the browser.
<script type="module">
  import toUpper from 'lodash/toUpper.js';
  import toLower from 'lodash/toLower.js';

  console.log(toUpper('hello'));
  console.log(toLower('HELLO'));
</script>
Constructing Import Maps Dynamically
Mappings can also be constructed dynamically in a script based on arbitrary conditions, and this capability can be used to conditionally import a module based on feature detection. The example below chooses the correct file to import under the lazyload specifier based on whether the IntersectionObserver API is supported.
<script>
  const importMap = {
    imports: {
      lazyload: 'IntersectionObserver' in window
        ? './lazyload.js'
        : './lazyload-fallback.js',
    },
  };

  const im = document.createElement('script');
  im.type = 'importmap';
  im.textContent = JSON.stringify(importMap);
  document.currentScript.after(im);
</script>
If you want to use this approach, make sure to do it before creating and inserting the import map script tag (as done above) because modifying an already existing import map object will not have any effect.
Improve Script Cacheability by Mapping Away Hashes
A common technique for achieving long-term caching of static files is by using the hash of the file's contents in their names so that the file remains in the browser cache until the contents of the file change. When this happens, the file will get a new name so that the latest update is reflected in the app instantly.
With the traditional way of bundling scripts, this technique can fall short if a dependency that is relied on by several modules is updated. This will cause all the files that rely on that dependency to be updated, which forces the browser to download them afresh, even if only a single character of code was changed.
Import maps provide a solution to this problem by allowing each dependency to be updated separately though a remapping technique. Assuming that you need to import a method from a file named post.bundle.8cb615d12a121f6693aa.js, you can have an import map that looks like this:
<script type="importmap">
  {
    "imports": {
      "post.js": "./static/dist/post.bundle.8cb615d12a121f6693aa.js",
    }
  }
</script>
Instead of writing statements like
import { something } from './static/dist/post.bundle.8cb615d12a121f6693aa.js'
you can write the following:
import { something } from 'post.js'
When the time comes to update the file, only the import map will need to be updated. Since the references to its exports does not change, they will remain cached in the browser while the updated script is download once again due to the updated hash.
<script type="importmap">
  {
    "imports": {
      "post.js": "./static/dist/post.bundle.6e2bf7368547b6a85160.js",
    }
  }
</script>
Using Multiple Versions of the Same Module
It's easy to require multiple versions of the same package with import maps. All you need to do is use a different import specifier in the mapping as shown below:
    <script type="importmap">
      {
        "imports": {
          "lodash@3/": "https://unpkg.com/lodash-es@3.10.1/",
          "lodash@4/": "https://unpkg.com/lodash-es@4.17.21/"
        }
      }
    </script>
You can also use the same import specifier to refer to different versions of the same package through the use of scopes. This allows you to change the meaning of an import specifier within a given scope.
<script type="importmap">
  {
    "imports": {
      "lodash/": "https://unpkg.com/lodash-es@4.17.21/"
    },
    "scopes": {
      "/static/js": {
        "lodash/": "https://unpkg.com/lodash-es@3.10.1/"
      }
    }
  }
</script>
With this mapping, any modules in the /static/js path will use the https://unpkg.com/lodash-es@3.10.1/ URL when referring to the lodash/ specifier in an import statement, while other modules will use https://unpkg.com/lodash-es@4.17.21/.
Using NPM Packages with Import Maps
As I've demonstrated throughout this article, production-ready versions of any NPM package that use ES Modules can be utilized in your import maps through CDNs like ESM, Unpkg, and Skypack. Even if the package on NPM wasn't designed for the ES Modules system and native browser import behavior, services like Skypack and ESM can transform them to be ready to use in an import map. You can use the search bar on Skypack's homepage to find browser-optimized NPM packages that can be used right away without fiddling with a build step.
Programmatically Detecting Import Map Support
Detect import map support in browsers is possible as long as the HTMLScriptElement.supports() method is supported. The following snippet may be used for this purpose:
if (HTMLScriptElement.supports && HTMLScriptElement.supports('importmap')) {
  // import maps is supported
}
Supporting Older Browsers
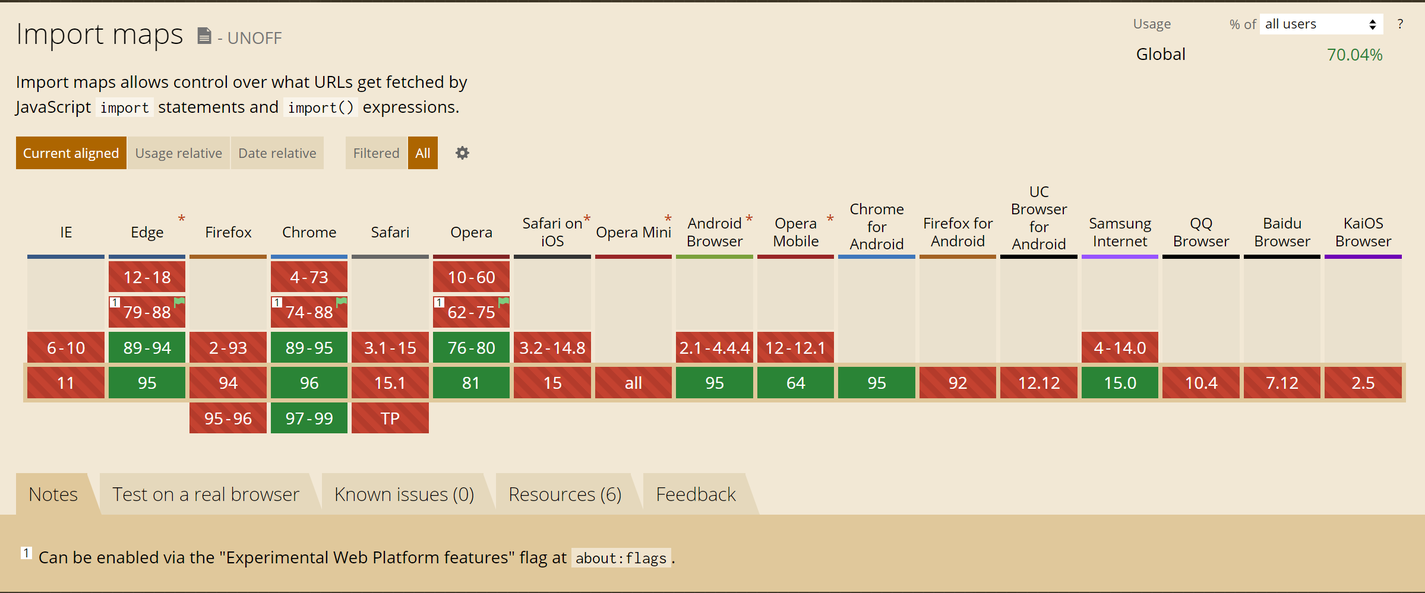
Import maps makes it possible to use bare module specifiers in the browser without depending on the complicated build systems currently prevalent in the JavaScript ecosystem, but it is not widely supported in web browsers at the moment. At the time of writing, versions 89 and onward of the Chrome and Edge browsers provide full support, but Firefox, Safari, and some mobile browsers do not support this technology. To retain the use of import maps in such browsers, a suitable polyfill must be employed.
An example of a polyfill that can be used is the ES Module Shims polyfill that adds support for import maps and other new module features to any browser with baseline support for ES modules (about 94% of browsers). All you need to do is include the es-module-shim script in your HTML file before your import map script:
<script async src="https://unpkg.com/es-module-shims@1.3.0/dist/es-module-shims.js"></script>
You still might get a JavaScript TypeError in your console in such browsers after including the polyfill. This error can be ignored safely, as it does not have any user-facing consequences.
Uncaught TypeError: Error resolving module specifier “lodash/toUpper.js”. Relative module specifiers must start with “./”, “../” or “/”.
Other polyfills and tooling related to import maps can be found in its GitHub repository.
Conclusion
Import maps provide a saner way to use ES modules in a browser without being limited to importing from relative or absolute URLs. This makes it easy to move your code around without the need to adjust the import statement and makes the updating of individual modules more seamless, without affecting the cacheability of scripts that depend on such modules. On the whole, import maps bring parity to the way ES modules are utilized on the server and in a browser.
Will you be using import maps to replace or complement your current build system? Let me know the reasons for your decision on Twitter.
Thanks for reading, and happy coding!


