Getting started with asynchronous PHP using ReactPHP
As web developers, we’re all familiar with the request-response model. It usually goes something like this:
- A user accesses a page using their browser.
- The server queries the necessary data from the database.
- The database responds with the data.
- The server sends the requested page back to the user.
Basically, the server executes a task requested by the client and then terminates once a response has been returned. This is straightforward, unless the server is processing requests from hundreds of users simultaneously, it could cause a problem. Time-consuming tasks usually involve I/O operations, such as reading from a file or querying the database, so you’re always limited by the hardware speed. You can scale the server vertically or horizontally; however, it won’t solve the root issue because there's a limit on how many simultaneous requests the server can process simultaneously. Once you begin reaching that limit, you'll need to incorporate techniques like load balancing so that the server can continue serving your users.
If it’s a task that takes some time, such as sending an email or processing an uploaded file, then we typically utilize some kind of queue system using Redis or Beanstalkd. This queue system will then take care of running the time-consuming task for you as a background task on the server. Thus, the user doesn’t have to wait for it to be completed before they see a response. This is a good solution in most cases.
However, what if I told you that there’s an alternative solution that doesn’t involve a queue server? It’s a technique that allows your server's full capacity to be utilized without the burden of waiting on I/O operations to complete. In this article, we’ll explain how to use ReactPHP in asynchronous PHP.
What is ReactPHP?
ReactPHP is a library that allows you to turn PHP into something like Go or Node.js so that tasks can be performed asynchronously. Note that ReactPHP is just a library that you install with Composer. It doesn’t have cumbersome requirements, such as installing a custom PHP extension; it just works as intended.
With the asynchronous model, some tasks, such as processing an uploaded file, is performed incrementally. Let’s take ordering food from a restaurant as an example. This certainly doesn’t follow the request → execute → respond model because if it did, there would be a lot of angry customers. Therefore, instead of taking an order from one customer, preparing their food, and then only proceeding to the next customer once it’s finished, we simply take orders from all the customers and have another staff member prepare the food. This means that not all orders will be fulfilled in the order that they are placed, since one order might take longer to prepare than the others, and another order might be easier to prepare. However, at the end of the day, all the orders will be fulfilled at some point. This is how the asynchronous model works.
Event-driven architecture
By default, PHP works synchronously, so it has to wait for I/O operations to complete before it can start doing another task. With the Event-driven architecture, we instead hand over the time-consuming I/O operation to the operating system and have it notify us once the task is completed. While the operating system is doing its thing, the script can then go off to work on some other task. Once it receives the notification that the task is completed, it can then process it further.
Install ReactPHP
In the root of your working directory, install ReactPHP using the following command:
composer require react/react
ReactPHP has various components, such as the event loop, promise, and streams. When you install ReactPHP, these components and a few more are installed, so you don’t have to install the separately.
The event loop
The event loop is simply an endless loop that listens for events and calls the handlers for them. For example, here are the general steps being performed when reading data from the database:
- The event loop is run.
- The main thread receives a request from the client to query the database.
- The task of querying the database is handed over to the operating system.
- Another user triggers a database query, so steps 2 and 3 are performed again.
- The operating system is finished with one of the requests, so it triggers an event with the data being requested.
- The main thread receives this event and hands over the result to the client.
- After some time, the other task is also completed, so steps 5 and 6 are performed for that task.
Note that there’s only a single thread, and each request is being received and processed by that thread in nanoseconds, so it’s very fast. The event loop also uses a queue, so it knows which one to process first. The main deciding factor is how fast the operating system returns the requested data. Therefore, requests that come in first aren’t necessarily completed first.
To demonstrate how the Event loop works, let’s take a look at a simple example using timers.
If you’ve worked with JavaScript for a while, then you’re already familiar with the setTimeout() and setInterval() functions:
setTimeout(() => {
    console.log('hello world after 1 second');
}, 1000);
setInterval(() => {
    console.log('I show up every 5 seconds');
}, 5000);
By nature, JavaScript is an asynchronous language, which is why it has functions like the two mentioned previously. The event loop is already built into it, so we don't need to create and run it explicitly. However, for PHP, we need a library like ReactPHP to make it asynchronous.
Here’s the equivalent of the setTimeout() function in PHP using ReactPHP:
<?php
// timeout.php

require 'vendor/autoload.php';

$loop = \React\EventLoop\Factory::create();

// add a timer
$loop->addTimer(1, function () {
    echo "After timer\n";
});

echo "Before timer\n";

$loop->run(); // start the event loop
You can run it from the terminal:
php timer.php
You’ll see the following output:
Before timer <-- this shows up immediately when you run the script
After timer  <-- this shows up a second later
Here’s the equivalent of the setInterval() function:
<?php
// interval.php

use React\EventLoop\TimerInterface;

require 'vendor/autoload.php';

$loop = \React\EventLoop\Factory::create();

$counter = 0;
$loop->addPeriodicTimer(1, function (TimerInterface $timer) use (&$counter, $loop) {

    $counter += 1;
    echo "{$counter} iterations\n";

    if ($counter === 10) {
        echo "Cancelled after 10 iterations\n";
        $loop->cancelTimer($timer);
    }


});

$loop->run();
Run it:
php periodic-timer.php
You’ll see the following output, each one being one second apart:
1 iterations
2 iterations
3 iterations
4 iterations
5 iterations
6 iterations
7 iterations
8 iterations
9 iterations
10 iterations
Cancelled after 10 iterations
In both instances above, we did three things:
-
Created an event loop:
$loop = \React\EventLoop\Factory::create(); -
Registered a callback for a specific event:
$loop->addTimer(1, function () { echo "after\n"; }); -
Ran the loop:
$loop->run();
That’s the whole pattern, so you can register a callback to a number of events, and each of them will run in a loop. Try to combine the timer and periodic timer events so that you’ll see what I mean:
<?php

// interval-and-timeout.php

use React\EventLoop\TimerInterface;

require 'vendor/autoload.php';

$loop = \React\EventLoop\Factory::create();

$loop->addTimer(2, function () {
    echo "At the second iteration\n";
});

$loop->addTimer(4, function () {
    echo "At the fourth iteration\n";
});

$counter = 0;
$loop->addPeriodicTimer(1, function (TimerInterface $timer) use (&$counter, $loop) {

    $counter += 1;
    echo "{$counter} iterations\n";

    if ($counter === 10) {
        echo "Cancelled after 10 iterations\n";
        $loop->cancelTimer($timer);
    }

});

$loop->run();
When you run it:
php interval-and-timeout.php
You’ll see the following:
1 iterations
At the second iteration <-- this gets outputted at the same time as the one below it
2 iterations <-- this gets outputted at the same time as the one above it
3 iterations
At the fourth iteration <-- this gets outputted at the same time as the one below it
4 iterations  <-- this gets outputted at the same time as the one above it
5 iterations
6 iterations
7 iterations
8 iterations
9 iterations
10 iterations
Cancelled after 10 iterations
This proves that the code inside the callback gets called once it’s time to be executed. In this case, the basis for the execution of the callback is time in seconds. Each iteration of the loop is called a tick, and it will continue executing until there are no more listeners or it’s stopped manually.
Note that the tick isn’t executing per second; we’ve only set the callback to execute per second so that we can easily perceive it. You can also set it to milliseconds:
$loop->addTimer(0.3, function(){
    // do something
});
The above code will execute after 300 milliseconds.
Another important thing to note is that timers aren’t time-accurate. This is simply because the codes inside the callback aren’t being executed in parallel; it just looks like it because the code being executed in the callback doesn’t take much time to execute. This means that if you have something like sleep() in the code, then it will delay all the other events:
<?php
// interval-with-sleep.php

use React\EventLoop\TimerInterface;

require 'vendor/autoload.php';

$loop = \React\EventLoop\Factory::create();

$counter = 0;
$loop->addPeriodicTimer(1, function (TimerInterface $timer) use (&$counter, $loop) {

    $counter += 1;
    echo "{$counter} iterations\n";

    if ($counter === 10) {
        echo "Cancelled after 10 iterations\n";
        $loop->cancelTimer($timer);
    }

    sleep(5);
});

$counter2 = 0;
$loop->addPeriodicTimer(1, function (TimerInterface $timer) use (&$counter2, $loop) {

    $counter2 += 1;
    echo "Counter 2: {$counter2} iterations\n";

    if ($counter2 === 10) {
        echo "Counter 2: Cancelled after 10 iterations\n";
        $loop->cancelTimer($timer);
    }
});

$loop->run();
When you run the above code, here’s what the output will look like:
1 iterations
Counter 2: 1 iterations <-- shows up 5 seconds later
2 iterations <-- shows up 1 second after the one directly above it
Counter 2: 2 iterations <-- shows up 5 seconds after the one directly above it
3 iterations <-- shows up 1 second after the one directly above it
The key takeaway here is that you should keep the code inside the callback fast. Otherwise, it will delay all the others. This means that you can't simply write code like you usually would, especially if you plan to employ code that uses I/O. In the next few sections, you’ll learn some techniques that will allow you to work with I/O while still keeping it light.
Streams
Streams are used for processing large amounts of data into chunks. Each time one of these chunks are received, it triggers a notification so that the new piece of data can be utilized by whoever requested it.
Here’s an example of how to use streams to read a text file:
<?php
// streams.php

use React\Stream\ReadableResourceStream;

require 'vendor/autoload.php';

$loop = React\EventLoop\Factory::create();

$logFile = './logfile.txt';

$readChunkSize = 100;

$stream = new ReadableResourceStream(fopen($logFile, 'r'), $loop, $readChunkSize);
$stream->on(
    'data',
    function ($data) {
        echo "===" . $data . "\n";
    }
);

$stream->on('end', fn() => print "Finished reading the file.");
$loop->run();
Here, we’re streaming the contents of the logfile.txt file within the same directory. We do this by creating a new instance of ReadableResourceStream, which accepts two arguments: the resource and the event loop. Remember the tick? The stream still abides to it. Thus, it’s reading the contents of the file incrementally on each tick. You can even supply a $readChunkSize as the third argument, which allows you to specify the bytes for each chunk.
In the final section, you'll see how we can use streams when processing file uploads. Basically, you reach for streams when you're working with files or an HTTP request body that can't be processed instantly.
Promises
A promise is a representation of some future value. It’s the result of executing an asynchronous code. This means that you can attach a listener to it; therefore, when a result becomes available, you can easily get access to the result (or the error if the operation wasn’t successful).
A promise has three possible states:
- Unfulfilled - the default state. It remains in this state until the operation is completed.
- Fulfilled - a promise is in this state if the operation was successful, and the results are now ready to be sent to the client.
- Failed - this is the state when the operation has failed. It will then return some information about the issue.
A promise cannot be created by itself. For that, you’ll need a deferred object. This represents the code to be executed to arrive at a result. A deferred object has three methods:
promise()- for creating a promise.resolve()- if the operation was successful, this is used for changing the state of the promise tofulfilled.reject()- if the operation failed, you could use this to set the promise asfailed.
Here’s an example of how to use promises in ReactPHP. Let’s make a request to the Pokemon API:
<?php
// promises.php

use React\Promise\Deferred;

require 'vendor/autoload.php';

function httpRequest($url) {
    $response = file_get_contents($url);
    $deferred = new Deferred();

    if($response) {
        $deferred->resolve($response);
    } else {
        $deferred->reject(new Exception('No response returned'));
    }

    return $deferred->promise();
}

httpRequest('https://pokeapi.co/api/v2/pokemon/ditto')
    ->then(function ($response) {
        $response_arr = json_decode($response, true);
            return [
                'name' => $response_arr['name'],
                'sprite' => $response_arr['sprites']['front_default'],
            ];
    })
    ->then(
        function ($response) {
            print_r($response);
        })
    ->otherwise(
        function (Exception $exception) {
            echo $exception->getMessage();
        });
Let’s break down the above code. First, we create the function that will create a new deferred object, which is what we’ll use to create a promise. A promise is what we return from this function. To keep things simple, we make an HTTP request using the file_get_contents function. If a response becomes available, we call the resolve() function on the deferred object and pass it the response. Otherwise, we call the reject() function and pass in an exception:
function httpRequest($url) {
    $response = file_get_contents($url);
    $deferred = new Deferred();

    if ($response) {
        $deferred->resolve($response);
    } else {
        $deferred->reject(new Exception('No response returned'));
    }

    return $deferred->promise();
}
When we call the httpRequest() function, we pass it the URL to which we want to make a request. Since we returned a promise earlier, this allows us to attach a callback using then() and pass in the callback function. This contains whatever value we passed to the deferred’s resolve() function earlier. In this case, it’s a JSON string. From here, we can do a bit of processing to the data so that we end up with the part of the data and format we want. In this case, we convert it to an array and only return the name and the sprite. Next, we can continue piping then() calls to process the data further or return the final output. To handle exceptions, you can pipe in a call to the otherwise() function and pass in a callback for handling the issue:
httpRequest('https://pokeapi.co/api/v2/pokemon/ditto')
    ->then(function ($response) {
        $response_arr = json_decode($response, true);
        return [
            'name' => $response_arr['name'],
            'sprite' => $response_arr['sprites']['front_default'],
        ];
    })
    ->then(
        function ($response) {
            print_r($response);
        })
    ->otherwise(
        function (Exception $exception) {
            echo $exception->getMessage();
        });
Note that wrapping your code in a promise doesn’t automatically make it asynchronous-friendly. In the above example, we used the file_get_contents() function. This uses I/O, so it is “blocking” by nature.
Child processes
ReactPHP provides the Child Process utility component as a means to make non-blocking I/O calls. This integrates operating system calls, such as curl or cat, into the event loop so that we can attach a callback function for when specific events happen in the operating system calls we executed.
The Child Process component isn’t installed by default, so you have to install it manually:
composer require react/child-process
Here’s an example of how to use Child Process together with the Event Loop. This is the non-blocking equivalent of the file_get_contents() call we performed earlier:
<?php
// child-process.php

use React\ChildProcess\Process;

require 'vendor/autoload.php';

$loop = React\EventLoop\Factory::create();

$process = new Process('curl https://pokeapi.co/api/v2/pokemon/ditto');
$process->start($loop);

$process->stdout->on('data', function ($data) {
    echo $data;
});

$loop->run();
Breaking it down, we first create a new Process object. This is where we pass in the command that we want to execute. In this case, we perform an HTTP request to the Pokemon API using the curl command:
$process = new Process('curl https://pokeapi.co/api/v2/pokemon/ditto');
To integrate it with the Event Loop, when you start the process, we simply pass in the instance of the Event Loop we created:
$process->start($loop);
Then, listen for the data event in stdout (standard output). This is basically the same as when you see the console output when executing the same command in the console:
$process->stdout->on('data', function ($data) {
    echo $data;
});
Child Processes is what you reach for whenever you need to execute I/O operations, such as creating and appending to a file or making a request to another server.
File upload processing using ReactPHP
Now that we’re familiar with the core concepts of ReactPHP, it’s time to put our knowledge to the test by implementing file upload. We will use the Laravel framework, along with ReactPHP, to make things easier to implement.
Laravel project
Start by installing Laravel:
composer create-project laravel/laravel reactphp-fileupload
cd reactphp-fileupload
npm install
php artisan serve
Next, create a new Controller:
php artisan make:controller FileUploadController --invokable
Add the following code to the generated file:
<?php
// app/Http/Controllers/FileUploadController.php

namespace App\Http\Controllers;

use Illuminate\Http\Request;

class FileUploadController extends Controller
{
    /**
      * Handle the incoming request.
    */
    public function __invoke(Request $request)
    {
        return view('upload');
    }
}
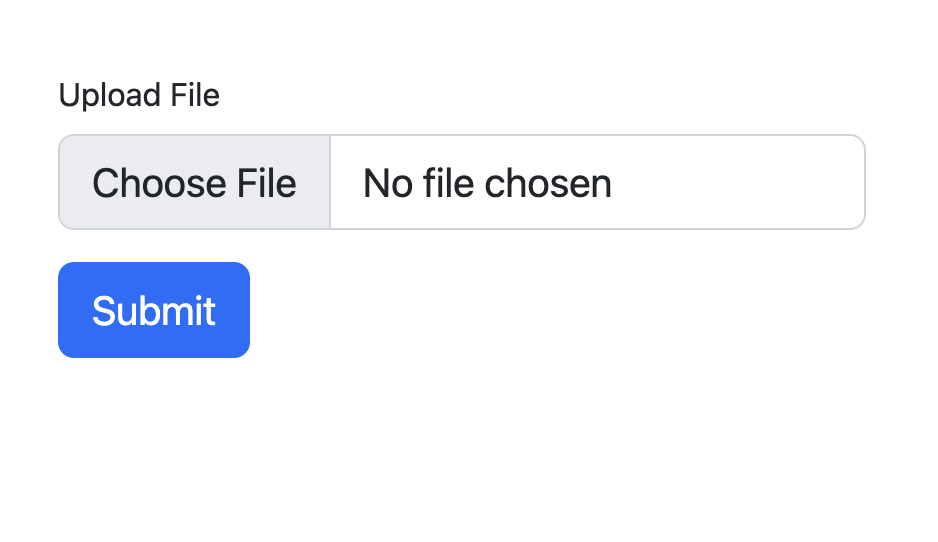
Here’s the code for the upload view. As you can see, we’re submitting the form elsewhere. This will be a separate server that we will create using ReactPHP:
<!--resources/views/upload.blade.php -->
<!DOCTYPE html>
<html lang="en">
<head>
    <meta charset="UTF-8">
    <meta http-equiv="X-UA-Compatible" content="IE=edge">
    <meta name="viewport" content="width=device-width, initial-scale=1.0">
    <title>File Upload</title>
    <link rel="stylesheet" href="/css/bootstrap.min.css" />
</head>
<body>
    <div class="p-5">
        <form
            action="http://localhost:8080"
            method="POST"
            enctype="multipart/form-data">

            <div>
                <label for="file" class="form-label">Upload File</label>
                <input class="form-control form-control-lg" id="file" name="file" type="file">
            </div>

            <div class="mt-3">
                <button type="submit" class="btn btn-lg btn-primary">
                Submit
                </button>
            </div>

        </form>
    </div>
</body>
</html>
Open your routes file and add the upload page:
<?php
// routes/web.php

use Illuminate\Support\Facades\Route;
use App\Http\Controllers\FileUploadController;

// ...

Route::get('/upload', FileUploadController::class);
This is what it will look like:
ReactPHP server
Now we’re ready to build the ReactPHP side of things. You can use the same working directory as the one used for the tests we performed earlier.
Inside your working directory, create an upload-server.php file and add the following:
<?php
// upload-server.php

use React\EventLoop\LoopInterface;

use React\Http\Server;
use React\Socket\SocketServer;
use React\Http\Message\Response;
use Psr\Http\Message\ServerRequestInterface;

use React\Http\Middleware\StreamingRequestMiddleware;
use React\Http\Middleware\RequestBodyBufferMiddleware;
use React\Http\Middleware\RequestBodyParserMiddleware;

use React\ChildProcess\Process;

require 'vendor/autoload.php';

$loop = React\EventLoop\Factory::create();

$server = new Server(
    $loop,

    new StreamingRequestMiddleware(),
    new RequestBodyBufferMiddleware(5 * 1024 * 1024), // 5 Mb
    new RequestBodyParserMiddleware(5 * 1024 * 1024, 1), // 5 Mb

    function (ServerRequestInterface $request) use ($loop) {

        if ($request->getMethod() === 'POST') {

            $files = $request->getUploadedFiles();


            $file = $files['file'];

            $process = new Process(
                "cat > uploads/{$file->getClientFilename()}",
                __DIR__
            );

            $process->start($loop);
            $process->stdin->write($file->getStream()->getContents());

            return new Response(
                200, ['Content-Type' => 'text/plain'], "Uploaded!"
            );
     }
});

$socket = new SocketServer(8080);
$server->listen($socket);

$loop->run();
Breaking it down, we first import what we need. You’re already familiar with a couple of these since we used them in the previous sections, so we’ll only go through the ones that we haven’t previously covered:
use React\EventLoop\LoopInterface;

use React\Http\Server;
use React\Socket\SocketServer;
use React\Http\Message\Response;
use Psr\Http\Message\ServerRequestInterface;

use React\Http\Middleware\StreamingRequestMiddleware;
use React\Http\Middleware\RequestBodyBufferMiddleware;
use React\Http\Middleware\RequestBodyParserMiddleware;

use React\ChildProcess\Process;
React\Http\Server- this is ReactPHP’s server component. It’s already installed when you install ReactPHP, so there’s no need to install it separately. It’s composed of both server and browser APIs. Server is used for creating servers and handling incoming HTTP requests. The browser is used for making outgoing requests (e.g., when making requests to an external API).React\Socket\SocketServer- the HTTP server cannot be created on its own. It has to be served to a certain socket in the server for it to be accessible to the outside world. This is what the socket server is used for.React\Http\Message\Response- for specifying the response you want to return.Psr\Http\Message\ServerRequestInterface- this allows us to access various data about the request received by the server. It’s how we get access to form data.React\Http\Middleware- this contains various middleware for parsing and processing the request body.
Now let’s go through the body of the code. First, we create an event loop:
$loop = React\EventLoop\Factory::create();
Next, we create a new server and pass in the event loop, followed by the request middlewares:
StreamingRequestMiddleware- with this middleware, it’s going to stream the request body, so it’s emitted as chunks to the server.RequestBodyBufferMiddleware- used for buffering the whole incoming request body into memory. Basically, it’s the one responsible for putting the streamed chunks together. Instantiating this requires you to pass in the total number of bytes allowed for each request body (i.e., the total size of the uploaded file). The same is true for the middleware below.RequestBodyParserMiddleware- responsible for taking a fully buffered request body and parsing the form and file uploads from the incoming HTTP request body.
You may have noticed that the middlewares above work together, and each one simply passes its output to the next. However, this doesn’t mean you can’t mix up their ordering. You can, but it makes more sense to order them this way:
$server = new Server(
    $loop,

    new StreamingRequestMiddleware(),
    new RequestBodyBufferMiddleware(5 * 1024 * 1024), // 5 Mb
    new RequestBodyParserMiddleware(5 * 1024 * 1024, 1), // 5 Mb
// ...
Next, we have the callback function. This gets called whenever a file upload form gets submitted. First, we check if the request method is what we expect. In this case, we want a form to be posted. Only then can we assume that a file was uploaded. We access it using the value assigned to the input's name attribute:
function (ServerRequestInterface $request) use ($loop) {

    if ($request->getMethod() === 'POST') {

        $files = $request->getUploadedFiles();
        $file = $files['file'];

        // ...
    }

}
Next, we spin up a new Child Process. This will create the file in the uploads directory of the server and use the given filename as the filename for the file. We need to pass in __DIR__ as a second argument so that it works off of the same directory as the upload-server.php file:
$process = new Process(
    "cat > uploads/{$file->getClientFilename()}",
    __DIR__
);
Next, we start the child process. Don’t forget to pass in an instance of the event loop:
$process->start($loop);
Next, we get the contents from the stream and then write these contents to the file using the standard input write() method:
$file_contents = $file->getStream()->getContents();
$process->stdin->write($file_contents);
Next, we return a plain text response:
return new Response(
    200,
    ['Content-Type' => 'text/plain'],
    "uploaded!"
);
Outside the callback, we create a new socket server and have the HTTP server listen for requests on that socket:
$socket = new SocketServer(8080);
$server->listen($socket);

$loop->run();
Running the server
At this point, you can now run the server:
php upload-server.php
Then, access the Laravel project on your browser, pick a file, and hit the “submit” button. If everything was set up correctly, you should have the file you picked in the uploads directory. If you haven’t created the uploads directory yet, this is a good time to do so since the child process won’t create the folder for you.
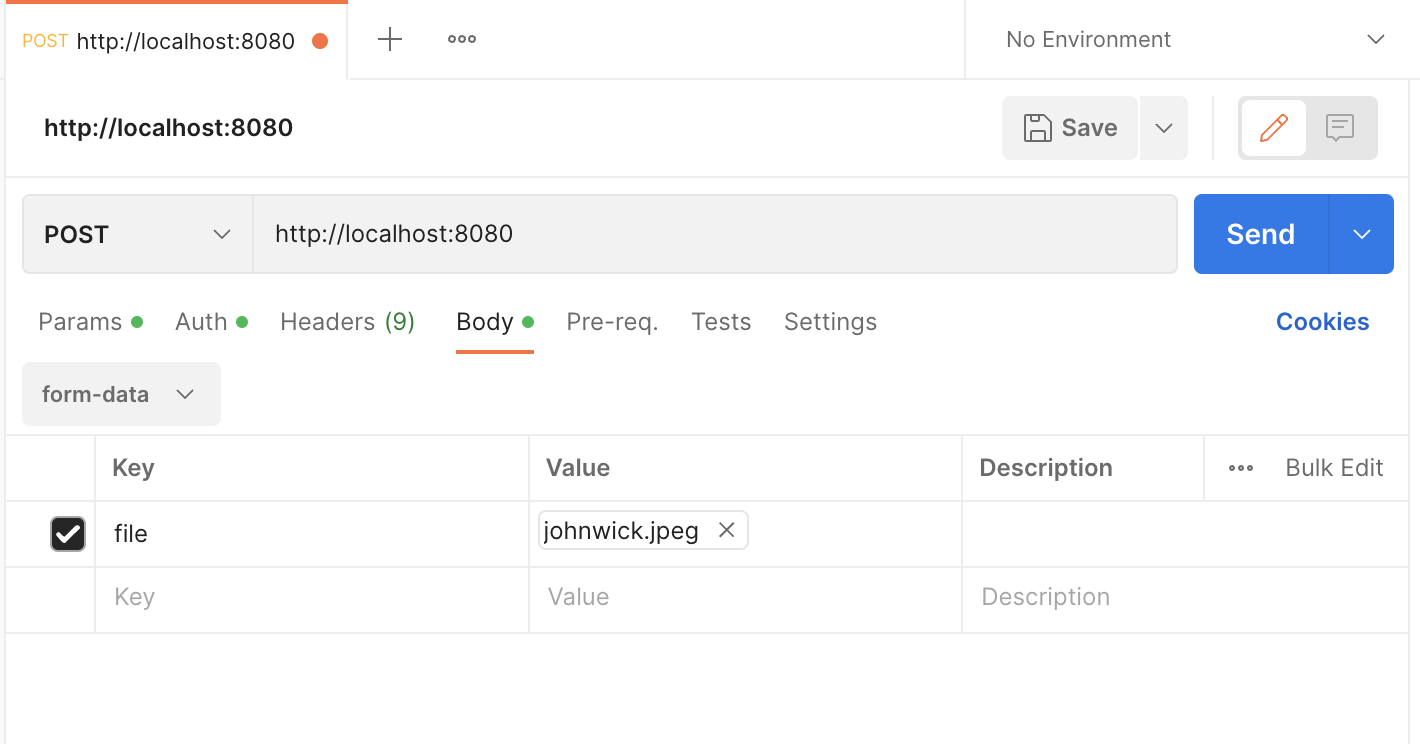
You can also use Postman for trying it out:
Conclusion
That’s it! In this article, you’ve learned the basics of ReactPHP and how to use it in your projects. The key takeaway is that ReactPHP has its own way of doing things; thus, you can’t simply install it via Composer and integrate it on an existing project. Instead, you have to create a new server and do all the async operations on there. Of course, this also means you can't simply use existing libraries, such as the ones used for talking to the database. Everything has to be async. Avoid the use of blocking code, such as file_get_contents(), or basically anything that uses I/O. Instead, use child processes, streams, and promises to keep things async and bound to the event loop.
The codes used in this article are in this GitHub repo.

Written by
Wern AnchetaWern is a freelance full stack developer primarily working with Laravel and React Native. He loves sharing the things he has learned as a means of documentation and giving back to the community.