Securing Laravel forms using Cloudflare's Turnstile CAPTCHA
Security is an important aspect of any web application. It helps to ensure that your application is protected from malicious actors who may want to cause harm to your application or users, as well as bots trying to spam your forms with fake submissions.
One common entry point, especially for automated scripts, is to submit data to publicly-accessible forms on your application. Depending on the form being attacked, it may be used to create fake accounts, send spam emails, or even attempt to exploit vulnerabilities in your application. Adding a completely automated public Turing test to tell computers and humans apart (CAPTCHA) to forms can help to reduce the likelihood of these automated tasks being successful.
In this article, we'll explain what CAPTCHAs are and the advantages and disadvantages of using them. We're then going to look at how to implement Cloudflare's Turnstile CAPTCHA solution in a Laravel application to secure a form. Finally, we'll look at how to write tests for our Turnstile code to improve our confidence in our code.
What are CAPTCHAs?
CAPTCHAs are a type of challenge-response test and can be used to determine whether a user is a human. Challenge-response tests involve the system, such as your application, presenting a challenge to the user. The user then responds to the challenge in some way. The system then uses the response to verify the user and decide whether it thinks they are human.
The primary purpose of a CAPTCHA is to prevent bots and automated scripts from performing actions on behalf of a user. For example, if you have a registration form on your application, you may want to prevent bots from being able to create fake accounts. By adding a CAPTCHA to the form, you can reduce the likelihood of this happening.
You'll typically see CAPTCHAs on publicly-accessible forms on websites. This is usually because they can be easily accessed by automated scripts without needing to authenticate.
You'll generally come across CAPTCHAs in one of the following formats:
- Text-based CAPTCHAs - These may display some text in a distorted image and ask the user to type the text into a text field.
- Image-based CAPTCHAs - These may display a set of images and ask the user to select all the images that contain a certain object.
- Audio-based CAPTCHAs - These may play an audio clip and ask the user to type the words that they hear into a text field. This type of CAPTCHA is particularly useful for users who are visually impaired.
- Math-based CAPTCHAs - These may display a simple math equation (such as "10+5") and ask the user to solve it.
- Interactive CAPTCHAs - These may ask the user to perform an interactive task, such as dragging and dropping an object into a box or rotating an image to a certain orientation. Alternatively, they may ask the user to check a box to confirm that they're human.
- Invisible CAPTCHAs - These may monitor the user's behavior on the page, such as mouse movement and key presses, to determine the likelihood of the user being human. If the CAPTCHA can't determine whether the user is a human, it may then display an interactive CAPTCHA for further confirmation.
What is Cloudflare Turnstile?
There are multiple ways to implement CAPTCHAs in your applications. You can either implement your own CAPTCHA solution, or you can use a third-party solution. In this article, we'll explore Cloudflare's "Turnstile" CAPTCHA solution.
Cloudflare offer multiple tiers for Turnstile, ranging from a free tier with basic bot protections to enterprise-level solutions with improved bot protections.
Turnstile offers three types of CAPTCHAs that can be used in your applications:
- Managed - Turnstile will use information from the user (such as their behavior on the page) to attempt to determine whether the user is human. If it can't decide whether the user is human, it will display an interactive challenge to the user and ask them to check a box.
- Non-interactive - This is a purely non-interactive challenge. It works in a similar way as the managed challenge, but it doesn't require any interaction from the user if it can't determine whether the user is human.
- Invisible - This is an invisible challenge that runs in the background, so the user doesn't see it. It works in a similar way as the non-interactive challenge and doesn't require any input.
In this article, we'll explain how to implement the Managed challenge in a Laravel application. However, the same principles can be applied to the other challenges.
The Managed challenge workflow works like so:
- The page with the form loads.
- Turnstile runs in the background and attempts to determine whether the user is human.
- If Turnstile can't determine whether the user is human, it will display an interactive challenge to the user.
- If the user successfully completes the challenge, Turnstile will add a hidden field to the form that contains a code.
- When the form is submitted, we make a request to Turnstile API with the code to ensure it's valid.
- If the code is valid, we allow the request to continue. If the code is invalid, we return an error.
Therefore, this workflow has a client-side component (displaying the challenge to the user) and a server-side component (verifying the code generated when the user completed the challenge).
Advantages of CAPTCHAs
Using CAPTCHAs can provide a number of benefits to your application. Let's explore some of them.
Improve security
One of the key benefits of using CAPTCHAs is that they can be used to help improve the security of your application. For example, you may want to use a CAPTCHA on your application's login form. As a result, you can reduce the chances of an automated script being able to brute force the login form.
However, it's important to remember that this won't protect the form on its own; it just acts as an extra layer of security. You'll still want to use other security measures, such as rate limiting, enforcing strong passwords, and implementing two-factor authentication to further improve the security of your application.
Reduce spam
If you have any publicly-accessible forms on your website, such as a comments form for blog posts or a contact form, they may be susceptible to spam. This is because they can be easily accessed by automated scripts without needing to authenticate.
By using a CAPTCHA on these forms, you could reduce the likelihood of this happening, which could also help to reduce the amount of time spent moderating submissions.
If you're using a CAPTCHA to protect a form that triggers an action, such as sending an email whenever the contact form is submitted, it can also help to reduce the amount of resources used by your application. This is because you won't be sending emails containing spam content. It may also prevent spikes in the costs of your application, such as when you’re using a third-party email service.
Easy to implement
Another benefit of using CAPTCHAs is that they’re relatively easy to implement. This is especially true if you’re using a third-party solution, such as Cloudflare Turnstile.
For example, Turnstile only requires adding a JavaScript library to your page and a small piece of HTML. You then need to make a simple POST request to their API to verify the code generated when the user completed the challenge. The steps to get Turnstile working in your application are relatively simple and quick.
Adaptive
Another benefit of using a CAPTCHA solution, such as Turnstile, is that it can adapt to the user's behavior. For example, if you're using the managed solution and Turnstile can't determine whether the user is human, it will display an interactive challenge to the user.
Thus, it can unobtrusively protect your forms without requiring any input from the user most of the time. This can help to improve the user experience of your application.
Disadvantages of CAPTCHAs
Although CAPTCHAs can be beneficial to your application, they can also have some disadvantages. Let's take a look at some of them.
User frustration
Some websites and web applications may implement a CAPTCHA in a way that causes frustration for the user. For example, the user may be required to complete a challenge every time they visit the website if an interactive challenge (or similar) is presented. Although challenging the user on each visit can help to improve the security of the website, it can also cause frustration for the user, especially if they're a regular visitor.
Additionally, some CAPTCHAs may be difficult for some users to complete. For instance, if a user has a visual impairment, they might struggle to decipher the text displayed in a distorted image. For this reason, it's important to use a CAPTCHA solution that's accessible to all users, or ensure that an alternative challenge can be used if the user is unable to successfully complete the challenge.
False positives
A disadvantage of using CAPTCHAs is that they may sometimes result in the challenge deeming a user to be a bot when they're human. As you'd expect, this may be frustrating for users because it might prevent them from being able to complete an action on your website.
Depending on the CAPTCHA solution you're using, it may allow you to set a threshold to decide how strict the challenge should be. Increasing the threshold can help to reduce the number of bots bypassing the challenge, but it may also increase the number of false positives. Similarly, decreasing the threshold can help to reduce the number of false positives, but it may increase the number of bots bypassing the challenge. It's important to find a suitable balance that works well for your use case.
Can be bypassed by sophisticated bots
Although CAPTCHAs can drastically reduce the amount of spam submissions and actions performed by bots and automated scripts, sophisticated bots may still bypass them.
Additionally, some CAPTCHAs may be bypassed by using a third-party service. Some services allow you to pay a small fee to have a human solve the challenge for you. This means that the CAPTCHA could be bypassed, and the bot could continue its intended action.
Therefore, as we've already mentioned, it's important to treat your CAPTCHA as an extra layer of security and not a complete solution. You'll still want to implement other security measures, such as rate limiting and cross-site request forgery (CSRF) tokens to further improve the security of your application.
Privacy concerns
Another disadvantage of using CAPTCHAs is that they may raise privacy concerns for users. For example, if the CAPTCHA is monitoring the user's behavior on the page, it may be collecting and storing data about the user. This may be a concern for some users, especially if they weren't initially aware that it was happening.
This might worry privacy-conscious users more if a third-party solution is being used, as it likely means that the user's behavior is being transmitted to an external service. Once the data has arrived at the external service, it may be used for other purposes that the user isn't aware of, such as being sold to other third-parties.
Therefore, it's important to ensure that you're using a CAPTCHA solution that's transparent about what data is being collected and stored, as well as how it's being used.
Alternative CAPTCHA solutions
Although we'll be discussing Cloudflare Turnstile in this article, other CAPTCHA solutions could be used in your applications. Let's briefly discuss some of them.
One of the most popular CAPTCHAs is Google's reCAPTCHA. This is a free CAPTCHA solution provided by Google, and you’ve probably encountered it while browsing websites. It sometimes displays a checkbox that asks the user to confirm that they're human, and other times, it displays an interactive challenge to the user (such as asking the user to select all the images that contain a certain object). However, reCAPTCHA also supports invisible CAPTCHAs that run in the background and don't require any input from the user.
Another popular CAPTCHA solution is hCaptcha, which is a privacy-focused CAPTCHA solution designed to be an alternative to Google's reCAPTCHA. It provides a free tier, with billed tiers available for more advanced features. It claims to be compliant with data laws, such as General Data Protection Regulation (GDPR) and the California Consumer Privacy Act (CCPA).
Another approach that you may want to consider is implementing your own CAPTCHA solution. This can be useful if you want to have full control over the CAPTCHA’s inner workings and the data it collects. However, it's important to remember that this can be a potentially complex task and may require a lot of time to implement, especially if you want it to be robust enough to prevent sophisticated bots from bypassing it.
Using Turnstile with Laravel
Now that we know what Cloudflare Turnstile is and the benefits of using a CAPTCHA, let's look at how we can use it in our Laravel applications.
For the remainder of this article, we'll be walking through how you can add Turnstile to a registration form in Laravel. For the purposes of this article, the registration form will be very simple and won't include any client-side validation (other than Turnstile), error handling, or styling. We'll focus solely on the steps required to add Turnstile to a form.
Getting the API keys
Before touching any code, you'll first need to head over to Cloudflare and create an account if you don't already have one.
Once you've created an account, you'll need to create a new "Turnstile site". When creating a site, you'll be asked whether you want to create a "managed", "non-interactive", or "invisible" site. For this article, we'll be using a "managed" site.
After creating the Turnstile site, you should be presented with your site key and site secret. These are the credentials we'll need to use Turnstile in our Laravel application. We'll add them to our Laravel project's .env file as TURNSTILE_SITE_KEY and TURNSTILE_SITE_SECRET fields:
TURNSTILE_SITE_KEY=key-goes-here
TURNSTILE_SITE_SECRET=secret-goes-here
So that we can access both of these values in our code, we'll also add them to our config/services.php file:
return [

    // ...

    'cloudflare' => [
        'turnstile' => [
            'site_key' => env('TURNSTILE_SITE_KEY'),
            'site_secret' => env('TURNSTILE_SITE_SECRET'),
        ]
    ],

];
Now we can access the site key and site secret using config('services.cloudflare.turnstile.site_key') and config('services.cloudflare.turnstile.site_secret'), respectively.
Adding the client-side code
For Turnstile to work on your webpages, you must first include the Turnstile JavaScript file on your page. To do this, you can add the following code to your site's <head> tag:
<script src="https://challenges.cloudflare.com/turnstile/v0/api.js" async defer></script>
Your site's HTML will now look something like this:
<html>
    <head>
        <!-- ... -->

        <script src="https://challenges.cloudflare.com/turnstile/v0/api.js" async defer></script>
    </head>
    <body>
        <!-- ... -->
    </body>
</html>
To get the Turnstile widget to display, you'll need to add the following HTML to your form:
<div class="cf-turnstile"
     data-sitekey="{{ config('services.cloudflare.turnstile.site_key') }}"
></div>
In the HTML, we can see that we need to add a div element with a class of cf-turnstile. This class is automatically used by Cloudflare's JavaScript file to find the div element and replace it with the Turnstile widget. We're also passing the site key to the widget using the data-sitekey attribute.
Cloudflare refers to this approach as the "implicit" approach because the Turnstile challenge will automatically trigger when the page is initially loaded. However, Turnstile also supports an "explicit" approach. This approach allows you to manually trigger the Turnstile widget using JavaScript. For the purposes of this article, we'll use the implicit approach, but if you'd like to find out more about the explicit approach, you can read about it in the Turnstile documentation.
Turnstile also supports the option to specify a callback function that will be run when the user successfully completes the challenge. This callback function is specified using the data-callback attribute. For example, if we wanted to run a function called window.onTurnstileSuccess when the user successfully completes the challenge, we could add the following to our HTML:
<div class="cf-turnstile"
     data-sitekey="{{ config('services.cloudflare.turnstile.site_key') }}"
     data-callback="onTurnstileSuccess"
></div>
Running a callback after a successful challenge is useful for things like enabling a submit button on a form that was previously disabled.
Let's take a look at what this might look like if we added it to a basic registration form:
<html>
    <head>
        <!-- ... -->

        <script src="https://challenges.cloudflare.com/turnstile/v0/api.js" async defer></script>
    </head>

    <body>
        <form method="POST" action="{{ route('register') }}">
            @csrf

            <!-- Name -->
            <div>
                <label for="name">Name</label>
                <input id="name" type="text" name="name"/>
            </div>

            <!-- Email Address -->
            <div>
                <label for="email">Email</label>
                <input id="email" type="email" name="email"/>
            </div>

            <!-- Password -->
            <div>
                <label for="password">Password</label>
                <input id="password" type="password" name="password"/>
            </div>

            <!-- Confirm Password -->
            <div>
                <label for="password_confirmation">Confirm Password</label>
                <input id="password_confirmation" type="password" name="password_confirmation"/>
            </div>

            <div class="cf-turnstile"
                 data-sitekey="{{ config('services.cloudflare.turnstile.site_key') }}"
                 data-callback="onTurnstileSuccess"
            ></div>

            <button type="submit" disabled>
                Register
            </button>
        </form>
    </body>
</html>
As we can see in the registration form, we've specified that the Turnstile widget should be displayed after the "Confirm Password" field and before the "Register" button. We've also specified that the window.onTurnstileSuccess function should be run when the user successfully completes the challenge. If the challenge is successful, and Turnstile deems the user to be human, it will add a hidden cf-turnstile-response field to the form. This field will contain a code that can be used to verify the challenge on the server-side.
To provide an example of what this widget looks like in a browser, here's how it would look when added to the default Laravel Breeze registration form:
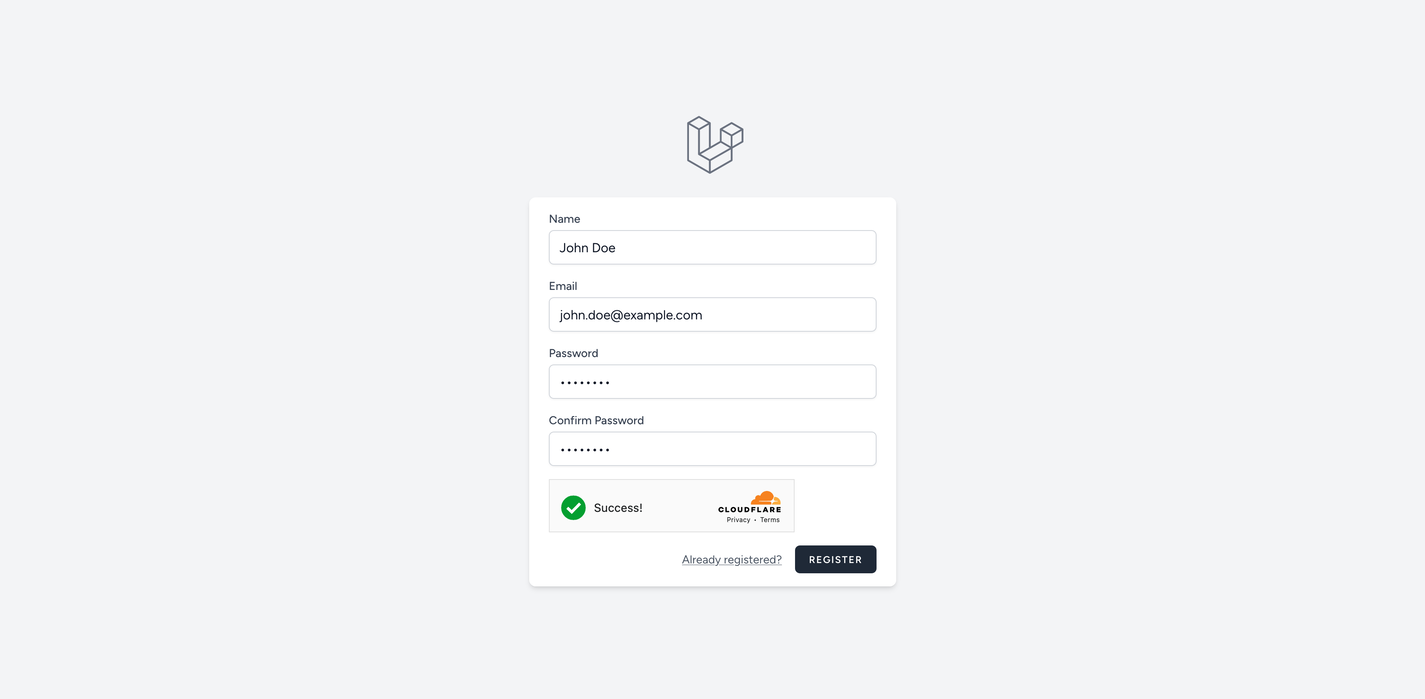
You may have also spotted in the HTML above that we added the disabled attribute to the "Register" button. This is because we want to prevent the user from submitting the form until they've successfully completed the Turnstile challenge. To enable the button once the user has completed the challenge, we can add the following JavaScript to our page:
window.onTurnstileSuccess = function (code) {
    document.querySelector('form button[type="submit"]').disabled = false;
}
In this example, we're selecting the "Register" button on the page and removing the disabled attribute so that it can be clicked.
If you're using the default JavaScript file that comes in the Laravel installation, you can add this code to the resources/js/app.js file.
Adding server-side validation
It's important to know that adding the client-side challenge isn't sufficient to prevent malicious requests to the registration form's endpoint. All the client-side code does is verify that the user is human and then add a hidden field to the form. At this stage, it's still possible for a malicious user to send a request to the registration form's endpoint without completing the Turnstile challenge.
To prevent this, we need to add server-side validation that checks the Turnstile code added to the form. We'll make an API request to the Turnstile API to verify the code. If the code is valid, we'll allow the request to continue. If the code is invalid, this suggests that the request was sent by a bot, and we'll return an HTTP 400 response.
To implement this, we'll create a new middleware class called HasValidCaptcha by running the following Artisan command in our project root:
php artisan make:middleware HasValidCaptcha
Running this command should have created a new app/Http/Middleware/HasValidCaptcha.php file. Let's make some updates to this file and then discuss what's being done:
declare(strict_types=1);

namespace App\Http\Middleware;

use Closure;
use Illuminate\Http\Request;
use Illuminate\Support\Facades\Http;
use Symfony\Component\HttpFoundation\Response;

final readonly class HasValidCaptcha
{
    public function handle(Request $request, Closure $next): Response
    {
        // Attempt to resolve the Turnstile code from the request. If it doesn't
        // exist then return an HTTP 400 response.
        $turnstileCode = $request->input('cf-turnstile-response') ?? abort(400);

        if (!$this->turnstileCodeIsValid($turnstileCode)) {
            abort(400);
        }

        return $next($request);
    }

    /**
     * Make an HTTP call to the Turnstile API to verify the code.
     */
    private function turnstileCodeIsValid(string $turnstileCode): bool
    {
        return Http::post(
            url: 'https://challenges.cloudflare.com/turnstile/v0/siteverify',
            data: [
                'secret' => config('services.cloudflare.turnstile.site_secret'),
                'response' => $turnstileCode,
            ]
        )->json('success');
    }
}
In the handle method of the middleware, we're first attempting to get the cf-turnstile-response field from the request body. This fields contains the code added to the form when the user successfully completed the Turnstile challenge. If this field doesn't exist, we return an HTTP 400 response.
We then send this code to the Turnstile API to verify that it's valid. To do this, we make a POST request to the https://challenges.cloudflare.com/turnstile/v0/siteverify endpoint and pass the site secret (that we added to our .env file earlier) in a secret field, and the Turnstile code (generated when the user completed the challenge) in a response field.
If the Turnstile code is valid, the Turnstile API will return a JSON response with a status code of 200 that looks something like this:
{
  "success": true,
  "error-codes": [],
  "challenge_ts": "2023-09-11T14:40:06.952Z",
  "hostname": "turnstile-test.test",
  "action": "",
  "cdata": "",
  "metadata": {
    "interactive": true
  }
}
If the Turnstile code is invalid (for example, if the code has already been used before, or it's not a valid code), the Turnstile API will return a JSON response with a status code of 200 that looks something like this:
{
  "success": false,
  "error-codes": [
    "timeout-or-duplicate"
  ],
  "messages": []
}
Therefore, we can use the success field to determine whether the Turnstile code is valid. If the code is valid, we allow the request to continue. If the code is invalid, we return an HTTP 400 response.
Now that we've created the middleware, we can apply it to any routes that we want to protect using Turnstile. For example, if we had a RegisterController used for registering new users, we could add the middleware to the route in the routes/web.php file:
use App\Http\Controllers\Auth\RegisterController;
use App\Http\Middleware\HasValidCaptcha;
use Illuminate\Support\Facades\Route;

Route::middleware('guest')->group(function () {
    Route::post('register', RegisterController::class)->middleware(HasValidCaptcha::class);
    // ...
});

// ...
Testing Turnstile code in Laravel
Like any other part of your application, it's vital that you test your Turnstile code to ensure it's working as expected. This is especially important because the HasValidCaptcha middleware is a security feature so we need to be sure that we're not introducing any vulnerabilities.
Using Turnstile's testing keys
During your development and debugging, you may want to use Turnstile's testing keys. These keys are designed so that you can use them to simulate different scenarios. For example, you can use them to simulate a successful challenge, a failed challenge, or a token that has already been used.
It's important to remember that these keys should only be used in your development environment. They should never be used in a production environment.
You can add the following site keys to your application (by replacing the TURNSTILE_SITE_KEY in your .env file) to simulate the different scenarios on the client-side:
| Site key | Description | Visibility |
|---|---|---|
| 1x00000000000000000000AA | Always passes | Visible |
| 2x00000000000000000000AB | Always blocks | Visible |
| 1x00000000000000000000BB | Always passes | Invisible |
| 2x00000000000000000000BB | Always blocks | Invisible |
| 3x00000000000000000000FF | Forces an interactive challenge | Visible |
If you'd like to simulate any scenarios in the server-side validation stage, you can use the following Turnstile codes (by replacing the TURNSTILE_SITE_SECRET in your .env file):
| Secret key | Description |
|---|---|
| 1x0000000000000000000000000000000AA | Always passes |
| 2x0000000000000000000000000000000AA | Always fails |
| 3x0000000000000000000000000000000AA | Returns a "token already spent" error |
Writing automated tests
In addition to using Turnstile's testing keys, it's important that you write automated tests for your Turnstile-related code. By doing this, you'll have more confidence that your code is working as expected and is securing your application correctly.
Let's take a look at how we might write some tests in PHPUnit for our HasValidCaptcha middleware.
We'll want to test the following three scenarios:
- The request continues if the Turnstile code is valid.
- An error is returned if the Turnstile code is invalid.
- An error is returned if the Turnstile code is missing from the request.
We'll start by writing the test for the first scenario, and then we'll discuss what's being done. This test will look something like this:
declare(strict_types=1);

namespace Tests\Feature\Middleware;

use App\Http\Middleware\HasValidCaptcha;
use Illuminate\Http\Client\Request as ClientRequest;
use Illuminate\Http\Request;
use Illuminate\Support\Facades\File;
use Illuminate\Support\Facades\Http;
use PHPUnit\Framework\Attributes\Test;
use Symfony\Component\HttpFoundation\Response;
use Symfony\Component\HttpKernel\Exception\HttpException;
use Tests\TestCase;

final class HasValidCaptchaTest extends TestCase
{
    protected function setUp(): void
    {
        parent::setUp();

        Http::preventStrayRequests();

        config(['services.cloudflare.turnstile.site_secret' => 'dummy-secret-here']);
    }

    #[Test]
    public function request_continues_if_the_captcha_code_is_valid(): void
    {
        // Fetch the JSON fixture that contains a valid Turnstile response.
        // We then tell Http::fake() to return this JSON fixture when the
        // request is sent to the Turnstile API.
        $jsonFixture = File::json(base_path('tests/_data/Fixtures/Turnstile/success.json'));

        Http::fake([
            'https://challenges.cloudflare.com/turnstile/v0/siteverify' => Http::response($jsonFixture),
        ]);

        // Create a dummy request that contains the Turnstile code.
        $request = Request::create(uri: 'register', parameters: [
            'cf-turnstile-response' => 'valid-captcha-code',
        ]);

        // Pass the request through the middleware.
        $response = (new HasValidCaptcha())->handle(
            request: $request,
            next: fn () => new \Illuminate\Http\Response('success')
        );

        // Assert that the response is HTTP 200 and the response body is "success".
        // If this happens, it means the request was allowed to continue.
        $this->assertSame(Response::HTTP_OK, $response->getStatusCode());
        $this->assertSame('success', $response->getContent());

        // Assert the request was sent to the Turnstile API with the correct data.
        Http::assertSent(static fn(ClientRequest $request): bool =>
            $request->url() === 'https://challenges.cloudflare.com/turnstile/v0/siteverify'
                && $request['secret'] === 'dummy-secret-here'
                && $request['response'] === 'valid-captcha-code'
        );
    }

    // ...
}
In the setup of the test (in the setUp method), we're starting by calling Http::preventStrayRequests(). This method helps to ensure that we're only making HTTP requests that we've explicitly stated we want to make. If any other requests are made, a \RuntimeException will be thrown, and the test will fail.
We then add a dummy value to the services.cloudflare.turnstile.site_secret config key. This value will be sent in the HTTP request to the Turnstile API. We'll use this value later in the test to assert that the request was sent with the correct data.
Next, we begin the test by using Http::fake() and defining that all calls to the https://challenges.cloudflare.com/turnstile/v0/siteverify endpoint should return the JSON fixture that we've defined in a tests/_data/Fixtures/Turnstile/success.json file. This JSON fixture contains a valid Turnstile response for a successful verification, similar to the one we looked at earlier.
We then create an instance of the Illuminate\Http\Client\Request class that contains a dummy Turnstile code in the cf-turnstile-response field. Later in the test, we'll assert that the code was sent in the HTTP request to the Turnstile API.
We then pass our Illuminate\Http\Client\Request object to the HasValidCaptcha middleware and call the handle method. We also specify a callback for the middleware that should be executed if the middleware allows access and deems the CAPTCHA code to be valid. We use this in the assertions to ensure that the correct status code and content were returned.
As a final check, we also ensure that we made the correct request to the Turnstile API. We do this by using Http::assertSent() and passing a callback that asserts that the request was sent to the correct URL and contains the correct data.
Let's write a test for the second scenario (where the Turnstile code is invalid) and then discuss what's being done:
declare(strict_types=1);

namespace Tests\Feature\Middleware;

use App\Http\Middleware\HasValidCaptcha;
use Illuminate\Http\Client\Request as ClientRequest;
use Illuminate\Http\Request;
use Illuminate\Support\Facades\File;
use Illuminate\Support\Facades\Http;
use PHPUnit\Framework\Attributes\Test;
use Symfony\Component\HttpFoundation\Response;
use Symfony\Component\HttpKernel\Exception\HttpException;
use Tests\TestCase;

final class HasValidCaptchaTest extends TestCase
{
    protected function setUp(): void
    {
        parent::setUp();

        Http::preventStrayRequests();

        config(['services.cloudflare.turnstile.site_secret' => 'dummy-secret-here']);
    }

    // ...

    #[Test]
    public function error_is_returned_if_the_captcha_code_is_invalid(): void
    {
        $this->expectException(HttpException::class);

        // Fetch the JSON fixture that contains a failure Turnstile response.
        // We then tell Http::fake() to return this JSON fixture when the
        // request is sent to the Turnstile API.
        $jsonFixture = File::json(base_path('tests/_data/Fixtures/Turnstile/failure.json'));

        Http::fake([
            'https://challenges.cloudflare.com/turnstile/v0/siteverify' => Http::response($jsonFixture),
        ]);

        // Create a dummy request that contains the Turnstile code.
        $request = Request::create(uri: 'register', parameters: [
            'cf-turnstile-response' => 'invalid-captcha-code',
        ]);

        // Pass the request through the middleware.
        $response = (new HasValidCaptcha())->handle(
            request: $request,
            next: fn () => new \Illuminate\Http\Response('success')
        );

        // Assert that the response is HTTP 400.
        $this->assertSame(Response::HTTP_BAD_REQUEST, $response->getStatusCode());

        // Assert the request was sent to the Turnstile API with the correct data.
        Http::assertSent(static fn(ClientRequest $request): bool =>
            $request->url() === 'https://challenges.cloudflare.com/turnstile/v0/siteverify'
            && $request['secret'] === 'dummy-secret-here'
            && $request['response'] === 'valid-captcha-code'
        );
    }

    // ...
}
The setup of the test is very similar to the previous test. However, in this case, we're using a JSON fixture that contains a failure Turnstile response. This is done so that we can simulate a scenario where the Turnstile code is invalid. You may have also noticed that we're also using the expectException method so that we can assert that an HttpException is thrown if the Turnstile code is invalid.
We then create our Illuminate\Http\Client\Request instance and pass it to the middleware so we can inspect the response. In this case, we're asserting that our middleware response contains an HTTP 400 status code to indicate that the request was invalid.
Finally, we're asserting that the request was made to the Turnstile API with the correct data.
Let's write our final test for the third scenario (where the Turnstile code is missing from the request) and then discuss what's being done:
declare(strict_types=1);

namespace Tests\Feature\Middleware;

use App\Http\Middleware\HasValidCaptcha;
use Illuminate\Http\Client\Request as ClientRequest;
use Illuminate\Http\Request;
use Illuminate\Support\Facades\File;
use Illuminate\Support\Facades\Http;
use PHPUnit\Framework\Attributes\Test;
use Symfony\Component\HttpFoundation\Response;
use Symfony\Component\HttpKernel\Exception\HttpException;
use Tests\TestCase;

final class HasValidCaptchaTest extends TestCase
{
    // ...

    #[Test]
    public function error_is_returned_if_the_captcha_code_is_missing_from_the_request(): void
    {
        $this->expectException(HttpException::class);

        Http::fake();

        // Create a dummy request that doesn't contain a Turnstile code.
        $request = Request::create(uri: 'register');

        // Pass the request through the middleware.
        $response = (new HasValidCaptcha())->handle(
            request: $request,
            next: fn () => new \Illuminate\Http\Response('success')
        );

        // Assert that the response is HTTP 400.
        $this->assertSame(Response::HTTP_BAD_REQUEST, $response->getStatusCode());

        // Assert that no request was sent to the Turnstile API.
        Http::assertNothingSent();
    }
}
In this test, we're using the expectException method so that we can assert an Symfony\Component\HttpKernel\Exception\HttpException is thrown.
We're then using the Http::fake() method to prevent any HTTP requests from being made. You may have noticed that this looks different to the previous tests. We aren't faking any particular URLs; instead, we're preventing all requests from being made because we don't expect any requests to be made to the Turnstile API if the Turnstile code is missing from the request.
Next, we create our Illuminate\Http\Client\Request instance (without the cf-turnstile-response field) and pass it to the middleware. We then assert that the middleware response contains an HTTP 400 status code to indicate that the request was invalid.
Finally, we assert that no requests were sent to the Turnstile API. We do this by using the Http::assertNothingSent() method.
Conclusion
In this article, we've covered what CAPTCHAs are, the advantages and disadvantages of using them, and alternative CAPTCHA solutions. We then learned how to use Cloudflare's Turnstile CAPTCHA solution in our Laravel applications to secure a form. We also learned how to write tests for our Turnstile code to enhance confidence in our code.
Hopefully, you now feel comfortable enough to attempt to implement Turnstile in your own Laravel application.

Written by
Ashley AllenAshley is a freelance Laravel web developer who loves contributing to open-source projects and building exciting systems to help businesses succeed.