Writing comprehensive integration tests for Django applications
Integration testing verifies that multiple components of your Django application work together correctly. Unlike writing unit tests that examine isolated functions or methods, the Django integration testing process validates entire user workflows, tests database transactions, and system interactions. Django's testing framework provides specialized tools for creating realistic automated test scenarios that mirror production environments. Integrating automated testing into your web development process catches bugs earlier when they're cheaper to fix.
In this tutorial, I will show you how to implement integration testing in a Django app using the Django built-in testing tool.
For the coding aspect, we will work with an already built blog application, then go through the process of testing some of the application workflows. You can find the application on GitHub.
What is integration testing in Django?
Integration testing builds confidence that different components of your Django application work correctly when combined. Rather than testing individual units in isolation, it focuses on the interactions between models, views, forms, and external services, including data validation across these components. In unit tests, you mock dependencies and test single functions or methods, but that is not the case here. Integration tests exercise multiple layers of your application simultaneously.
Integration testing in a Django project is used to validate workflows that span multiple parts of your application. These test coverage catch issues that unit tests miss, such as database constraint violations that only surface when multiple models interact, serialization problems between views and templates, or authentication flows that break when middleware processes requests differently than expected. Integration tests also validate that your application's configuration works correctly across different environments.
Understanding Django integration testing in a real project
Integration tests in the Django framework verify that your models, views, forms, and templates work together properly to deliver expected functionality. These tests simulate real user interactions by making HTTP requests to your application and examining the complete response, including status codes, content, and side effects like database changes.
Django's test framework provides specialized tools for integration testing through test case classes like TestCase. These provide the foundation, along with the test client. The test client acts as a dummy web browser, allowing you to make GET and POST requests, follow redirects, and examine responses without running a web server. This approach tests your application's behavior from the user's perspective while maintaining the speed and isolation necessary for automated testing.
The primary difference between integration and unit testing lies in scope. While unit tests might verify that a model's clean() method raises the correct validation error, an integration test ensures that submitting invalid form data through a view returns appropriate error messages to the template and maintains database consistency.
Writing integration tests for registration and login flow
User authentication is the gateway to your application. A broken signup or login flow can completely prevent access to your platform. Testing the complete authentication journey ensures that users can create accounts, log in, access protected resources, and log out when needed.
Our authentication flow follows a typical pattern that millions of web applications use:
-
Signup: A new user creates an account
-
Auto-login: After successful signup, the user is automatically logged in
-
Protected Access: The authenticated user can access restricted pages
-
Manual Login: The user can log back in with their credentials
-
Re-authentication Verification: Protected pages remain accessible after manual login
This flow represents the real-world experience of your users, making it an ideal candidate for integration testing.
Each test case in our authentication suite validates a specific user journey, from successful signup to handling invalid credentials. Before diving into the test cases, we need to set up our test environment.
from django.test import TestCase, Client, override_settings

from django.contrib.auth.models import User

from django.urls import reverse

from django.core.files.uploadedfile import SimpleUploadedFile

from .models import Post

import io

from PIL import Image

import cloudinary.uploader

class UserRegistrationAndLoginFlowTest(TestCase):

    def setUp(self):

        self.client = Client()

        self.signup_url = reverse('signup')

        self.login_url = reverse('login')

        self.post_create_url = reverse('post_create')

        self.my_posts_url = reverse('my_posts')

        self.user_data = {

            'username': 'testuser',

            'password1': 'ComplexPass123!',

            'password2': 'ComplexPass123!',

        }
In the code above, the def setUp method runs before each test method, initializing the test client, creating test users, and preparing URLs needed across multiple tests.
The Client() object simulates a browser, allowing us to make HTTP requests and follow redirects. We use reverse() to generate URLs dynamically, ensuring our tests remain valid even if URL patterns change.
The heart of our authentication test verifies the entire user journey in a single, cohesive flow:
# ...

    def test_complete_user_journey(self):

        # Step 1: Signup and verify auto-login

        response = self.client.post(self.signup_url, self.user_data)

        self.assertEqual(response.status_code, 302)

        self.assertRedirects(response, reverse('post_list'))
When a user signs up, we expect two things: the account is created, and the user is automatically logged in. Checking the response status code of 302 confirms the redirect occurred, which is Django's standard behavior after a successful form submission.
We then verify that the user was created in the database and can immediately access protected resources:
# ...

    def test_complete_user_journey(self):

        # ...


        response = self.client.get(self.my_posts_url)

        self.assertEqual(response.status_code, 200)
A response status code of 200 means the page loaded successfully. If the user weren't logged in, they would be redirected to the login page instead.
Finally, we test that users can log back in with their credentials:
# ...

    def test_complete_user_journey(self):

        # ...

        # Step 3: Manual login

        login_data = {

            'username': 'testuser',

            'password': 'ComplexPass123!',

        }

        response = self.client.post(self.login_url, login_data)


        # Step 4: Verify protected access

        response = self.client.get(self.my_posts_url)

        self.assertEqual(response.status_code, 200)

        self.assertTrue(response.context['user'].is_authenticated)
The test_complete_user_journey test case verifies the entire authentication flow in a single execution.
Comprehensive testing includes failure scenarios as well. When passwords don't match, the form should be re-displayed (status 200), and no user should be created. Similarly, testing invalid login credentials ensures your error handling works correctly.
class UserRegistrationAndLoginFlowTest(TestCase):

# ...

    def test_invalid_signup(self):

        invalid_data = {

            'username': 'testuser',

            'password1': 'ComplexPass123!',

            'password2': 'DifferentPass456!',

        }

        response = self.client.post(self.signup_url, invalid_data)

        self.assertEqual(response.status_code, 200)

        self.assertFalse(User.objects.filter(username='testuser').exists())
Each test method in our test class validates a specific aspect of the authentication workflow, from successful registration to error handling. When passwords don't match, the form should be re-displayed (status 200), and no user should be created. Similarly, we write tests for invalid login credentials to ensure your error handling works correctly.
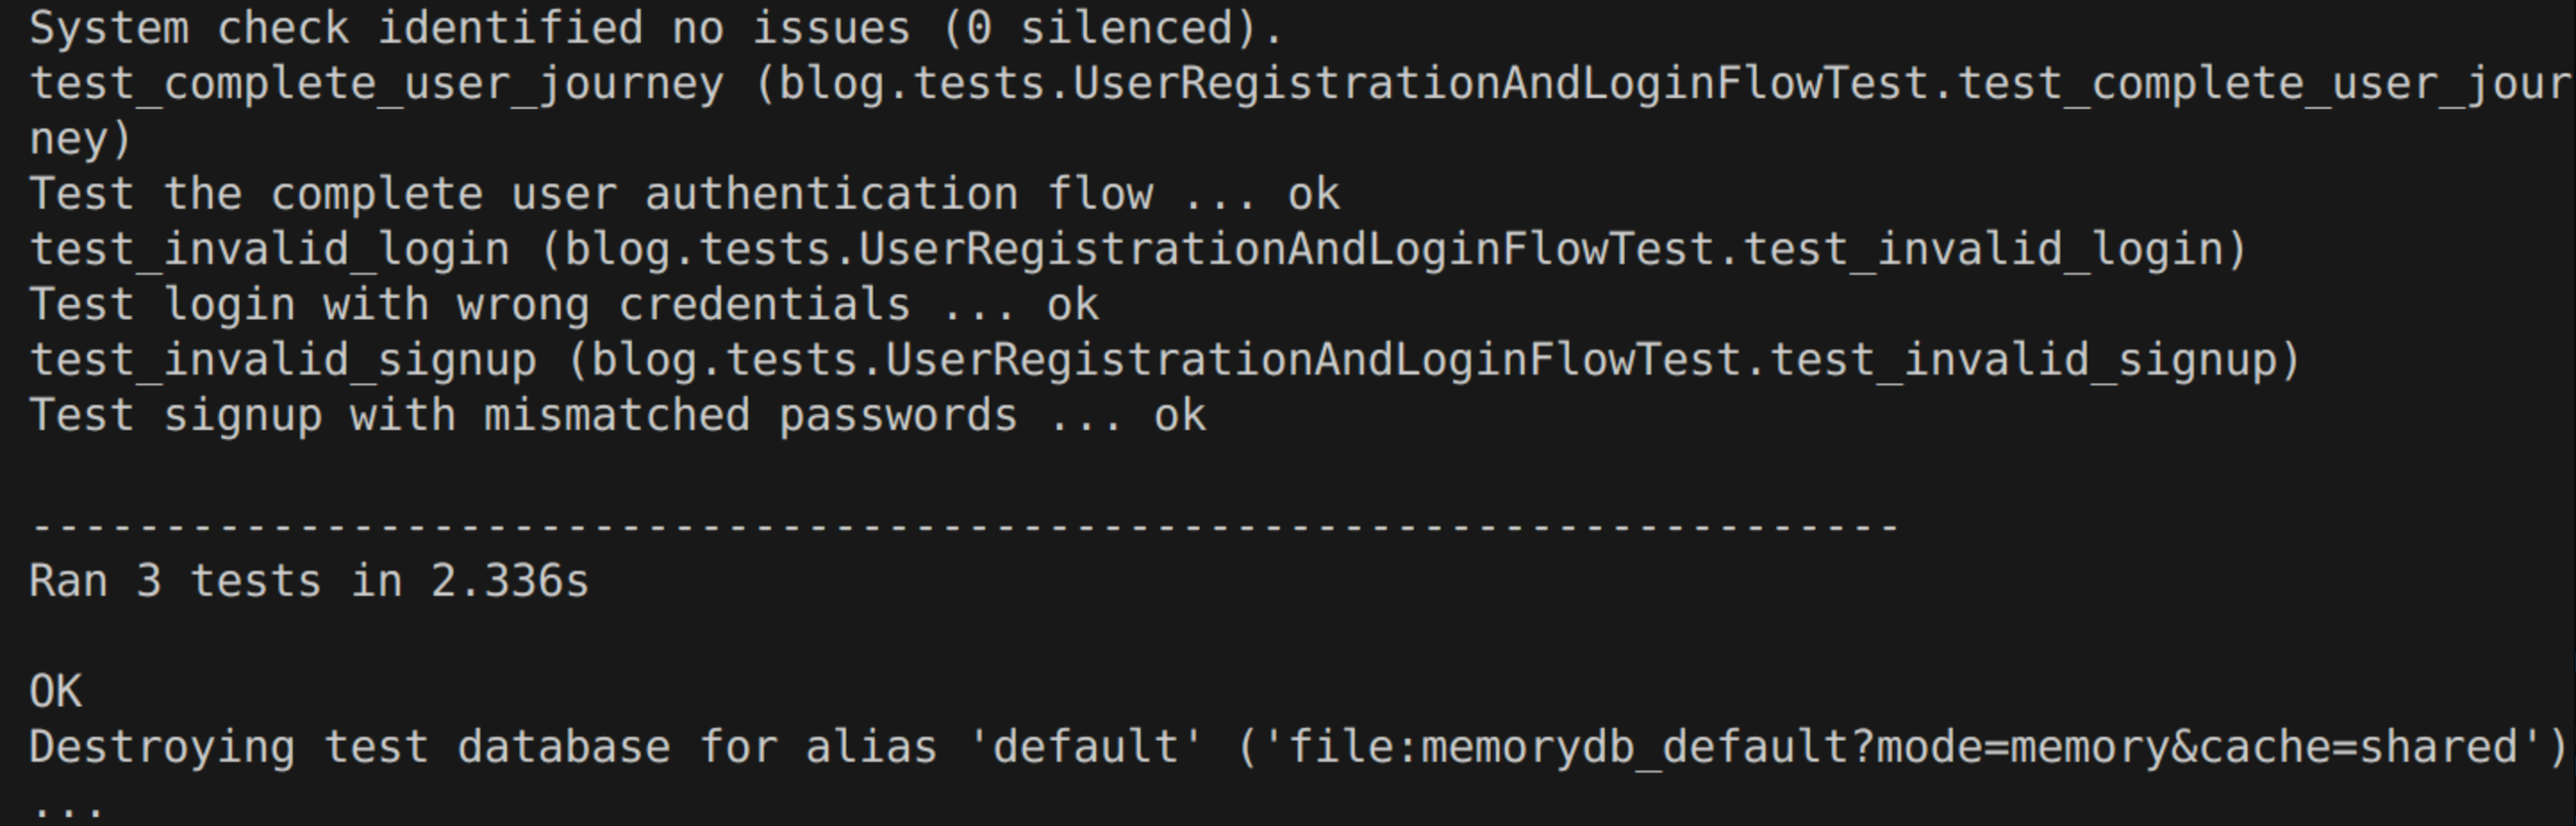
Now, execute a test run with the following command at the root directory.
python manage.py test blog --verbosity=2
Your expected results should look something like this:
Testing external service integrations
Sometimes you might come across situations where you need to write integration tests for features that in include one external service or the other. In this project, we are working with Cloudinary for uploading images. Here we will test image upload to Cloudinary. Our Cloudinary integration includes multiple test cases covering image creation, display, update, and deletion.
The test method workflow will be upload image → display image → update uploaded image. Testing this integration requires balancing thoroughness with practicality.
Understanding the image upload workflow
Our image upload integration involves several steps:
-
User selects an image file
-
Browser submits form with multipart/form-data
-
Django receives and validates the file
-
Cloudinary SDK uploads the image to their servers
-
Cloudinary returns image metadata (URL, dimensions, etc.)
-
Django saves the post with the Cloudinary image reference
-
Image URLs are embedded in rendered templates
In your tests.py file, paste in the following code:
class CloudinaryImageUploadIntegrationTest(TestCase):

    def setUp(self):

        self.client = Client()


        self.user = User.objects.create_user(

            username='photographer',

            password='PhotoPass123!'

        )

        self.client.login(username='photographer', password='PhotoPass123!')


        self.create_url = reverse('post_create')
We'll create a user nicknamed "photographer" to reflect this test's focus on visual content.
Rather than storing test image files in our repository, we generate them on the fly:
class CloudinaryImageUploadIntegrationTest(TestCase):

#...

    def create_test_image(self):

        image = Image.new('RGB', (100, 100), color='red')

        image_file = io.BytesIO()

        image.save(image_file, format='JPEG')

        image_file.seek(0)


        return SimpleUploadedFile(

            name='test_image.jpg',

            content=image_file.read(),

            content_type='image/jpeg'

        )
This helper method uses Pillow (PIL) to create a simple 100x100 red square. The image is saved to a BytesIO buffer, which acts like a file in memory. SimpleUploadedFile wraps this buffer in Django's file upload interface.
This approach keeps our test suite lightweight and ensures consistent test data.
The key to fast integration tests is mocking external API calls:
# ...

    @patch('cloudinary.uploader.upload')

    def test_post_creation_with_image_upload(self, mock_upload):

        mock_upload.return_value = {

            'public_id': 'test_public_id_123',

            'url': 'https://res.cloudinary.com/demo/image/upload/test_image.jpg',

            'secure_url': 'https://res.cloudinary.com/demo/image/upload/test_image.jpg',

            'format': 'jpg',

            'width': 100,

            'height': 100,

        }
The @patch decorator intercepts calls to cloudinary.uploader.upload and returns our mock response instead of actually contacting Cloudinary's servers. This response mimics Cloudinary's actual API response structure.
Now we can test the upload workflow:
# ...

    @patch('cloudinary.uploader.upload')

    def test_post_creation_with_image_upload(self, mock_upload):

        # ...

        test_image = self.create_test_image()


        post_data = {

            'title': 'Post with Image',

            'content': 'This post has a beautiful featured image.',

            'status': 'published',

            'featured_image': test_image,

        }


        response = self.client.post(self.create_url, post_data, format='multipart')

        self.assertEqual(response.status_code, 302)
The format='multipart' parameter tells Django's test client to send the data as multipart/form-data, which is required for file uploads.
We then verify the integration worked:
# ...

    @patch('cloudinary.uploader.upload')

    def test_post_creation_with_image_upload(self, mock_upload):

        # ...

        post = Post.objects.get(title='Post with Image')

        self.assertEqual(post.author, self.user)

        self.assertTrue(post.featured_image)


        # Verify Cloudinary upload was called

        self.assertTrue(mock_upload.called)
In this test method, the post should have a featured_image, and our mock should have been called, confirming Django attempted to upload to Cloudinary.
A comprehensive integration test covers the entire image lifecycle:
class CloudinaryImageUploadIntegrationTest(TestCase):

#...

    @patch('cloudinary.uploader.upload')

    def test_complete_image_workflow(self, mock_upload):

        mock_upload.side_effect = [

            {

                'public_id': 'original_image_123',

                'url': 'https://res.cloudinary.com/demo/image/upload/original.jpg',

            },

            {

                'public_id': 'updated_image_456',

                'url': 'https://res.cloudinary.com/demo/image/upload/updated.jpg',

            }

        ]
Using side_effect with a list allows different responses for multiple calls. This simulates uploading an original image, then replacing it with an updated one.
CREATE with image:
#...

    @patch('cloudinary.uploader.upload')

    def test_complete_image_workflow(self, mock_upload):

        # ...

        test_image = self.create_test_image()

        post_data = {

            'title': 'Gallery Post',

            'content': 'A post showcasing my photography.',

            'status': 'published',

            'featured_image': test_image,

        }


        response = self.client.post(self.create_url, post_data, format='multipart')

        post = Post.objects.get(title='Gallery Post')

        self.assertTrue(post.featured_image)
Now write a test method to READ with image display:
#...

    @patch('cloudinary.uploader.upload')

    def test_complete_image_workflow(self, mock_upload):

        # ...

        detail_url = reverse('post_detail', kwargs={'slug': post.slug})

        response = self.client.get(detail_url)

        self.assertEqual(response.status_code, 200)

        self.assertContains(response, 'Gallery Post')
In a real scenario, we'd verifythat the Cloudinary URL appears in the response. With mocked data, we confirm the page renders successfully with the post containing an image reference.
UPDATE with new image:
#...

    @patch('cloudinary.uploader.upload')

    def test_complete_image_workflow(self, mock_upload):

        # ...

        new_image = self.create_test_image()

        edit_url = reverse('post_edit', kwargs={'slug': post.slug})

        updated_data = {

            'title': 'Gallery Post',

            'content': 'Updated with a new image.',

            'status': 'published',

            'featured_image': new_image,

        }


        response = self.client.post(edit_url, updated_data, format='multipart')


        # Verify upload was called twice (original + update)

        self.assertEqual(mock_upload.call_count, 2)
The call count confirms that replacing an image triggers a new upload, as expected.
Now we can test if we can DELETE all references to the image:
#...

    @patch('cloudinary.uploader.upload')

    def test_complete_image_workflow(self, mock_upload):

        # ...

        delete_url = reverse('post_delete', kwargs={'slug': post.slug})

        response = self.client.post(delete_url)


        self.assertFalse(Post.objects.filter(id=post.id).exists())
Deleting the post in this case only removes all references to the image. In a production system, you might also want to delete the image from Cloudinary to avoid storage costs.
Not every post needs an image, so this function will handle such a scenario:
#...

    def test_post_without_image(self):

        post_data = {

            'title': 'Text Only Post',

            'content': 'This post has no image, just text content.',

            'status': 'published',

        }


        response = self.client.post(self.create_url, post_data)


        post = Post.objects.get(title='Text Only Post')

        self.assertFalse(post.featured_image)
This verifies that our image field is truly optional and doesn't break the application when omitted.
Images should appear consistently across your application:
#...

    @patch('cloudinary.uploader.upload')

    def test_image_display_in_post_list(self, mock_upload):

        mock_upload.return_value = {

            'public_id': 'list_test_123',

            'url': 'https://res.cloudinary.com/demo/image/upload/list_test.jpg',

        }


        # Create post with image

        test_image = self.create_test_image()

        post_data = {

            'title': 'List Test Post',

            'content': 'Testing image in list view.',

            'status': 'published',

            'featured_image': test_image,

        }


        self.client.post(self.create_url, post_data, format='multipart')


        # Verify in post list

        post_list_url = reverse('post_list')

        response = self.client.get(post_list_url)

        self.assertContains(response, 'List Test Post')
This ensures images appear in list views, not just detail pages.
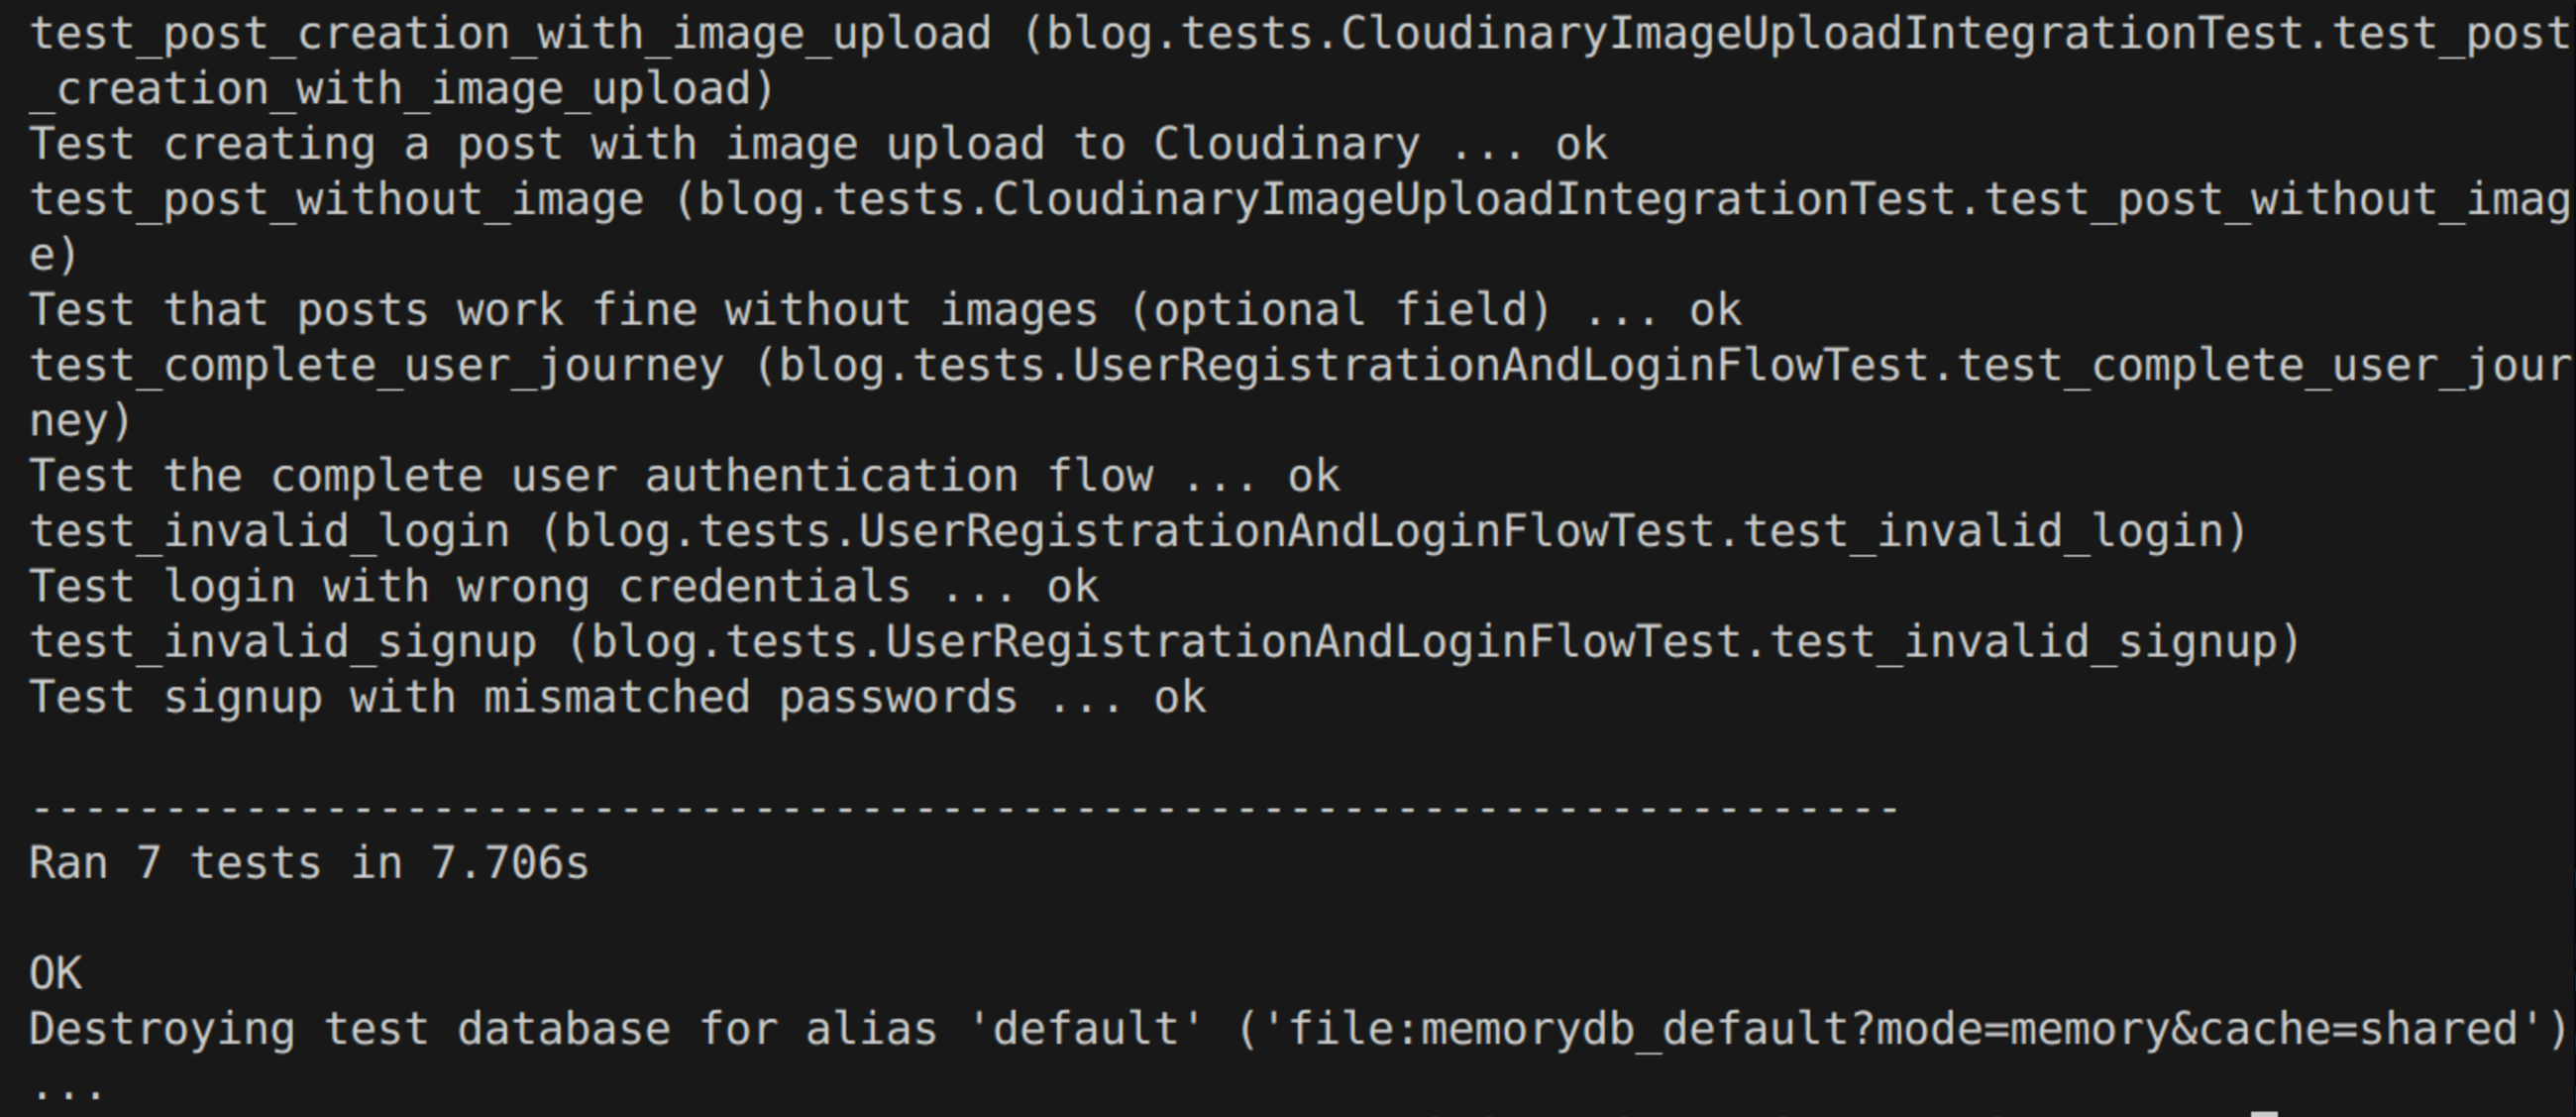
Now you can run tests with the following command:
python manage.py test blog --verbosity=2
Integration testing best practices
Integration testing is most effective when it validates the flow of data and control across multiple layers of the application. Here are some ways you can make this more effective.
Keep authentication flows under test
Integration tests should always cover the complete authentication cycle, including registration, login, and logout. Verifying redirects, session persistence, and access restrictions ensures that the application behaves consistently when user identity changes. Testing these flows reduces the likelihood of hidden regressions in areas that depend on authenticated sessions, such as posting content or accessing dashboards. These tests form the baseline for any further integration effort because all higher-level interactions typically depend on authenticated users.
Validate interactions between multiple components
Integration testing in Django should confirm that views, templates, models, and middleware interact as expected. Testing a feature such as creating a blog post involves validating not only the database write but also how the view handles form data, how the template renders it, and how middleware influences the request lifecycle. This end-to-end validation catches issues that unit tests cannot reveal, such as form validation mismatches or template context errors. The purpose is to verify that data flows correctly across all connected components. Effective data validation testing ensures that invalid input is rejected at the appropriate layer and produces meaningful error messages for users.
Manage test data and always clea nup
Tests that persist data across multiple tables or upload files require careful handling of setup and teardown. Using factories or fixtures creates predictable datasets that allow reliable assertions, while cleaning up after each test prevents unintended side effects. If the application integrates with external systems such as storage or messaging services, explicit cleanup routines ensure that resources are not consumed unnecessarily. Treating test data management as part of the test design itself improves reproducibility across environments.
Separate mocked and live integration runs
Not every integration test should communicate with external systems in real time. Most tests should use mocks or stubs to simulate third-party services, reducing execution time and cost. Live tests that make use of external APIs or storage should be isolated into a dedicated suite, clearly documented, and executed selectively. This separation ensures fast feedback during the web development workflow while still providing confidence that real integrations work correctly when required.
Integration tests are powerful when used correctly
The integration tests we’ve written today will pay dividends over time by catching hidden issues early, protecting against regressions, and giving you confidence to develop on your Django application confidently. That’s the real power of comprehensive Django integration testing: it turns refactoring from a risk into an opportunity for improvement. Each test case should focus on a single workflow or scenario to maintain clarity and make debugging easier when tests fail.
Some other common integration tests can be done for features that involve email notifications or background task processing. This way, you can verify that your message queuing system or email delivery works together as expected. You would catch integration issues before they impact users in production. The same principles apply when testing Django REST Framework APIs, where you'd verify that serializers, viewsets, and permissions work together correctly.
To take this further, clone the project repository and explore writing tests for additional workflows. The more real-world scenarios you cover, the stronger and more resilient your application becomes.
Like this article? Join the Honeybadger newsletter to learn about more concepts in Python and Django.

Written by
Muhammed AliMuhammed is a Software Developer with a passion for technical writing and open source contribution. His areas of expertise are full-stack web development and DevOps.