Almost every web application is built for end-users to view and use. The application deployment process is an important operation in software development because it allows software to fulfill its purpose.
This tutorial is primarily for software companies and developers to aid them in deploying and scaling web applications and services using a platform that automatically handles deployment with ease. Therefore, in this tutorial, we will be deploying a Django application to AWS. To do this, we will begin by cloning an existing Django project and then walk through a Django AWS deployment using the command line interface of one of its services, Elastic Beanstalk.
Why use Elastic Beanstalk?
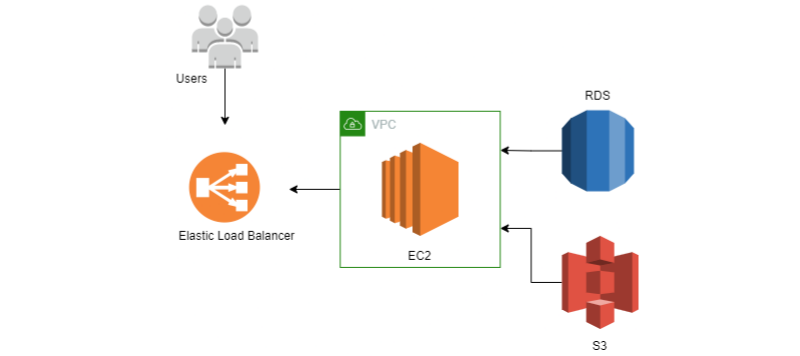
Elastic Beanstalk (EB) is a cloud deployment service provided by Amazon Web Services. It facilitates hosting Django on AWS by automating the creation of individual infrastructure components, including EC2 instances, auto-scaling, ELBs, security groups, and other infrastructure components. Using the AWS Management Console and command-line interface, the deployment process with EB is quick and simple. Although EB automatically handles your application’s deployment, the developer retains complete control of the AWS resources that run the application and may access them at any time. This is important, and it is a top benefit of using this service.
Let’s dive in!
Setup the sample project
Creating a virtual environment
To deploy Django on AWS, we will begin by setting up a virtual environment to host our project. The essence of a virtual environment is creating a separate container for our installed packages and dependencies.
pip install virtualenv
virtualenv env
Next, activate the virtual environment by running the following command:
For Windows:
env\Scripts\activate
For Mac/Linux:
source env/bin/activate
Virtual environment successfully activated!
Cloning the sample repository
Next, we will be cloning an existing repository built with the Django Rest Framework. This repo contains an e-commerce application with functionalities that allow users to add items to a cart, get a list of all the items in the cart, and edit and delete items in the shopping cart.
To clone the repo, run these lines of code in your terminal:
git clone https://github.com/Anitaachu/Django-E-commerce-RESTAPI.git
cd Django-E-commerce-RESTAPI
Once that is done, install the packages and dependencies used in this project. Create a requirements.txt file and install all packages. To do this, run the following commands:
pip freeze > requirements.txt
pip install -r requirements.txt
Create a new database with PostgreSQL that will run locally. You may also need to adjust the database option in settings.py, depending on your local Postgres configuration. Here is an example:
DATABASES = {
    'default': {
        'ENGINE': 'django.db.backends.postgresql_psycopg2',
        'NAME': 'ecommerceapi',
        'USER': '',
        'PASSWORD': '',
        'HOST': 'localhost',
        'PORT': '5432',
    }
}
Make sure you have all the dependencies installed and our app is running successfully. Then, run the following commands to migrate data to the database and create an admin user.
python manage.py makemigrations
python manage.py migrate
python manage.py createsuperuser
python manage.py runserver
Superuser created!
Testing the sample application
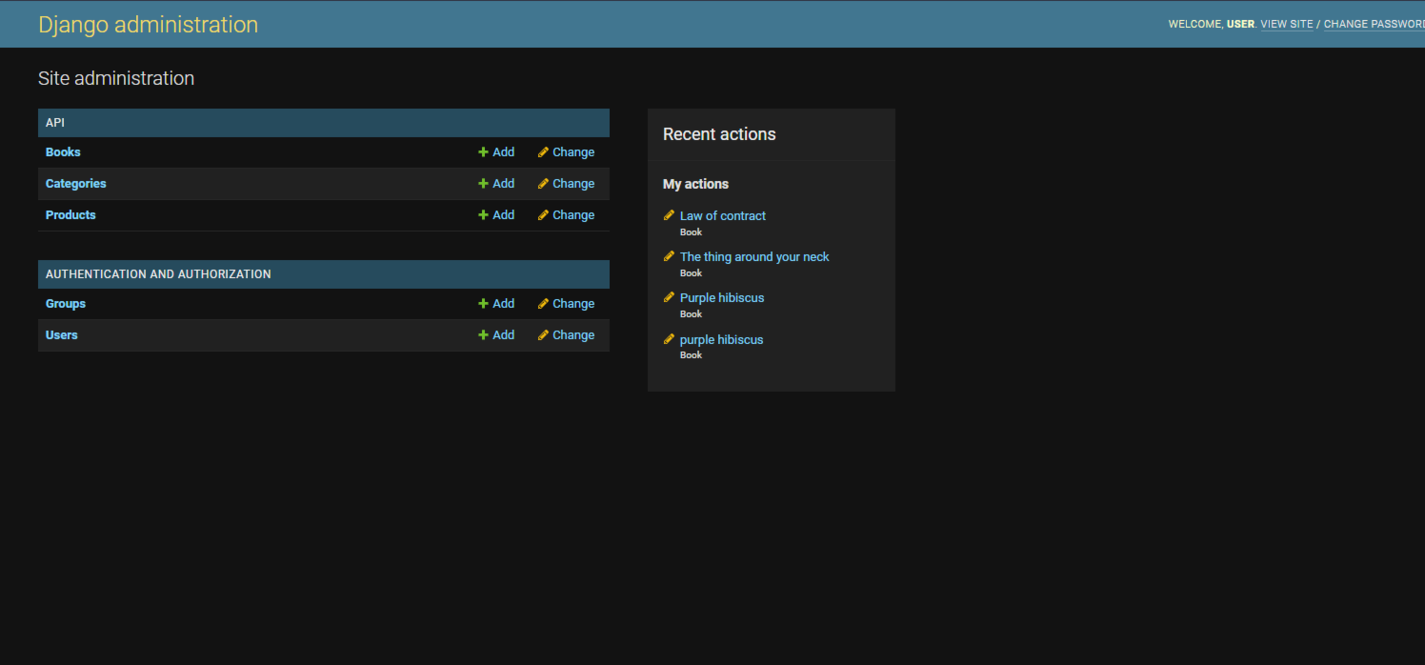
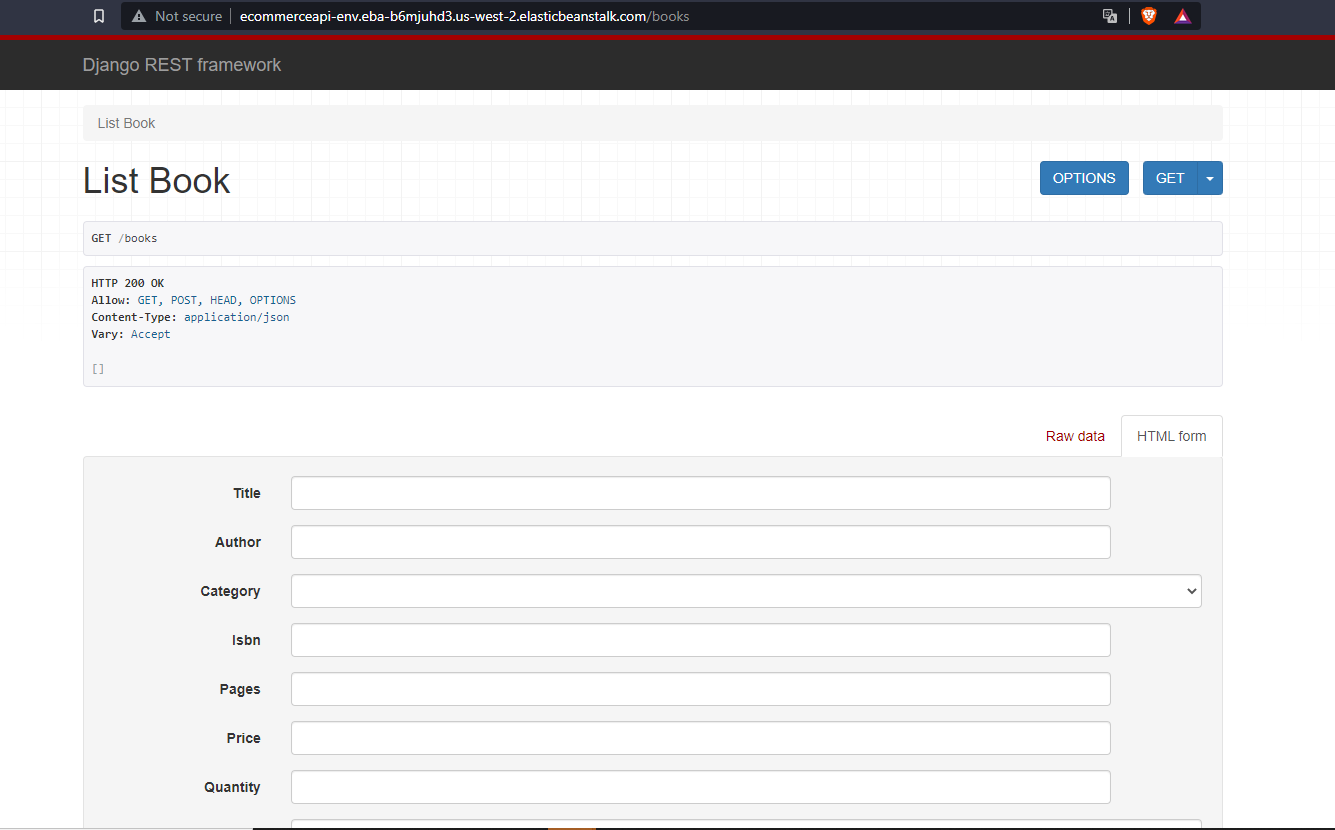
Now, we can test the application to ensure it’s working properly. To test locally, run python manage.py runserver, and in your browser, enter this endpoint: http://127.0.0.1:8000/books. You can also access the admin page at http://127.0.0.1:8000/admin/ to add new items to the home page.
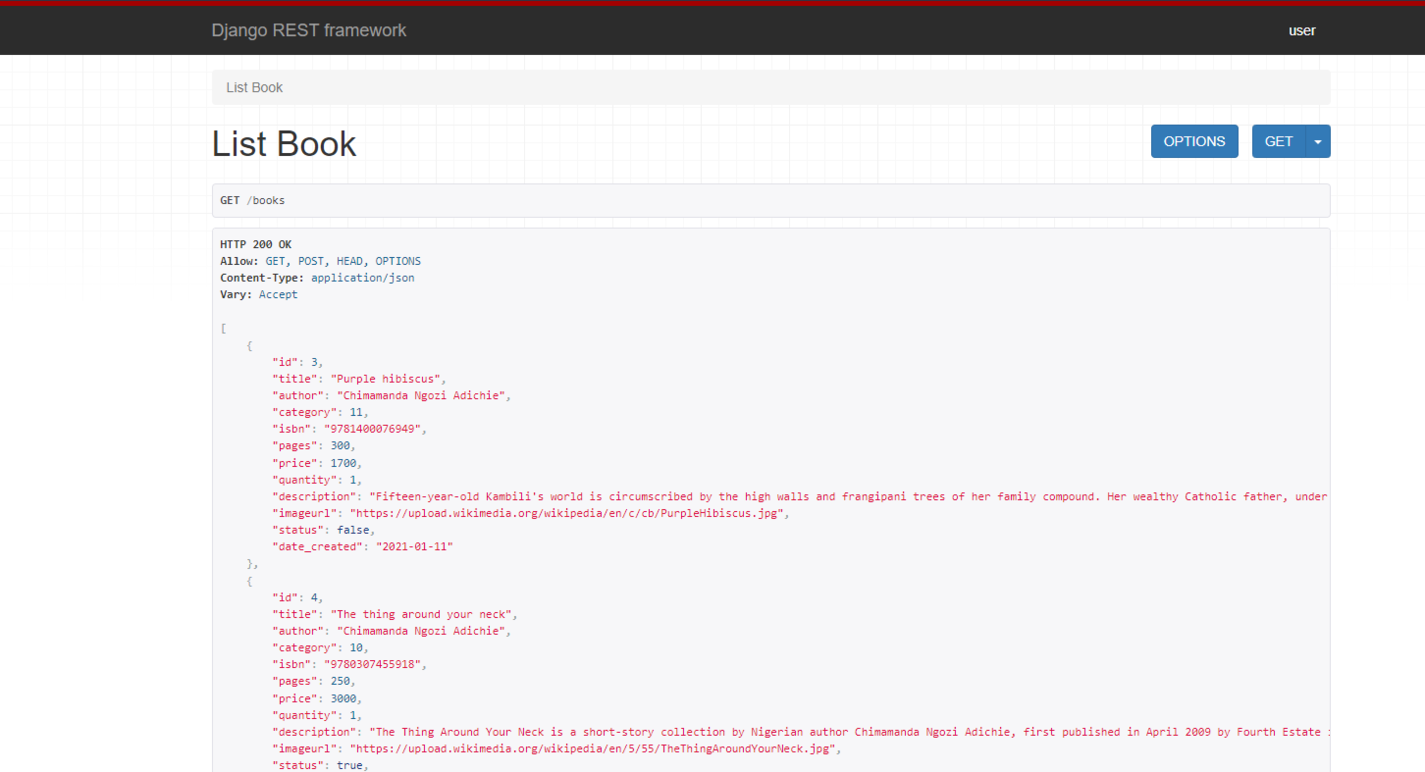
Kudos! Our application is running locally.
Briefly, before proceeding to deployment, we can deactivate our virtual environment since our Django project has been set up. You can reactivate the virtual environment whenever you need to install a package or run your application locally. Run this command to deactivate:
deactivate
Let’s deploy!

Setting up Elastic Beanstalk for our Django AWS deployment
Elastic Beanstalk provides the easiest and fastest way to deploy Django to AWS using the AWS Elastic Beanstalk Command Line Interface (EB CLI). EB CLI is an AWS Elastic Beanstalk application management and deployment tool.
Before proceeding, make sure you have an AWS account already set up.
Next, install the awsebcli using the pip command:
pip install awsebcli
The most recent version is 3.20.2 as of this writing.
Let’s confirm that the tool was installed successfully by running the following:
eb --version
Once it is successful, you should get this output or something similar, depending on the version available: EB CLI 3.20.2 (Python 3.9.6)
Next, we'll need to adjust some of the default configuration settings. We will be doing this by creating a .ebextensions folder and a configuration file:
Creating the .ebextensions folder
However, before initializing our EB application, let’s quickly create a .ebextensions folder that contains the commands required to get your Django application up and running on the server and set up your WSGI path.
mkdir .ebextensions
Inside this folder, we will create a file called django.config, which will contain these commands.
Add the following to your django.config:
option_settings:
  aws:elasticbeanstalk:container:python:
    WSGIPath: ecommerceapi.wsgi:application
Ensure you replace ‘ecommerceapi’ with the name of your application.
Initializing the Elastic Beanstalk application
Run the following command:
eb init
This command displays a series of questions that enable you to get started with Elastic Beanstalk and set up the applications.
You will be prompted for these on setup: Default region: For this project, our region will be set to option 3. User credentials: Next command requires your AWS Identity and Access Management (IAM) user credentials.
This option only comes up if you haven't set up your AWS CLI. However, if this option does not appear, it means this setup has been done already.
Select an application: This prompt usually has the name of your application in this manner:
 Select an application to use
 1) ecommerceApi
 2) [ Create new Application ]
 (default is 1): 1
Select the default application name. Python version: The CLI automatically recognizes that you’re running Python and asks for a confirmation. Select yes. Next, choose a version of Python you would want to use in the platform branch. Here we have three options:
  It appears you are using Python. Is this correct?
  (Y/n): Y
  Select a platform branch.
  1) Python 3.8 running on 64bit Amazon Linux 2
  2) Python 3.7 running on 64bit Amazon Linux 2
  3) Python 3.6 running on 64bit Amazon Linux (Deprecated)
  (default is 1):
Select the default version, which is version 3.8.
Code commit: Code commit is an Amazon Web Service used for hosting private Git repositories. Code commit is out of the scope of this tutorial, so select no. SSH instance: Yes, you should set up SSH for your instances. Select yes to set up SSH for your instance. Keypair: The next prompt will require you to create a new keypair or select an existing one. I will be using the default keypair.
Select a keypair.
1) aws-eb
2) [ Create new KeyPair ]
(default is 1):
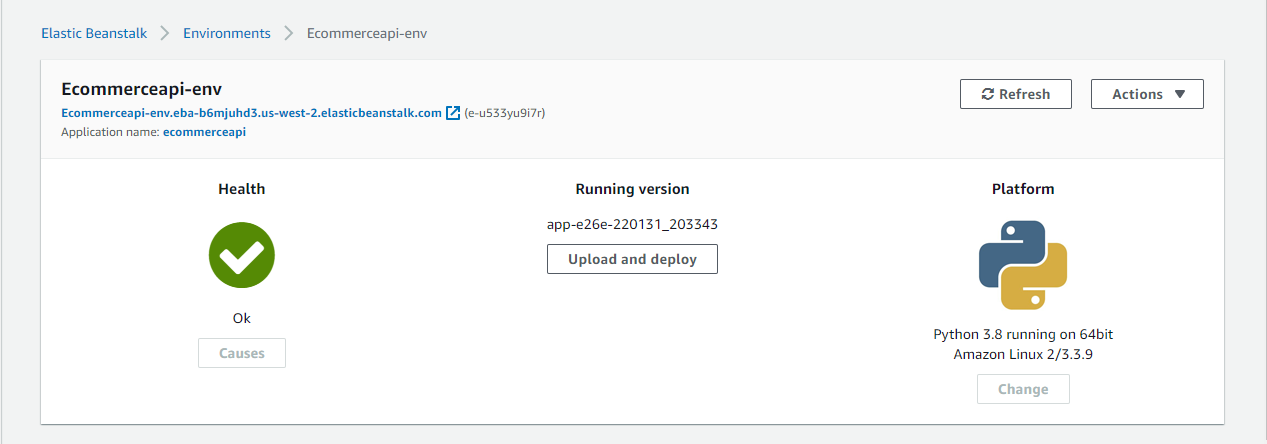
Once this is done, you can confirm that your application was successfully initialized on Elastic Beanstalk. Also, in your project directory, you will notice a folder, .elasticbeanstalk, which has been automatically created. **Inside this folder is a file named config.yml, which contains our EB CLI setup for future use.
N.B: If you need to restart the initialization of this project for any reason, delete the .elasticbeanstalk folder and run eb init again to alter any settings.
Creating an Elastic Beanstalk environment
Next, we will be creating our EB environment on the cloud.
eb create
This command automatically creates an ElasticBean environment, and similar to the initialization command, this command also displays a few prompts that enable you to set up your Elastic Beanstalk environment.
- First, Environment Name refers to the name of your EB environment. For this project, we will use the default name.
- Next, DNS CNAME prefix serves as the prefix to be used when setting up your domain name. Select the default name.
- Load balancer type: Select Application.
- Finally, Spot Fleet Requests: Select ‘No’.
Once the setup process is complete, an environment will be created for you. The next step is to deploy to Elastic Beanstalk.
Doing the actual deployment process
To deploy this application, run the deploy command:
eb deploy
This command should successfully deploy your application on Elastic Beanstalk. However, if you run the URL provided on the was page or run eb open, you’ll encounter an error.
To clear this error, create a file named setup.config in your .ebextension folder (i.e, .ebextension/setup.config). Add the following commands to your file:
packages:
  yum:
    amazon-linux-extras: []

commands:
    01_postgres_activate:
        command: sudo amazon-linux-extras enable postgresql14
    02_postgres_install:
        command: sudo yum install -y postgresql-devel

container_commands:
  01_migration:
      command: "source /var/app/venv/*/bin/activate && python manage.py makemigrations"
  02_migrate:
      command: "source /var/app/venv/*/bin/activate && python manage.py migrate --noinput"
      leader_only: true
  03_collectstatic:
      command: "source /var/app/venv/*/bin/activate && python manage.py collectstatic --noinput"
The AWS EC2 instance runs on Amazon Linux, so here, we will be using the yum installer to install the packages needed.
Next, run some migrations on the application server, which is located at /var/app/venv, and activate our virtual environment. Then, run the migration commands.
Keep in mind that whenever you make changes to a file, you must commit the changes to Git. Elastic Beanstalk only deploys to the app server the application added to git. In a different terminal window, go to your project root directory and add all the changes to git.
 git add .
 git commit -m "created setup.config file"
After you've committed your changes, we can deploy again. Run the Elastic Beanstalk deploy command again.
eb deploy
Hit the URL provided on the AWS Elastic Beanstalk page.
Alternatively, run eb open and add “/books/” at the end of the URL.
Configure the database to integrate PostgreSQL with Elastic Beanstalk
Currently, our application is running postgresql locally in our application project directory. We also need to configure PostgreSQL in production. Let’s briefly integrate PostgreSQL into Elastic Beanstalk.
Enter the eb console command to access the Beanstalk configuration page.
On the configuration page, navigate to “database” and click “edit”. Enter the following configuration settings:
- Engine: Postgres
- Engine version: At the time of writing this article, the default version is ‘13.4’. Go with the default.
- Instance class: Select the free class ‘db.t3.micro’.
- Storage: I chose ‘5gb’; you can choose whichever you prefer.
- Username: Choose a preferred username.
- Password: Choose a preferred password.
- Availability: Select ‘Low (one AZ)’.
Once this configuration is complete, click Apply. The Amazon Relational Database Service (RDS) will be created for you by Beanstalk.
Next, we will be connecting our Django program to the RDS. Beanstalk will help us with this task by providing a number of environment variables on the EC2 instances that describe how to connect to the Postgres server. To use these environment variables, we need to update our settings.py file by adding the following:
if 'RDS_DB_NAME' in os.environ:
    DATABASES = {
        'default': {
            'ENGINE': 'django.db.backends.postgresql_psycopg2',
            'NAME': os.environ['RDS_DB_NAME'],
            'USER': os.environ['RDS_USERNAME'],
            'PASSWORD': os.environ['RDS_PASSWORD'],
            'HOST': os.environ['RDS_HOSTNAME'],
            'PORT': os.environ['RDS_PORT'],
        }
    }
else:
    DATABASES = {
        'default': {
            'ENGINE': 'django.db.backends.postgresql_psycopg2',
            'NAME': 'ecommerceapi',
            'USER': 'ecommerceapi',
            'PASSWORD': '',
            'HOST': 'localhost',
            'PORT': '5432',
        }
    }
Do not forget to add a password.
Commit changes and deploy again.
Setting Up a S3 static file and media storage
So far, we have successfully deployed our Django application to AWS with Elastic Beanstalk. However, when we deploy the application, we lose all uploaded images. Additionally, our application does not show styles. Therefore, while a new instance is created on every deployment, the associated images are lost.
To solve this issue, we will need to store all media files on Amazon Simple Storage Service, also known as S3.
Creating a user and group
To get started, we will be creating an IAM user group before proceeding to create an IAM user. The AWS dashboard has a search section where users can search for a product or service.
- First, in the IAM user section on the AWS dashboard, do the following:
- Click on IAM; then, navigate to the user group and create a new group.
- Enter a user group name. I used ‘EbS3FullAccess’; you could use something similar.
- Next, ‘Attach permissions policies’. For the purpose of this project, search for
AmazonS3FullAccessAmazonEC2FullAccess,AWSElasticeBeanstalkFullAccess, andPowerUserAccess. The first policy grants permissions that allow full access to Amazon S3, and the second policy creates an API gateway and S3 bucket. Search for these policies and select them in the box. - Click on the next step to create the user group.
Next, follow these steps to create and set up IAM users:
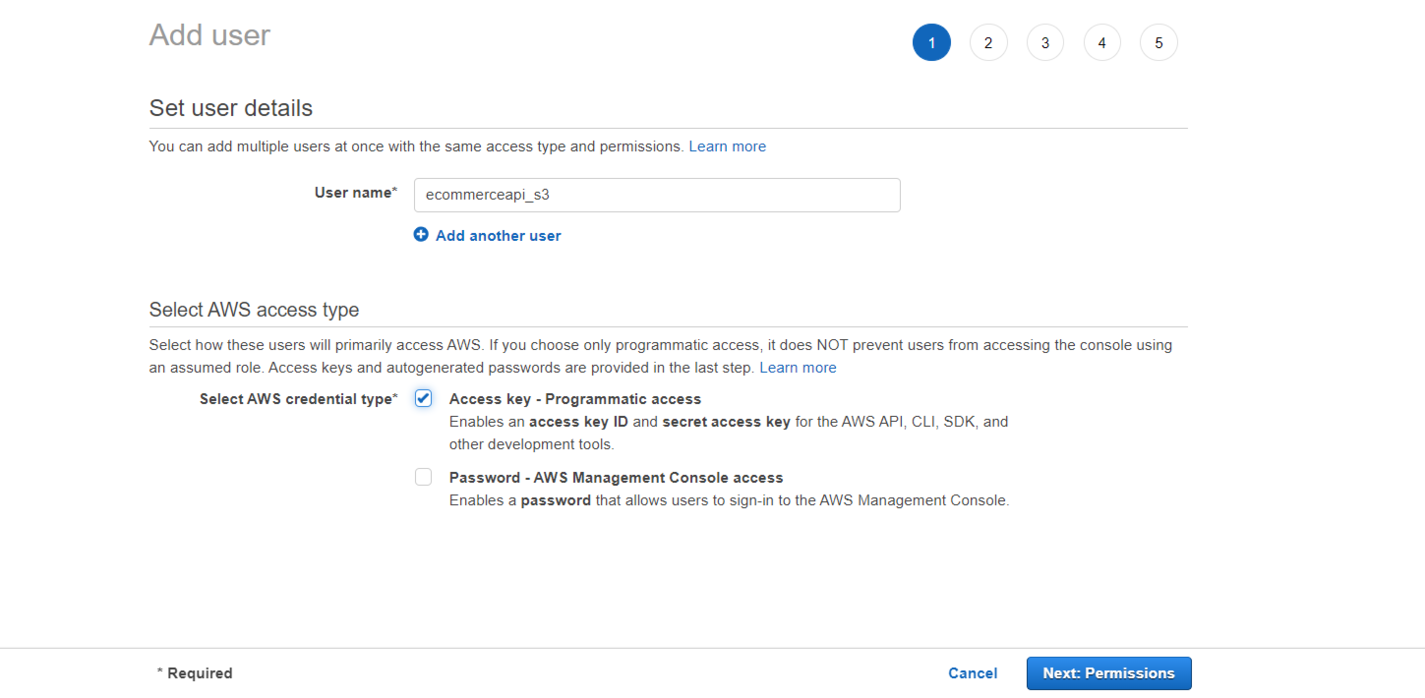
- Navigate to “Users” and add a new user.
- Enter your desired username.
- Next, select ‘Access key - Programmatic access’. This uses the API to interact with AWS.
- Click on ‘Next’ and add the user to the group we created previously.
- Skip Add tags, move to Review, and create a user.
Created successfully! An access key and a secret access key have been provided. Ensure you save the CSV file that contains your user credentials because you may not be able to access the credentials once the page is closed.
*Creating a bucket*
For the default Django styles to work at the deployed stage, static files must be preserved. The first step is to create a user and a bucket. We have already created a new user, so let’s create a bucket. A bucket is a container for objects. It is used to store data in Amazon S3.
Before we proceed, it is important that you uncheck ‘Block all public access’ before creating the bucket.
Creating a static file
Now, let's move on to Django storage options. To get started, install Django s3 storage at the root of your project directory. Run the following in your terminal:
  pip install django-s3-storage
  pip install boto3
With installation done, in your settings.py file, add django_s3_storage to your INSTALLED_APPS:
   INSTALLED_APPS = [
   ...
   'django_s3_storage'
   ]
With everything set up, we have one last step to complete this process. Add the following lines of code in your settings.py file:
        if DEBUG:
           STATICFILES_DIRS = [
           os.path.join(BASE_DIR, 'static'),
           ]
        else:
           STATIC_ROOT = os.path.join(BASE_DIR,'static')

        MEDIA_URL = '/media/'
        MEDIA_ROOT = os.path.join(BASE_DIR, 'media')
        S3_BUCKET_NAME = "Enter the name of your bucket"
        STATICFILES_STORAGE = "django_s3_storage.storage.StaticS3Storage"
        AWS_S3_BUCKET_NAME_STATIC = S3_BUCKET_NAME
        # serve the static files directly from the specified s3 bucket
        AWS_S3_CUSTOM_DOMAIN = '%s.s3.amazonaws.com' % S3_BUCKET_NAME
        STATIC_URL = "https://%s/" % AWS_S3_CUSTOM_DOMAIN
        # if you have configured a custom domain for your static files use:
        #AWS_S3_PUBLIC_URL_STATIC = "<https://static.yourdomain.com/
Finally, to update the modifications and upload the static files to the bucket, run this command: python manage.py collectstatic. To view these changes, push changes to GitHub and redeploy.
Cleaning things up
You can exit or cancel an Elastic Beanstalk running environment so that it does not incur charges when it is not in use. To do this, run eb terminate, and AWS will automatically clean up the environment.
Great work so far! A Django AWS deployment may seem complex at first, and well, it is. However, once you get a good understanding of the concepts and how it operates, it's easy to work with. Unlike deploying to your own Linux machine, Elastic Beanstalk also provides an environment that automatically scales as your usage increases.
While Elastic Beanstalk is still a supported tool to host Django on AWS, many teams are shifting to container-based paradigms. With containers, you have a bit more optionality, even if you want to stay on AWS. Still, this guide is useful for Django apps or teams wanting a quick AWS-native deployment without managing too much infrastructure headache.
Happy coding!


