Options for passwordless Django authentication
Passwordless Django authentication is gaining popularity as a secure and user-friendly alternative to traditional password-based authentication in Django applications. This article will explore various web authentication systems for implementing passwordless authentication in Django, highlighting their advantages, limitations, and considerations for choosing the right option.
In this article, we will delve into three passwordless authentication methods: email-based authentication, authentication with OAuth, and authentication with magic links.
For email-based authentication, the article will provide a step-by-step guide on how to implement it in Django. Next, we will walk through configuring Google APIs and setting up the necessary code and templates to enable Google OAuth authentication in a Django application.
Finally, this article will introduce authentication with magic links using the django-sesame library. It will explain how to send magic login links to users' emails and authenticate specific views.
Brief overview of traditional password-based Django authentication
Traditional password-based authentication in Django follows a standard username-password approach. Users create an account with a unique username and password combination, which is stored securely in a database. This ensures that the user's credentials are protected, and hackers cannot gain access to sensitive information. When users attempt to log in, they provide their credentials, and Django verifies the entered password against the stored hash of the user's password. This verification process is crucial in ensuring that only authorized users can access the platform.
Limitations and drawbacks of password-based user authentication
While password-based authentication has been widely used, it is not without limitations and drawbacks. Here are some common challenges associated with this approach:
- Password Management Issues: Users often struggle with password management, including remembering multiple passwords or creating strong and unique passwords. This can lead to user passwords being reused across different platforms, increasing the risk of security breaches if one account is compromised.
- Vulnerability to Phishing Attacks: Password-based authentication is susceptible to phishing attacks, where malicious actors trick users into providing their passwords on fake login pages. Users may unknowingly divulge their credentials, compromising their accounts' security.
- Password Database Vulnerabilities: Storing user passwords securely is crucial, but if not implemented properly, there can be vulnerabilities in the password storage mechanism. Inadequate hashing algorithms, lack of salting, or improper encryption can expose passwords to unauthorized access in case of a data breach.
- Forgotten Passwords and Reset Procedures: Users frequently forget their passwords, leading to frustration and creating additional workload for support teams. Password reset functionality, such as email verification or security questions, can also introduce vulnerabilities if not properly implemented.
- User Experience and Friction: Password-based authentication can create friction for users, especially when they need to remember complex passwords or go through lengthy login processes. Cumbersome login experiences can lead to user abandonment or dissatisfaction.
First, we will create a Django project, and then run migrations to set up the user authentication table. Run the following command to start a Django project:
django-admin startproject project
Navigate to the root of your project and run the following command to apply the migration for authentication:
python manage.py migrate
Email-based authentication
One popular passwordless authentication method is email-based authentication. Instead of passwords, users receive one-time login links via email. This approach eliminates the need for users to remember passwords and mitigates the risk of password-related vulnerabilities. We'll explore the implementation process of generating and verifying tokens for authentication, along with security considerations to ensure the integrity of an email-based authentication system.
For the illustration, we will have an application that authenticates the login of a particular user using a link sent to the user’s email. The message will contain a randomly generated link that can be used only once for login.
To start, go to project/settings.py and paste the following configuration to send an email from the Django app. Since this is in development, we will print out the email on the terminal.
# Email Backend Configuration (for development)
EMAIL_BACKEND = 'django.core.mail.backends.console.EmailBackend'  # Print emails to the console for testing

# Your SMTP email configuration (for production)
# EMAIL_BACKEND = 'django.core.mail.backends.smtp.EmailBackend'
# EMAIL_HOST = 'your-smtp-host'
# EMAIL_PORT = 587
# EMAIL_USE_TLS = True
# EMAIL_HOST_USER = 'your-smtp-username'
# EMAIL_HOST_PASSWORD = 'your-smtp-password'
Now create a new file named project/views.py and paste the following code to send the email containing the login link.
from django.shortcuts import render, redirect
from django.contrib.auth.tokens import default_token_generator
from django.contrib.auth import get_user_model, login
from django.contrib.sites.shortcuts import get_current_site
from django.utils.http import urlsafe_base64_encode, urlsafe_base64_decode
from django.utils.encoding import force_bytes, force_str
from django.template.loader import render_to_string
from django.core.mail import send_mail
from django.contrib.auth.decorators import login_required

User = get_user_model()

def send_login_link(request):
    if request.method == 'POST':
        email = request.POST.get('email')
        user = User.objects.get(email=email)

        if user:
            # Generate a one-time use token for the user
            token = default_token_generator.make_token(user)

            # Create a unique link for the user to log in
            uid = urlsafe_base64_encode(force_bytes(user.pk))
            domain = get_current_site(request).domain
            login_link = f'http://{domain}/login/{uid}/{token}/'
            print("login,", login_link)

            # Send the login link via email
            subject = 'Your Login Link'
            message = render_to_string('login_link.html', {'login_link': login_link})
            from_email = 'noreply@example.com'
            send_mail(subject, message, from_email, [email])

        return render(request, 'email_sent.html')
    return render(request, 'send_login_link.html')
The code above checks if the request method is 'POST' using request.method == 'POST'. If it is a POST request, it retrieves the user's email address from the request using request.POST.get('email'). It then retrieves the user object associated with the provided email address using User.objects.get(email=email). If a user is found, the code proceeds to generate a one-time use token for the user using default_token_generator.make_token(user). It creates a unique login link for the user by encoding the user's primary key using urlsafe_base64_encode(force_bytes(user.pk)), gets the current site's domain using get_current_site(request).domain, and appends the token to the URL. The login link is then sent to the user via email using the send_mail function. The email contains a subject, rendered message from the login_link.html template, the sender's email address, and the recipient's email address. Finally, it renders the email_sent.html template and returns it as a response.
Notice that some HTML files were used in the code. Create them (i.e., project/templates/login_link.html, project/templates/email_sent.html, project/templates/send_login_link.html) and paste in the following:
project/templates/login_link.html will display the email for the login link:
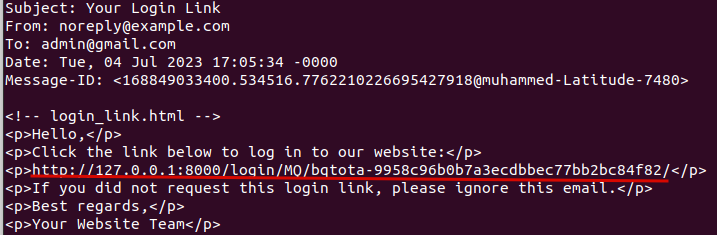
<!-- login_link.html -->
<p>Hello,</p>
<p>Click the link below to log in to our website:</p>
<p>{{ login_link }}</p>
<p>If you did not request this login link, please ignore this email.</p>
<p>Best regards,</p>
<p>Your Website Team</p>
project/templates/email_sent.html will display default message when email has been sent:
<!-- email_sent.html -->
<p>An email with the login link has been sent to your email address. Please check your inbox.</p>
project/templates/send_login_link.html will display the form for the user to submit their email:
<!-- send_login_link.html -->
<form method="post">
    {% csrf_token %}
    <input type="email" name="email" placeholder="Enter your email" required>
    <button type="submit">Send Login Link</button>
  </form>
Now we will work on the view that will handle the authentication when the login link is clicked. In the project/views.py file, paste the following code:
# ...
def login_with_link(request, uidb64, token):
    try:
        uid = force_str(urlsafe_base64_decode(uidb64))
        user = User.objects.get(pk=uid)
    except (TypeError, ValueError, OverflowError, User.DoesNotExist):
        user = None

    if user and default_token_generator.check_token(user, token):
        # Log the user in without requiring a password
        user.backend = 'django.contrib.auth.backends.ModelBackend'
        login(request, user)

        return redirect('user_email')  # Replace 'home' with the URL to redirect after login

    return render(request, 'login_link_invalid.html')
When the function is called, it first attempts to decode the uidb64 parameter, which is a base64-encoded string representing the user's primary key. The force_str function is used to convert the decoded byte string into a Unicode string. This decoded value is assigned to the variable uid.
Next, the code attempts to retrieve the user from the user model using the User.objects.get(pk=uid) statement. It uses the decoded uid as the primary key to fetch the corresponding user object. If the user does not exist or if any exceptions occur during the decoding or retrieval process, the user variable is set to None.
After retrieving the user, the code checks two conditions to determine whether the login is valid. First, it verifies that the user object exists. Then, it uses the default_token_generator.check_token(user, token) function to validate the provided token against the user.
If both conditions are met and the user is valid, the code proceeds to log in the user without requiring a password. To do this, it sets the authentication backend for the user to the default model backend using the statement user.backend = 'django.contrib.auth.backends.ModelBackend'. This step ensures that the user's authentication is handled correctly by Django's authentication system.
The project/templates/login_link_invalid.html fill will display the error message when the link is invalid or is used more than once:
<p>The login link is invalid. Please try again.</p>
Finally, for the views, we will create a view that will display the user’s email when they have successfully logged in. In the project/views.py file, paste the following code:
@login_required
def user_email(request):
    email = request.user.email
    return render(request, 'user.html', {'email': email})
Now paste the following in project/templates/user.html. The code below receives the email context from the user_email view and displays it if the user is authenticated.
<!-- user_email.html -->

  {% if user.is_authenticated %}
  <p>Your Email: {{ email }}</p>
  {% endif %}
Now update the urls.py file to accommodate the views we have just created:
from django.contrib import admin
from django.urls import path
from . import views #new

urlpatterns = [
    path('admin/', admin.site.urls),
    path('send-login-link/', views.send_login_link, name='send_login_link'), # new
    path('login/<str:uidb64>/<str:token>/', views.login_with_link, name='login_with_link'), #New
    path('user-email/', views.user_email, name='user_email'), #new
]
Now we will let Django know where the templates are located. You can do this in the settings.py file. Update TEMPLATES.DIRS with the following code:
'DIRS': [BASE_DIR / 'project/templates'],
To log in with an email, we need to be registered. I will use the Django superuser for this illustration. You can create a superuser by running the following command and filling in the prompt.
python manage.py createsuperuser
Now you can run the server with the following command and go to http://127.0.0.1:8000/send-login-link/ and submit the email you just created.
python manage.py runserver
You will then receive the email on your terminal containing the login link.
Note: The rest of the tutorial will start from this repo.
Django user authentication with OAuth
Open Authorization (OAuth) is an open standard protocol that enables secure authorization and delegated access to resources on behalf of a user. Common use cases of OAuth include social media login integration, accessing APIs of service providers, and single sign-on (SSO) implementations.
When it comes to integrating third-party login providers, OAuth has emerged as a widely adopted protocol. Implementing OAuth for user authentication offers numerous benefits, including a simplified user experience, enhanced security, and access to user profile information. In this comprehensive guide, we will dive into the practical steps required to integrate OAuth into a Django application using the django-allauth package. By following along, you will gain background knowledge on how to leverage OAuth providers, such as Google, Facebook, or GitHub, to authenticate users and access their profile information securely.
In this section, we will set up the application to authenticate with Google, but it is almost the same process for other providers. To use OAuth in Django, you need to install django-allauth. Do this by running the following command:
pip install django-allauth
Now add the following to the INSTALLED_APPS list in the settings.py file. The code lets Django know about the django-allauth library. 'allauth.socialaccount.providers.google' indicates that you want to use Google for authentication. You can check the documentation to see other options available for authentication.
INSTALLED_APPS = [
#  ...

    'django.contrib.sites',
    'allauth',
    'allauth.account',
    'allauth.socialaccount',
    'allauth.socialaccount.providers.google',
]
Now add the following configuration at the end of your settings.py file. The AUTHENTICATION_BACKENDS setting specifies the authentication backends to be used. The 'django.contrib.auth.backends.ModelBackend' and 'allauth.account.auth_backends.AuthenticationBackend' backends allow users to authenticate using both the traditional Django authentication system and social media accounts, such as Google. The SOCIALACCOUNT_PROVIDERS setting focuses on configuring the Google OAuth provider. The SITE_ID setting represents the ID of the current site in a multi-site Django setup. The LOGIN_REDIRECT_URL and LOGOUT_REDIRECT_URL settings define the URLs to redirect users after successful login and logout operations.
AUTHENTICATION_BACKENDS = [
    'django.contrib.auth.backends.ModelBackend',
    'allauth.account.auth_backends.AuthenticationBackend',
]

SOCIALACCOUNT_PROVIDERS = {
    'google': {
        'SCOPE': [
            'profile',
            'email',
        ],
        'AUTH_PARAMS': {
            'access_type': 'online',
        }
    }
}
SITE_ID = 1

LOGIN_REDIRECT_URL = '/'
LOGOUT_REDIRECT_URL = '/'
Now paste the following in project/templates/home.html. The following code checks if the user is authenticated (i.e., logged in) and then displays a welcome message with the username. Otherwise, it provides a link labeled "Login with Google" that, when clicked, redirects the user to the Google OAuth login page. The {% provider_login_url 'google' %} expression generates the appropriate URL for initiating the authentication flow with Google provided by the django-allauth library.
{% load socialaccount %}
<html>
<body>
<h1>My Google OAuth Project </h1>
{% if user.is_authenticated %}
  <p>Welcome, You are logged in as {{ user.username }}</p>
{% else %}
  <a href="{% provider_login_url 'google' %}">Login With Google</a>
{% endif %}
</body>
</html>
Now we will configure the URLs needed to access the application and log in. To do this, paste the following code in your urls.py file.
from django.urls import path, include
from django.views.generic import TemplateView
from django.contrib.auth.views import LogoutView

urlpatterns = [
#...
path('', TemplateView.as_view(template_name="home.html")),
path('accounts/', include('allauth.urls')),
path('logout', LogoutView.as_view()),
]
'accounts/': This path is used to handle URLs related to user accounts. It includes the URLs provided by thedjango-allauthlibrary, which is commonly used for user authentication and account management in Django.'logout': This path is used to handle the URL for user logout functionality.
Next, we will run the migration command to apply the new models from django-allauth to the database:
python manage.py migrate
Configure the Google API
Now we will configure a new Google APIs project. We need to do this so that Google will be aware of our account and grant access to their API. Start by going to the Google Developer APIs Console and creating a new project (this requires a Google account). Next, click the “Credentials” tab on the left-hand side. Here, you will set credentials to request user consent so that the app can access user data. Follow the image below to set this up.

You will now be prompted to a page to select the application type. Select “web application” and add the following:
http://127.0.0.1:8000under ”Authorized JavaScript origins”.http://127.0.0.1:8000/accounts/google/login/callback/under ”Authorized redirect URIs”.
Then, click the “CREATE” button, and you will be provided with the Client ID and Client Secret. Save this information, as you will need it later.
Run application
Before using the authentication method, we need to add a Site for the domain and OAuth provider (in this case, Google) to the admin.
To access the admin, run the following command to create a superuser:
python manage.py createsuperuser
Start the server:
python manage.py runserver
Open http://127.0.0.1:8000/admin and log into Django Admin with the details you just created. On the ”Sites" tab, click ”Add” and input 127.0.0.1:8000 as the Domain name and Display name.
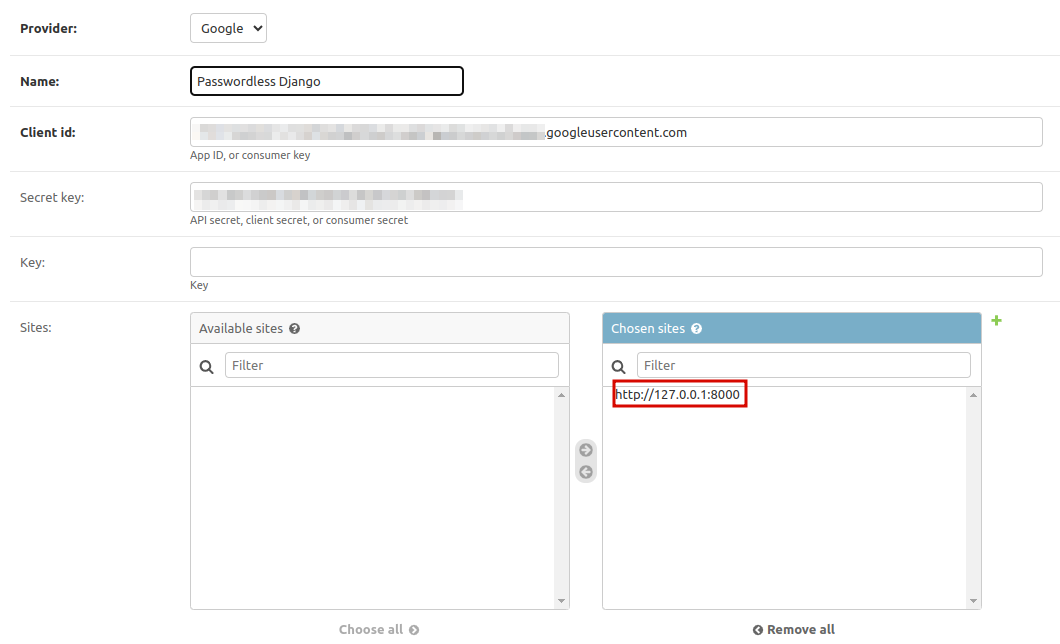
Now we will add our Google OAuth credentials to the site. On the “Social Applications“ tab, click ”Add” and input the following:
- Provider: Google
- Name: “Passwordless Django” (You can use anything here.)
- Client id:
<client-ID-from-Google> - Client secret:
<client-secret-from-Google> - Sites:
127.0.0.1:8000
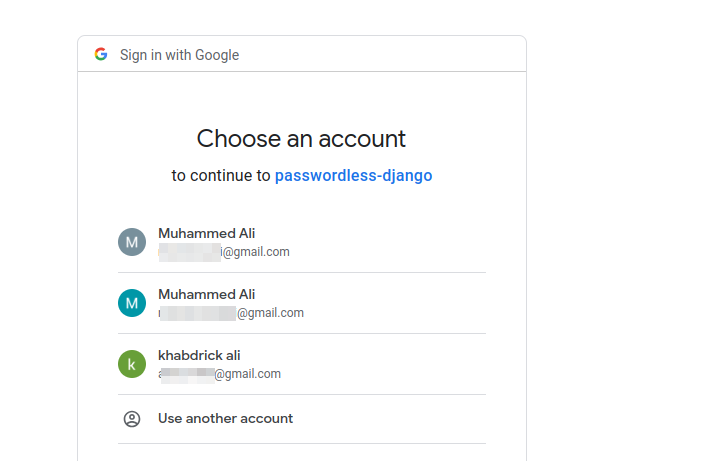
Now log out of the admin account and go to the home page 127.0.0.1:8000. You will be able to access the application and log in with Google accounts.
If you need more information about your users from Google, there is a process that your app needs to go through to be verified. This process is outlined in detail in the OAuth Client Verification docs. Once your app is verified, you can access a wider range of user information.
Authenticating with Django magic links
Similar to email-based authentication, a link (magic link) will be sent to the user’s email address for logging in. Additionally, you can use magic links to authenticate a specific view instead of the entire application. For instance, suppose you have an employment website. You could grant job seekers access to the list of available jobs, but restrict their ability to apply until they request a link for application (magic link).
In this section, we will use a tool called Django-sesame for this. Since we have seen how the link for authentication works (you can learn this in the docs), I will focus on authenticating a specific view.
We will start by installing Django-sesame:
pip install django-sesame
Navigate to the root of your project and run the following command to apply the migration for authentication:
python manage.py migrate
Go to project/settings.py and paste the following configuration to send an email from the Django app and set Django-sesame as the authentication backend.
AUTHENTICATION_BACKENDS = [
    "django.contrib.auth.backends.ModelBackend",
    "sesame.backends.ModelBackend",
]

EMAIL_BACKEND = 'django.core.mail.backends.console.EmailBackend'  # Print emails to the console for testing
Now create a new file project/views.py and paste the following code to send the email containing the authentication link for a secret page.
from django.shortcuts import render
from django.contrib.auth.models import User
from django.urls import reverse
import sesame.utils
from .forms import EmailForm
from sesame.decorators import authenticate
# Create your views here.
def index(request):
if request.method == 'POST':
form = EmailForm (request. POST) #th
if form.is_valid ():
#here we, want to email the user the magic link
# first check, user exists w/ that email
email = form.cleaned_data['email']
user = User.objects.filter(email=email).first()
if user is None:
#we can add an error here.
return render(request, 'index.html', {'form':form})
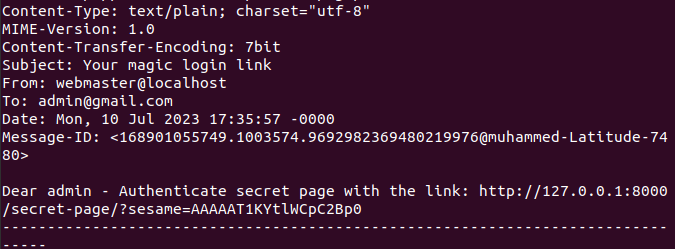
link = request.build_absolute_uri(reverse('secret-page'))
print (link)
link += sesame.utils.get_query_string(user) #add token to link (http://127.0.0.1:8000/secret/)
user.email_user(
subject = 'Your magic login link',
message = f"""Dear {user.username} - Authenticate secret page with the link: {link}"""
)
context = {"form": EmailForm()}
return render(request, 'index.html', context)
@authenticate
def secret_page(request):
return render(request, 'secret_page.html')
The index function is the view that handles the HTTP requests to the root URL ("/") of the application. It expects both GET and POST requests. If the request method is POST, it will validate a form named EmailForm, which will be created later. This form that will accept the user's email address.
If the form is valid, it retrieves the email field value and checks if a User object with that email exists. If a user is found, it generates a magic login link using request.build_absolute_uri() and sesame.utils.get_query_string(), and then sends an email to the user containing the link. The link that is sent only authenticates the view with the [@authenticate](https://django-sesame.readthedocs.io/en/stable/howto.html#view-decorator) decorator. Thus, if a view has a @login_required decorator, this link will not be able to access such a view.
The secret_page function is decorated with @authenticate, indicating that the user must be authenticated to access this view. When accessed, it renders the secret_page.html template.
Now we will create the EmailForm form. In project/forms.py, paste the following code:
from django import forms

class EmailForm(forms.Form):
    email = forms.EmailField()
Notice in the view code that some HTML files were used; create them (project/templates/index.htmlandproject/templates/secret_page.html) and paste in the following.
In project/templates/index.html, paste the following:
<form action="{{request.path}}" method="POST">
{% csrf_token %}
<p>
    {{ form }}
    <input type="submit" value="Send log in link">
</p>
</form>
In project/templates/secret_page.html, paste the following:
<h1>This is a secret page </h1>
Finally, you can update the project/urls.py file with the following code:
from django.contrib import admin
from django.urls import path
from . import views

urlpatterns = [
    path('admin/', admin.site.urls),
    path('', views.index, name='index'),
    path('secret-page/', views.secret_page, name="secret-page"),
]
Enter the following code to test run the migration command:
python manage.py migrate
Then, enter the following code to create a superuser:
python manage.py createsuperuser
Finally, run the server and of to http://127.0.0.1:8000/ on your browser and input the registered user. Then, the email with the access link will be sent to your command line.
Considerations when implementing passwordless authentication
This article provided a comprehensive overview of passwordless Django authentication options, allowing developers to choose the most suitable method for their applications based on security requirements and user experience considerations. By implementing passwordless authentication, developers can enhance the security and usability of their Django applications.
Selecting the most suitable passwordless authentication option for your Django app depends on various factors, such as the app's security requirements, user experience goals, technical complexity, and integration capabilities. Evaluating the strengths and weaknesses of each option will help you make an informed decision that aligns with your specific needs.
Want to see more of what we offer for Django? Check out our page on how Honeybadger supports Django.
Editor's note: This post was originally published in September 2023 and has been updated for accuracy.

Written by
Muhammed AliMuhammed is a Software Developer with a passion for technical writing and open source contribution. His areas of expertise are full-stack web development and DevOps.