Build a CI/CD pipeline for Flask apps using GitHub Actions
The practice of continuous integration (CI) and continuous deployment (CD) involves creating an automated flow that governs how changes will be integrated into the main project and how these new changes will be deployed.
GitHub Actions is a feature on GitHub that enables you to implement CI/CD in your project repository. It is usually a smart idea to use GitHub Actions because it makes it simple to automate tasks, such as testing and project deployment, directly in your GitHub repository.
In this article, you will learn how to build a Flask API, write some unit tests for the API endpoints, and then develop the pipeline that will test the Flask API and deploy it to Heroku if all tests pass. You can find the code for the tutorial on GitHub.
Prerequisites
To follow along, you need basic knowledge of the following:
- Flask
- Git and GitHub
Building a base Flask API
In this section, you will create a to-do list API, which will be the app that will be deployed to Heroku. We will create a basic CRUD functionality for the to-do list.
First, let’s start with the initial imports. Create a folder that will hold all the files for your application and then, in that folder, create a file named main.py and paste the following code. Here we are just importing Flask and SQLAlchemy (required for the database connection to work), as well as initializing the Flask app and database.
from flask import Flask, jsonify, request, json
from flask_sqlalchemy import SQLAlchemy

# instantiate Flask functionality
app = Flask(__name__)

# set sqlalchemy URI in application config
app.config["SQLALCHEMY_DATABASE_URI"] = "sqlite:///test.db"
app.config["SQLALCHEMY_TRACK_MODIFICATIONS"] = False

db = SQLAlchemy(app)  # instance of SQL
Next, we need to create models for the database. This will indicate the fields in the database. To do this, paste the code below directly below the code section above.
# ...
class TodoList(db.Model):
    id = db.Column(db.Integer, primary_key=True)
    todo = db.Column(db.Text, nullable=False)

    def __str__(self):
        return f"{self.id} {self.todo}"
Next, we can create a function that will read all the items in the to-do list. JSON is the generalized format in which data can be accepted from the client, so we will need to also have a function that converts all the items retrieved from the database into JSON. You can do this by pasting the following code.
# ...
def todo_serializer(todo):
    # convert data from TodoList to JSON
    return {"id": todo.id, "todo": todo.todo}

@app.route("/", methods=["GET"])
def home():
    return jsonify([*map(todo_serializer, TodoList.query.all())]) #get all items in TodoList
Now we will develop the todo_create() function, which will create a new to-do item. The function will convert the JSON data retrieved from the client into a format Python can understand and then save the data in the database. You can do this by pasting the following code.
# ...
@app.route("/todo-create", methods=["POST"])
def todo_create():
    # add todo to database
    request_data = json.loads(request.data)
    todo = TodoList(todo=request_data["todo"])

    db.session.add(todo)
    db.session.commit()

    return {"201": "todo created successfully"}
Now to the update functionality. You will first extract each to-do based on the inputted id, and from there, you will be able to update the to-do. Paste the following code to implement this functionality.
# ...
@app.route("/update/<int:id>", methods=["PUT"])
def update_todo(id):
    # edit todo item based on ID
    item = TodoList.query.get(id)
    request.get_json(force=True)
    todo = request.json["todo"]
    item.todo = todo
    db.session.commit()

    return {"200": "Updated successfully"}
Finally, we will create the delete function. We will get the to-do based on the inputted id and then delete the to-do item from there. We will also close off with the line that will run the Flask server.
# ...
@app.route("/<int:id>", methods=["POST"])
def delete_todo(id):
    # delete todo item from todo list
    request.get_json(force=True)
    request_data = json.loads(request.data)

    TodoList.query.filter_by(id=request_data["id"]).delete()
    db.session.commit()
    return {"204": "Delete successfully"}

if __name__ == "__main__":
    app.run(debug=True)
Now, run the following command to start up your Flask app server:
python main.py
Open another terminal window and run the following command to create a new to-do item. Replace <add new to-do item> in the command below with the to-do item you want to add to the list.
curl -d '{"todo":"<add new to-do item>"}' -H "Content-Type: application/json" -X POST [http://127.0.0.1:5000/todo-create](http://127.0.0.1:5000/todo-create)
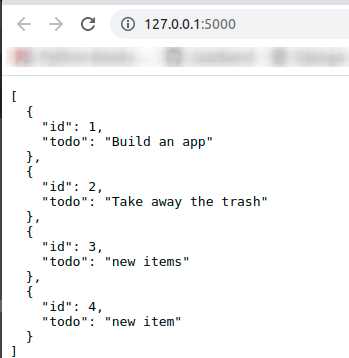
When you open the API on your browser with http://127.0.0.1:5000, you should see the to-do list in JSON format.
Write unit tests for the app
Since we are done with building the API, we can write unit tests for the endpoints, which is what we will be doing in this section. To start, create a new file named test_main.py and then paste the following code. The following code creates some initial data in a test database that will be used to test the endpoints of the API.
from main import db, app, TodoList
import json
import unittest

TEST_DB = "app_test.db"

class RecipesApiTests(unittest.TestCase):

    # executed before each test run
    def setUp(self):
        app.config["TESTING"] = True
        app.config["WTF_CSRF_ENABLED"] = False
        app.config["DEBUG"] = False
        app.config["SQLALCHEMY_DATABASE_URI"] = "sqlite:///app_test.db"
        self.app = app.test_client()
        db.drop_all() # drop tables in previous tests
        db.create_all() # table in databse
        self.create_todo()
        self.assertEqual(app.debug, False)

    def create_todo(self):
         # create to-do items that will be used for testing
        item1 = TodoList(todo="Go to school")
        item2 = TodoList(todo="Make Mediterranean Chicken")

        db.session.add(item1)
        db.session.add(item2)

        db.session.commit()
To test the list API endpoint, we will assert that the items we get from that particular endpoint is the same as what was saved in the test database and that the status code coming as the output is 200. You can do this by pasting the following code:
# ...
class RecipesApiTests(unittest.TestCase):

    # ...

    def test_todo_list_endpoint(self):

        response = self.app.get("/")
        # print (response.data)
        self.assertEqual(
            response.data,
            b'[{"id":1,"todo":"Go to school"},{"id":2,"todo":"Make Mediterranean Chicken"}]\n',
        )
        self.assertEqual(response.status_code, 200)
For the creation and updating endpoints, we will be asserting that the status code in the main app is the same when running the tests. You can do this by pasting following the code:
# ...
def test_todo_creation_endpoint(self):
        json_data = {"todo": "Go to kschool"}
        response = self.app.post("/todo-create", data=json.dumps(json_data))
        # print(response.data)

        self.assertEqual(response.data, b'{"201":"todo created successfully"}\n')

    def test_update_todo_endpoint(self):

        json_data = {"todo": "just an update"}
        response = self.app.put(
            "/update/1",
            data=json.dumps(json_data),
            #  follow_redirects=True
        )

        self.assertEqual(response.data, b'{"200":"Updated successfully"}\n')

if __name__ == "__main__":
    unittest.main()
You can run the test by running the following command:
python test_main.py
Prepare a Flask application for Heroku
First, we will create a Web Server Gateway Interface WSGI file, which will be used by Heroku to run our application on their server. You can do this by creating a file named [wsgi.py](http://wsgi.py) and pasting the following code:
from main import app

if __name__ == "__main__":
    app.run()
Now, we can create the Procfile for Heroku. The Procfile contains the command that will be run once the application is deployed on Heroku. You can do this by creating a new file named Procfile and pasting the following command. We will be using Gunicorn to run the application instead of the default Flask server.
web: gunicorn wsgi:app
Now state the list of the dependencies required for this application by creating a new file named requirements.txt and pasting the following text. This will be used in your pipeline and Heroku.
Flask==2.1.0
Flask-SQLAlchemy==2.5.0
gunicorn
Set up Heroku
Before continuing further, you must create a Heroku account if you don’t have one already, and then install Heroku CLI.
Now you can log into your Heroku CLI by running the following command:
heroku login
Next, create a Heroku app by running the following command. Replace todo-app-101 in the command below with any name that suits your app.
heroku create todo-app-101
Once the app is created, you will be given a URL that you can use to access your application when it is deployed. You can also see it on Heroku dashboard.

Now we need to get the API key for our Heroku account. This is essential so that GitHub Action will know to which account to deploy. You can get it by going to your account settings. While on your account settings page, scroll down, and you will see “API Key”; make note of it, as it will be needed later in this article.
Build a CI/CD pipeline with GitHub Actions
Create a folder named .github in the root of your project, and inside it, create workflows/main.yml; the path should be .github/workflows/main.yml to get GitHub Actions working on your project.
GitHub Actions have three levels:
workflowsis a file that contains the automation process. A Workflow can handle multiple jobs.jobsare a set of steps or instructions that are executed on the same runner. A runner is an operating system on which your job is supposed to run.stepsrepresent a sequence of tasks that will be executed as part of the job.
Now we can go ahead and develop the jobs and steps. This can be created by pasting the following configurations in the file you just created. The configuration below will install the dependencies and then run tests. If all the tests pass, it goes ahead to the next steps, which handle the deployment of the application.
name: CI/CD

# Controls when the workflow will run
on:
  # Activates the workflow; then there is a push to the main or master branch
  push:
    branches: [main, master]

  # allows you to manually execute this pipeline from the Actions tab.
  workflow_dispatch:

# A workflow run consists of one or more jobs that can be executed either sequentially or concurrently.
jobs:
  # This workflow contains a single job called "build"
  build:
    # The type of runner that the job will run on
    runs-on: ubuntu-latest

    #
    steps:
      - uses: actions/checkout@v2
      - uses: actions/setup-python@v2
      - run: pip install -r requirements.txt  # install requirements to enable GitHub run tests
      - run:  python test_main.py

      - uses: akhileshns/heroku-deploy@v3.12.12 #
        with:
          heroku_api_key: put-the-api-key-you-copied-ealier
          heroku_app_name: khabdrick-todo-101
          heroku_email: yoursignupemail@gmail.com
Activate the pipeline
You can activate this pipeline by creating a repository on GitHub and pushing your code to that repository, and GitHub will handle the rest of the work. After your code is pushed go to the repository on GitHub, click on the “Actions” tab. Then, click on the commit you just made, and you will see that the workflow ran successfully.
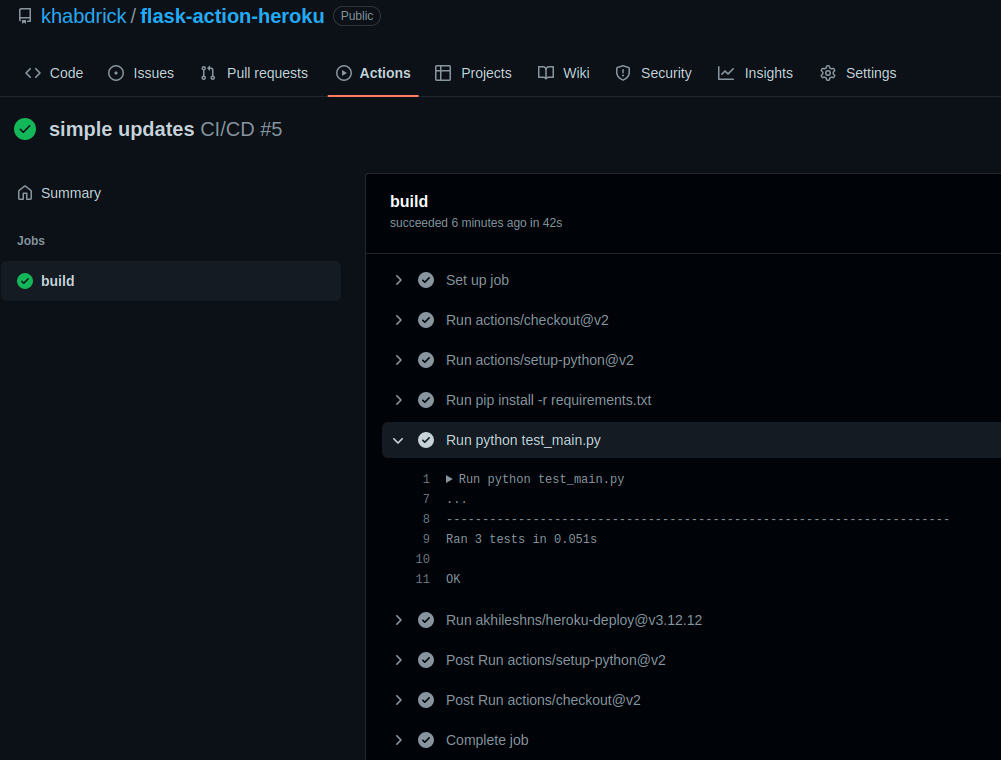
This means that your application has now been deployed to Heroku. You can access it by opening the URL you were given earlier in your browser. You can go ahead and test out the other endpoints.

Conclusion
In this post, you’ve learned how to create a to-do list with Flask API. You also learned how to create unit tests for the API endpoints and create a pipeline that will test the Flask API and deploy it to Heroku if all tests pass.
Furthermore, you can build up on this knowledge by building a pipeline that can deploy to a bare bones Linux server or maybe a platform similar to DigitalOcean.

Written by
Muhammed AliMuhammed is a Software Developer with a passion for technical writing and open source contribution. His areas of expertise are full-stack web development and DevOps.