Deploying a Django application on Ubuntu
Using a PaaS like Heroku or Netlify is cool, but using tools like these comes at the cost of flexibility. You can’t choose the firewall you want, and all your data will be stored in the PaaS provider’s database. Additionally, the PaaS provider may not provide support for a particular tool.
There is a way to have flexibility, security, and increased compatibility and integration with other tools: deploy your application to a server.
In this tutorial, I will show you how to get a Linux server from Linode, set it up with the security configuration, and then deploy the Django application. You will be building a lead management application for this tutorial, but if you already have an application, you can skip this step.
You can find the final product on GitHub.
Prerequisites
- An understanding of basic Linux commands.
- A basic understanding of Django.
Build a Django Application
We will primarily use the Django admin, so the lead management application will only have a model. For authentication, we will use the inbuilt Django authentication system.
Create a folder for your project and enter it using cd to get going. To begin a project and a Django app, enter the following command:
django-admin startproject lead . && python3 manage.py startapp app
Now, update the INSTALLED_APPS in the settings.py file to include the app you just created.
INSTALLED_APPS = [
     …
    'app',
]
The Lead model will have the name, email, lead_owner and some other fields that you will see in the following code. The lead_owner file will have a foreign key to the Django user authentication model. Therefore, if we create a superuser, we will be able to use it to create new leads and test the application. Open the file app/models.py and paste the following code:
from django.db import models
from django.contrib.auth.models import User

class Lead(models.Model):
    name = models.CharField(max_length=100)
    email = models.EmailField(max_length=100, unique=True)
    details = models.CharField(max_length=500, blank=False)
    lead_owner = models.ForeignKey(
        User, related_name="lead", on_delete=models.CASCADE, null=True)
    created_at = models.DateTimeField(auto_now_add=True)
Next, you’ll need to update the admin.py file so that you can access the models you just created in the admin panel. You can do this by pasting the following code into the app/admin.py:
from django.contrib import admin
from .models import Lead

admin.site.register(Lead)
Get an Ubuntu 20.04 Server from Linode
Linode is one of the most popular providers of Linux cloud solutions and services. We will get the Ubuntu 20.04 server we need for this tutorial from them. If you don’t have an account, go ahead and create one, and you will be given a $50 credit to get started with their services.
After authentication, click the “Create Linode" button.
Now, select server configurations based on requirements, but make sure the “Distribution” is Ubuntu 20.04. Vultr has a tutorial on how to generate SSH keys. Then, click the “Create Linode" button.
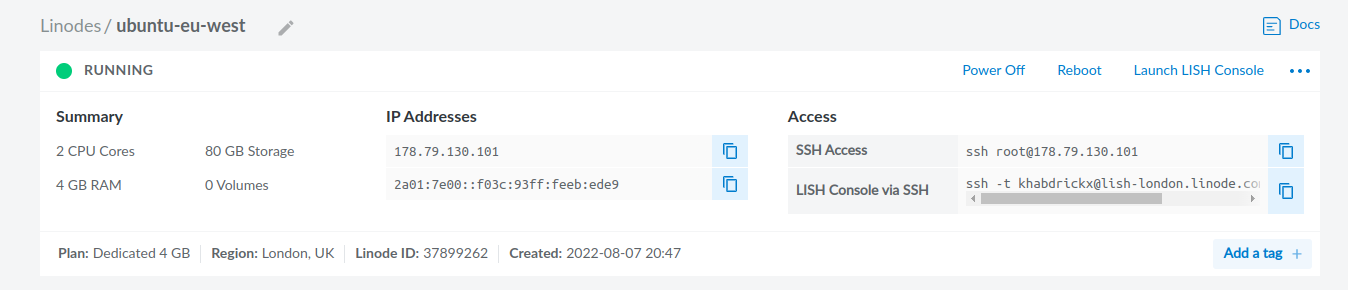
Your server will run in a minute, and you will be provided with the details of how to access it.
We will connect to the server we just created using Secure Shell (SSH). The SSH protocol provides a secure way to connect to other servers over a network.
To access your remote server, run the following command. Replace root@178.79.130.101 with the IP address you were given by Linode.
ssh root@178.79.130.101
When asked, “Are you sure you want to continue connecting (yes/no/[fingerprint])?”, type "yes” and press the “Enter” key.
Deploy a Django App to a Remote Server
Deployment, in this case, just means we will copy our Django application folder to a folder on the remote server. We will use the scp (secure copy) command to securely copy the content of the folder that houses the whole application (django-linode-ubuntu). On your local machine, run the command below to copy the application to the remote server. Don’t forget to change 178.79.130.101 in the command below to the IP address of your remote server.
scp -r django-linode-ubuntu root@178.79.130.101:project
The command above first creates a new directory named project in the remote server and then pastes the contents of django-linode-ubuntu.
Set Up a Deployed Application on a Ubuntu Server
In this section, you will do everything necessary to make your application work properly on the remote server. Then, you will be able to access the application on your browser. You will first set up the firewall for network security, use NGINX to reverse host to the IP address of your remote server, and then run your application on the server.
Set Up a Firewall for Network Security
Setting up a firewall on your server provides protection for your server network and sets rules for incoming and outgoing requests to your server. We will use Uncomplicated Firewall (UFW) in this tutorial; it’s easy to set up, and you don't need to install anything new on your server.
UFW comes with Ubuntu by default, but its activity is disabled. You can enable UFW on your server by running the following command:
Note: Make sure that you have SSH into your remote server.
ufw enable
Allow all outgoing ports by running the command below. You can allow all outgoing requests because it doesn’t pose a threat from external sources.
ufw default allow outgoing
Run the command below to prevent access to your server from the outside world.
ufw default deny incoming
When you ran the command above, you also blocked SSH requests. To continue using SSH to access our server, you must enable SSH. To do this, run the following command:
ufw allow ssh
Allow http/tcp traffic on the firewall so that your browser can access your app.
sudo ufw allow http/tcp
Set Up NGINX as a Reverse Proxy
In this section, you will need NGINX for reverse proxy, which allows your server to listen for the application running and then redirect requests to your remote IP address.
To do this, install NGINX by running the following command:
apt-get install nginx
Remove the default configuration file provided by the NGINX installation so that we can create our own.
rm /etc/nginx/sites-enabled/default
Run nano /etc/nginx/sites-enabled/project to create and open a new NGINX configuration file and paste the NGINX script below; then, save the file. The code below will send requests to your IP address at http://localhost:8000 because it is the host where your application will run. If you have a domain name, you can replace the IP address in the script.
    server{
        listen 80;
        server_name 178.79.130.101;

        location / {
                proxy_pass http://localhost:8000;
                include /etc/nginx/proxy_params;
                proxy_redirect off;
            }
    }
Now, restart NGINX to set the new configurations you just created.
sudo systemctl restart nginx
Running the Application
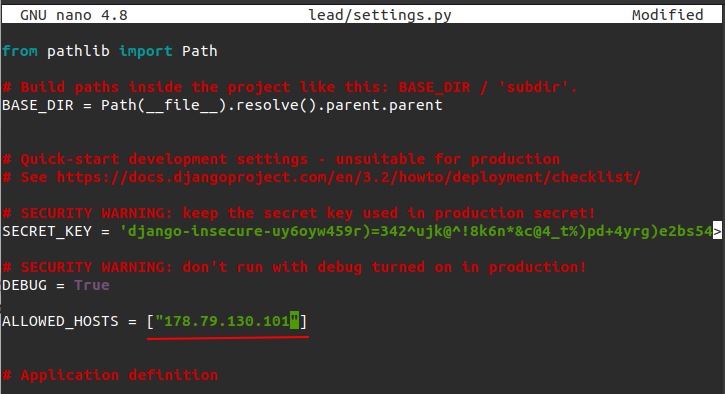
Next, you’ll need to add your IP address to the ALLOWED_HOSTS in the settings.py file so that Django can recognize it. We will do this in the server by running the command below to open the settngs.py file, edit ALLOWED_HOSTS, and then save.
nano project/lead/settings.py
Django is not installed on the server yet, but you can install it by running the following command:
pip install django==3.2
Now, run the migration commands so that you can create a superuser and start working with the models you created for the application. Make sure that you have inserted cd into the root of your project (/project).
python3 manage.py makemigrations && python3 manage.py migrate
Create a superuser by running the command below and filling in the prompt:
python3 manage.py createsuperuser
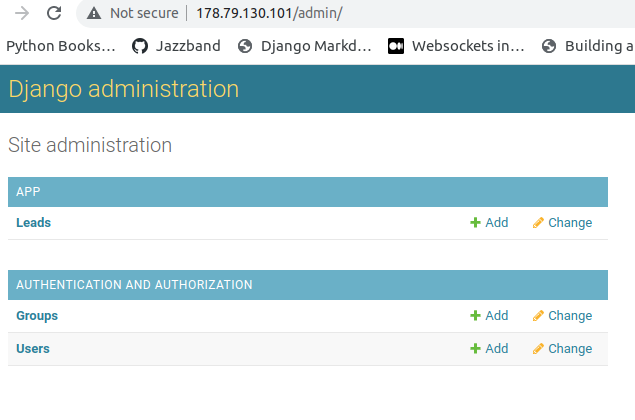
Now, you can use the credentials inputted above to access the admin of your application (http://178.79.130.101/admin/). Once that is done, you can run your application by running this command:
python3 manage.py runserver
You will now be able to access your application with the IP address of your server.
Conclusion
In this tutorial, you built a lead management application. Then, you learned how to get a Linux server from Linode, set up the security configuration, set reverse proxy with NGINX, and run your Django application on a server.
You can build on what you’ve learned in this tutorial by going through the Django deployment checklist and trying to find solutions to each of the items.
Want to see more of what we offer for Django on our end? Then check out our page on how Honeybadger supports Django.

Written by
Muhammed AliMuhammed is a Software Developer with a passion for technical writing and open source contribution. His areas of expertise are full-stack web development and DevOps.