This is part 3 in a series looking at implementing various sorting algorithms with Ruby. Part 1 explored bubble sort, and part 2 explored selection sort.
As we've discussed in the previous posts in this series, understanding how to sort data is an integral part of any software engineer's toolkit. Luckily, most higher-level languages, like Ruby, already have built-in methods that are efficient in sorting arrays. For instance, when you call .sort on an array, you are using quicksort under the hood. In this post, we're going to learn a similar algorithm to quick sort -- merge sort. Both of these algorithms utilize a "divide and conquer approach." Merge sort was invented by John von Neumann in 1945. Von Neumann was a famous computer scientist and physicist who is also known for working on the Manhattan Project, the "mini-max" theorem, the Monte Carlo method, and more.
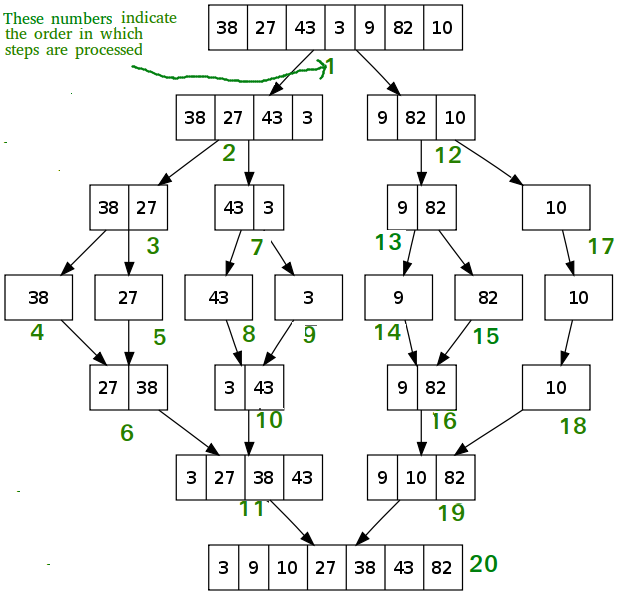
At a high level, the merge sort algorithm splits the array into two sub-arrays again and again (utilizing recursion) until only one element remains. From there, the elements are "merged" back together to form the final, sorted array. Unlike bubble sort and other similar algorithms, merge sort is difficult to understand without visualization. The following diagram is a step-by-step illustration from Wikipedia showing how merge sort works. However, don't worry if you're still a bit fuzzy about what's going on; we will work through the code next.
Unlike the algorithms we've previously discussed (i.e., bubble and selection), which were basically impractical for any real task, merge sort performs much better in terms of Big-O notation. If you're unfamiliar with Big-O notation, it represents the worst-case performance of different algorithms. This allows us to easily compare algorithms based on their Big-O. For example, an algorithm with a Big-O of O(1) means that the worst-case run-time is constant as the number of elements, "n", grows, whereas an algorithm with a Big-O notation of O(n) means that the worst-case run-time increases linearly as n grows. This means that if you have an array with 100 elements and must choose between sorting algorithms that are O(n) and O(1), you would choose the O(1) algorithm because O(1) definitely beats O(100). The bubble and selection sort algorithms both have a worst-case of O(n^2). This is not very useful because it means the algorithm will perform extremely slowly as the number of elements increases. In contrast, merge sort performs at n log(n), which means the algorithm will not sacrifice as much efficiency as bubble or selection sort.
Let's walk through the example in the diagram. We start with an array of [38, 27, 43, 3, 9, 82, 10] and then split the array in half until we're left with single elements.
- We split the starting array into two halves:
[38, 27, 43, 3]and[9, 82, 10]. - We split the first half again:
[38, 27]and[43, 3]. - We split the first half into single elements:
[38],[27],[43], and[3]. - We sort the 38 and 27 to make
[27, 38]and the 48 and 3 to make[3, 43]. - Putting these together, we have
[3, 27, 38, 43]. - Now, we move to the second half of the original array, which was
[9, 82, 10]. We split it in half and get[9, 82]and[10]. - We split
[9, 82]into[9]and[82], and then we have[10], which is already singular. - We sort the
[9, 82]back together and then merge the[10]back in, resulting in[9, 10, 82]. - Finally, we merge
[3, 27, 38, 43]and[9, 10, 82]to get[3, 9, 10, 27, 38, 43, 82].
A Ruby Implementation
The following is a merge sort algorithm written in Ruby:
class MergeSort
  def sort(numbers)

    num_elements = numbers.length
    if num_elements <= 1
      return numbers
    end

    half_of_elements = (num_elements / 2).round

    left  = numbers.take(half_of_elements)
    right = numbers.drop(half_of_elements)

    sorted_left = sort(left)
    sorted_right = sort(right)

    merge(sorted_left, sorted_right)
  end

  def merge(left_array, right_array)
    if right_array.empty?
      return left_array
    end

    if left_array.empty?
      return right_array
    end

    smallest_number = if left_array.first <= right_array.first
      left_array.shift
    else
      right_array.shift
    end

    recursive = merge(left_array, right_array)

    [smallest_number].concat(recursive)
  end
end
Let's walk through what's happening here. First, we'll focus on the sort method at the top.
  def sort(numbers)

    num_elements = numbers.length
    if num_elements <= 1
      return numbers
    end

    half_of_elements = (num_elements / 2).round

    left  = numbers.take(half_of_elements)
    right = numbers.drop(half_of_elements)

    sorted_left = sort(left)
    sorted_right = sort(right)

    merge(sorted_left, sorted_right)
  end
The goal of this portion of the code is to split the given numbers in half until we're left with only one item in each. To see it in action, comment out the last line (merge(sorted_left, sorted_right)) and, instead, print out sorted_left and sorted_right. Running the program by passing in our example array, you should see this in your terminal:
merge_sort = MergeSort.new
puts merge_sort.sort([38, 27, 43, 3, 9, 82, 10])
ruby ruby-merge-sort.rb
27
43
38

3
9
82
10
Great! Our code has taken our initial array and split it in half. Let's take a look at the merge portion of the code next.
  def merge(left_array, right_array)
    if right_array.empty?
      return left_array
    end

    if left_array.empty?
      return right_array
    end

    smallest_number = if left_array.first <= right_array.first
      left_array.shift
    else
      right_array.shift
    end

    recursive = merge(left_array, right_array)

    [smallest_number].concat(recursive)
  end
First, we check whether either of the sub-arrays is empty. If so, we can simply return the other one. Otherwise, given that both sub-arrays are not empty, we compare the value of each array's first element and then shift the compared values to prevent the creation of an infinite loop. Next, we utilize recursion (more on that in a second!) on the original array until we can finally connect the two arrays together, nicely sorted.
A bit more on recursion
If there is something that looks weird in our code, my guess is it's this line: recursive = merge(left_array, right_array) We're calling our merge method from within itself. Whoa! This is what we call recursion -- a technique in which a function calls itself one or more times until a specified condition is met. In our case, merge will continue to be called until the left or right array is empty. If you're interested in learning more about recursion, here is an example that walks through utilizing Ruby and recursion to write a function for a Fibonacci Sequence.
Wrap-up
I hope you enjoyed learning more about merge sort! Understanding how it works at a high level, as well as why it is a more efficient choice than bubble or selection sort will likely come in handy in job interviews or your day-to-day tasks. Also, there are a number of merge sort variants that you can read more about it on Wikipedia if you're interested. Until next time ... happy sorting!


