How to build your own user authentication system in Rails
When building an app, you'll probably need to handle user authentication in one form or another. In Rails applications, several pre-built libraries and gems make it a breeze to build user authentication including well-known libraries like Devise, Doorkeeper and OmniAuth. These libraries work well out of the box, but there's a caveat, as developers must follow certain configuration and design rules for each library. Therefore, some developers might prefer to roll out their own authentication layer and configure it to their specifications. In this article, we'll explain how to build a custom authentication layer from scratch for a Ruby on Rails app.
Prerequisites
You'll need the following to complete this tutorial:
- Some knowledge of working with Ruby on Rails.
- A local installation of Ruby on Rails; we'll be using Ruby version 3.2.2 and Rails version 7.0.7 for this tutorial.
Quick note: The source code for this tutorial can be found here.
Before diving into the tutorial, we’ll explain why user authentication is needed.
The importance of user authentication
Generally speaking, authentication is the process of verifying the identity of an app's users before giving them access to certain resources. It is a very fundamental feature of any app and helps with the following:
-
Preventing unauthorized access - Authentication, in whatever form it's been implemented, ensures that only authorized persons access an app’s resources. Without it, your app would be open for anyone to access, which could lead to data loss and abuse.
-
Accountability - With authentication, it's possible to associate different actions performed in an app with the authenticated user who performed them. This forms a very powerful accountability mechanism that can help maintain app security and provides an audit history of actions performed within an app.
-
Providing a personalized user experience - In many multi-tenant software-as-a-service (SaaS) apps, providing a personalized user experience is made possible by building a user authentication layer. Thus, regardless of whether the app has ten or ten-thousand users, each user has a tailored experience.
Earlier in this article, we pointed out some of the reasons a developer might want to roll out their own authentication solution. Next, we’ll highlight some of these ready-made solutions and note where they fall short.
A brief look at current authentication solutions
Several pre-built user authentication solutions are available to Rails developers, including the following:
-
Devise - A very popular authentication library with a diverse set of features ranging from user sign up to password resets, all of which can help developers quickly build a robust authentication system for a Rails application. Although it's possible to build a production-ready user authentication system using Devise, it’s worth noting that the library has some limitations: pre-configured views, controllers and modules that may take time to customize, and some opinionated defaults that might not work for every project.
-
Clearance - A lightweight authentication library that tries to offer simplicity and customization for building user authentication in Rails apps. Clearance might work well for projects that don't require complex user authentication rules, but if you need to perform extensive customizations, you will likely find the gem to be limiting.
-
Sorcery - Yet another excellent gem that allows developers to choose the particular authentication modules they would like to have in their app. Some of the concerns that come with using this gem include less frequent updates compared to other libraries and a lack of extensive documentation when compared to a library like Devise.
Other solutions are Doorkeeper, OmniAuth, JWT and Authlogic, but we won't get into them for now. We should note that regardless of the library used, you will likely end up with a lot of customization overhead if you need very specific authentication features and have to deal with opinionated defaults that come packaged with most of these pre-built authentication solutions.
With these limitations in mind, we’ll begin building a user authentication system from scratch in the next section.
Setting up the project
Run the command below to generate a new app:
rails new simple_auth_app
We should now have a simple Rails 7 app that will form the foundation for building the user authentication features from scratch.
Creating a user model
After creating our bare-bones Rails app, the next step is to create a User model. You might ask why we need this model. As obvious as it might sound, one of the basic features of a user authentication system is the ability to store and retrieve user credentials. These credentials include the user’s name, email address, password and other personal information, and we'll need a model to store and retrieve these attributes.
In the new app's root, run the command below to generate the User model with some basic attributes:
rails generate model User email password_digest
This command should generate a model, some tests, and a migration to create the users table. Before we continue, you may have noticed that we seem to be missing the user's password, but we have password_digest. The reason for this discrepancy is whenever you're dealing with user authentication, security is of utmost importance. Since it would be bad practice to store a user's password in plain text, we instead take the password supplied by the user when they sign up for the first time, encrypt it, and then save the encrypted form in the password_digest field. This field would be useless to anyone who accesses it via nefarious means. However, don't worry about this for now; we'll cover it in detail later in this tutorial.
For now, open up the generated migration and edit it as shown below:
# db/migrate/XXXXX_create_users.rb

class CreateUsers < ActiveRecord::Migration[7.0]
  def change
    create_table :users do |t|
      t.string :email
      t.string :password_digest

      t.timestamps
    end
    add_index :users, :email, unique: true # Add this line
  end
end
Note: We add an index on the email column with a unique constraint to ensure that all user-supplied emails are unique.
Next, run the migration to create the users table:
rails db:migrate
With that done, let's now turn our attention to something we highlighted earlier, encrypting a user's password.
Encrypting user passwords
As mentioned, storing user passwords in plain format defeats the purpose of user authentication since anyone who manages to access the database can easily access other users’ accounts. We also mentioned that the way to mitigate this risk is by encrypting user passwords. For Ruby on Rails apps, we can do this easily using the bcrypt gem, the Ruby variant of the OpenBSD bcrypt() password-hashing algorithm.
By default, new Rails apps come with the gem commented out in the Gemfile, and all we need to do is to uncomment it:
# Gemfile
...

gem "bcrypt", "~> 3.1.7"

...
Run bundle install to install it.
Next, to reference bcrypt within the User model, we use a nifty Active Model class method called has_secure_password that accepts two arguments:
- A password attribute supplied by the user.
- A set of validations the password has to adhere to, such as password length. However, if you don't want to have any validations, just pass
validations: falseas the second argument.
Now that we have an idea of what has_secure_password is all about, let's add it to the User model, as well as some basic validations, to ensure the user submits a valid email. For this last part, we'll use the standard Ruby library's URI::MailTo and, specifically, the EMAIL_REGEXP module:
# app/models/user.rb

class User < ApplicationRecord
  has_secure_password

  validates :email, presence: true
  validates_format_of :email, with: URI::MailTo::EMAIL_REGEXP
end
This should be enough to get us going. We'll progressively add more features to the User model, but for now, let's delve into views.
Adding controllers and views
Allowing users to register on our app requires us to present them with the views to do so. We'll keep it as basic as possible with a simple user registration form and another one for logging in. We'll also add a basic dashboard view to redirect a user when they successfully log in and a simple home page where they'll be redirected when they log out.
The homepage controller
Let's start with the homepage. Run the command below to generate it:
rails generate controller home welcome
This command generates a bunch of files and inserts a relevant route to routes.rb. Let's modify this route so that it becomes the root route:
# config/routes.rb

root 'home#welcome'
For this page, we'll keep things simple and just add a title "Homepage", a link to sign up, and another link to sign in (we'll add these as dummy links for now and then change them after we work on the respective controller actions and views).
<nav>
  <ul>
    <li><strong>Simple Auth App</strong></li>
  </ul>
  <ul>
    <li><a href="#">Sign up</a></li>
    <li><a href="#">Sign in</a></li>
  </ul>
</nav>

<h1>Homepage</h1>
Quick note: We are using Pico CSS to style the app, but feel free to use whatever works best for you.
The user controller and sign up view
Next, let's add a users_controller by running the following command:
rails generate controller users
Now open up the generated users_controller and modify it as shown below:
# app/controllers/users_controller.rb

class UsersController < ApplicationController

  def new
    @user = User.new
  end

  def create
    @user = User.new(user_params)
    if @user.save
      redirect_to root_path, notice: 'Successfully registered!'
    end
  end

  private

  def user_params
    params.require(:user).permit(:email, :password, :password_confirmation)
  end
end
Let's break down what's going on here:
- First, we define an action,
new, with a correspondingapp/views/users/new.html.erbview, which is where the user sign-up form will be placed. - Next, the
createaction redirects the user back to the root page if the respective user model is created successfully.
We should also whitelist the necessary user_params to play nice by Rails mass-assignment rules.
With that done, let's work on the sign-up view:
# app/views/users/new.html.erb

<h2>Sign up</h2>
<%= form_with model: @user, url: sign_up_path do |form| %>
  <label for="email">
    Email
    <%= form.email_field :email, required: true %>
  </label>
  <label for="password">
    Password
    <%= form.password_field :password, required: true %>
  </label>
  <label for="password_confirmation">
    Password Confirmation
    <%= form.password_field :password_confirmation, required: true %>
  </label>
  <%= form.submit "Sign Up" %>
<% end %>
Then, head over to the routes.rb file to define the route for this view:
# config/routes.rb

Rails.application.routes.draw do
  root 'home#welcome'
  get 'sign_up', to: 'users#new', as: :sign_up
  post 'sign_up', to: 'users#create'
end
At this point, you can test the user sign-up process by spinning up rails s, visiting localhost:3000, clicking on the sign up link, and filling in the details in the sign-up form. If everything goes according to plan, you should be redirected to the homepage with a notification of "Successfully registered!".

With that bit working as expected, let's improve the user sign-up process by requiring users to confirm their email address.
User confirmation
In the previous process, we successfully signed up users with the simple registration form implementation. This is good, but it misses a very important feature, which is to ensure that any user who registers on our app uses a valid email address.
An effective process to ensure this is requiring that users confirm their email address, which can be achieved by having the app send out a confirmation message with a unique confirmation token to the email address submitted by a user when they first sign up. When users click on this link, it should redirect them to the log-in page and update their confirmation status to confirmed.
To begin, we'll modify the users table by adding a confirmed_at column to capture the timestamp of when a user confirms their account:
rails generate migration add_column_confirmed_at_to_user confirmed_at:datetime
Then, run the resulting migration with rails db:migrate.
Next, we’ll modify the User model as shown below:
# app/models/user.rb

class User < ApplicationRecord
  has_secure_password

  def confirm!
    update_columns(confirmed_at: Time.current)
  end

  def confirmed?
    confirmed_at.present?
  end

  def unconfirmed?
    !confirmed?
  end

  def generate_confirmation_token
    signed_id expires_in: 15.minutes
  end

end
Some important notes on what we've just done:
- We define a method,
confirm!, which will update a user's record with the current timestamp for the confirmed_at column when this method is called. confirmed?- Returnstrueif a user’s record contains a confirmed_at timestamp. This will let us know that a user’s email address is confirmed. The reverse of this is theunconfirmedmethod.generate_confirmation_token- Here, we use Active Record's Signed Id module to generate a tamper-proof signed ID which takes two arguments: the expiration duration and an optionalpurpose, which can work as a versioning method for the signed IDs. We'll use this signed ID in the confirmation email message sent to users. You can read more about this subject here.
Before we begin working on the confirmations controller, let's modify the users controller slightly to let a user know that they need to confirm their email address:
# app/controllers/users_controller.rb

class UsersController < ApplicationController

  ...

  def create
    @user = User.new(user_params)
    if @user.save
      redirect_to root_path, notice: 'A confirmation email has been sent to your registered email.'
    else
      render :new, status: :unprocessable_entity
    end
  end

  ...
end
The confirmation mailer
Run the command below to create a new mailer, which we'll use to send the confirmation email message:
rails generate mailer User confirmation
This command results in a mailer file named app/mailers/user_mailer.rb, some test files, and the mailer views. Let's work on the mailer first:
# app/mailers/user_mailer.rb

class UserMailer < ApplicationMailer

  def confirmation(user, confirmation_token)
    @user = user
    @confirmation_token = confirmation_token

    mail to: @user.email, subject: "Confirm your account"
  end
end
Next, we need a confirmations controller where we'll define the respective confirmation actions, as well as the routes that go with them:
Create a new file app/controllers/confirmations_controller.rb and edit it as shown below:
# app/controllers/confirmations_controller.rb

class ConfirmationsController < ApplicationController

  def confirm_email
    @user = User.find_signed(params[:confirmation_token])

    if @user.present?
      @user.confirm!
      redirect_to root_path, notice: "Your account has been confirmed."
    end
  end

end
Then, add the route to this action in routes.rb:
# config/routes.rb

Rails.application.routes.draw do
  ...

  get 'confirmations/confirm_email/:confirmation_token', to: 'confirmations#confirm_email'
end
Moving on, let's deal with the mailer views. Open up both confirmation email views and edit accordingly:
<!-- app/views/user_mailer/confirmation.html.erb -->

Hey there,
Thanks for signing up. Please <%= link_to 'confirm your email', email_confirmation_url(@confirmation_token) %>.
<!-- app/views/user_mailer/confirmation.text.erb -->

Hey there,
Thanks for signing up. Please <%= link_to 'confirm your email', email_confirmation_url(@confirmation_token) %>.
Next, we update the User model:
# app/models/user.rb

class User < ApplicationRecord
  ...

  def send_confirmation_email!
    confirmation_token = generate_confirmation_token
    UserMailer.confirmation(self, confirmation_token).deliver_now
  end

end
Here, we define a send_confirmation_email! method, which generates a confirmation_token and then calls the UserMailer's confirmation method to send an email message with the user model and the confirmation_token as arguments.
Adding default URL options
To test this locally, we need to add a minimal configuration to the config/environments/developement.rb file so that the URL we defined in the mailer views will work as expected:
# config/environments/developement.rb

config.action_mailer.default_url_options = { host: "localhost", port: 3000 }
Finally, let's modify the create action in the users controller to send the confirmation email:
# app/controllers/users_controller.rb

class UsersController < ApplicationController

  ...

  def create
    @user = User.new(user_params)
    if @user.save
      @user.send_confirmation_email! # Add this line
      redirect_to root_path, notice: 'A confirmation email has been sent to your registered email.'
    else
      render :new, status: :unprocessable_entity
    end
  end

  ...
end
Testing the mailer locally
To test this setup in your local machine (development environment), spin up the Rails server rails s and complete the sign-up process. If everything goes according to plan, you should see the email message sent in the server logs, as shown below:
Alternatively, if you need to use an email preview tool like letter_opener, add the gem:
# Gemfile

gem "letter_opener", group: :development
Then, run bundle install. Finally, open up the development configuration file and add the following lines:
# config/environments/developement.rb

config.action_mailer.delivery_method = :letter_opener
config.action_mailer.perform_deliveries = true
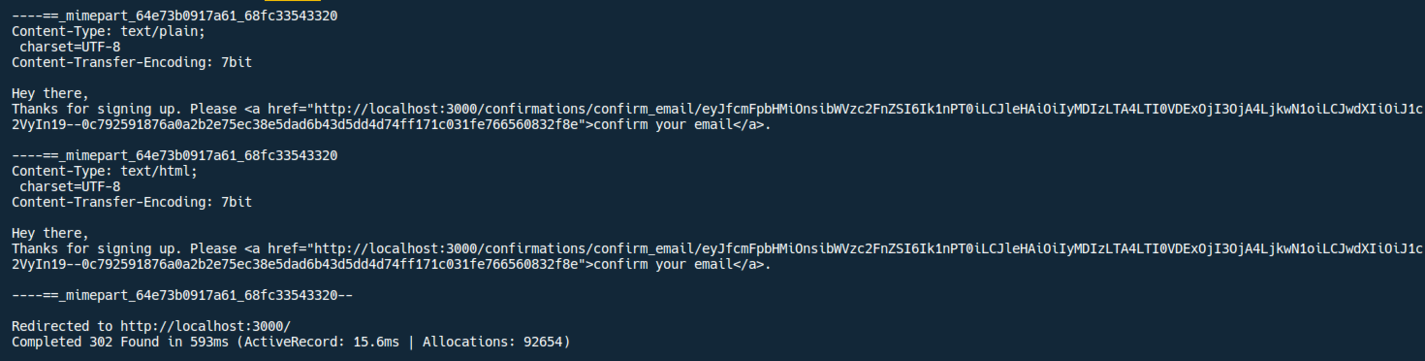
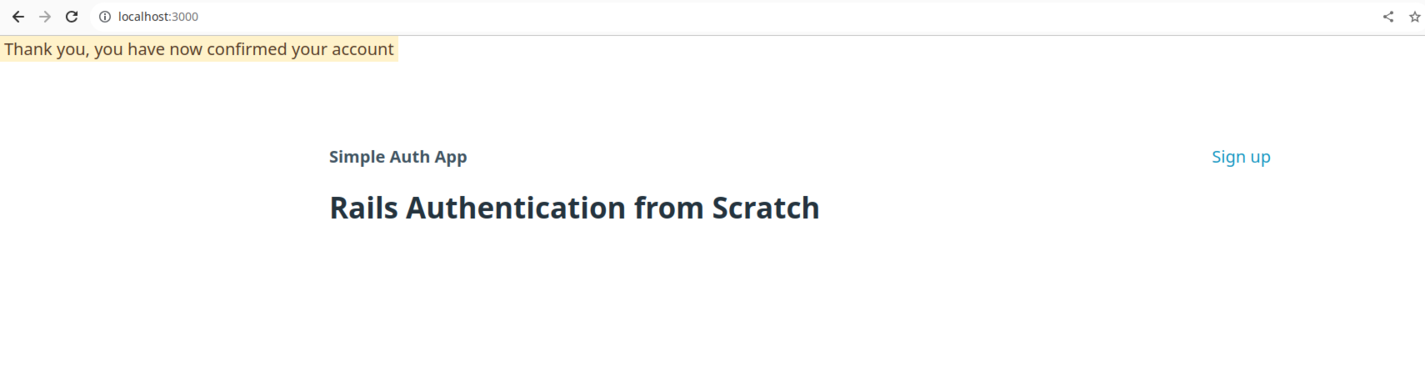
Awesome, now spin up the server again and test it. If everything works as expected, you should get the email message rendered in the browser, and after clicking the confirmation link, the user account will be confirmed, and the user redirected accordingly:
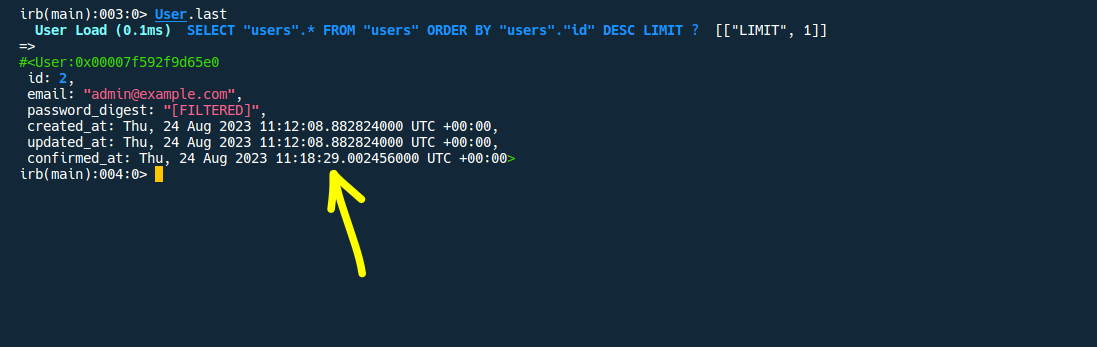
We can also check whether the user is confirmed as required:
Great, our basic user registration process is complete. Let's turn our attention to the sign-in process.
User log-in
An important aspect that you'll have to deal with when rolling out your own authentication is how to store and reference user-data across requests. In simple terms, once a user logs in, the Rails app will need a way to "remember" that users are logged in and track what they are doing in the app until they log out.
This is good to know, but considering that the HTTP protocol is stateless, we need to find a way to store such user data across multiple requests since the server will not do this automatically for us. We can do this using sessions, which are basically small data-storages created during a request and can be accessed in later requests.
With this in mind, we'll need to create a sessions controller:
rails generate controller sessions
Open the new controller and modify accordingly:
# app/controllers/sessions_controller.rb

class SessionsController < ApplicationController
  def new
  end

  def create
    @user = User.find_by(email: params[:user][:email].downcase)
    if @user
      if @user.authenticate(params[:user][:password])
        reset_session
        session[:current_user_id] = @user.id
        redirect_to dashboard_index_path, notice: "Signed in."
      else
        flash.now[:alert] = "Incorrect email or password."
        render :new, status: :unprocessable_entity
      end
    else
      flash.now[:alert] = "Incorrect email or password."
      render :new, status: :unprocessable_entity
    end
  end

  def destroy
    reset_session
    redirect_to root_url
  end
end
Let's explain what's going on here:
- The
newaction simply renders the user log-in form. - In the
createaction, we first try to find a user by utilizing the params submitted when the user submits the log-in form, specifically, their email address and password. Then, we call theauthenticatemethod, which is conveniently supplied byhas_secure_password. - We then
reset_sessionto remove any lingering session data and then store a new session with the user's ID. -Next, we redirect the user to a dashboard view (which we'll create later in the tutorial). - The
logoutis rather simple since we are just removing all stored sessions and redirecting the user to the root page.
Next, let's add the log-in and log-out routes to routes.rb:
# config/routes.rb
...
  get "login", to: "sessions#new", as: :login
  post "login", to: "sessions#create"
  delete "logout", to: "sessions#destroy", as: :logout
...
Then, we’ll create the login view:
<!-- app/views/sessions/new.html.erb -->

<%= form_with url: login_path, scope: :user do |form| %>
  <label for="email">
    Email
    <%= form.email_field :email, required: true %>
  </label>
  <label for="password">
    Password
    <%= form.password_field :password, required: true %>
  </label>
  <%= form.submit "Sign In" %>
<% end %>
Also remember to update the welcome page:
<!-- app/views/home/welcome.html.erb -->

<nav>
  ...
  <ul>
    ...
    <li><%= link_to 'Login', login_path %></li>
  </ul>
</nav>
...
Finally, we'll define the dashboard view to which authenticated users will be redirected after signing in:
rails generate controller dashboard index
Next, let's create a concern that will give us access to current_user, which we can reference more easily across the app.
Creatingcurrent_user and user_signed_in? helpers
Having a helper to reference the currently logged-in user would be convenient. To do this, we need to create a concern where we'll define current_user and, to check whether a user is signed in, the user_signed_in? helper:
# app/controllers/concerns/authenticated.rb

module Authenticated
  extend ActiveSupport::Concern

  included do
    before_action :current_user
    helper_method :current_user
    helper_method :user_signed_in?
  end

  def current_user
    if session[:current_user_id]
      current_user ||= User.find_by(id: session[:current_user_id])
    end
  end

  def user_signed_in?
    current_user.present?
  end

end
Quick note: What we are using here is a basic version of creating a current_user. Alternatively, consider using ActiveSupport's CurrentAttributes, which you can learn more about here.
Next, include this concern in the application controller so that it's available throughout:
# app/controllers/application_controller.rb

class ApplicationController < ActionController::Base
  include Authenticated
end
With that done, let's now create a navigation-view partial to account for this new logic:
<!-- app/views/shared/_navbar.html.erb -->

<nav>
  <ul>
    <li><strong>Simple Auth App</strong></li>
  </ul>
  <ul>
    <% if user_signed_in? %>
    <li><%= link_to 'Log out', logout_path, data: { turbo_method: :delete } %></li>
    <% else %>
        <li><%= link_to 'Sign up', sign_up_path %></li>
        <li><%= link_to 'Login', login_path %></li>
    <% end %>
  </ul>
</nav>
Then, modify the dashboard index view accordingly:
<!-- app/views/dashboard/index.html.erb -->

<%= render 'shared/navbar' %>
<h1>Dashboard</h1>
<p>Welcome, <%= current_user.email %></p>
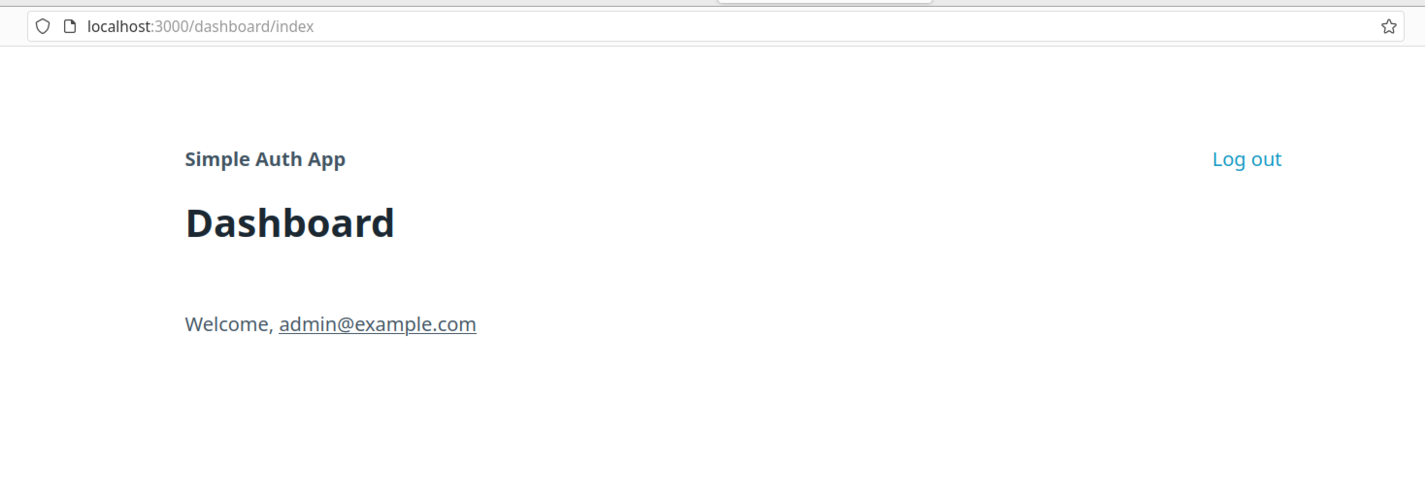
The dashboard view should now appear as shown below:
Wrapping up and next steps
In this tutorial, we've built a functioning user authentication system for a Ruby on Rails 7 app from scratch. It's working well and very flexible for further modification. However, some important authentication features have not been put in place, and we challenge you, the reader, to make an attempt at building them:
- Secure the dashboard controller - With a gem like Devise, you get a helper method,
authenticate_user!, which we use in abefore_actioncallback in controllers where we want to control access. For custom authentication, it's up to us to build this feature, and I highly encourage you to try it out for yourself. - Password resets and 'remember me' features - This is something users might expect from your app but we didn't have to build. Again, consider challenging yourself to build these features.
That's a wrap. Happy coding.

Written by
Aestimo KirinaAestimo is a family guy, Ruby developer, and SaaS enterpreneur. In his free time, he enjoys playing with his kids and spending time outdoors enjoying the sun, running, hiking, or camping.