Working with GraphQL and Django
Have you ever wondered whether there is a better way to develop APIs other than REST? If you have asked this question, then you are in luck. GraphQL is an open-source runtime for querying existing data, as well as a manipulation language for APIs.
In this article, you will learn what GraphQL is about, the problem it solves, and how to go about connecting it with Django to build amazing APIs. You will learn different ways to use GraphQL to query a database and set up authentication when you are building an API. Building a GraphQL API with Django requires some configurations, and I will explain all of them as we go.
You can get the full project on GitHub.
Prerequisites
To follow this article, the following are required:
- Prior knowledge of Django and Python
- Python v3.1
- Django v3.8
A Brief Introduction to GraphQL and How it Works
As I said earlier, GraphQL is a data query and manipulation language for APIs. GraphQL was developed to solve a problem developers were having with REST that led to the over-fetching or under-fetching of data, as well as inflexibility with impromptu API changes.
GraphQL enables you to make declarative data requests, which means that you can describe the data you want, and GraphQL provides it specifically. It exposes a single endpoint and responds with precise data from the client's request.
To get data from a GraphQL API, create queries from the frontend or client to get data from that particular endpoint.
Setting up GraphQL to Work with Django
To build GraphQL APIs with Django, there are some settings you will have to go through, and in this section, I will go through how you can do that.
Assuming you have Python and Django installed, follow the steps below to set up GraphQL:
- Install Graphene and Graphene-Django. Graphene is a tool that makes working with GraphQL in Python easy, while Graphene-Django adds some additional abstractions to make adding GraphQL functionality to your Django project a breeze. To install Graphene and Graphene-Django, run the following on your command line/terminal,
pip install graphene graphene-django. - Create a new directory for your project, navigate to the directory you just created and create a new Django project and app by running
django-admin startproject graphql_tutorial . && python3 manage.py startapp app. - Add
'app'toINSTALLED_APPSin yoursettings.pyfile.
Ways to Query the Database When working With GraphQL
In this section, you will learn how to make some basic queries with GraphQL in Django.
Open your preferred text editor, navigate to app/models.py, and paste the code below, which is just a simple model for a contact list application.
from django.db import models

class Contact(models.Model):
    name = models.CharField(max_length=200)
    phone_number=models.CharField(max_length=200)
    def __str__(self):
        return self.name
Next, we must create a schema for the model. In this case, the schema describes the models that will be provided to GraphQL; you can also think of it as serializers in REST.
To set up the schema, create a new file at the same folder where you have your settings.py file and name it schema.py; then, paste the following code:
import graphene
from graphene_django import DjangoObjectType #used to change Django object into a format that is readable by GraphQL
from app.models import Contact

class ContactType(DjangoObjectType):
    # Describe the data that is to be formatted into GraphQL fields
    class Meta:
        model = Contact
        field = ("id", "name", "phone_number")

class Query(graphene.ObjectType):
    #query ContactType to get list of contacts
    list_contact=graphene.List(ContactType)

    def resolve_list_contact(root, info):
        # We can easily optimize query count in the resolve method
        return Contact.objects.all()

schema = graphene.Schema(query=Query)
Next, paste the following code sample at the bottom part of your settings.py file to state the schema location for Graphene.
GRAPHENE = {
    "SCHEMA": "graphql_tutorial.schema.schema"
}
Then, to use Graphene-Django in your Django project, add it to INSTALLED_APPS in your setting.py file.
INSTALLED_APPS = [
# ...
'app',
'graphene_django',
]
Now, replace the urls.py file of your project with the code sample below:
from django.contrib import admin
from django.urls import path
from django.views.decorators.csrf import csrf_exempt
from graphene_django.views import GraphQLView #View for the user interface
from graphql_tutorial.schema import schema #Schema we want to query

urlpatterns = [
    path('admin/', admin.site.urls),
    # This URL will provide a user interface that is used to query the database
    # and interact with the GraphQL API.
    path("graphql", csrf_exempt(GraphQLView.as_view(graphiql=True, schema=schema))),
]
Next, migrate the database to apply the model objects in the database. You can do this by running the following commands:
python manage.py makemigrations
python manage.py migrate
After the migrations are done, we need to create a superuser that you will use to add some data to the database. You can create a superuser by running the command below and filling up the required information.
python manage.py createsuperuser
Now we have to make our models visible in the admin page so that we can add some data to the database. To do this, navigate to app/admin.py and paste the following code:
from django.contrib import admin
from .models import Contact
admin.site.register(Contact)
Now go to http://127.0.0.1:8000/admin on your browser and log in with the user you just created and populate the database.
Next, open http://127.0.0.1:8000/graphql and press the run button to query the API and get the data from the database.

Note: Graphene changes fields with underscore camelCase; it change phone_number to phoneNumber.
Build GraphQL API CRUD Operations
In the previous section, we went through how to set up GraphQL to work with Django and fetch some data from the database.
In this section, you will learn how to add create, read, update, and delete functionalities in your GraphQL API. You will learn how to code out functionalities to create, read, update, and delete a particular contact.
Read
Next, we will create an endpoint where the frontend will be able to query the API with a particular id, and the front end will display the contact attached to that id.
To do this, go to your schema.py file and update the Query class with the following code:
# ...
class Query(graphene.ObjectType):
    #query ContactType to get list of contacts
    list_contact=graphene.List(ContactType)
    read_contact = graphene.Field(ContactType, id=graphene.Int()) # id=graphene.Int() gives id an integer datatype

    def resolve_list_contact(root, info):
        # We can easily optimize query count in the resolve method
        return Contact.objects.all()
    def resolve_read_contact(root, info, id):
        # get data where id in the database = id queried from the frontend
        return Contact.objects.get(id=id)

schema = graphene.Schema(query=Query)
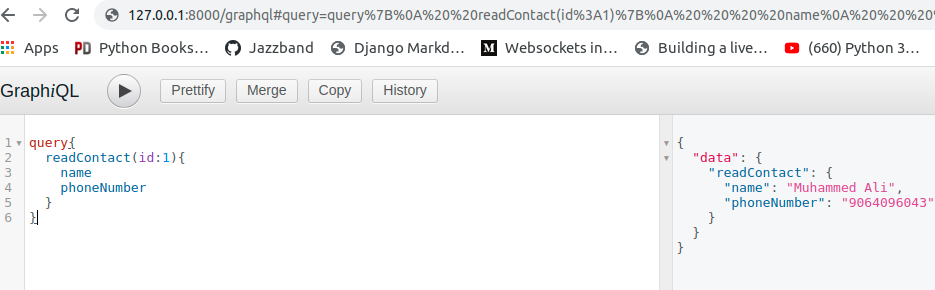
Now run your server, open the GraphQL UI, on your browser and run the following:
query {
  readContact(id: 1) {
    name
    phoneNumber
  }
}
You should then see the contact attached to id=1.
Create
To create new data in the database, we need a class called Mutation instead of Query, which we used previously. Mutation in GraphQL is used to modify data or create data in the database and returns a value.
Add create functionality by pasting the code below into your schema.py file. You can put it right below the Query class.
class ContactMutation(graphene.Mutation):
    class Arguments:
        # Add fields you would like to create. This will corelate with the ContactType fields above.
        name=graphene.String()
        phone_number=graphene.String()
    contact = graphene.Field(ContactType) # define the class we are getting the fields from
    @classmethod
    def mutate(cls, root, info, name, phone_number):
        # function that will save the data
        contact = Contact(name=name, phone_number=phone_number) #accepts all fields
        contact.save() #d=save the contact

class Mutation(graphene.ObjectType):
    # keywords that will be used to do the mutation in the frontend
    create_contact= ContactMutation.Field()

schema = graphene.Schema(query=Query, mutation=Mutation) # Tell the schema about the mutation you just created.
Now run your server, open the GraphQL UI on your browser, and run the following:
mutation nameOfMutation {
  createContact(name: "New Contact", phoneNumber: "486054-850"){
    contact {
      name,
      phoneNumber
    }
  }
}
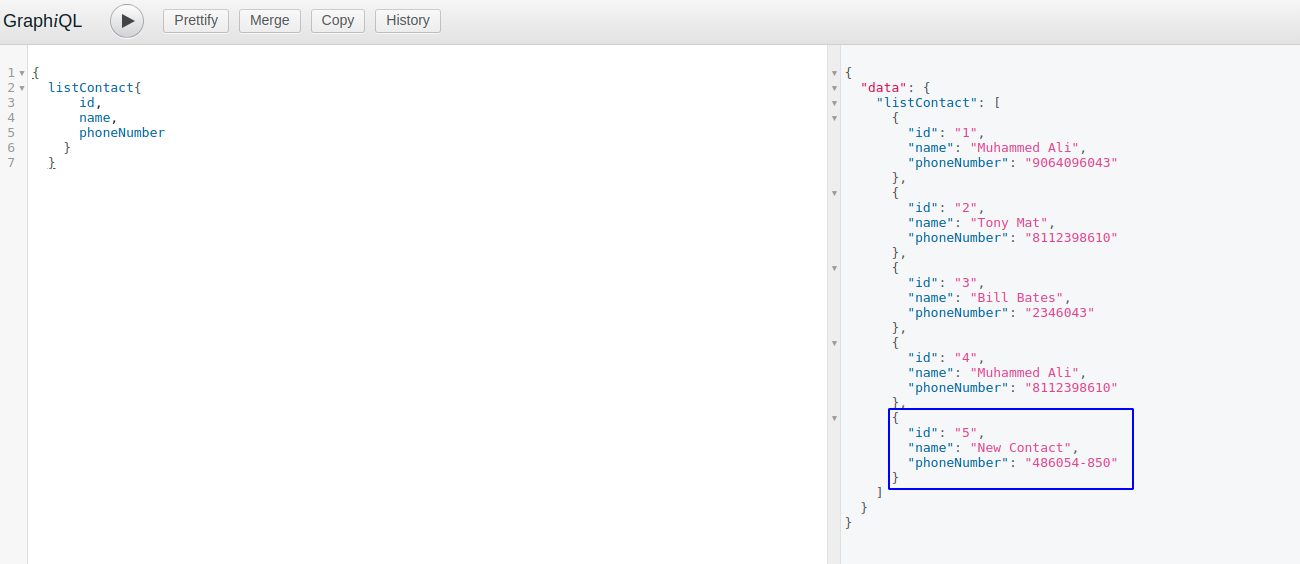
Next, still on the browser, run the following command, and you will see that the contact you just saved is included in the list of contacts.
{
  listContact {
      id,
      name,
      phoneNumber
    }
  }
Update
To update, we will get a particular contact using their id and then use GraphQL to update the data. You can do this by updating your ContactMutation and Mutation class with the code below:
class ContactMutation(graphene.Mutation):
    class Arguments:
        # add fields you will like to create. This will corelate with the ContactType fields above
        id = graphene.ID() # new
        name=graphene.String()
        phone_number=graphene.String()
    contact = graphene.Field(ContactType) # define the class we are getting the fields from

    @classmethod
    def mutate(cls, root, info, name, phone_number, id):
        # function that will save the data
       ###########Create##############
        contact = Contact(name=name, phone_number=phone_number) #accepts all fields
        contact.save() #save the contact

      ###########Update##############
        get_contact = Contact.objects.get(id=id)
        get_contact.name = name #override name
        get_contact.phone_number = phone_number #override phone_number
        get_contact.save()
        return ContactMutation(contact=get_contact)

class Mutation(graphene.ObjectType):
    # keywords that will be used to do the mutation in the frontend
    create_contact = ContactMutation.Field()
    update_contact = ContactMutation.Field() #new
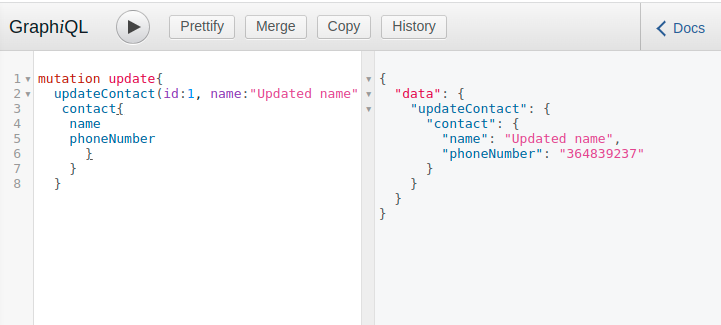
Now if you run the query below on the browser, you will see that the contact has been updated successfully.
mutation update {
  updateContact(id: 1, name: "Updated name", phoneNumber: "364839237") {
    contact{
      name
      phoneNumber
     }
  }
}
Delete
To delete, you need to get the data related to a particular id and then use the delete() function to delete it.
You can add delete functionality by adding the new class below to your schema.py file.
class ContactDelete(graphene.Mutation):
    class Arguments:
        id = graphene.ID()

    contact = graphene.Field(ContactType)

    @classmethod
    def mutate(cls, root, info, id):
        contact = Contact(id=id)
        #########Delete##############
        contact.delete()
Then add delete_contact = ContactDelete.Field() to your Mutation class. Now if you run the query below on your browser, you will see that GraphQL deleted the contact with id of 1.
mutation delete {
  deleteContact(id: 1) {
   contact {
        id
      }
    }
  }
Setting up Authentication When Working on GraphQL API in Django
In this section, you will learn how to build a GraphQL authentication backend with Django.
To start, create a new app with python manage.py startapp users and then add "users" to INSTALLED_APPS in your settings.py file.
Then, paste the code below into your users/models.py file to create a model that uses email for authentication.
from django.db import models
from django.contrib.auth.models import AbstractUser

class User(AbstractUser):
    email = models.EmailField(blank=False, verbose_name="Email")

    EMAIL_FIELD = "email"
    USERNAME_FIELD = "username"
Next, go to your settings.py file and add AUTH_USER_MODEL = 'users.User' to tell Django to use your model for users authentication instead of the default.
Run the commands below to apply your model to the database.
python manage.py makemigrations
python manage.py migrate
Set up GraphQL with JWT in Django
JSON Web Token (JWT) is a standard that specifies a concise and self-contained method for securely exchanging information as a JSON object between parties. In this case, we will be using it for authentication. Here, each request will include the JWT once the user has authenticated, allowing the user to access routes, resources permitted with that token.
Luckily for us, we have an already created a tool that enables us to use JWT in GraphQL API in Django. The tool we will be working with is django-graphql-jwt.
First, install the tool with pip install django-graphql-jwt.
Add "graphql_jwt.refresh_token.apps.RefreshTokenConfig" to your INSTALLED_APPS to tell Django to generate new access tokens after some time.
Next, add AuthenticationMiddleware middleware to MIDDLEWARE in your settings.py file:
MIDDLEWARE = [
     # ...
    "django.contrib.auth.middleware.AuthenticationMiddleware",
     # ...
]
Add JSONWebTokenMiddleware middleware to GRAPHENE in your settings.py file:
GRAPHENE = {
    # ...
    "MIDDLEWARE": [
        "graphql_jwt.middleware.JSONWebTokenMiddleware",
    ],
}
Set up Authentication for Django and GraphQL
In this section, we will set up authentication in Django and GraphQL API. You will need another tool called Django GraphQL Auth. Install Django GraphQL Auth by running pip install django-graphql-auth.
Next, add "graphql_auth", "django_filters" to your INSTALLED_APPS; 'django_filters' is required by graphql_auth.
Now, paste the code below into your settings.py file to tell Django about the new authentication settings.
AUTHENTICATION_BACKENDS = [
    "graphql_auth.backends.GraphQLAuthBackend",
    "django.contrib.auth.backends.ModelBackend",
]
Then, run python manage.py migrate to apply refresh_token and graphql_auth models and paste the following code into your settings.py file:
GRAPHQL_JWT = {
    "JWT_ALLOW_ANY_CLASSES": [
        #connect GraphQL Auth to GraphQL JWT for authentication
        "graphql_auth.mutations.Register",
        "graphql_auth.mutations.VerifyAccount",
        "graphql_auth.mutations.ObtainJSONWebToken",# get jwt to log in
    ],
    "JWT_VERIFY_EXPIRATION": True, # affirm that the jwt token will expire
    "JWT_LONG_RUNNING_REFRESH_TOKEN": True,
}

EMAIL_BACKEND = 'django.core.mail.backends.console.EmailBackend' #used to receive email in the backend to verify an account. This settings can be changed to the email provider you prefer
Then, add the class below (AuthMutation) to your schema.py file to handle the registration, verification, and logging in of users.
# ...
from graphql_auth.schema import UserQuery
from graphql_auth import mutations
# ...
class Query(UserQuery, graphene.ObjectType):# update
# ...
class AuthMutation(graphene.ObjectType):
   register = mutations.Register.Field() #predefined settings to register user
   verify_account = mutations.VerifyAccount.Field() #used to verify account
   token_auth = mutations.ObtainJSONWebToken.Field() # get jwt to log in

class Mutation(AuthMutation, graphene.ObjectType): # update
# ...
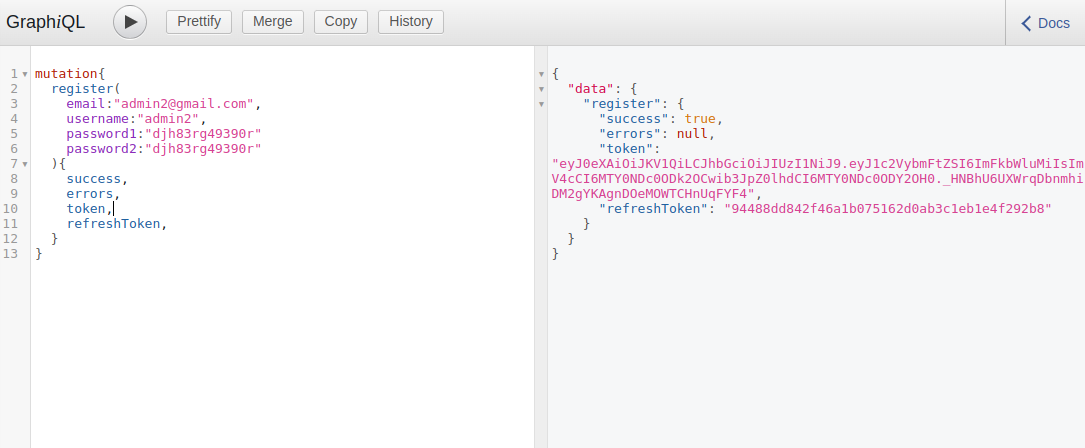
Now, run your server and open the Graphql endpoint on the browser and run the following JSON to register a new user:
mutation {
  register (
    email: "admin2@gmail.com",
    username: "admin2",
    password1: "djh83rg49390r",
    password2: "djh83rg49390r"
  ) {
    success,
    errors,
    token,
    refreshToken,
  }
}
At the moment, the user you just created is not verified. To verify the user, copy the verification token from the email sent to the terminal when you created the new user.
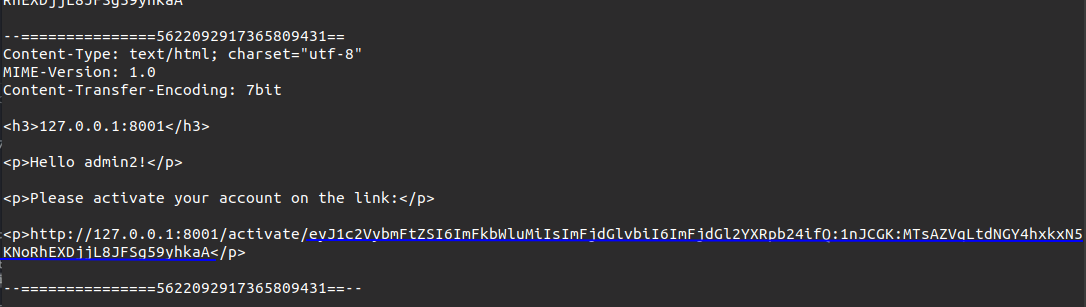
After copying the token, run the command below with that token.
mutation {
  verifyAccount(token: "eyJ1c2VybmFtZSI6ImFkbWluMiIsImFjdGlvbiI6ImFjdGl2YXRpb24ifQ:1nJCGK:MTsAZVqLtdNGY4hxkxN5KNoRhEXDjjL8JFSg59yhkaA") {
    success
    errors
  }
}
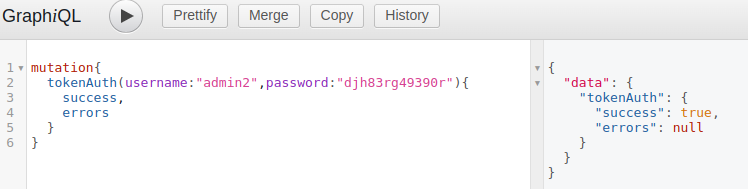
You can now log in by running the query below:
mutation {
  tokenAuth(username: "admin2", password: "djh83rg49390r") {
    success,
    errors
  }
}
Conclusion
In this article, you have learned what GraphQL is about, the problem it solves, and how to go about connecting it with Django to build APIs. We also learned a bit about authentication and the different ways in which you can use GraphQL to query, update, and delete from the database when you are building an API.
How will you use your newly gained knowledge? Perhaps you will add the logic to provide each user with personalized contacts?

Written by
Muhammed AliMuhammed is a Software Developer with a passion for technical writing and open source contribution. His areas of expertise are full-stack web development and DevOps.