Everything You Need to Know About Caching in Django
Have you ever wondered what caching is and if it can be done with Django? Would you like to demystify the whole concept of caching in Django? If you have been asking these questions, then you are in luck!
In web development, caching is a layer that stores data that are fetched often so that future requests are provided faster then when trying to access that data from the primary database. By caching, you are trading off capacity for speed. Unlike the primary database that contains all the data, cached data is only a subset of the data stored in the database.
In this article, I will explore scenarios in which you may want to implement caching, as well as the different tools and ways you can cache in a Django application. Caching in Django requires a small amount of set up; you just need to tell Django where you want the cache data to be stored, and the rest will be taken care of. Let's get to it!
Prerequisites
To follow this article, the following are required:
- Prior working knowledge of Django and Python
- Python v3.x
- Django v3.x
- Redis v5.x
Reasons and Where to Cache
The reasons you should consider caching in your application are as follows:
- If the remote server is down or crashes, users can still access a cached copy on the proxy, which improves the robustness of your application.
- Caching reduces access latency in the sense that frequently accessed data are fetched from a nearby proxy cache instead of the database itself; therefore, the data transmission delay is minimized.
- Caching reduces the workload of the server infrastructure by spreading the data widely among faster, alternative data storage locations.
When deciding where to cache in your Django application, here are some things you should consider:
- Which views/templates contain the most queries? These would be the best places to cache.
- Which models are being requested the most?
Setting up the Caching System
There are different ways in which caching can be set up, depending on where you want your cache to be stored. The ways in which you can set up caching in your Django application are discussed in the following sections.
Memcached
This is the most efficient caching system supported natively in Django. Memcached provides a fast interface for adding, retrieving, and deleting data from the cache. Here, all data are stored directly in memory instead of the database, which makes accessing the data faster. Memcached works like daemons and are allocated some RAM.
To set it up, you just need to first install Memcached on the local machine, and then install a Python Memcached binding supported by Django. The two supported by Django are pylibmc and pymemcache.
In this example, I will use pymemcache.
To use Memcached with Django, go to your [settings.py](http://settings.py) file, set BACKEND to
django.core.cache.backends.memcached.PyMemcacheCache, and set LOCATION to ip:port values, where ip is the IP address of the Memcached daemon, and port is the port on which you want Memcached to run.
In this example, Memcached is running on the localhost (127.0.0.1) port 9000.
CACHES = {
    'default': {
        'BACKEND': 'django.core.cache.backends.memcached.PyMemcacheCache',
        'LOCATION': '127.0.0.1:9000',
    }
}
Database Cache
If you would like to store cached data in the database, Django has a backend for this purpose.
To save cached data in the database, you just need to create a table in the database by going to the settings.py file, setting BACKEND to django.core.cache.backends.db.DatabaseCache, and setting LOCATION to tablename, which is the name of the table in which you want to store the cache.
Ensure that the name used for the table isn't already in the database.
Next, create a database table for the cached data by running
$ python manage.py createcachetable
Filesystem Caching
Filesystem caching involves saving the cached data as a separate file. To do this, set BACKEND to django.core.cache.backends.filebased.FileBasedCache and LOCATION to /path/to/django_cache.
CACHES = {
    'default': {
        'BACKEND': 'django.core.cache.backends.filebased.FileBasedCache',
        'LOCATION': '/path/to/django_cache',
                   # for windows users: 'c:/path/to/django_cache'
    }
}
Local-memory Cache
Local-memory cache is the default cache if no settings are specified. While it is almost as fast as Memcached, it cannot scale beyond a single server. Therefore, it is not suitable for use as a data cache for an application that uses more than one Web server.
local memory caching is best suited for your local development and testing environments.
Cache LOCATION is used to identify individual memory stores. To use it, set BACKEND to django.core.cache.backends.locmem.LocMemCache.
The following is an example:
CACHES = {
    'default': {
        'BACKEND': 'django.core.cache.backends.locmem.LocMemCache',
        'LOCATION': 'unique-snowflake',
    }
}
Start Base Project
First, clone the pre-built Django project populated with some data so that we can test out the caching functionality.
When you clone the project, create a virtual environment for it and run
$ pip install -r requirements.txt to install the dependencies.
Next, run $ python manage.py runserver to start the project, and then go to http://localhost:8000/recipe on your browser to display the project’s content.
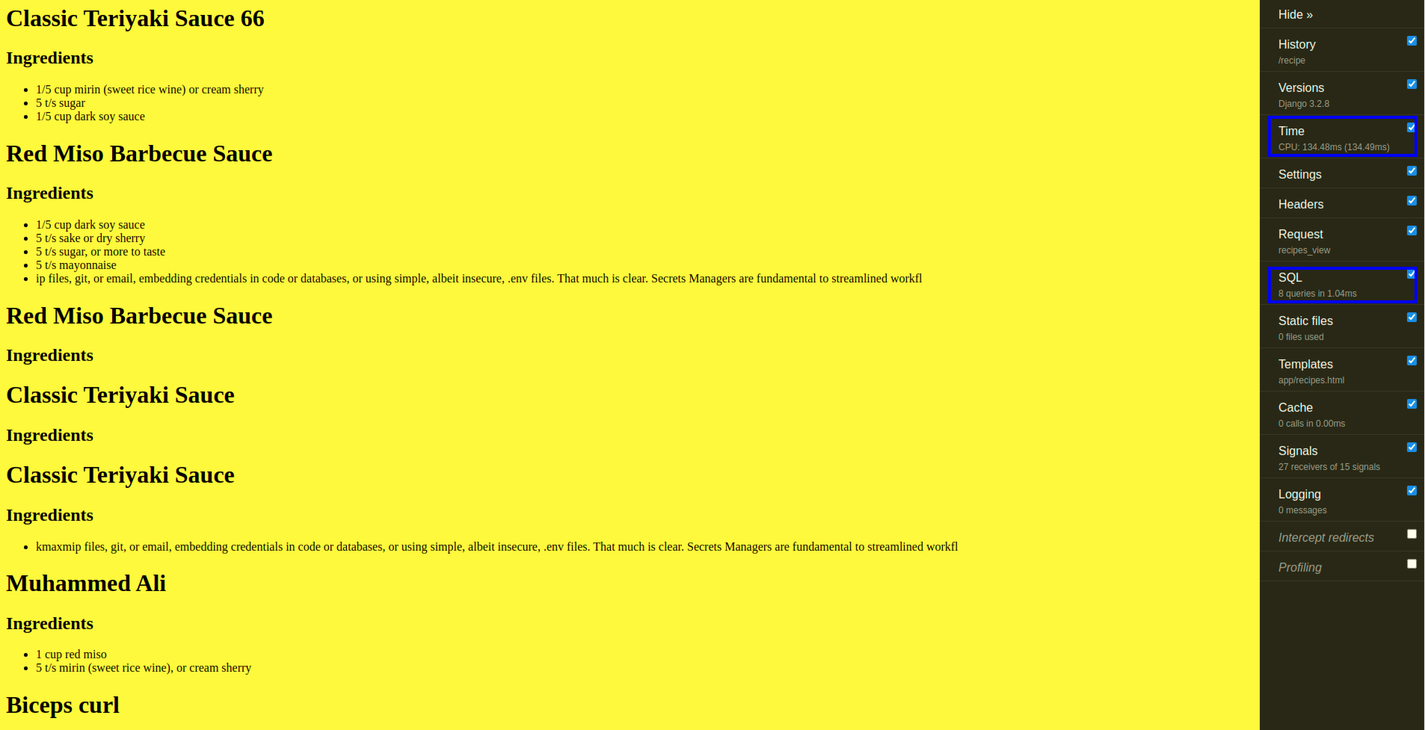
You should see something similar to the page shown above. Pay attention to the Time and SQL tabs; they indicate that your cache is working.
Levels of Caching in Django
Django provides different levels in which you can cache a Django application. This provides granularity when caching your application. In this section, I will discuss the levels Django provides and apply them to the Django project you just cloned. The levels are discussed in the following sections.
Template Fragment Caching
Template fragment caching gives you the most control over what gets cached on your site. Template fragment caching enables you to cache specific parts of your template where huge calculations are done. We can do this with the cache template tag, {% cache %}.
So that your template can access this tag, put {% load cache %} at the top of your template and close with {% endcache %}. The template tag {% cache %} caches the contents of the block for a certain period. At least two arguments are required: the cache timeout (in seconds) and a name to specify the cache fragment. If the timeout is None, caching in the template will continue indefinitely.
Example: Open the project you just cloned using your preferred text editor, go to app/templates/app/recipes.html, and insert the code below.
{% load cache %}

<html>
<head>
  <title>Recipes</title>
  <style>
      body {
          background-color:yellow;
        }
  </style>
</head>
<body>

{% cache 500 recipe %}


{% for recipe in recipes %}
  <h1>{{ recipe.name }}</h1>
  {% autoescape off %}
    <p>{{ recipe.desc }}</p>
  {% endautoescape %}
  <h2>Ingredients</h2>
  <ul>
    {% for ingredient in recipe.ingredient_set.all %}
    <li>{{ ingredient.description }}</li>
    {% endfor %}
  </ul>

{% endfor %}
{% endcache %}
</body>
</html>
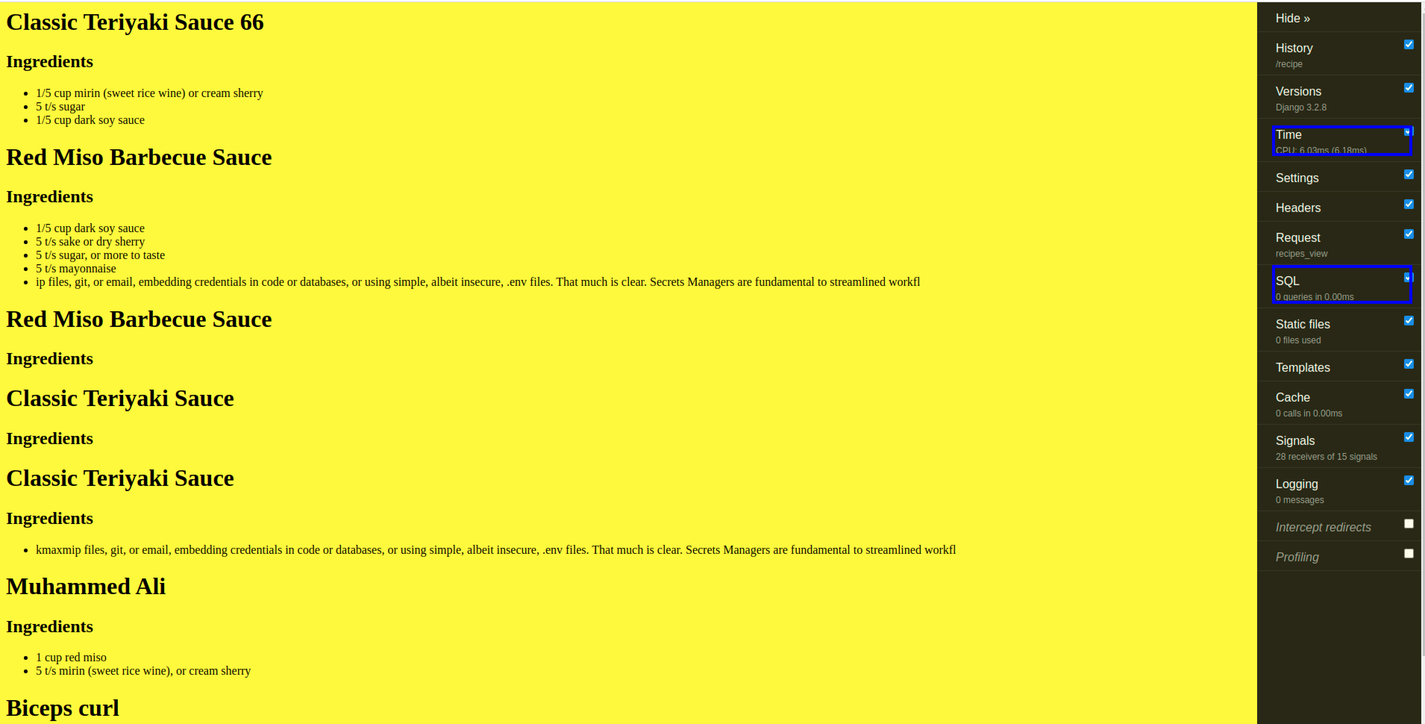
Now, if you run the project again, you will notice some changes. If you look carefully, you’ll see that the CPU time and the number of SQL queries have reduced drastically. This indicates that your site has been cached, and it's now running faster.
Here’s an image of the template caching product:

Per-site Cache
This is the simplest way to perform caching once your caching backend is set up. To implement this, you first need to add the caching middleware classes to your settings.py file:
MIDDLEWARE = [
    'django.middleware.cache.UpdateCacheMiddleware',  #new
    'django.middleware.common.CommonMiddleware',
    'django.middleware.cache.FetchFromCacheMiddleware', #new
]
Next, while still in your settings.py file, add the following code:
CACHE_MIDDLEWARE_ALIAS = 'default'  # The cache alias to use for storage and 'default' is **local-memory cache**.
CACHE_MIDDLEWARE_SECONDS = '600'    # number of seconds before each page is cached
CACHE_MIDDLEWARE_KEY_PREFIX = ''    # This is used when cache is shared across multiple sites that use the same Django instance. You use an empty string if you don’t care for it.
Pre-view Caching
Here, the django.views.decorators.cache.cache_page() decorator is used. Per-view provides a more granular way to use cached data by caching the output of individual views. When doing per-view caching, your view will look like this:
from django.shortcuts import render
from .models import Recipe
from django.views.decorators.cache import cache_page

@cache_page(600)
def recipes_view(request):
    recipes = Recipe.objects.all()
    return render(request, 'app/recipes.html', {
        'recipes': recipes
    })
cache_page takes a single argument: the cache timeout, in seconds, in this case, 600 seconds
Unlike per-site caching, with per-view caching, you can conserve memory for parts of the site that really need it. If multiple URLs point to the same view, each URL will be cached separately.
Low-level Cache API
Low-level caching just means that you have the option to control what gets cached on the site. For example, you might have a view on a site whose results depend on several expensive queries, and these results change at different intervals. Here, it would not be ideal to use the full-page caching offered by per-site and per-view caching strategies because you don't want to cache the entire output (because some data change frequently). However, you still want to cache results that rarely change. To do this, you can use the low-level API Django to manage individual objects in the cache using the cache key.
We will still use the project you just cloned for this example.
In the view.py file, paste the following code:
from django.shortcuts import render
from .models import Recipe
from django.core.cache import cache

def cache_recipes_view(request):
    recipes = cache.get('recipes')
    if recipes is None:
        recipes = Recipe.objects.all()
        cache.set('recipes', recipes)

    return render(request, 'app/recipes.html', {
        'recipes': recipes
    })
Then, update your URL to look like this:
from django.contrib import admin
from django.urls import path, include
import debug_toolbar
# from app.views import recipes_view
from app.views import cache_recipes_view #new

urlpatterns = [
    path('admin/', admin.site.urls),
    # path('recipe', recipes_view),
    path('cache_recipe', cache_recipes_view), #new
    path('__debug__/', include(debug_toolbar.urls)),
]
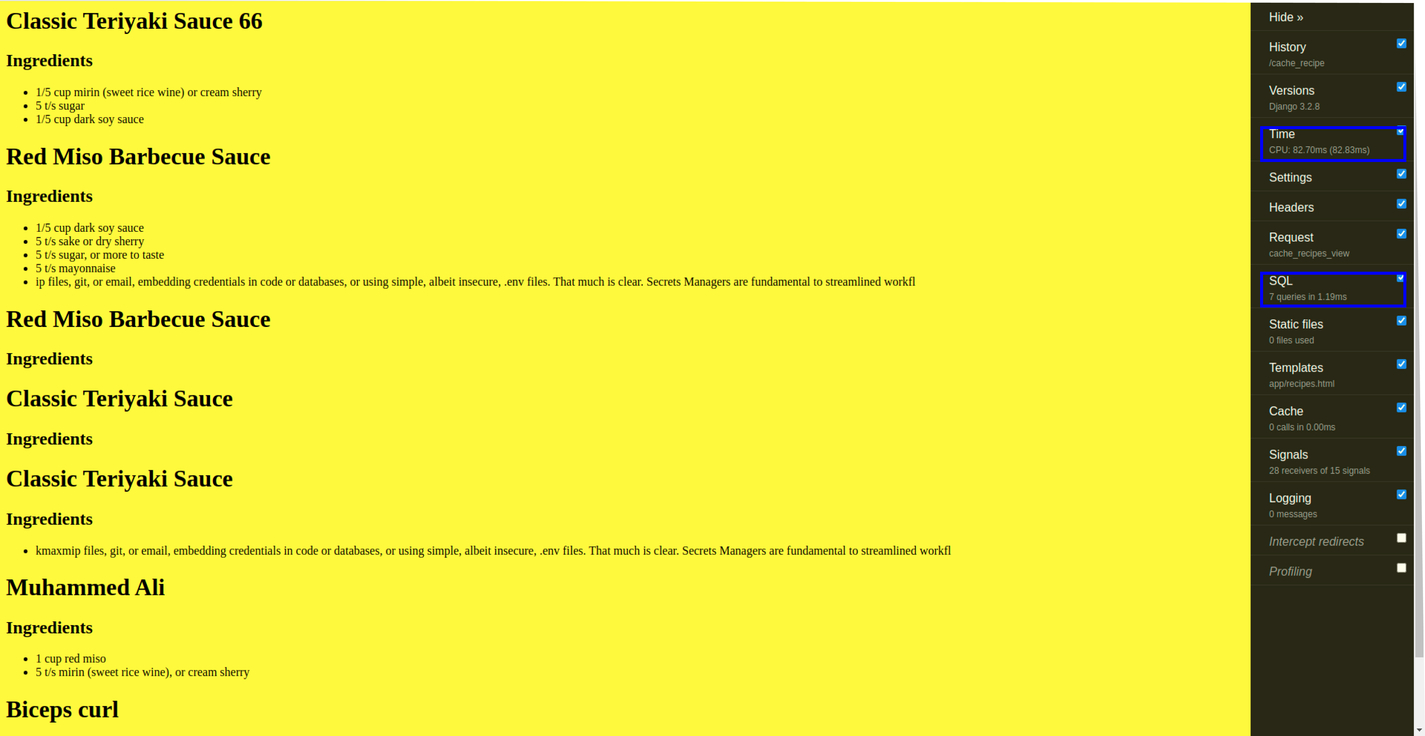
Now, if you open http://localhost:8000/cache_recipe on your browser, you will see some reduction in CPU time and SQL queries compared to the original data.
Caching in Django With Redis
Redis is an open-source data-structure store that can be used as a database, cache, message broker, etc. To start using Redis in your Django application, you need to first install the django-redis library. The library makes it easier to connect your Django application to Redis.
$ pip install django-redis
Next, add the code shown below to your settings.py file the same you did for Memcached.
CACHES = {
    'default': {
        'BACKEND': 'django_redis.cache.RedisCache',
        'LOCATION': 'redis://127.0.0.1:6379/1',
        'OPTIONS': {
            'CLIENT_CLASS': 'django_redis.client.DefaultClient',
        }
    }
}
Update your views.py file:
from django.shortcuts import render
from .models import Recipe
from django.views.decorators.cache import cache_page

@cache_page(60 * 15)
def recipes_view(request):
    recipes = Recipe.objects.all
    return render(request, 'app/recipes.html', {
        'recipes': recipes
    })
Next, run your Django server $ python manage.py runserver. Then, go to another terminal window and run the Redis server. You can run the Redis server with $ redis-cli -n 1.
After doing this, your Django caching backend will be connected to Redis.
Now, go to http://localhost:8000/recipe in your browser, and you will see that your site has been optimized as expected.
You can check whether your cache is being handled by Redis by going to the tab where the redis server is running and running 127.0.0.1:6379[1]> keys *; you will see something like the following:
1) ":1:views.decorators.cache.cache_header..5cf60c9557a12db6b6423fc6f291090e.en-us.UTC"
2) ":1:views.decorators.cache.cache_page..GET.5cf60c9557a12db6b6423fc6f291090e.d41d8cd98f00b204e9800998ecf8427e.en-us.UTC"
Copy the key name for cache_page and enter it with the get command:
127.0.0.1:6379[1]> get ":1:views.decorators.cache.cache_page..GET.5cf60c9557a12db6b6423fc6f291090e.d41d8cd98f00b204e9800998ecf8427e.en-us.UTC"
When you run this command, you should see the rendered HTML string, which shows that your website is cached on Redis.
Conclusion
This article's aim was to take you from not knowing anything about caching in Django applications to showing you the different ways in which you can cache data when building Django applications. Hopefully, I was successful.
With this article, you can add caching to any part of your application. It's not advisable to cache the entire site unless you have excess memory and don't care about cutting costs. Try to make a calculated decision when picking portions of your site to cache.
Now that you have learned all this, hopefully, you will confidently implement the knowledge in your future Django projects or when it is expected by the company you work for.

Written by
Muhammed AliMuhammed is a Software Developer with a passion for technical writing and open source contribution. His areas of expertise are full-stack web development and DevOps.