Building A New Programming Language In Ruby: The Interpreter
Full Source on Github
A complete implementation of the Stoffle programming language is available at GitHub. Feel free to open an issue if you find bugs or have questions.
In this blog post, we're going to start implementing the interpreter for Stoffle, a toy programming language built entirely in Ruby. You can read more about this project in the first part of this series.
The interpreter we are going to build is commonly referred to as a tree-walk interpreter. In the previous post of this series, we built a parser to transform a flat sequence of tokens into a tree data structure (an abstract syntax tree, or AST for short). As you might be imagining, our interpreter has the job of going through the AST created by our parser and breathing life into a Stoffle program. I find this last step the most exciting one of this language implementation journey. When building the interpreter, everything finally clicks, and we are able to see Stoffle programs running for real!
I'm going to show and explain the interpreter's implementation in two parts. In this first part, we are going to get the basics working: variables, conditionals, unary and binary operators, data types, and printing to the console. We are reserving the more meaty stuff (function definition, function calling, loops, etc.) for the second and last post on implementing our interpreter.
A Quick Recap of the Lexer and Parser
Before we dive in and start implementing the interpreter, let's quickly remind ourselves what we did in the previous posts of this series. First, we built the lexer, which transforms raw source code into tokens. Then, we implemented the parser, the component responsible for morphing tokens into a tree structure (the AST). To sum up, here are the transformations we have observed so far:
State 0: Source
my_var = 1
State 1: Lexer transforms raw source code into tokens
[:identifier, :'=', :number]
State 2: Parser transforms tokens into an Abstract Syntax Tree
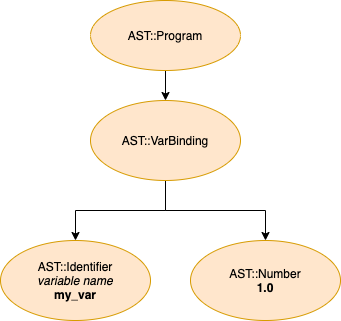
It's All About Walking
Now that we have an AST, our job is to write code to walk this structure. We have to write Ruby code that can give life to what each node in our AST describes. If we have a node that describes a variable binding, for example, our task is to write Ruby code that is able to somehow store the result of the right-hand side of our variable binding expression and to have this storage space associated with (and accessible through) the name given to the variable.
As we did in previous parts of this series, we are going to explore the implementation by going through all the important lines of code involved in handling an example program. The piece of Stoffle code we have to interpret is the following:
num = -2
if num > 0
  println("The number is greater than zero.")
else
  println("The number is less than or equal to zero.")
end
This is the AST produced for the same program:
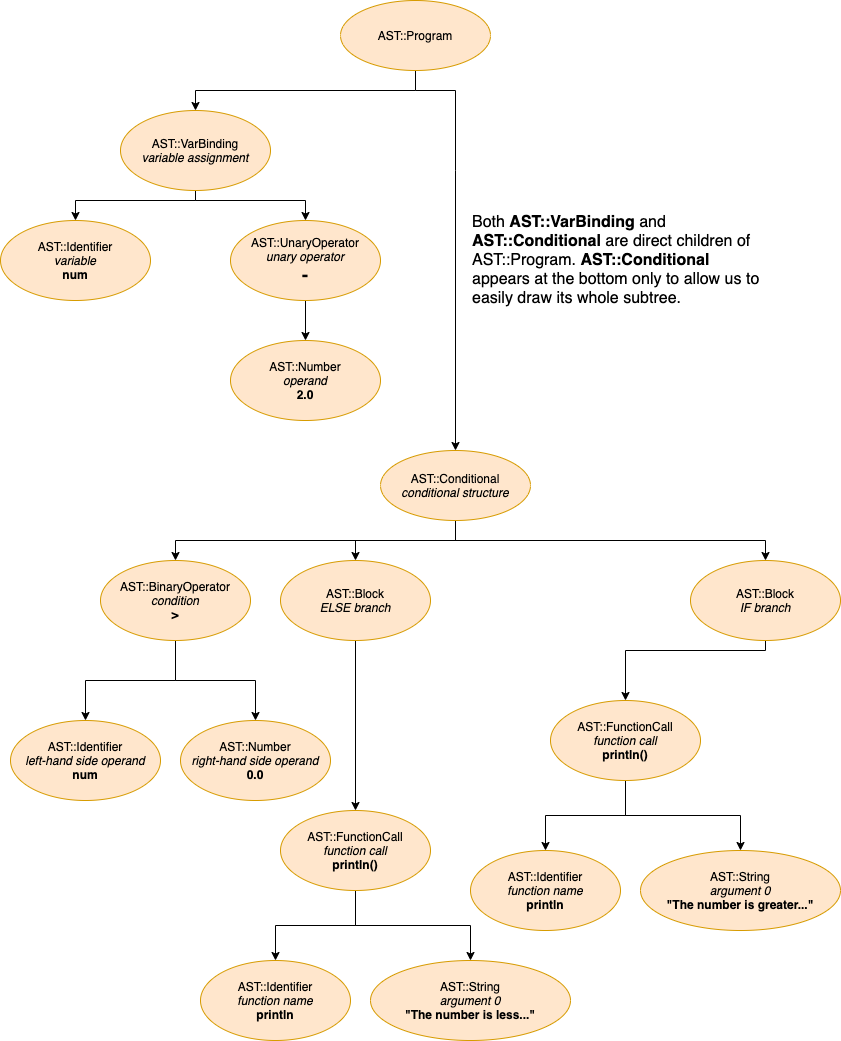
The First Step in Our Walk
As you probably remember from the last post in this series, a Stoffle AST always has as its root an AST::Program node. This root generally has multiple children. Some of them will be shallow (think of the AST produced for a simple variable assignment). Other children can be the root of quite deep subtrees (think of a loop with many lines inside its body). This is the Ruby code we need to start walking through the AST that was passed in to our interpreter:
module Stoffle
  class Interpreter
    attr_reader :program, :output, :env

    def initialize
      @output = []
      @env = {}
    end

    def interpret(ast)
      @program = ast

      interpret_nodes(program.expressions)
    end

    private

    def interpret_nodes(nodes)
      last_value = nil

      nodes.each do |node|
        last_value = interpret_node(node)
      end

      last_value
    end

    def interpret_node(node)
      interpreter_method = "interpret_#{node.type}"
      send(interpreter_method, node)
    end

    #...

  end
end
When a new Interpreter is instantiated, right from the get-go we create two instance variables: @output and @env. The former's responsibility is to store, in chronological sequence, everything our program has printed out. Having this information at hand is very useful when writing automated tests or debugging. The responsibility of @env is a bit different. We named it as such as a reference to "environment". As the name may suggest, its function is to hold the state of our running program. One of its functions will be to implement the binding between an identifier (e.g., a variable name) and its current value.
The #interpret_nodes method loops through all the children of the root node (AST::Program). Then, it calls #interpret_node for each individual node.
#interpret_node is simple but nonetheless interesting. Here, we use a bit of Ruby metaprogramming to call the appropriate method for handling the node type currently at hand. For example, for an AST::VarBinding node, the #interpret_var_binding method is the one that gets called.
Invariably, We Have to Talk About Variables
The first node we have to interpret in the AST of the example program we are going through is an AST::VarBinding. Its @left is an AST::Identifier, and its @right is an AST::UnaryOperator. Let's take a look at the method responsible for interpreting a variable binding:
def interpret_var_binding(var_binding)
  env[var_binding.var_name_as_str] = interpret_node(var_binding.right)
end
As you can see, it's pretty straightforward. We add (or overwrite) a key-value pair to the @env Hash.
The key is the name of the variable (#var_name_as_str is just a helper method equivalent to var_binding.left.name). At the moment, all variables are global. We will handle scoping in the next post.
The value is the result of interpreting the expression on the right-hand side of the assignment. To do that, we use #interpret_node again. Since we have an AST::UnaryOperator on the right-hand side, the next method that gets called is #interpret_unary_operator:
def interpret_unary_operator(unary_op)
  case unary_op.operator
  when :'-'
    -(interpret_node(unary_op.operand))
  else # :'!'
    !(interpret_node(unary_op.operand))
  end
end
The semantics of Stoffle's supported unary operators (- and !) are the same as in Ruby. As a consequence, the implementation could not be simpler: we apply Ruby's - operator to the result of interpreting the operand. The usual suspect, #interpret_node, appears yet again here. As you may remember from the AST of our program, the operand for - is an AST::Number (the number 2). This means our next stop is at #interpret_number:
def interpret_number(number)
  number.value
end
The implementation of #interpret_number is a piece of cake. Our decision to adopt a Ruby float as the representation of number literals (this happens in the lexer!) pays off here. The @value of the AST::Number node already holds our desired internal representation of numbers, so we just retrieve it.
With that, we finish interpreting the first direct child of AST::Program. Now, to conclude interpreting our program, we must handle its other, more hairy, child: a node of type AST::Conditional.
Terms and Conditions May Apply
Back in #interpret_nodes, our best friend #interpret_node is called again to interpret the next direct child of AST::Program.
def interpret_nodes(nodes)
  last_value = nil

  nodes.each do |node|
    last_value = interpret_node(node)
  end

  last_value
end
The method responsible for interpreting an AST::Conditional is #interpret_conditional. Before taking a look at it, however, let's refresh our memories by reviewing the implementation of AST::Conditional itself:
class Stoffle::AST::Conditional < Stoffle::AST::Expression
  attr_accessor :condition, :when_true, :when_false

  def initialize(cond_expr = nil, true_block = nil, false_block = nil)
    @condition = cond_expr
    @when_true = true_block
    @when_false = false_block
  end

  def ==(other)
    children == other&.children
  end

  def children
    [condition, when_true, when_false]
  end
end
Ok, so @condition holds an expression that will either be truthy or falsey; @when_true holds a block with one or more expressions to be executed in case the @condition is truthy, and @when_false (the ELSE clause) holds the block to be run in case @condition happens to be falsey.
Now, let's take a look at #interpret_condition:
def interpret_conditional(conditional)
  evaluated_cond = interpret_node(conditional.condition)

  # We could implement the line below in a shorter way, but better to be explicit about truthiness in Stoffle.
  if evaluated_cond == nil || evaluated_cond == false
    return nil if conditional.when_false.nil?

    interpret_nodes(conditional.when_false.expressions)
  else
    interpret_nodes(conditional.when_true.expressions)
  end
end
Truthiness in Stoffle is the same as in Ruby. In other words, in Stoffle, only nil and false are falsey. Any other input to a condition is truthy.
We first evaluate the condition by interpreting the expression being held by conditional.condition. Let's take a look at the AST of our program again to figure out what node we are dealing with:
It turns out that we have an AST::BinaryOperator (the > used in num > 0). Okay, it’s the same path again: first #interpret_node, which calls #interpret_binary_operator this time:
def interpret_binary_operator(binary_op)
  case binary_op.operator
  when :and
    interpret_node(binary_op.left) && interpret_node(binary_op.right)
  when :or
    interpret_node(binary_op.left) || interpret_node(binary_op.right)
  else
    interpret_node(binary_op.left).send(binary_op.operator, interpret_node(binary_op.right))
  end
end
Our logical operators (and and or) can be considered binary operators, so we handle them here as well. Since their semantic is equivalent to Ruby's && and ||, the implementation is plain sailing, as you can see above.
Next is the section of the method we are most interested in; this section handles all other binary operators (including >). Here, we can leverage Ruby's dynamism in our favor and come up with a very concise solution. In Ruby, binary operators are available as methods in the objects participating in an operation:
-2 > 0           # is equivalent to
-2.send(:'>', 0) # this
# and the following line would be a general solution,
# very similar to what we have in the interpreter
operand_1.send(binary_operator, operand_2)
A Verbose Implementation of Binary Operators
As you saw, our implementation of binary operators is very concise. If Ruby was not such a dynamic language, or the semantics of the operators were different between Ruby and Stoffle, we could not have coded the solution in this fashion.
If you ever find yourself in such a position as a language designer/implementer, you can always fall back on a simple (but not that elegant) solution: using a switch construct. In our case, the implementation would look somewhat like this:
# ... inside #interpret_binary_operator ...

case binary_op.operator
when :'+'
  interpret_node(binary_op.left) + interpret_node(binary_op.right)
# ... other operators
end
Before going back to #interpret_conditional, let's take a quick detour to make sure nothing is overlooked. If you remember the program we are interpreting, the num variable is used in the comparison (using the binary operator >) we just explored together. How did we retrieve the left operand (i.e., the value stored in the num variable) of that comparison? The method responsible for that is #interpret_identifier, and its implementation is easy-peasy:
def interpret_identifier(identifier)
  if env.has_key?(identifier.name)
    env[identifier.name]
  else
    # Undefined variable.
    raise Stoffle::Error::Runtime::UndefinedVariable.new(identifier.name)
  end
end
Now, back to #interpret_conditional. In the case of our little program, the condition evaluated to a Ruby false value. We use this value to determine whether we have to execute the IF or the ELSE branch of the conditional structure. We proceed to interpret the ELSE branch, whose associated block of code is stored in conditional.when_false. Here, we have an AST::Block, which is very similar to the root node of our AST (AST::Program). The block, likewise, potentially has a bunch of expressions that need to be interpreted. For this purpose, we also use #interpret_nodes.
def interpret_conditional(conditional)
  evaluated_cond = interpret_node(conditional.condition)

  # We could implement the line below in a shorter way, but better to be explicit about truthiness in Stoffle.
  if evaluated_cond == nil || evaluated_cond == false
    return nil if conditional.when_false.nil?

    interpret_nodes(conditional.when_false.expressions)
  else
    interpret_nodes(conditional.when_true.expressions)
  end
end
The next AST node we have to handle is an AST::FunctionCall. The method responsible for interpreting a function call is #interpret_function_call:
def interpret_function_call(fn_call)
  return if println(fn_call)
end
As we discussed in the beginning of the article, function definition and function calling will be covered in the next post in this series. Therefore, we are only implementing a special case of function calling. In our tiny toy language, we provide println as part of the runtime and implement it directly in the interpreter here. It's a good enough solution, considering the objectives and scope of our project.
def println(fn_call)
  return false if fn_call.function_name_as_str != 'println'

  result = interpret_node(fn_call.args.first).to_s
  output << result
  puts result
  true
end
The first and only argument of our AST::FunctionCall is an AST::String, which gets handled by #interpret_string:
def interpret_string(string)
  string.value
end
In #interpret_string, we have the exact same case of #interpret_number. An AST::String already holds a ready-to-use Ruby string value, so we just have to retrieve it.
Now, back to #println:
def println(fn_call)
  return false if fn_call.function_name_as_str != 'println'

  result = interpret_node(fn_call.args.first).to_s
  output << result
  puts result
  true
end
After storing the function argument (converted to a Ruby string) in result, we have two more steps to complete. First, we store what we are about to print to the console in @output. As explained previously, the idea here is to be able to easily inspect what was printed (and in what order). Having this at hand makes our life easier when debugging or testing the interpreter. Finally, to implement printing something to the console, we use Ruby's puts.
Execution Matters
Now that we have explored everything that is necessary to implement the bare-bones of Stoffle, let's create a very basic executable to see our interpreter in action.
#!/usr/bin/env ruby

require_relative '../lib/stoffle'

path = ARGV[0]
source = File.read(path)
lexer = Stoffle::Lexer.new(source)
parser = Stoffle::Parser.new(lexer.start_tokenization)
interpreter = Stoffle::Interpreter.new

interpreter.interpret(parser.parse)

exit(0)
TIP: To use Stoffle's interpreter from anywhere, remember to add the executable to your PATH.
It's finally time to run our program. If everything works well, we should see the string "The number is less than or equal to zero" printed to the console. This is exactly what happens when we run the interpreter:

TIP: If you have the interpreter installed, try changing the
numvariable in our sample program so that it holds a number greater than zero. As expected, now the IF branch will get executed, and the string "The number is greater than zero" will be printed out.
Wrapping Up
In this post, we saw the beginnings of Stoffle's interpreter. We implemented enough of the interpreter for it to handle some of the language basics: variables, conditionals, unary and binary operators, data types, and printing to the console. In the next and final part on the interpreter, we will tackle the remaining bits required for us to have our little toy language working as designed: variable scoping, function definition, function calling, and loops. I hope you had fun reading the article (I certainly had fun writing it!), and we’ll see you soon in the next post in the series!

Written by
Alex Braha StollAlex is a software developer that cannot get tired of attempting to write the next line of code at least a little better than the one before it. In his free time, he likes to study and practice Photography.