Building an OCR service with Amazon Textract and AWS Lambda
Are you looking for a good way to extract text from PDFs and images? What about extracting text from tables? If you have these questions in mind, you are in the right place.
In this tutorial, you will learn how to use Amazon’s Optical Character Recognition (OCR) service, Textract, to extract text from image files, PDF files, or handwritten text. The extraction can be done using Lambda functions and Textract. While we will demonstrate the process of extracting content from images, the same process applies to PDFs and handwritten text. We will also go further to extract tables into CSV files, which can then be used in other applications. The repository for this article can be found on GitHub.
Prerequisites
This tutorial will be a hands-on demonstration. If you'd like to follow along, be sure you have the following:
- An AWS account
- Basic knowledge of python
- AWS CLI v2 setup with a User with Textract Permission.
What is Amazon Textract?
Amazon Textract is Machine Learning (ML) powered OCR provided by Amazon Web Services. Amazon Textract is used to extract text, tables, and forms from organized PDF, image(JPEG, PNG), or handwritten documents. The advantages of using Textract are that:
- It can extract printed text, handwritten text, images, and structured data from documents like financial records, tax forms, student results, and grades, etc.
- You can extract data from different file types with consistent data configuration.
- You do not need any knowledge of ML in order to use this service.
Don’t confuse AWS Textract with Amazon Rekognition. You can use Amazon Rekognition if there is simple random text in an image or video; for example, if you want to extract text from a signboard.
You can see the pricing for Textract here, and you can find the limits of Textract here.
Practical Applications and Use Cases for Textract
- Text extraction for document classification
- Creation of intelligent search indexes
- Extraction of text from documents for word processing
- Automation of document processing workflows
- Maintenance of compliant document archives
- Extraction of text for Natural Language Processing (NLP)
Setting up S3 and Lambda
The whole extraction process follows these steps:
- User uploads files to S3 bucket
- The Lambda function is triggered
- The text gets extracted from the image or PDF
We need to set up our Lambda function to follow suit. The Lambda function will run automatically, and the content will be extracted when the S3 bucket receives a document.
To get started with the setup, let’s go to the S3 Management Console and create an S3 bucket for our documents. On the S3 management console, click the “Create bucket” button, give the bucket a name, then click the “Create bucket” button again to submit the name.
To set up text extraction, you need to follow the steps below.
Click on the “Services” button on the AWS nav bar and select “Lambda” in the “Compute” section. This will take you to the Lambda management console.
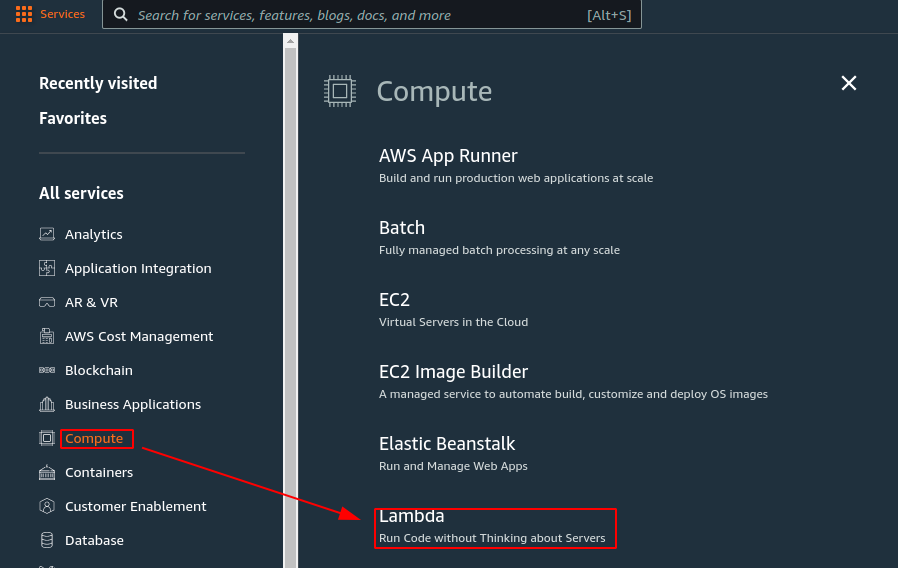
Selecting Lambda Service
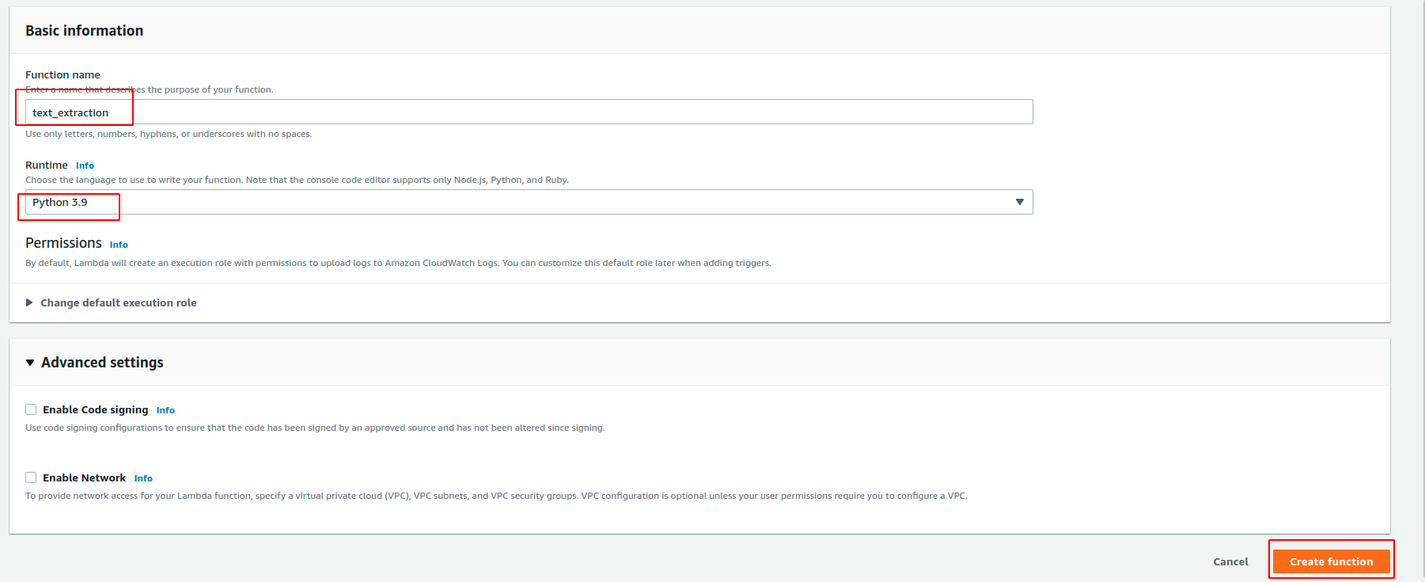
Now, click the Create function button and set up your lambda function as shown in the images below; then submit your selection.
Next, we have to give our Lambda function permission to enable it to run functions and also access Textract functionalities. To do this, click on the Configuration tab and then find Permissions on the sidebar (below “Role name”); click on it to update the permissions. Now click the “Add permissions” dropdown, then click on “Attach policies”. You will be provided with a list of policies; pick AWSLambdaExecute and AmazonTextractFullAccess by checking the box attached to each of them and clicking on the “Attach policies” button.
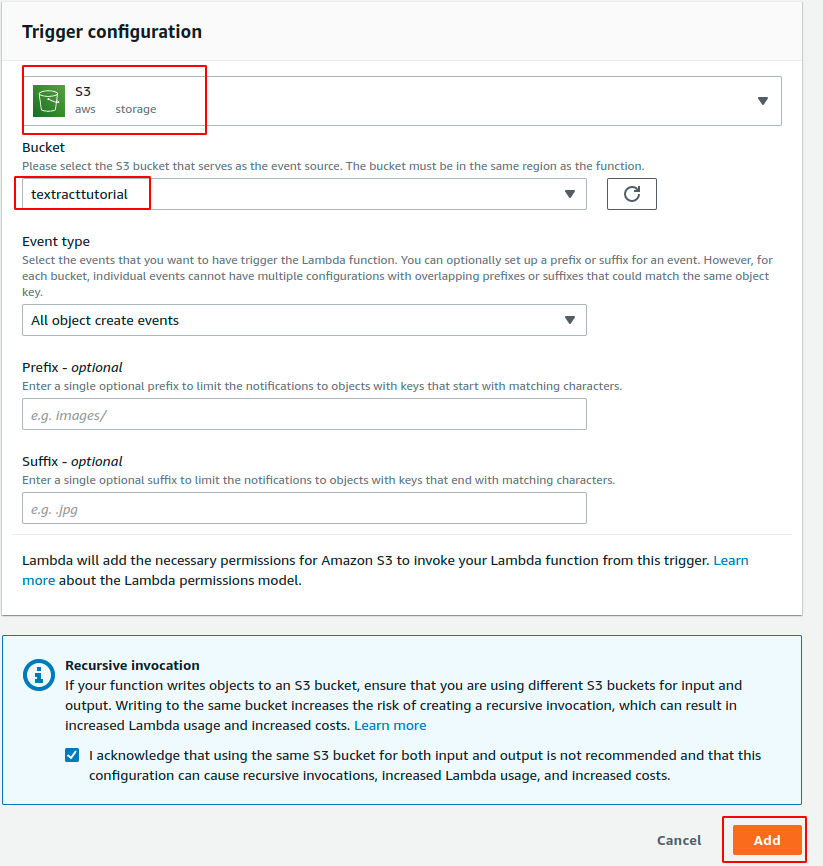
As I mentioned earlier, we want the Lambda function to be triggered when the S3 bucket we created receives a file. To enable this trigger in your Lambda function, go to the lambda function console and then click on the function you just created.
You will see the “Add trigger” button. Click on it, then select S3 as the type of trigger, select your bucket name, and click the “Add” button.
How to Extract Text from an Image/PDF File Using Lambda Functions and Textract
This section will take you through how to extract text from image or PDF files using Lambda functions and Textract. You can do this by following the steps below:
Go to the Lambda function you just created, where you will be taken to a Python file. Paste the following code sample into the Python file, then click the “Deploy” button.
import json
import boto3 # used to get the textract service in our Python code

def lambda_handler(event, context):
    textract = boto3.client("textract")
    if event: # the event==True when S3 receives a document
        file_obj = event["Records"][0] # get the current event
        bucketname = str(file_obj["s3"]["bucket"]["name"]) #get bucket name from event
        filename = str(file_obj["s3"]["object"]["key"]) #get file name from event

        response = textract.detect_document_text(
        # a call to textract API to just extract text (detect_document_text), then we state the bucket name and file name
            Document={
                "S3Object": {
                    "Bucket": bucketname,
                    "Name": filename,
                }
            }
        )
        print(json.dumps(response)) # print the extracted data

        return {
            "statusCode": 200,
            "body": json.dumps("Content extracted successfully!"),
        }
To trigger our Lambda function, open the S3 bucket you just created, then drag and drop the image file from which you want to extract the text content. To see the output of this trigger, go back to your Lambda function and click the “Monitor” tab, then click on the “View logs in CloudWatch” link. Click on your Lambda function, then click on the current trigger to see the outputs. The output will be in JSON format which provides each line, word, bounding box of each line, etc. This output is not really useful since we just want to see the whole text line by line.
You can find each line in the JSON response where “Block" is “BlockType" and “BlockType" is “LINE”.
To get each of the text lines we need, we have to create a new function that traverses the JSON response and collects each text line. Update your current code with the following:
import json
import boto3 # used to get the textract service in our Python code

 #####################New###########################
def display_text(response, extract_by):
    # traverse response and get each line
    line_text = []
    for block in response["Blocks"]:
        if block["BlockType"] == extract_by:
            line_text.append(block["Text"])
    return line_text
  ##################################################

def lambda_handler(event, context):
    textract = boto3.client("textract")
    if event: # the event==True when S3 receives a document
        #...
        print(json.dumps(response)) # print the extracted data

      #####################New###########################
        raw_text = display_text(response, extract_by="LINE") # pass response to display_text()
        print(raw_text)
      ##################################################
Repeat these steps to trigger the Lambda function like you did in the previous section. You should now see the text line by line in the output.

Note: You can find the images I used in this tutorial on GitHub
How to Extract Tables from Image Files Using Lambda
This section will show you how you can use it to extract data from tables.
To extract forms and tables from an image, you have to use the textract.analyze_document instead of textract.detect_document_text like we did in the previous section.
In the Lambda function you created in the previous section, replace all of your code with the code below.
import json
import boto3

def lambda_handler(event, context):
    textract = boto3.client("textract")
    if event:
        file_obj = event["Records"][0]
        bucketname = str(file_obj["s3"]["bucket"]["name"])
        filename = str(file_obj["s3"]["object"]["key"])

        response = textract.analyze_document(
            Document={
                "S3Object": {
                    "Bucket": bucketname,
                    "Name": filename,
                }
            },
            FeatureTypes=["TABLES"], #if you have forms and table FeatureTypes=["TABLES", "FORMS"]
        )

        print(json.dumps(response))
Repeat these steps to trigger the Lambda function like you did in the previous sections and you should see the JSON output.
The "BlockType": "TABLE" includes a list of child IDs for the cells within the table. My JSON response shows that the table has twenty cells, which are listed in the Ids array.
You can find the content of each cell where "BlockType": "LINE”. From this, you can use Python to traverse the response and get the output whichever way you want it. Here is the relevant code file for this section.
How to Extract Tables From PDFs and Save as CSVs
In the previous section, we were able to extract table content from an image. But this data might not be very useful if you want to use it in other applications such as databases or ML models. This is why it is useful to extract the data as a Comma-Separated Values (CSV) format.
AWS has provided a solution for this; all I had to do is modify it and add some comments to make the code more readable.
On your local machine, with AWS CLI configured properly, run the following command to install Boto3.
pip install boto3
Now, clone the code for this tutorial and run the following command, which will produce the CSV output.
python extract_table_csv.py table.png
Conclusion
In this article, we learned a lot about Textract and how useful it can be when building applications that involve content extracted from images.
We demonstrated how you can extract plain text from an image, extract a table from an image, and extract a table as a CSV file. This knowledge will come in handy when you want to build an application to analyze PDFs or images. From what you have learned in this tutorial, you can go further by integrating some of the processes into a Python application that requires you to extract text for an ML model or for Natural Language Processing. You could also look into extracting content from forms (Textract extracts forms from documents in key-value pairs) and try extracting content into other file types besides CSV.

Written by
Muhammed AliMuhammed is a Software Developer with a passion for technical writing and open source contribution. His areas of expertise are full-stack web development and DevOps.