Serverless computing helps offload the work of managing and provisioning servers to a cloud provider and is rapidly becoming a thing for most technology teams. AWS Lambda is a type of serverless technology used by many technology teams. AWS Lambda supports most of the core programming languages, including NodeJS, Java, Python, and Ruby. Although core programming languages are supported, there may be times when you want to run serverless functions dependent on features that are part of the frameworks built with these languages. In this post, we will explore how to run a Rails application in AWS Lambda. This post assumes that you are conversant with serverless computing and AWS Lambda and that you want to figure out how to run Rails on AWS Lambda. A tool called Lamby makes running Rails in AWS Lambda almost effortless, and we will cover how Lamby can be used to build and deploy Rails to Lambda. I will call it "Rails on Lambda".
What is Lamby?
Lambda lets you deploy your code and run it at any scale without having to maintain your servers. You simply upload your code to AWS. It will be run whenever it's triggered by an event, such as a user requesting a web page a job being queued.
Lambda expects your code to be structured a certain way. Therefore, if you want to use it to host something like a Rails app, you'll need to use an adapter like Lamby.
Lamby is a simple Rack adapter. It sits between your Rails app and AWS Lambda and converts Lambda invocation events from different AWS sources, such as an API gateway or application load balancers, into Rack events that your Rails app can listen to.
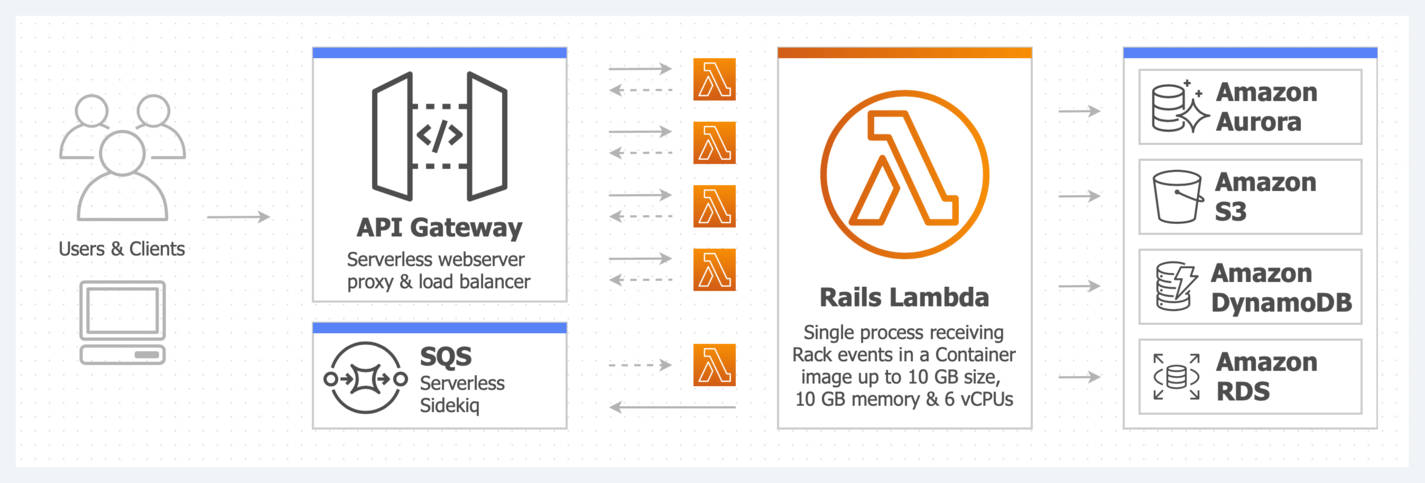 Rails Lambda architecture source: Lamby Docs
Lamby leverages Docker & AWS SAM to build, package, and deploy a Rails app to Lambda.
The AWS Serverless Application Model (AWS SAM) is an open-source framework that you can use to build serverless applications on AWS. A serverless application is a combination of Lambda functions, event sources, and other resources that work together to perform tasks. Note that a serverless application is more than just a Lambda function—it can include additional resources, such as APIs, databases, and event source mappings. -- AWS SAM documentation
To get started with Lamby, we need to install Docker, create an AWS account, and configure programmatic access to your AWS account.
Installing Docker
AWS SAM uses Docker to simulate the Lambda Runtime environment. Docker also reduces the complexity of installing AWS CLI and SAM CLI, which are both dependent on Python. If you do not already have Docker installed, installing Docker is super easy, as you can download and install it if from the official website. To check whether Docker has been installed, run the command below in your terminal. If Docker is installed, you will see a version number and build similar to the one shown below:
$ docker --version
 Docker installation confirmation
Setting up an AWS Account
If you don’t already have an AWS account, you’ll need to set one up. Amazon has a free-tier plan, which will cover creating and testing the Rails app in Lambda, as well as a guide on how to create and activate an AWS account. Follow the guide to set up your account.
Setting AWS Programmatic Access
Now that you have an AWS account, you will need to configure programmatic access using your account's AWS Access Key ID and AWS Secret Access Key. If you do not have these already, you can create them by doing the following.
- Login to your AWS account.
- In your AWS Management Console, click on "Services" in the toolbar.
- Search and select "IAM".
- Click on "Users" from the left-hand navigation.
- If "IAM" already exists, select your username.
- Click the "Security credentials" tab.
- Click the "Create access key" button.
- Copy your key id and secret to a secure place.
- If no "IAM" user exists,
- Click on "Add user".
- Add a username and select the "Programmatic access" option.
- Follow the prompts to complete the process.
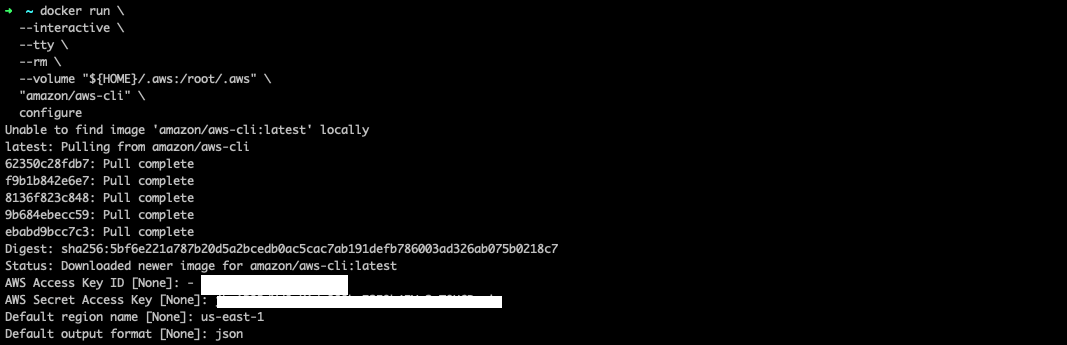
Let's use Docker to configure CLI programmatic access. Copy the code below to your terminal. You will be prompted for an AWS Access Key ID and AWS Secret Access Key; enter the keys from the previous step.
$ docker run \
  --interactive \
  --tty \
  --rm \
  --volume "${HOME}/.aws:/root/.aws" \
  "amazon/aws-cli" \
  configure
Creating a New Rails Application
We will use SAM CLI to bootstrap our Rails project. The AWS SAM CLI allows you to initialize a new project from a GitHub repository template, commonly called a cookiecutter. To start a new SAM project, we will use a Docker container to run sam init, which leverages the Lamby Cookiecutter project template to kickstart a new project folder for you. You will be prompted to provide a project name, but I have used "rails_on_lambda".
$ docker run \
  --rm \
  --interactive \
  --volume "${PWD}:/var/task:delegated" \
  lambci/lambda:build-ruby2.7 \
  sam init --location "gh:customink/lamby-cookiecutter"

Your new SAM project folder has everything you need for your new Rails on Lambda project. From a higher level, here is what has been generated in your new project.
- Docker setup using both a Dockerfile and docker-compose.
- A working Ruby project with a lib directory, bundler, and tests.
- A SAM
template.yamlfile.
Set up and Deploy
Now that we have created a new Rails app, we need to set it up for Lambda deployment. The two commands below run scripts that build a Docker development image and bundle gems. The bootstrap command is a one-time process, whereas the setup command will be run each time you add a new project dependency.
$ ./bin/bootstrap
$ ./bin/setup
Upon successful execution of the previous commands, your project is ready for deployment via SAM. Deployment is done using a Lamby script that builds, packages, and deploys your Rails application.
./bin/deploy
The deploy command runs a Lamby build script that duplicates your current project directory into a local .lamby directory and runs the three SAM commands needed to deploy your application.
If the scripts run as expected, you should see output for SAM's CloudFormation deployment tasks ending with something like this:
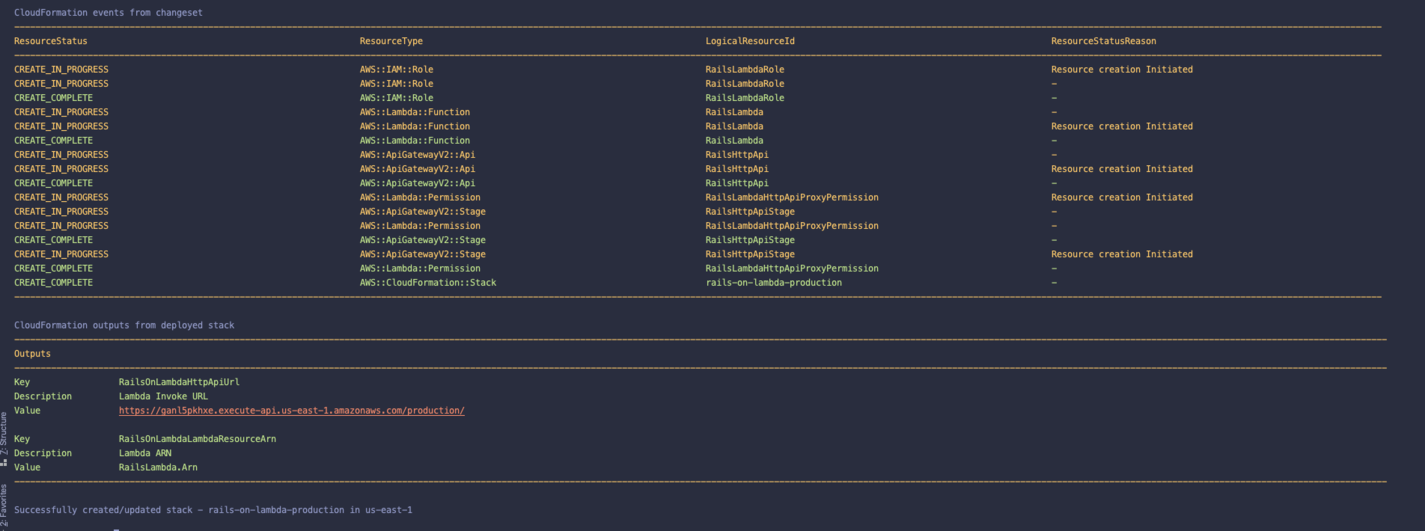
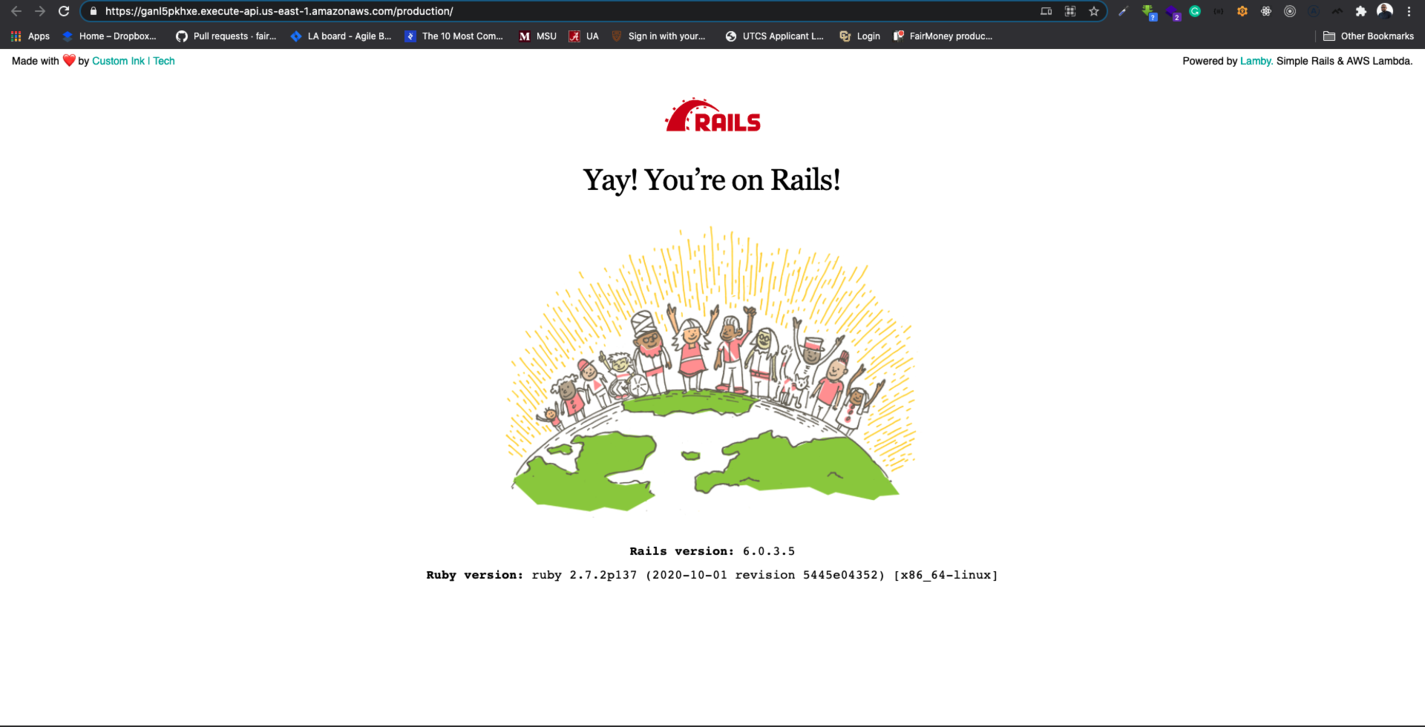
You should also see a URL as part of the terminal output. The URL is an API Gateway HTTP API endpoint that invokes your Rails application using Rack. Open it in your browser, and you should see the familiar "welcome to Rails" screen:
Invoking Your Rails App from the AWS Console
We can also test our app from the Lambda dashboard. Log in to the AWS Management Console:
- Click on "Services" in the toolbar.
- Enter "Lambda" in the find services field, select.
From this page, you will see your newly deployed "RailsOnLambda" project.
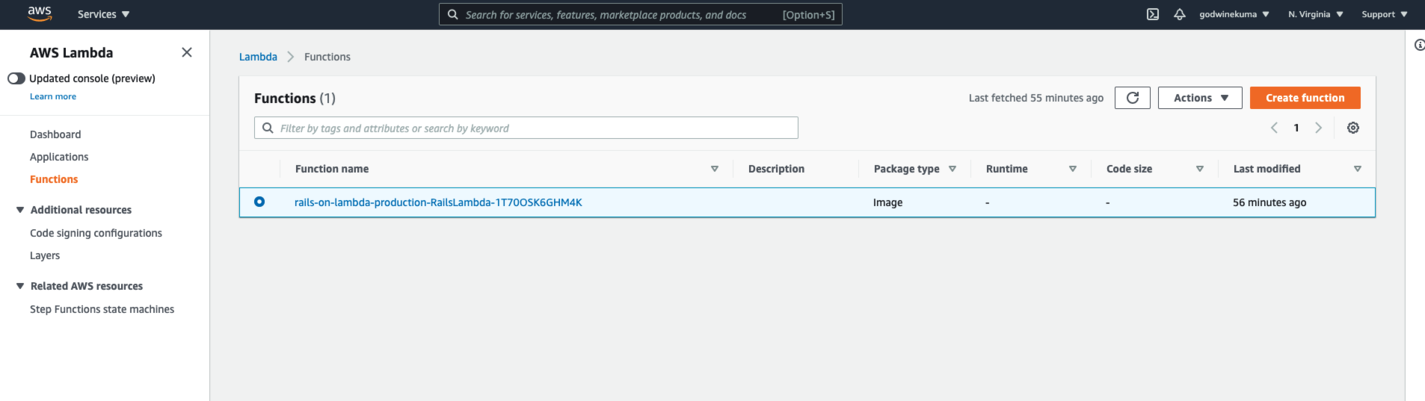
- Open the "RailsOnLambda" function.
- Click on the "Test" button in the upper right.
- Use the "Amazon API Gateway Proxy" event template (use the JSON template below to update the corresponding fields).
- Give it the name of "RailsOnLambdaTest".
- Click the "Create" button.
- Click the "Test" button to invoke your Lambda.
{
  "body": "",
  "path": "/",
  "httpMethod": "GET",
  "queryStringParameters": {},
  "multiValueQueryStringParameters": {},
  "pathParameters": {
    "proxy": "/"
  },
  "stageVariables": {},
  "requestContext": {
    "path": "/",
    "httpMethod": "GET"
  }
}
Assuming that everything went smoothly, you should see output similar to the one below.
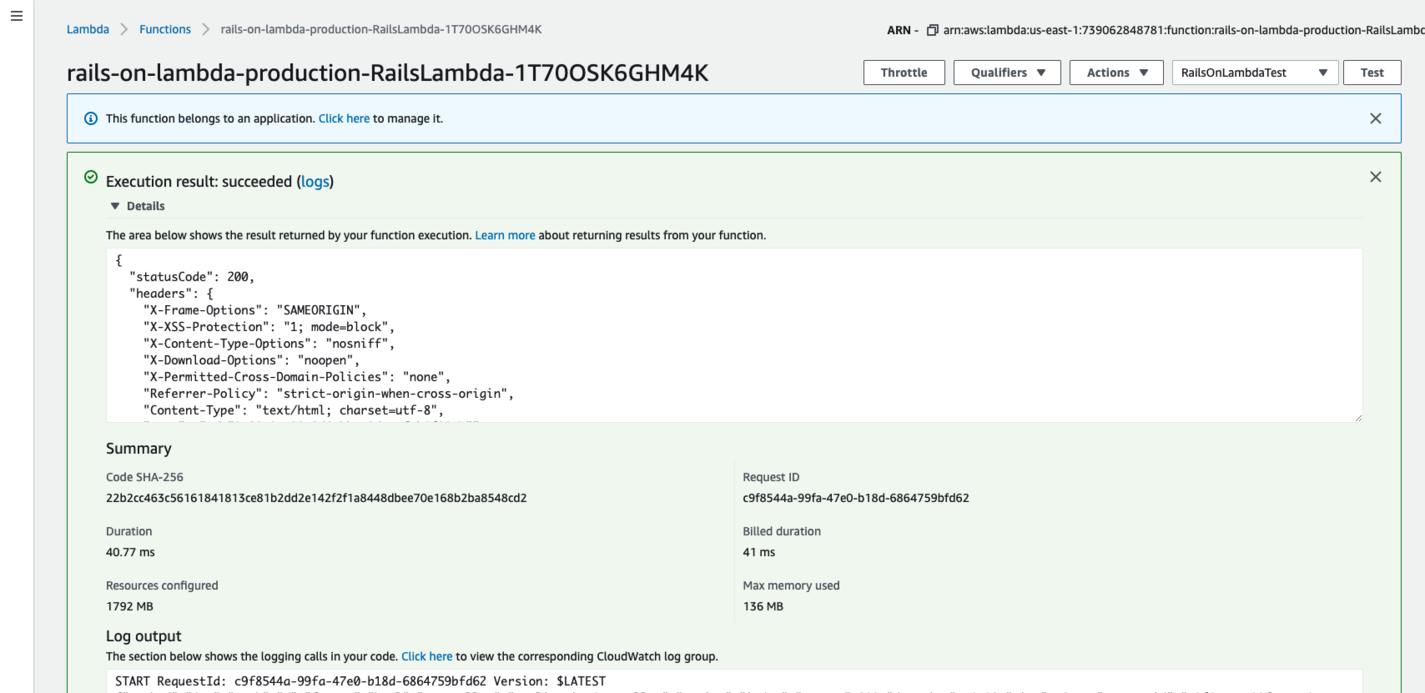
Congratulations! You now have Rails on Lambda, although a Rails application on Lambda is still just a normal Rails application. The only difference is that the Lamby gem converts API Gateway HTTP API, API Gateway REST API, and application load balancer target events to Rack-compatible env objects and sends them to Rails. Rails then passes back the result of the event to a Lambda handler defined in your project.
def handler(event:, context:)
 Lamby.handler $app, event, context
end
How Well Does Rails on Lambda Perform?
Rails on Lambda will experience a slow response time for the first request after deployment. This phenomenon is called "cold start". However, after the first request, the performance is excellent and can meet or beat EC2. If there are no subsequent requests after the first request, the server resources serving the Rails app will be dynamically assigned to other Lambda functions after about 5-7 minutes. This will cause a cold start for new requests. There are a couple of ways to avoid a cold start and keep the Rails app warm.
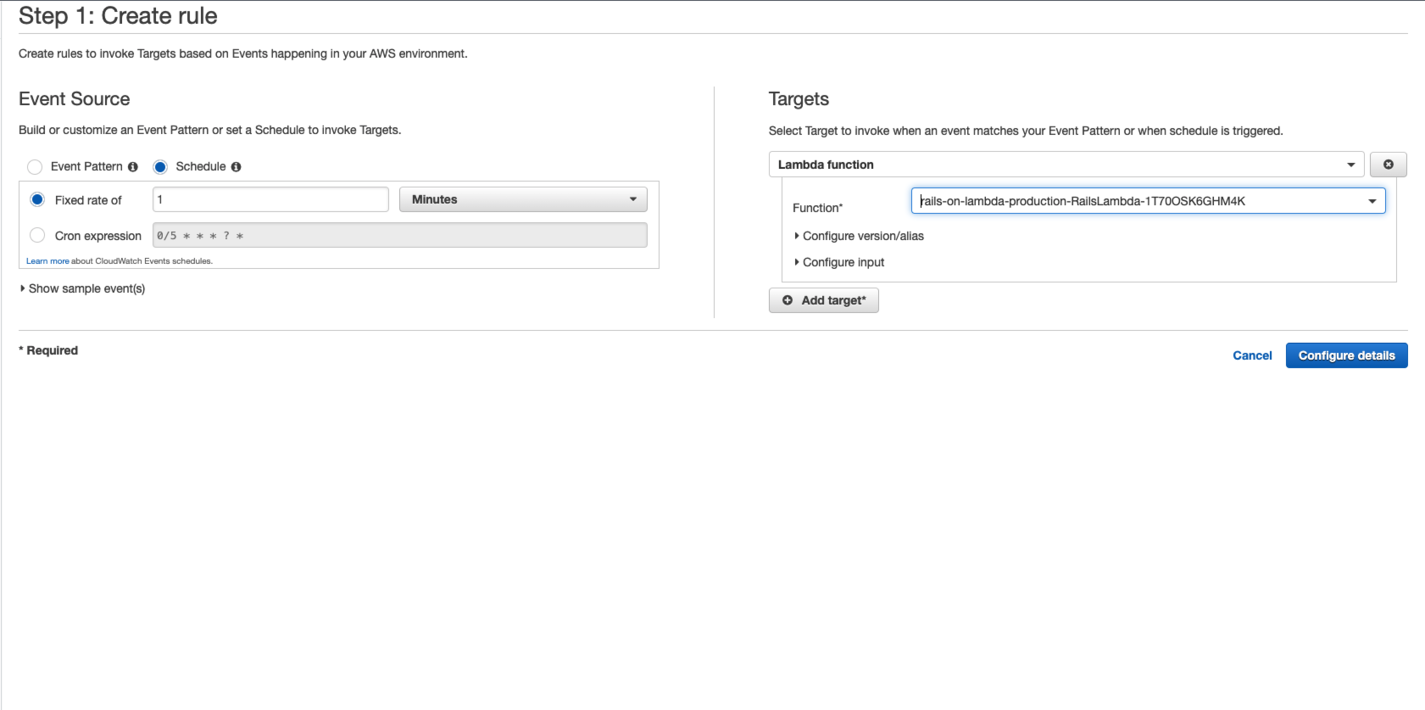
CloudWatch timer
You can set up a time to ping your Rails on Lambda function every minute to keep it warm. Open the AWS console and search for CloudWatch. From there, go to Events and click Create rule. Set the event type to Schedule, and we’ll run this event every 1 minute.
Provisioned concurrency
Provisioned concurrency is an AWS feature that allows you to toggle and agree to pay more to have AWS keep an unused container running at all times. To configure provisioned currency for the Rails app, open your AWS console and open the Lambda service page.
- Choose a function(rails-on-lambda).
- Choose Configuration and then choose Concurrency.
- Under Provisioned concurrency configurations, click on Add configuration.
- Select either alias or version.
- Enter the amount of provisioned concurrency(e.g., 500) to allocate.
- Save your changes. Provisioned currency can also be configured via the AWS CLI using the following command:
aws lambda put-provisioned-concurrency-config --function-name my-function \
--qualifier BLUE --provisioned-concurrent-executions 100
What is the Cost of Lambda on AWS?
With AWS Lambda, you only pay for what you use. Cost is a combination of the number of requests and the duration of code execution. The duration price depends on the amount of memory you allocate to your function. Memory sizes range from 128 MB to 10,240 MB, and you can allocate any amount of memory to your function depending on your needs. Below is a chart that shows the cost of running 100,000 invocations of a Lambda function over varying times.

When You Shouldn’t Run Rails on Lambda
We have seen that we can run a Rails app on AWS Lambda, but should every Rails application run on Lambda? Rails assumes that your application is running on a traditional server and not serverless. Certain operations that work easily in a traditional Rails server app may not work serverless. For example, file or image uploads would not work in a Rails on Lambda app because the app doesn’t have access to a persistent filesystem. Also, WebSocket communication would not work on Lambda because your server doesn’t exist when there are no requests.
Conclusion
We have only shown how to deploy a basic Rails application, but the same process is followed for large applications. Feel free to add controllers and routes and test from the console or via Postman and any other HTTP clients.


