Building, Testing, and Deploying Google Cloud Functions With Ruby
Serverless Functions are a new programming paradigm of developing and deploying cloud services. In a serverless world, we abstract the provisioning, maintenance, and scaling of our backend services to the cloud provider. This substantially improves developer productivity by allowing developers focus on solving a specific problem. While there are many advantages and disadvantages of building serverless functions, one thing to consider in building them is language support. Recently, Google announced the support of Ruby 2.7 for Google Cloud Functions, and in this article, I'll focus on building, testing, and deploying a serverless function in Ruby on Google Cloud Functions and the pros and cons of serverless functions.
Building a Serverless OTP System
One-time passwords (OTPs) are short numeric codes used for authentication purposes, such as when your bank sends an OPT via text to verify your identity.
In this article, we'll build an OTP function that handles three core responsibilities:
POST /otp: Generates and sends an OTP message to the provided phone_number.
# Request
{
  "phone_number": "+2347012345678"
}

# Response
{
  "status": true,
  "message": "OTP sent successfully",
  "data": {
    "phone_number": "+2347012345678",
    "otp": 6872,
    "expires_at": "2021-02-09 07:15:25 +0100"
  }
}
PUT /otp/verify: Verifies an OTP against user provided OTP.
# Request
{
  "phone_number": "+2347012345678",
  "otp": 7116
}

# Response
{
  "status": true,
  "message": "OTP verified",
  "data": {}
}
PUT /otp/resend: Tries to generate and resend an OTP to the provided phone_number.
# Request
{
  "phone_number": "+2347012345678"
}

# Response
{
  "status": true,
  "message": "OTP sent successfully",
  "data": {
    "phone_number": "+2347012345678",
    "otp": 8533,
    "expires_at": "2021-02-09 08:59:16 +0100"
  }
}
For the sake of simplicity, our cloud function will be backed by a Cloud MemoryStore (Redis or Memcache on GCP) rather than a full SQL or NoSQL Database. This will also enable us learn about shared states in a stateless environment.
Writing a Google Cloud Function with Ruby
To write functions in GCF, we'll rely on the Functions Framework provided by the Google Cloud team for building GCF functions (more on this later).
First, Create App directory and enter the directory.
mkdir otp-cloud-function && cd otp-cloud-function
Next, create your Gemfile and install.
Like most standard Ruby applications, we'll use bundler to manage our function's dependencies
source "https://rubygems.org"

# Core
gem "functions_framework", "~> 0.7"

# Twilio for Sms
gem 'twilio-ruby', '~> 5.43.0'

# Database
gem 'redis'

# Connection Pooling
gem 'connection_pool'

# Time management
gem 'activesupport'

# API Serialization
gem 'active_model_serializers', '~> 0.10.0'

group :development, :test do
  gem 'pry'
  gem 'rspec'
  gem 'rspec_junit_formatter'
  gem 'faker', '~> 2.11.0'
end
bundle install
Creating the Function
Generally, different hosting environments allow you specify a different file where your functions are written. Google Cloud Functions, however, requires it to be app.rb in the root of your project directory. Now, we're ready to write our function.
Open app.rb and create the function:
# Cloud Functions Entrypoint

require 'functions_framework'
require 'connection_pool'
require 'active_model_serializers'
require './lib/store'
require './lib/send_sms_notification'
require './lib/response'
require './lib/serializers/models/base_model'
require './lib/serializers/models/otp_response'
require './lib/serializers/application_serializer'
require './lib/serializers/base_model_serializer'
require './lib/serializers/otp_response_serializer'

FunctionsFramework.on_startup do |function|
  # Setup Shared Redis Client
  require 'redis'
  set_global :redis_client, ConnectionPool.new(size: 5, timeout: 5) { Redis.new }
end

# Define HTTP Function
FunctionsFramework.http "otp" do |request|

  store = Store.new(global(:redis_client))
  data = JSON.parse(request.body.read)

  if  request.post? && request.path == '/otp'
    phone_number = data['phone_number']
    record = store.get(phone_number)
    unless record.nil? || record.expired?
      data = Models::OtpResponse.new(phone_number: phone_number,
                                      otp: record['otp'],
                                      expires_at: record['expires_at'])
      json = Response.generate_json(status: true,
                            message: 'OTP previously sent',
                            data: data)

      return json
    end

    otp = rand(1111..9999)
    record = store.set(phone_number, otp)
    SendSmsNotification.new(phone_number, otp).call

    data = Models::OtpResponse.new(phone_number: phone_number,
                                    otp: record['otp'],
                                    expires_at: record['expires_at'])

    Response.generate_json(status: true,
                          message: 'OTP sent successfully',
                          data: data)

  elsif request.put? && request.path == '/otp/verify'
    phone_number = data['phone_number']
    record = store.get(phone_number)

    if record.nil?
      return Response.generate_json(status: false, message: "OTP not sent to number")
    elsif record.expired?
      return Response.generate_json(status: false,  message: 'OTP code expired')
    end

    is_verified = data['otp'] == record['otp']

    if is_verified
      return Response.generate_json(status: true, message: 'OTP verified')
    else
      return Response.generate_json(status: false, message: 'OTP does not match')
    end

  elsif request.put? && request.path == '/otp/resend'
    phone_number = data['phone_number']
    store.del(phone_number)

    otp = rand(1111..9999)
    record = store.set(phone_number, otp)
    SendSmsNotification.new(phone_number, otp).call

    data = Models::OtpResponse.new(phone_number: phone_number,
                                    otp: record['otp'],
                                    expires_at: record['expires_at'])

    json = Response.generate_json(status: true,
                          message: 'OTP sent successfully',
                          data: data)
  else
    Response.generate_json(status: false,
                            message: 'Request method and path did not match')
  end
end
This is a lot of code, so we’ll break it down:
-
Functions_Framework.on_startupis a block of code that runs per Ruby instance before functions begin processing requests. It is ideal to run any form of initialization before our functions are called. In this case, I'm using it to create and share a connection pool to our Redis server:set_global :redis_client, ConnectionPool.new(size: 5, timeout: 5) { Redis.new }This enables us share a pool of Redis connection objects across multiple concurrent function invocations without fear. Multiple startups can be defined. They'll run in the order that they are defined. It is also important to note that the
Functions Frameworkdoes not provide any special hook to run after function completion. -
Functions_Framework.http 'otp' do |request|handles the request and response processing of our functions. This function supports three different route patterns. It is possible to define other types of functions (e.g.,Functions_Framework.cloud_event 'otp' do |event|) that handle events from other Google services. It is also possible to define multiple functions in the same file but deployed independently. -
In
store = Store.new(global(:redis_client)), theglobalmethod is used to retrieve any object stored in the global shared state. As it is used above, we retrieve the Redis client from the Connection pool defined in the global setup in ourstartupblock. -
ResponseandModels::OtpResponsehandles response serialization withactive_model_serializersto give properly formatted JSON responses.
Testing our Function Locally
The Functions Framework library enables us to easily test our functions locally before deploying them to the cloud. To test locally, we run
bundle exec functions-framework-ruby --target=otp --port=3000
--target is used to select the function to deploy.
While manual testing is great, automated tests and self-testing software is the holy grail in testing. The Functions Framework provides helper methods for both Minitest and RSpec to help test our functions for both http and cloudevents handlers. Here is an example of a test:
require './spec/spec_helper.rb'
require 'functions_framework/testing'

describe  'OTP Functions' do
  include FunctionsFramework::Testing

  describe 'Send OTP', redis: true do
    let(:phone_number) { "+2347012345678" }
    let(:body) { { phone_number: phone_number }.to_json }
    let(:headers) { ["Content-Type: application/json"] }

    it 'should send OTP successfully' do
      load_temporary "app.rb" do
        request = make_post_request "/otp", body, headers

        response = call_http "otp", request
        expect(response.status).to eq 200
        expect(response.content_type).to eq("application/json")

        parsed_response = JSON.parse(response.body.join)
        expect(parsed_response['status']).to eq true
        expect(parsed_response['message']).to eq 'OTP sent successfully'
      end
    end
  end
end
Deploying Our Function
First, we need to deploy a Redis server using Google Cloud Memorystore, on which our function is dependent. I won't go into further detail here on how to deploy a Redis server to the GCP, as it is outside the scope of this article.
There are multiple ways to deploy our function to the Google Cloud Function's environment: deploying from your machine, deploying from the GCP console, and deploying from our code repositories. Modern software engineering encourages CI/CD processes for most of our development, and for the purpose of this article, I'll focus on deploying our Cloud Function from Github with Github Actions using deploy-cloud-functions.
Let's set up our deployment file (.github/workflows/deploy.yml).
name: Deployment
on:
  push:
    branches:
      - main
jobs:
  deploy:
    name: Function Deployment
    runs-on: ubuntu-latest
    steps:
      - uses: actions/checkout@v2
      - id: deploy
        uses: google-github-actions/deploy-cloud-functions@main
        with:
          name: otp-cloud-function
          runtime: ruby26
          credentials: ${{ secrets.gcp_credentials }}
          env_vars: "TWILIO_ACCOUNT_SID=${{ secrets.TWILIO_ACCOUNT_SID }},TWILIO_AUTH_TOKEN=${{ secrets.TWILIO_AUTH_TOKEN }},TWILIO_PHONE_NUMBER=${{ secrets.TWILIO_PHONE_NUMBER }},REDIS_URL=${{ secrets.REDIS_URL }}"
Environment Variables
In the above code, the last line allows us specify environment variables that will be available to our function in the Google Cloud environment. Note that for security reasons, we're not exposing these variables in our code-base; instead, we're utilizing Github actions secrets to keep this information private. To check whether our tokens have been properly deployed, check your cloud function in the Google Console, as shown below:

Authentication
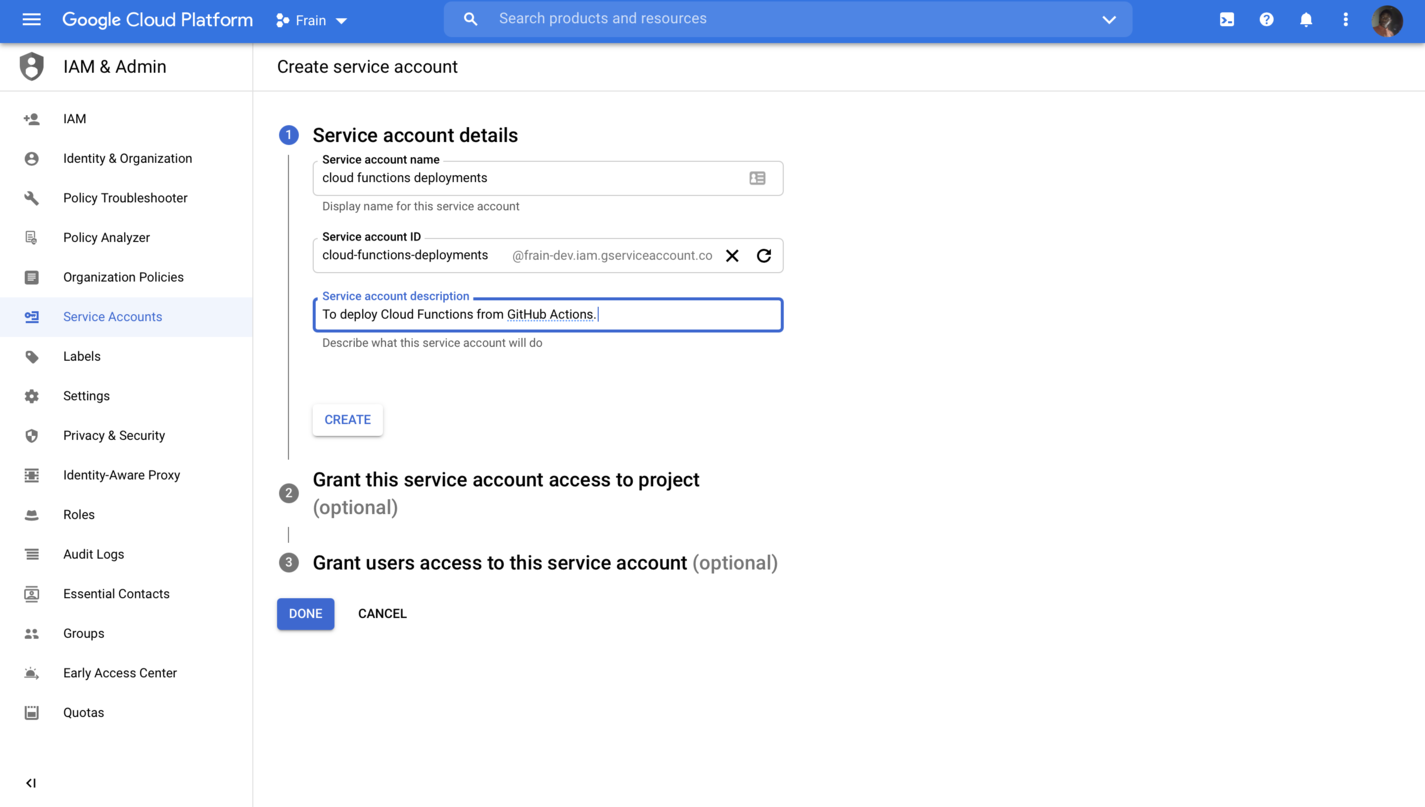
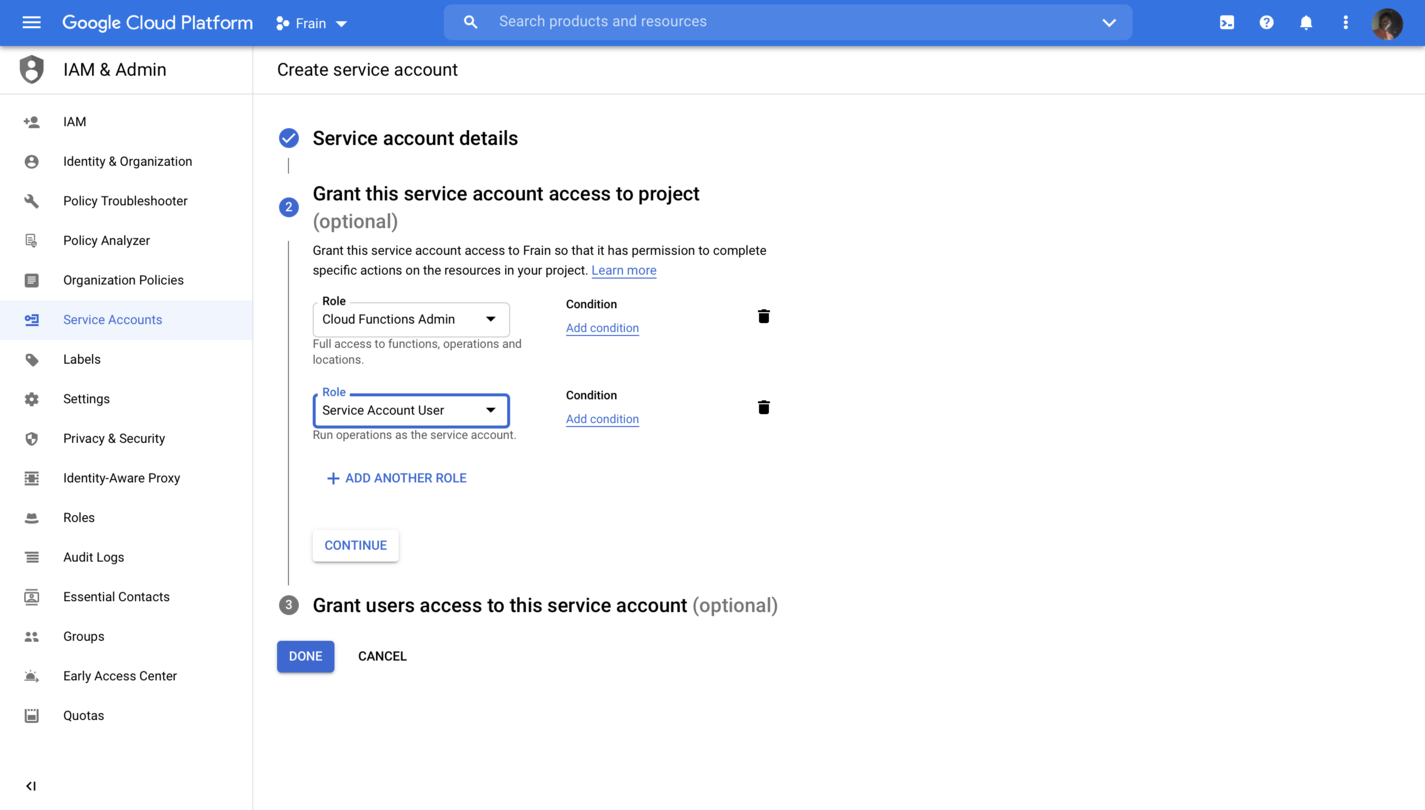
Create a Service Account with Cloud Functions Admin and Service Account User roles.
A service account is used for machine-to-machine IAM. Thus, when a system, regardless of whether it’s running on the Google Cloud, talks to another system on the Google Cloud, a service account is needed to help identify who is requesting access to our Google resource. The roles Cloud Functions Admin and Service Account User enable us to determine whether the user is authorized to access the resource. In this scenario, a Github Action runner communicates with Google Cloud authenticating as a service account with the necessary permissions to deploy our function.
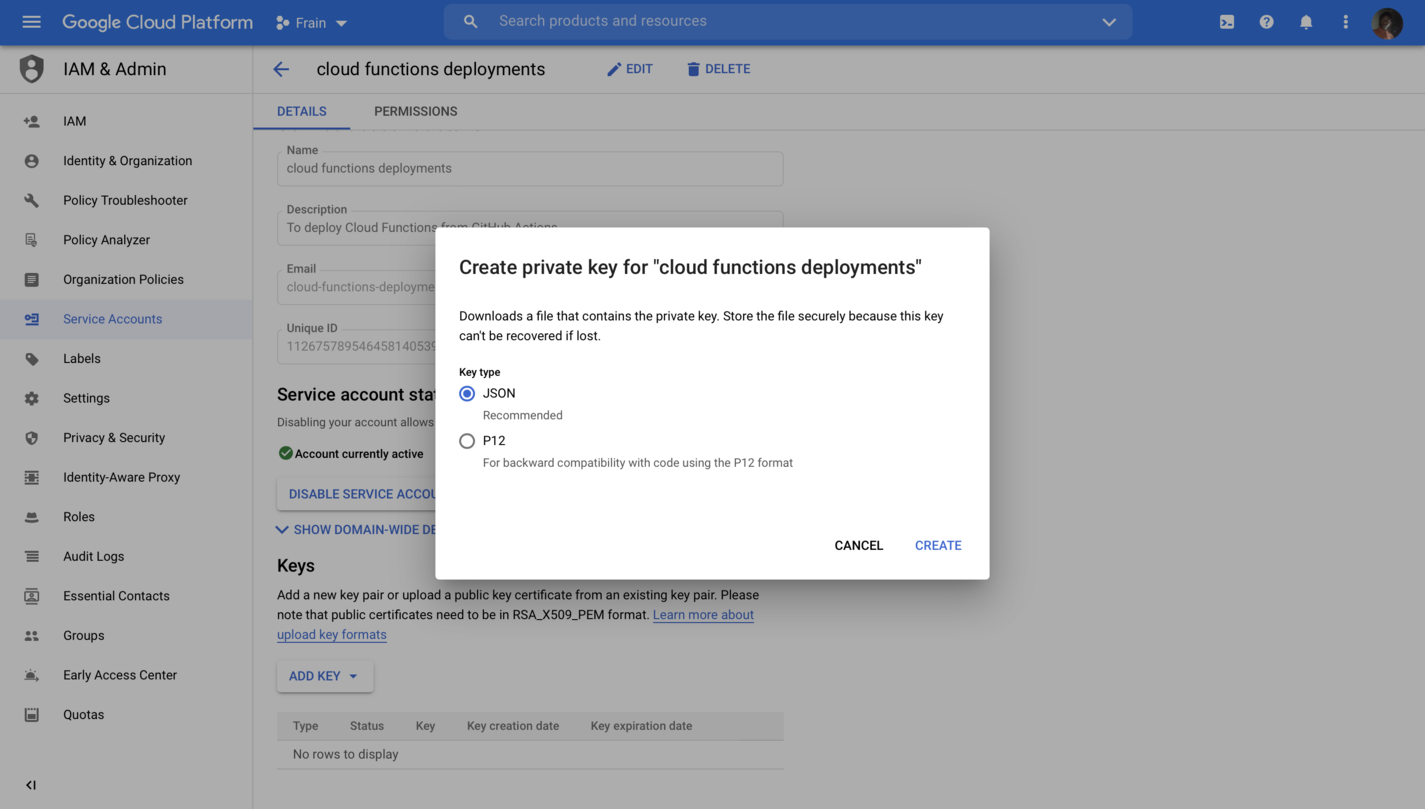
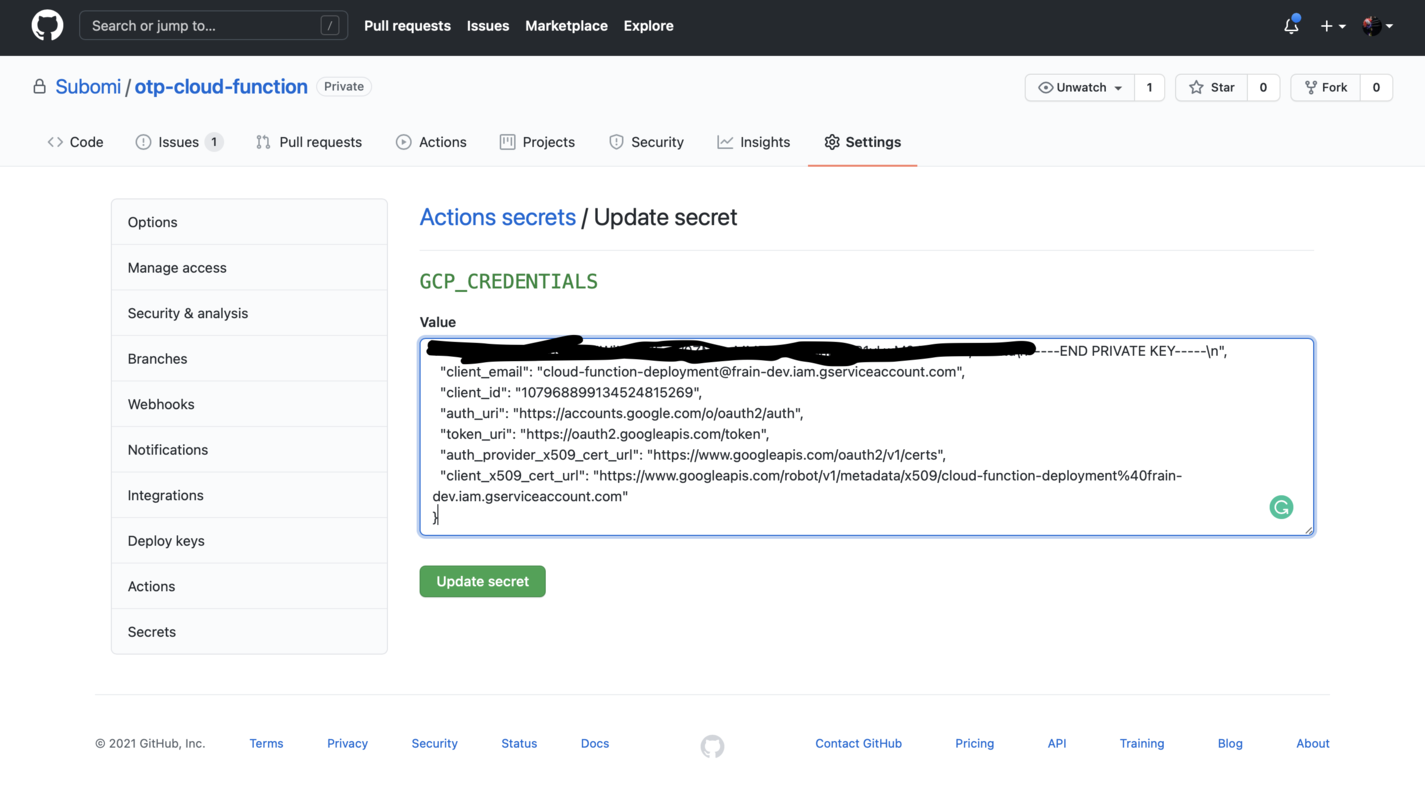
Create a Service Account Key, download JSON, and add it to GitHub Secrets.
Voila! 🎉 Our Cloud Function has been deployed successfully.
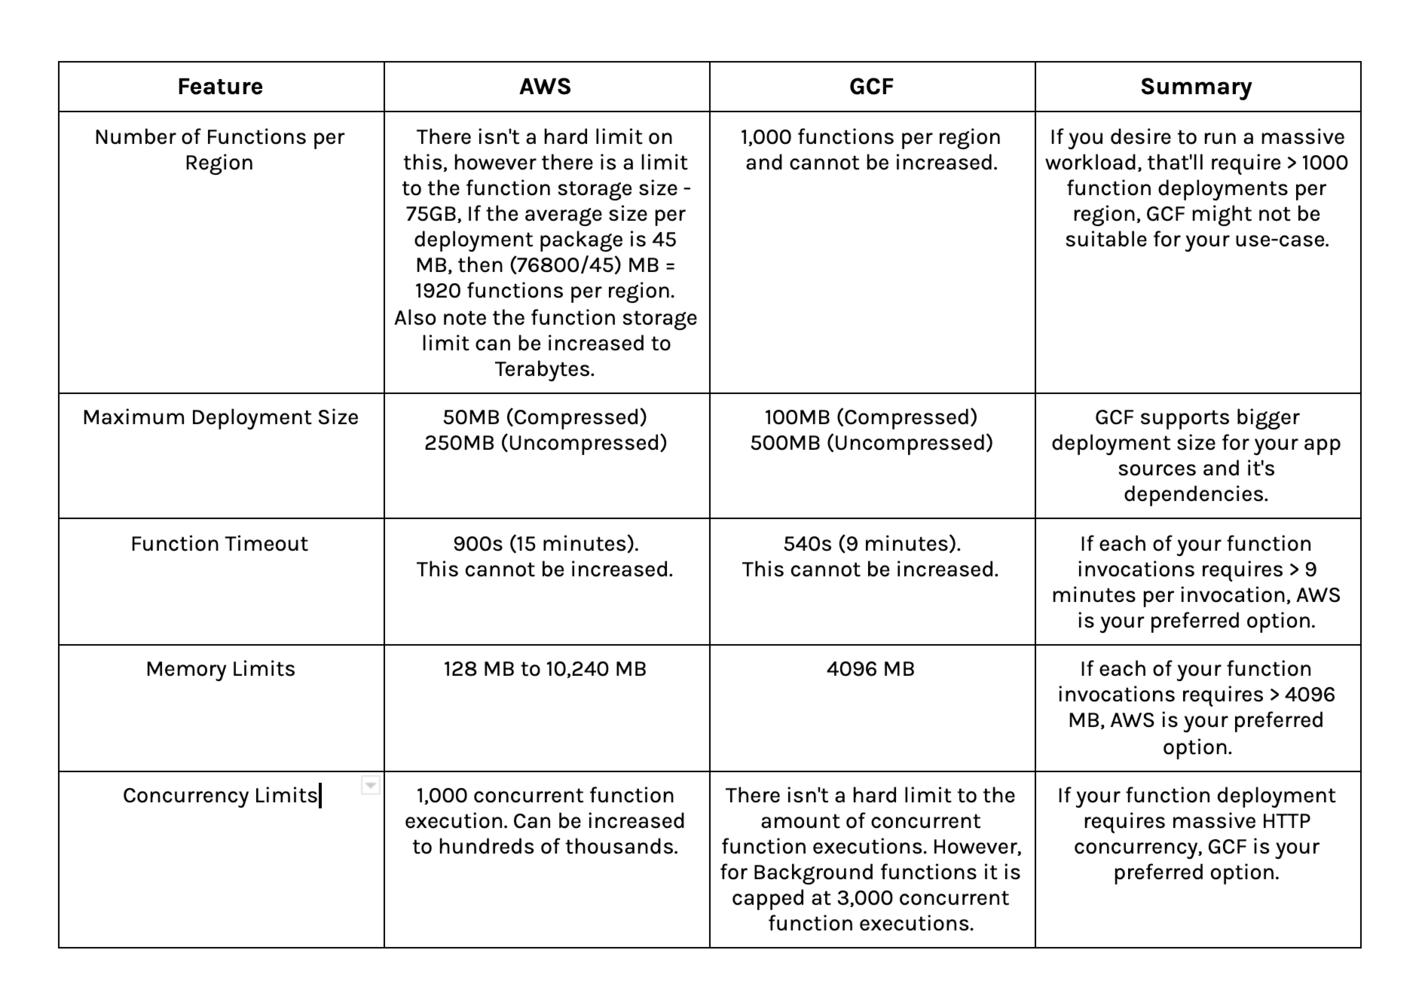
Cloud Functions Limits vs. AWS Limits
Below is a detailed comparison of two of the biggest Serverless function providers:
Functions Framework Contract vs. Serverless Framework
In this article, we've focused on building cloud functions for Google Cloud Functions. In this segment, I want to compare building with the Functions Framework vs. Serverless Framework.
- The
Serverless Frameworkis based onserverless.yml, while Functions Framework is based on theFunctions Framework Contract, which is used to deploy serverless functions across the Google Cloud Infrastructure. - With the
Serverless Framework, there are only few examples, and it isn't quite clear how to build and deploy serverless functions with Ruby to the different Google serverless environments (Cloud Functions, Cloud Run, and Knative environments). With theFunctions Framework Contractfunction, building with Ruby across these different Google products is straightforward.- Following from the previous point, the
Functions Framework Contractmakes it very easy to switch the backing language behind your function without necessarily changing much in your deployment process.
- Following from the previous point, the
- As of this writing,
Functions Frameworkonly supports interoperability across Google Cloud Serverless Environments and Knative environments.Serverless Framework, however, supports multiple platforms across multiple providers.
For reference, the full code is available here.

Written by
Subomi OluwalanaSubomi is a passionate software engineer. His main focuses are Ruby and backend development.