Building command-line applications in Python
If you are into programming, you might have used commands like cp, mv, cat, etc, to perform different operations using a text interface like bash or Windows PowerShell. This article discusses implementing command-line applications in Python with functionalities such as keyword arguments, flags, positional arguments, and mode selection. It also discusses how to implement the Linux head command in Python.
What is a command-line application?
A command-line application is a computer program we use from a text interface like Bash, Windows PowerShell, Zsh, Dash, etc. We can execute a command line application by typing the command name and the required arguments.
For example, we can use the mv command to move a file from one directory to another by passing the source and destination locations as shown below.

In the above image, we have used the mv command to move the sample_code.py file from the /HoneyBadger/Codes directory to the /HoneyBadger/ProgramCodes directory.
Here, mv is the command line application name, and the two locations are input arguments to the application.
What are the different types of command-line arguments?
In a command-line application, we can use positional arguments, keyword arguments, options, and flags to decide how the application executes. Let us discuss what they are.
Positional arguments in a command-line application
Positional arguments in a command-line application are mandatory values passed to the application in a specific order.
For example, ‘/HoneyBadger/Codes/sample_code.py’ and ‘/HoneyBadger/ProgramCodes’ are positional arguments for the above-mentioned mv command. Here, you observe the following things.
- The
mvcommand cannot work without these two arguments. - The first argument is the source address of the file.
- The second argument is the destination directory to which the file will be moved.
- The source address will always be written before the destination address for the command to work correctly.
Hence, positional arguments are mandatory arguments that we pass to a command-line application in a specific order for the application to work correctly.
Keyword arguments in a command-line application
The keyword arguments in a command-line application are key-value pairs we pass to the application as input. We specify the keyword argument to the command-line application using single hyphen (-) or double hyphen characters (--) followed by the argument name.
The input value to the argument follows the argument name after a space character or assignment operator (=), as shown in the following command.
application_name --argument_1 value_1 --argument_2 value_2 --argument_N value_N positional_argument_1 positional_argument_2 positional_argument_M
You can also write the above command as follows.
application_name --argument_1=value_1 --argument_2=value_2 --argument_N=value_N positional_argument_1 positional_argument_2 positional_argument_M
In the above statement,
application_nameis the command-line application.argument_1,argument_2,argument_Nare keyword arguments with valuesvalue_1,value_2, andvalue_Nrespectively. You can also use the assignment operator or the space character between the argument and its value to assign values to the keyword arguments.positional_argument_1,positional_argument_2, andpositional_argument_Mare positional arguments for the applicationapplication_name.
To understand this, consider the following spark-submit command.
spark-submit --master yarn --deploy-mode cluster --num-executors 10 --executor-cores 8 example_code.py
We use the spark-submit command to run applications on a spark cluster. In the above command,
spark-submitis the application name.masteris a keyword argument with the valueyarn.deploy-modeis a keyword argument with the valuecluster.num-executorsis a keyword argument with the value10.executor-coresis a keyword argument with the value8.example_code.pyis a mandatory positional argument.
The keyword arguments in a command line application often come with a default value. Hence, keyword arguments are optional, and we use them only to change the application's default behavior.
What are options in a command-line application?
Options are keyword arguments that have predefined allowed values. To understand this, let us look at the spark-submit command again.
spark-submit --master yarn --deploy-mode cluster --num-executors 10 --executor-cores 8 example_code.py
Here, the parameter deploy-mode is an option as it can have only two values, i.e., cluster and client. Similarly, master is also an option as it can have two values, i.e., local and yarn.
What are flags in a command-line application?
Flags work as switches or toggles. We use flags to turn on or off specific features of a command-line application. For instance, we use the cp command to copy files from one location to another using the following syntax.
cp source_file_location destination_directory
When we execute the above command, the file kept at source_file_location is copied to destination_directory. If source_file_location is a directory, the cp command won't copy the directory. To change this behavior, we use the -r flag to copy directories using the cp command, as shown below.
cp -r source_file_location destination_directory
In the above command, -r is a flag that enables copying the contents at source_file_location to destination_directory even if source_file_location is a directory. Hence, flags are used in a command line application to turn specific features on or off.
How to build command-line applications in Python
Usually, we execute a Python program from the command-line terminal using the syntax python filename.py or python3 filename.py. For example, suppose that we have the following Python code in a file cmd_example_1.py.
print("I am a simple python application containing only the print statements.")
print("I have been executed through command line.")
We can execute the above file from the command line terminal using the following statement.
python3 cmd_example_1.py
The output looks as follows.

The above approach to executing the Python application from the command-line interface has some requirements.
- The user needs to know the filename and exact location of the Python file. If we know the filename and the file's location, we can execute the file by opening the directory where the file is present. Or, we can pass the entire file path of the python file to the python3 command.
- If we don’t know the exact location of the Python file, we cannot execute it. If we try to run the file from a different directory, we will get an error saying that the file doesn’t exist, as shown below.
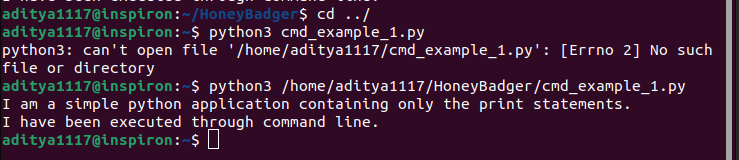
In the above image, you can observe that when we move out of the directory where the python file exists, we cannot execute the file unless we pass the full path of the file to the python3 command.
What is the solution to the above problem?
Using the python3 command with the filename isn’t very desirable. We don’t need the user to know which Python file is executed for a given command-line application or where the file is stored. Hence, we will hide the entire Python3 command using an alias. For this, we will use the alias command in Linux.
The Linux alias command replaces one string from the command-line with another string. To build an alias for our Python application, we will use the alias command to create an alias for the python3 command using the following statement.
alias print_with_python='python3 /home/aditya1117/HoneyBadger/cmd_example_1.py'
After executing the above statement, whenever we run the command print_with_python, the bash shell will execute the statement "python3 /home/aditya1117/HoneyBadger/cmd_example_1.py" as shown below.

Hence, we can execute the Python application without knowing the file name. Also, we have used the complete file path of the Python file while creating the alias for the command. Hence, we can execute the application print_with_python in any working directory to run the Python program.
We have successfully created a basic command-line application, print_with_python, that prints two predefined statements when executed.
Adding functionalities to the command-line application
To add different functionalities to the Python command-line application, we will use the argparse module. You can install this module using PIP by executing the following statement in the bash terminal.
pip3 install argparse
After installing, we can use the argparse module in a Python program to create and parse command-line arguments for adding different functionalities.
How to create and parse command-line arguments in Python
We'll create an argument parser to create or parse command-line arguments in a Python application using the ArgumentParser() function defined in the argparse module. The ArgumentParser() function takes a string as input to its description parameter and returns an ArgumentParser object that you can use to define and process arguments.
After creating an ArgumentParser object, we can use the add_argument() and parse_args() methods to create and parse command-line arguments in a Python application.
Creating command-line arguments in a Python application
After creating the ArgumentParser object using the ArgumentParser() function, we use the add_argument() method to create arguments for the Python application. It has the following syntax.
ArgumentParser.add_argument(name or flags [, default][, type][, choices][, required][, help][, dest] [,action][,const] )
Here,
- The
nameorflagsparameter takes as its input the name of the command-line argument that we want to create. If we're going to create positional arguments, we pass a single string to thenameparameter. You can pass multiple strings to thenameorflagsparameter to create keyword arguments, optional parameters, or flags. - The
defaultparameter defines the default value for the input argument if the argument is absent from the command line. - The
typeparameter defines the data type for the values passed to the argument. - We use the
choicesparameter to define all the allowed values for an input argument. - The
requiredparameter in theadd_argument()method is used to specify if a keyword argument can be omitted while executing the application. - We use the
helpparameter to specify a brief description of what the argument does. - Instead of creating variables with the same name as the input arguments, we can map the command-line argument to different variable names. The
destparameter takes a command-line argument's destination variable name as its input. While parsing the command-line arguments, the values for the given command-line arguments are stored in the variable name passed to thedestparameter in theadd_argument()method. After this, we can access the values using the variable name in thedestparameter. - The
actionparameter defines the action to be taken when the argument is encountered at the command line. We can use this parameter to define flags. - We use the
constparameter to define the constant values theactionparameter requires.
The add_argument() method, when invoked on an ArgumentParser object, creates the argument as defined in the input parameters.
Parse command-line arguments in a Python Application
To parse the command-line arguments created by the add_argument() method, we use the parse_args() method. The parse_args() method, when invoked on an ArgumentParser object, returns a Namespace object containing the command-line arguments as its variables.
We can retrieve values in the arguments using the Namespace object and the argument names. For this, we use the syntax namespace.argument_name, as discussed in the following sections.
Handling arguments in a command-line application in Python
We can add positional arguments, keyword arguments, options, and flags to a command-line application to make it more interactive. Let us discuss how to do this one by one.
Add Positional Arguments to a command-line application
To add a positional argument in a command-line application, we first create an ArgumentParser object using the ArgumentParser() function. Then, we invoke the add_argument() method on the ArgumentParser object and pass the argument name as input. After this, the argument is added to the command-line application.
We use the parse_args() method to read the value passed to the argument. Here, we will use the namespace returned by the parse_args() method to get the value passed to the command-line argument.
To understand this, consider the following code.
import argparse
parser = argparse.ArgumentParser(description='Parser for command line application')
parser.add_argument('first_value')
arguments=parser.parse_args()
value1=arguments.first_value
print("The input argument is:", value1)
In the above code, we have defined the positional argument first_value using the add_argument() method. When the code executes, the parse_args() method returns a namespace in which first_value is a variable name.
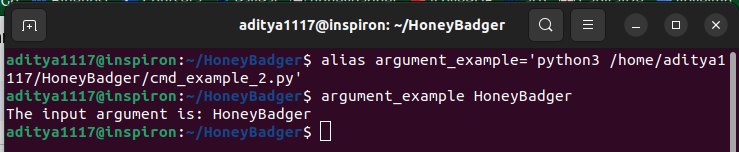
We will save the above code in the file cmd_example_2.py. Then, we will create an alias for running the Python3 command using the following statement.
alias argument_example='python3 /home/aditya1117/HoneyBadger/cmd_example_2.py'
Next, we will run the program argument_example to get the output as shown below.
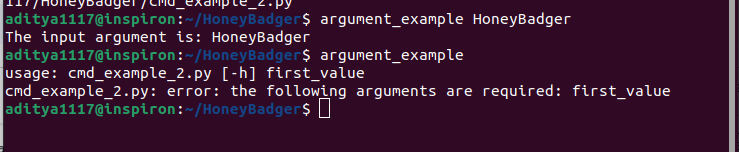
Positional arguments are mandatory. Hence, if you don’t pass the argument with the command-line application, the program will run into an error saying that the arguments are required.
To explain the purpose of the arguments, you can use the help parameter in the add_argument() method. The help messages are printed when the user passes the --help flag to the command-line application, as shown below.
import argparse
parser = argparse.ArgumentParser(description='Parser for command line application')
parser.add_argument('first_value', help='First input value.')
parser.add_argument('second_value', help='Second input value.')
arguments=parser.parse_args()
value1=arguments.first_value
value2=arguments.second_value
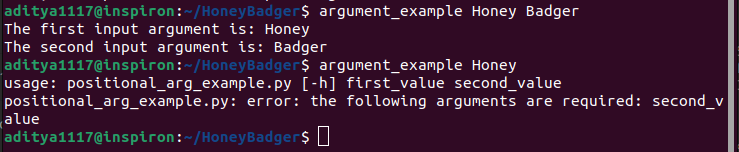
print("The first input argument is:", value1)
print("The second input argument is:", value2)
When we pass the --help flag to the above program, the output looks as follows.
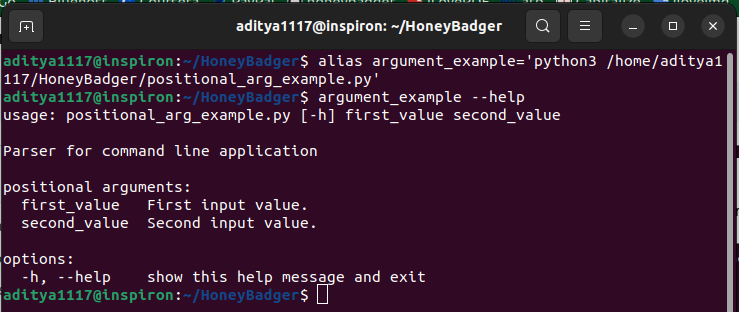
You can observe that the strings passed to the help parameter in the add_argument() method are present as details for the arguments.
While executing the above command-line application, you must pass all the positional arguments if it doesn't have a default value. Otherwise, the program will run into an error, as shown below.
Add keyword arguments to the command-line application
We can define keyword arguments in a command-line application using the hyphen character with the keyword names. For example, we can add the keyword arguments keyword_arg1 and keyword_arg2 to a Python command-line application, as shown below.
import argparse
parser = argparse.ArgumentParser(description='Parser for command line application')
parser.add_argument('-keyword_arg1', help='First keyword argument.')
parser.add_argument('-keyword_arg2', help='Second keyword argument.')
arguments=parser.parse_args()
value1=arguments.keyword_arg1
value2=arguments.keyword_arg2
print(value1)
print(value2)
If no input is passed to the keyword arguments, they are set to None. You can observe this in the following output.
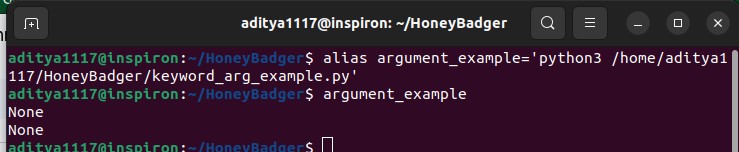
We haven’t passed any arguments to the command-line application in the above example. Hence, both the input arguments are None. When we pass a value to the arguments, it will be reflected in the output.
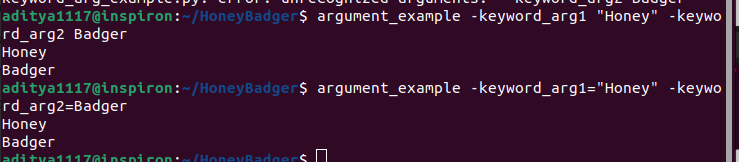
In the above image, you can observe that I used the syntax using the space character and the assignment operator to assign values to the keyword argument. Single hyphen characters are often used for flags. Hence, we will use the double hyphen (--) to define keyword arguments in our application. However, the working of the application doesn't change. You can observe this in the following example.
import argparse
parser = argparse.ArgumentParser(description='Parser for command line application')
parser.add_argument('--keyword_arg1', help='First keyword argument.')
parser.add_argument('--keyword_arg2',help='Second keyword argument.')
arguments=parser.parse_args()
value1=arguments.keyword_arg1
value2=arguments.keyword_arg2
print(value1)
print(value2)
Output:
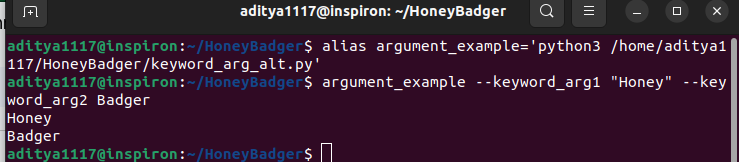
In the above example, we have used a double hyphen character to define the keyword arguments instead of a single hyphen character. Still, the functioning of the program remains unchanged.
Add options to a command-line application
We will use the choices parameter in the add_argument() method to define options in a command-line application. The choices parameter takes a list of allowed values for a given keyword argument as its input. After this, the keyword argument behaves as an option. To understand this, consider the following code.
import argparse
parser = argparse.ArgumentParser(description='Parser for command line application')
parser.add_argument('--option1', choices=["A", "B","C", "D"], help='Allowed values: "A", "B","C", "D"')
parser.add_argument('--option2', choices=["X", "Y", "Z"], help='Allowed values: "X", "Y", "Z"')
arguments=parser.parse_args()
value1=arguments.option1
value2=arguments.option2
print(value1)
print(value2)
In the above code, the argument option1 only takes values "A", "B", "C", and "D" as its input. Similarly, the argument option2 only takes the values "X", "Y", and "Z" as its input. You can observe this in the following example.
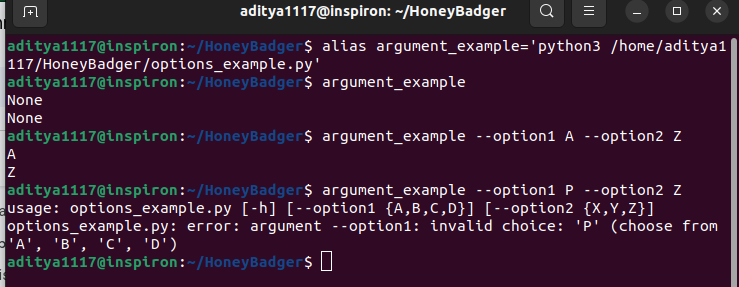
In the above output, you can observe that the options contain the value None if we don’t pass any input arguments. The application executes normally if we pass the allowed values to each option. But, when we pass unspecified values as input to the options, the program runs into an error saying that you should choose input from specified values.
Add flags to a command-line application in Python
We use flags in a command-line application to turn features on or off. Hence, flags mostly contain True or False values. We will use the action parameter in the add_argument() method to create flags. The action parameter takes predefined values given in the argparse module. For example, it takes the strings "store_true" and "store_false" to store True and False values, respectively, in a flag if the flag is present in a command-line application.
Here,
- Suppose we set the
actionparameter to"store_true"for a flag. Then, its default value is set toFalse. It is set to True only when the flag is present in the command-line arguments. - If we set the
actionparameter to"store_false"for a flag, its default value is set toTrue. It is set toFalseonly when the flag is present in the command-line arguments.
To understand this, consider the following code.
import argparse
parser = argparse.ArgumentParser(description='Parser for command line application')
parser.add_argument('-flag1', action="store_true", help='Flag that becomes True if present in command line')
parser.add_argument('-flag2', action="store_false", help='Flag that becomes False if present in command line')
arguments=parser.parse_args()
value1=arguments.flag1
value2=arguments.flag2
print(value1)
print(value2)
When we run the above application with and without flags, the output looks as follows.
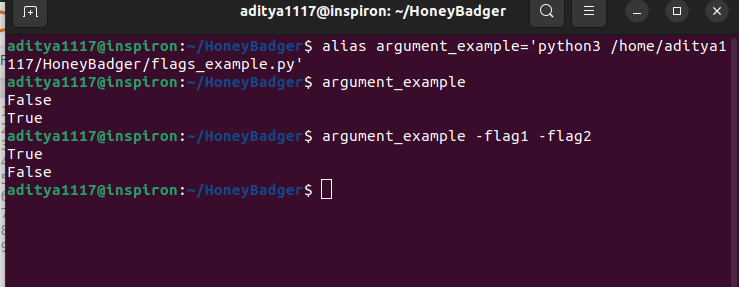
The above image shows that flag1 is False and flag2 is True when we don't pass the flags in the command-line argument. The values are reversed when we use the flags in the command line.
Adding more features to the command-line application
Apart from the basic inputs, we can perform different operations such as setting default values for the arguments, defining data types, assigning variable names, and making keyword arguments and options required in a command-line application in Python. Let us discuss each operation one by one.
Set default values for keyword arguments
We'll use the default parameter in the add_argument() method to set default values for the keyword arguments in a command-line application in Python. If a value isn’t passed to an argument, the input passed to the default parameter is assigned to the argument. To understand this, consider the following example.
import argparse
parser = argparse.ArgumentParser(description='Parser for command line application')
parser.add_argument('--keyword_arg1', default="Aditya", help='First keyword argument.')
parser.add_argument('--keyword_arg2', default= "Raj", help='Second keyword argument.')
arguments=parser.parse_args()
value1=arguments.keyword_arg1
value2=arguments.keyword_arg2
print(value1)
print(value2)
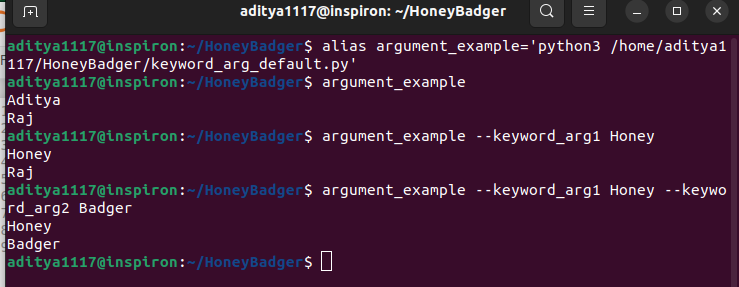
In the above code, we have assigned the default values "Aditya" and "Raj" to the arguments keyword_arg1 and keyword_arg2. Hence, it will contain the default values if we don't use these arguments while executing the command-line application. When we pass any value to these arguments, it will be processed accordingly. You can observe this in the following outputs.
Set data types for input arguments
The command-line arguments are read as strings in a Python application by default. However, we can specify data types for the input arguments. For this, we use the type parameter in the add_argument() method, as shown below.
import argparse
parser = argparse.ArgumentParser(description='Parser for command line application')
parser.add_argument('--name', type=str, help='Name of the user')
parser.add_argument('--age', type= int, help='Age of the user')
arguments=parser.parse_args()
value1=arguments.name
value2=arguments.age
print(value1)
print(value2)
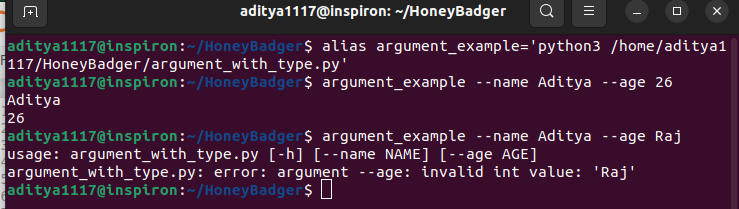
In the above code, we have specified the data type str for the name argument and int for the age argument. After this, the program checks for the data type of the input argument. If the input value isn’t compatible with the defined data type, the program runs into an error. You can observe this in the following output.
Make keyword arguments required
Some input arguments can never be optional. For example, you cannot leave the weight and height of a user empty in an application calculating BMI.
To make the keyword arguments required in a command-line application in Python, we set the required parameter to True in the add_argument() method while defining the arguments. After this, the program will work correctly only when the user passes the required arguments to the command-line application.
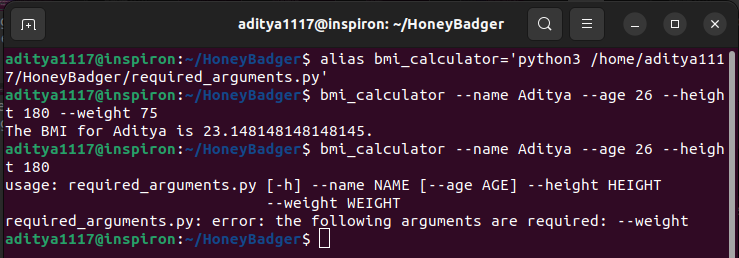
To understand this, let us implement a BMI calculator command-line application.
import argparse
parser = argparse.ArgumentParser(description='Parser for command line application')
parser.add_argument('--name', type=str, required=True, help='Name of the user')
parser.add_argument('--age', type= int, help='Age of the user')
parser.add_argument('--height', type=int, required=True, help='Height of the user in cm')
parser.add_argument('--weight', type= int, required=True, help='Weight of the user')
arguments=parser.parse_args()
value1=arguments.name
value2=arguments.age
user_weight=arguments.weight
user_height=arguments.height
BMI= user_weight/(user_height/100)**2
print("The BMI for {} is {}.".format(value1,BMI))
In the above code, the required parameter is set to True while defining the name, height, and weight arguments. Hence, the program will only work when the required arguments are passed to the command-line application during execution.
Separate variables from arguments in the application
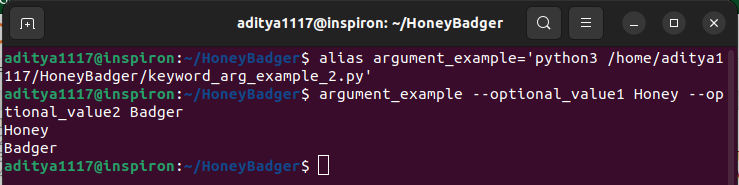
By default, the arguments in the command-line application are passed as variables in the namespace returned by the parse_args() method. However, we can change this behavior and define a different variable name for each command-line argument. We use the dest parameter in the add_argument() method. The dest parameter takes the name of the destination for storing the value of a given command line argument. After this, the value for the given command-line argument is stored in the variable with the name passed to the dest parameter in the add_argument() method. You can observe this in the following example.
import argparse
parser = argparse.ArgumentParser(description='Parser for command line application')
parser.add_argument('--optional_value1', help='First optional value.', dest="first_value")
parser.add_argument('--optional_value2', help='Second optional value.', dest="second_value")
arguments=parser.parse_args()
value1=arguments.first_value
value2=arguments.second_value
print(value1)
print(value2)
In the above code, the behavior of the program doesn’t change. It will print the value passed to the input arguments optional_value1 and optional_value2. However, the values are stored in the program in the variables first_value and second_value instead of optional_value1 and optional_value2. The output remains the same, as shown below.
Implementing actual command-line applications in Python
By now, we have covered almost all the tools we need to create working command-line applications in Python. Next, we will discuss implementing the Linux head command using the argparse module in Python.
Implementing the Linux head command in Python
The Linux head command is used to display the contents of a file. By default, it shows the first ten lines of any given file. However, we can set the argument n to any number to display that many lines from the file. If the value passed to the argument n is greater than the total number of lines in the file, the program prints the total number of lines. You can observe this in the following example.
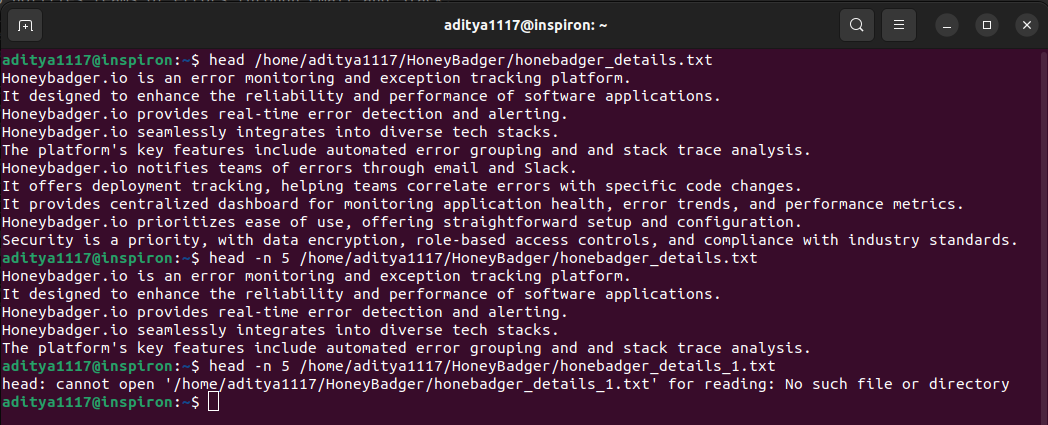
In the above example, we have used the following text file generated using content from ChatGPT.
In the output, you can observe that the head command displays ten text file lines. When we set n to 5, it shows only five lines from the file. Finally, if we give a non-existent filename to the head command, it says there is no such file or directory.
Let us implement this behavior in Python.
import argparse
import os

parser = argparse.ArgumentParser(description='The Linux head command in Python')
parser.add_argument('path', help='Address of the file to read.')
parser.add_argument('--n', type=int, default=10, help='How many lines of the file to read', dest="num_lines")
args = parser.parse_args()
filepath=args.path
num_lines=args.num_lines

if os.path.isfile(filepath):
    file=open(filepath,"r")
    content=file.readlines()
    try:
        for i in range(num_lines):
            print(content[i])
    except IndexError:
        pass
else:
    print("The file doesn't exist.")
In the above code, we first define the command-line arguments to read the filename and the number of lines. Then we used the isfile() method in the os module to check whether the file with the input filename exists. If the file exists, we read the n lines of the file. Otherwise, we inform the user that the file doesn't exist.
Let us create a command-line application head_command using the Linux alias command and the above Python code. When we execute the head_command application, the output looks as follows.

By default, the head_command application reads ten lines from the text file as the default value for the argument n is set to 10. If we set the argument n to a specific number, it will read only that many lines. If the file passed to the head_command application doesn't exist, the application will say so. You can observe this in the following example.
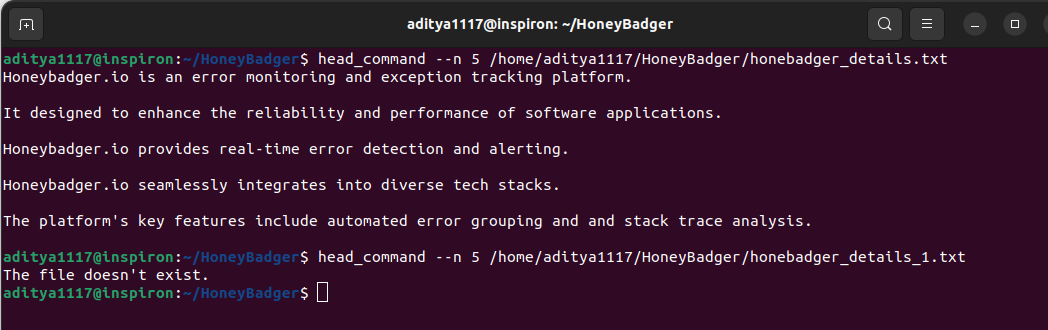
Thus, we have successfully imitated the Linux head command using the argparse module and the os module in Python.
Conclusion
In this article, we discussed different elements of a command-line application. Then, we discussed how to implement all the elements of a command-line application, like positional arguments, keyword arguments, flags, options, etc. We also discussed implementing a BMI calculator command-line application and the Linux head command in Python.
I hope you enjoyed reading this tutorial. To brush up your skills, use Python to implement more commands like cp, mv, cat, etc. This will help you understand how to use all the elements of a command-line application.
Stay tuned for more informative articles. Happy Learning!
