First published Jun 12, 2023
How to build a serverless web application
Serverless technology allows you to build and deploy efficient, scalable, and modern web applications. By going serverless, you can eliminate the need for server management and save time and money. In this tutorial, you'll learn how to utilize the power of serverless by building a full-stack web application using different technologies. If you are ready to take your web development skills to the next level and build a serverless web application, let's get started!
Here's the source code to the final project if you'd like to compare as you follow along when bulding your own serverless web app.
Project prerequisites
Before getting started, you should have the following:
- a solid understanding of HTML and CSS
- knowledge of JavaScript's ES6 syntax
- an understanding of React and how it works
I'll be using Next.js in this project, but feel free to use the framework of your choice. Just make sure to have Node.js installed on your computer to follow along with our serverless web app tutorial.
Project overview
You'll create a serverless web app for profile link management similar to Linktree, using Next.js and TailwindCSS for the frontend, PlanetScale for the database, and Vercel for deployment. The app allows users to create, read, update, and delete their profile links and share them on social media bios.
Setting up your environment
To make things easier for you, I created a starter codebase with a frontend so you can focus on the fun part (serverless backend). Run the following command to start the local development environment:
yarn create next-app profile-links-app -e https://github.com/giridhar7632/profile-links-starter
# or
npx create-next-app profile-links-app -e https://github.com/giridhar7632/profile-links-starter
Examining the starter code
The starter code for our serverless web app project has all the necessary dependencies installed and UI with minimal styling using TailwindCSS. It also has key features, such as form submissions, data display from the backend, and routing. Go to the project directory and start the dev server to run at http://localhost:3000:
cd profile-links-app

yarn dev
Connecting to the PlanetScale database
PlanetScale is a MySQL-compatible serverless database. You can easily create and connect to a MySQL database with an amazing developer experience. After logging in, an organization is automatically created for you. Next, we’ll create and connect to a database.
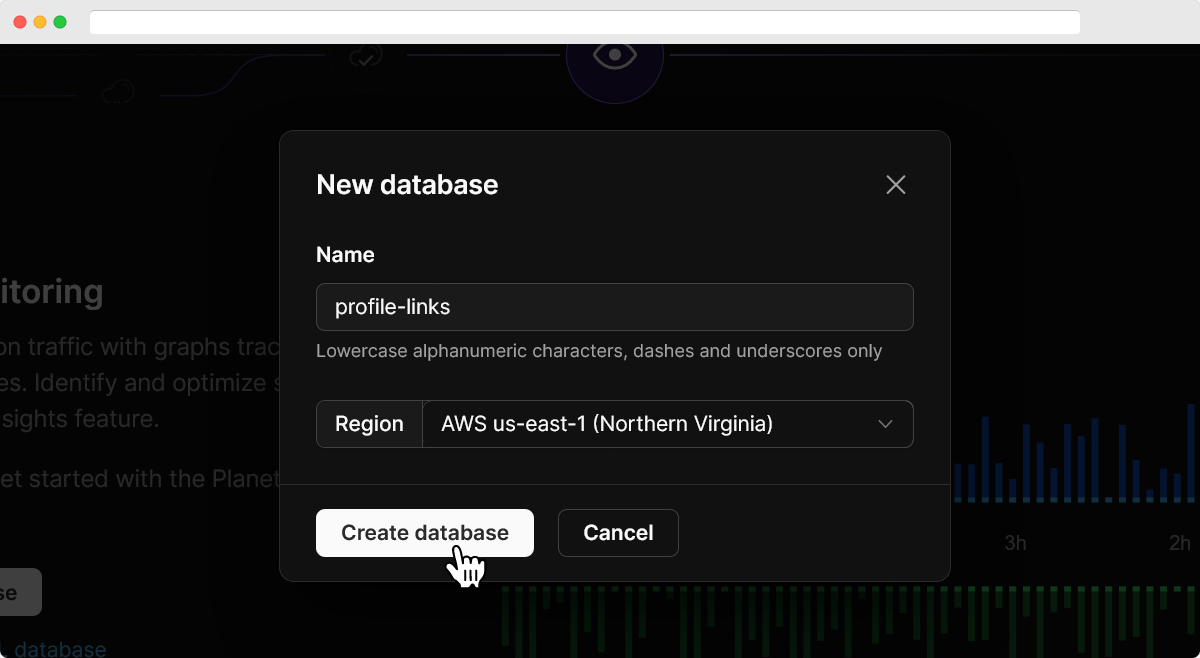
First, click the "Create a database" button and choose a name and region for your database.
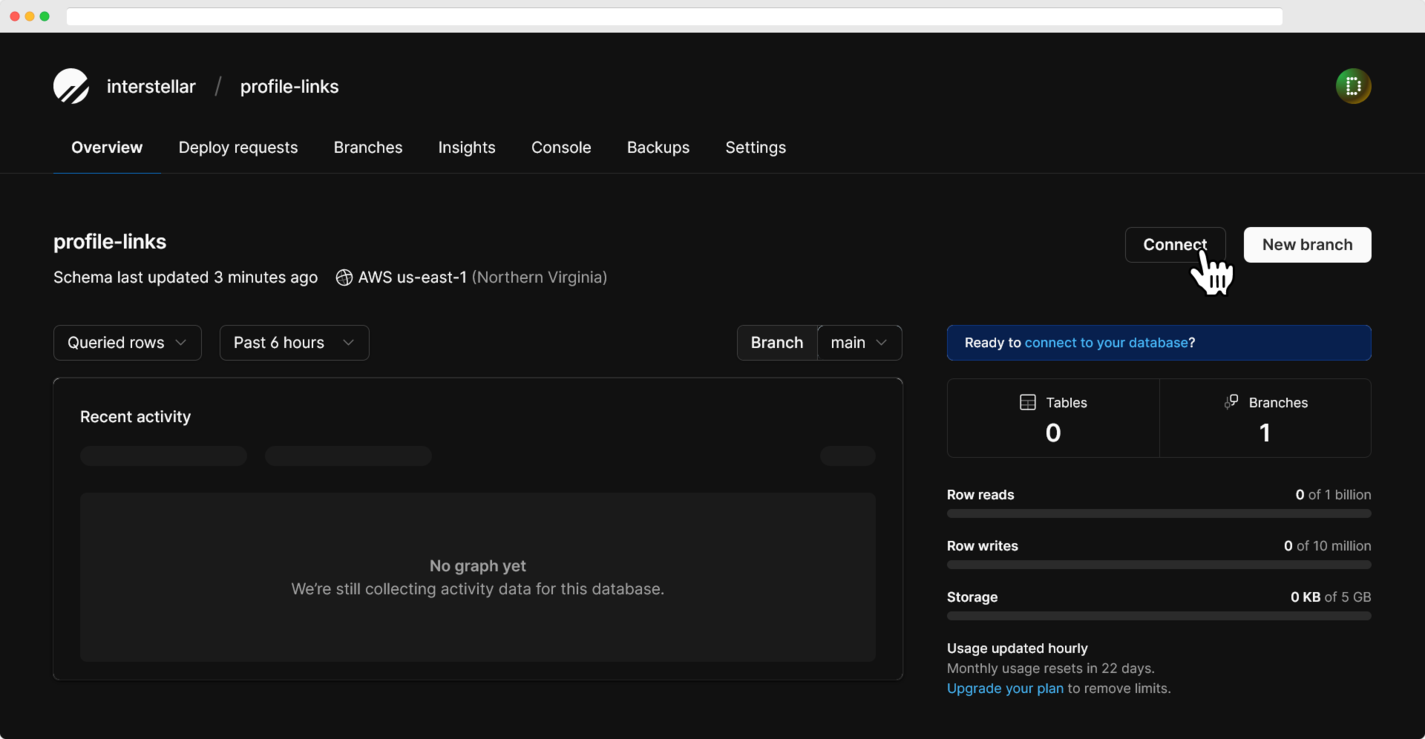
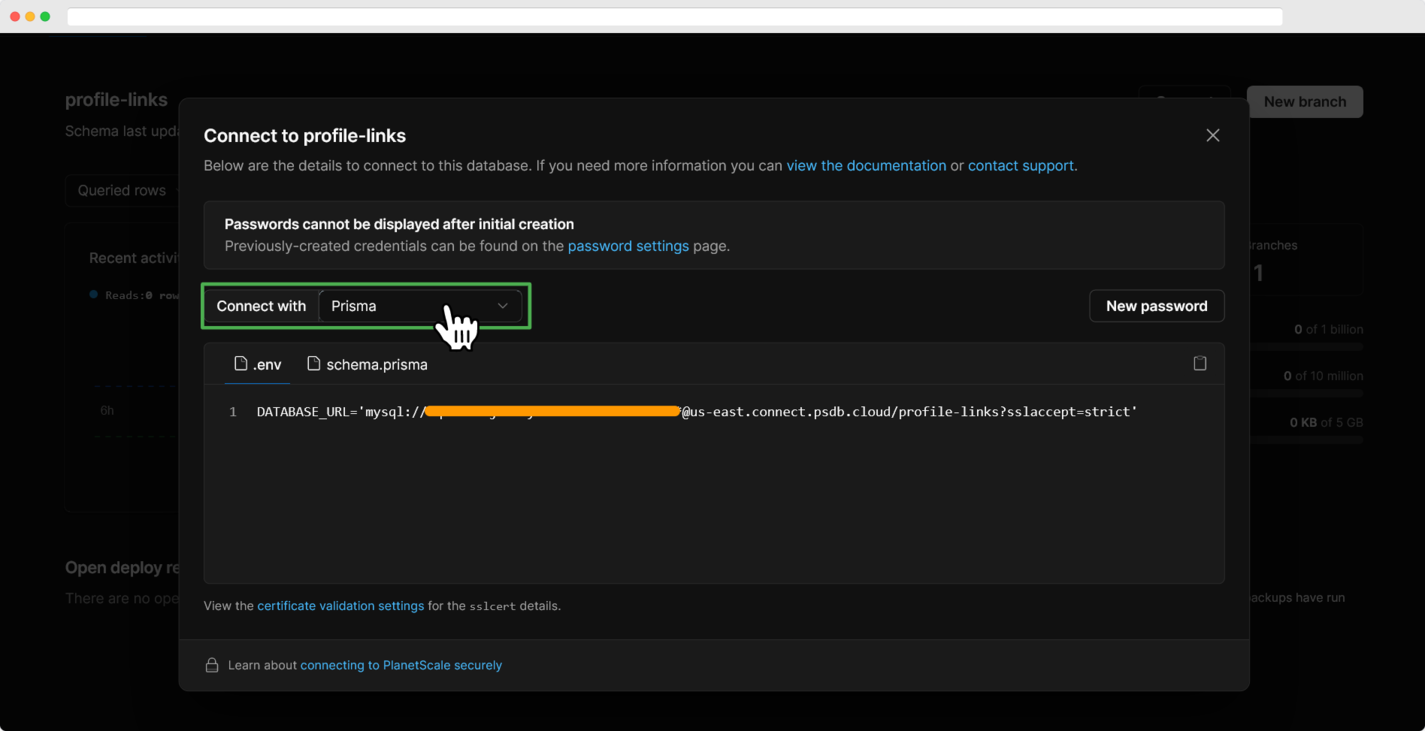
After your database is initialized, click the "Connect" button and choose "Prisma" under "Connect with". Prisma is an open-source object-relational mapping (ORM) tool that allows for simple interaction between databases using JavaScript.
In the terminal, run the following command to set up Prisma:
npx prisma init
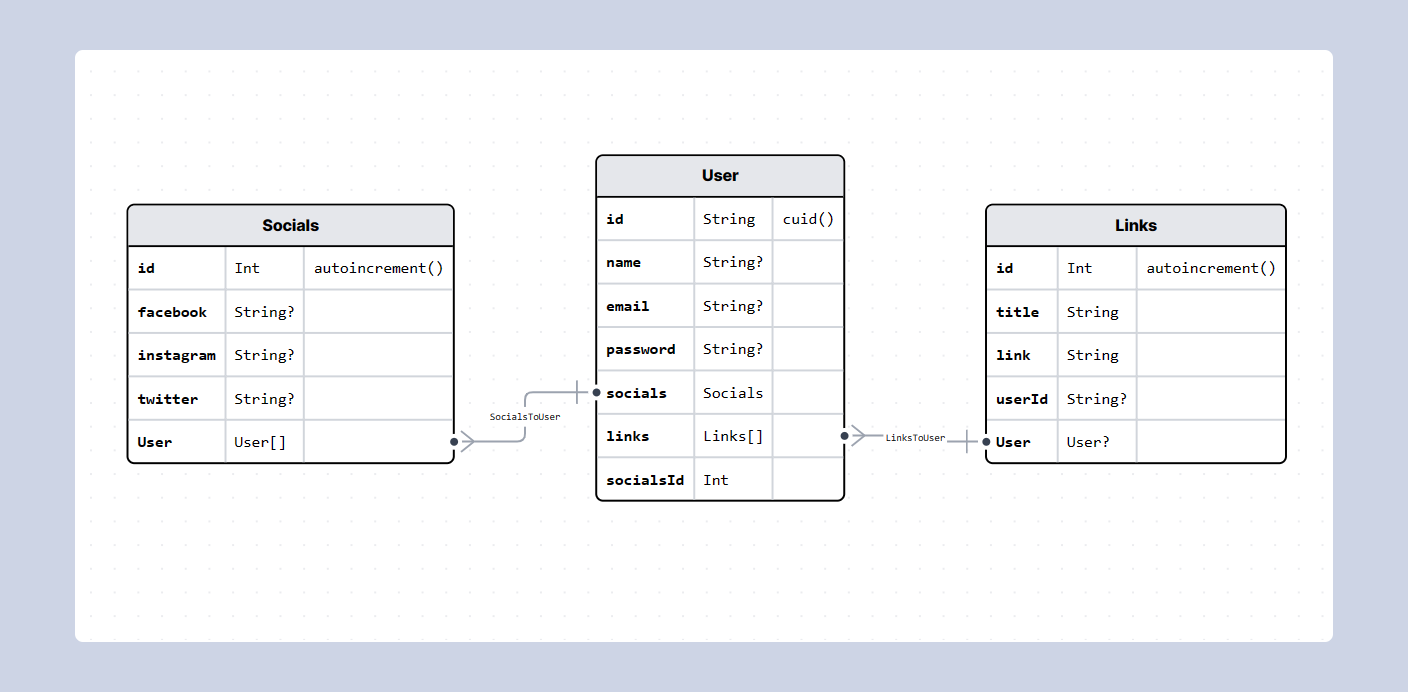
A schema.prisma file will be created inside the /prisma folder. Add the code from the PlanetScale webpage to the file and create the environment variable inside the .env file. The schema defines the structure and information about the database tables, which for this app, will include three tables: 'User', 'Link', and 'Social', related as shown in the diagram.
Open the /prisma/schema.prisma file and paste the following schema:
/prisma/schema.prisma
generator client {
  provider = "prisma-client-js"
}

datasource db {
  provider     = "mysql"
  url          = env("DATABASE_URL")
  relationMode = "prisma"
}

model Links {
  id     Int    @id @default(autoincrement())
  title  String
  link   String
  userId String?
  User   User?  @relation(fields: [userId], references: [id])

  @@index([userId])
}

model Socials {
  id        Int     @id @default(autoincrement())
  facebook  String?
  instagram String?
  twitter   String?
  User      User[]
}

model User {
  id        String    @id @default(cuid())
  name      String?
  email     String? @unique
  password  String?
  socials   Socials @relation(fields: [socialsId], references: [id])
  links     Links[]
  socialsId Int

  @@index([socialsId])
}
Now, run the following command to push the schema to PlanetScale database.
npx prisma db push
To see your database in action, run the following commands:
npm run seed

npx prisma studio
The data browser tab opens at http://localhost:5555
Create a new prisma.js file inside the /utils folder. This file will contain the instance of the Prisma client you will use to interact with your database.
/utils/prisma.js
import { PrismaClient } from '@prisma/client'

const prisma = new PrismaClient()
export default prisma
Now, you can use the database from the serverless backend or frontend.
Serverless API: building the backend
Let's start building the backend of the serverless web app using Vercel serverless functions. Remember, serverless doesn't mean there are no servers. You'll write network functions, and the cloud provider will run your code on their clusters of servers.
Since you'll add authentication and other functionality, I’ve created a global state to keep track of the user session. Inside the /utils folder, you’ll find an useAuth.js file.
/utils/useAuth.js
import React, { createContext, useContext, useEffect, useState } from 'react'

// making custom hook to use context in each component
export const useAuth = () => useContext(AuthContext)

// creating context
export const AuthContext = createContext({})

// defining the Context provider
export const AuthProvider = ({ children }) => {
  const [user, setUser] = useState('') // state for tracking user
  const [isAuth, setIsAuth] = useState('') // state for tracking jwt token

  useEffect(() => {
    const token = localStorage.getItem('token') // getting token from storage
    if (token) {
      setIsAuth(token)
    } else {
      localStorage.setItem('token', isAuth)
    }
  }, [isAuth])

  return (
    <AuthContext.Provider value={{ isAuth, setIsAuth, user, setUser }}>
      {children}
    </AuthContext.Provider>
  )
}
Here, you'll check whether there's a JWT token stored in the local storage. If the token exists, you'll update the global state. Later, when creating the API, you'll also need to send authorization requests to validate the token.
Adding users to your app
Next.js has an advantage; any file within the /pages/api folder is considered an API endpoint. For authentication, create a new file named register.js inside the /pages/api/user folder.
/pages/api/user/register.js
import prisma from '../../../utils/prisma'
import jwt from 'jsonwebtoken'
import bcrypt from 'bcrypt'

export default async function handler(req, res) {
  const { name, email, password, links, socials } = req.body

  try {
    // 1. check if user already exists
    const user = await prisma.user.findUnique({ where: { email } })
    if (user) {
      // if user exists return error
      throw new Error('User already exists! try logging in')
    }

    // 2. hash the password and store the user in database
    const hashedPassword = await bcrypt.hash(password, 10)
    const newUser = await prisma.user.create({
      data: {
        name,
        email,
        password: hashedPassword,
        socials: {
          create: {
            ...socials,
          },
        },
        links: {
          create: links,
        },
      },
    })

    // 3. sign a Json Web Token and send it along the request
    const token = jwt.sign({ userId: newUser.id }, process.env.JWT_SECRET, {
      expiresIn: '7d',
    })
    res.status(200).json({
      message: 'User registered!',
      token,
      user: newUser.id,
      type: 'success',
    })
  } catch (error) {
    console.log(error)
    res.status(500).json({
      message: error?.message || 'Something went wrong!',
      type: 'error',
    })
  } finally {
    await prisma.$disconnect()
  }
}
To register a user, you'll check whether the user already exists in the database using Prisma's findUnique method. If not, you'll create a new user and send the token for authentication; otherwise, return an error. You can create a new user using Prisma’s create method.
In the register.js file inside the /pages directory, you can find the frontend layout of the register page. Now, add the functionality to the onFormSubmit to send data to the backend.
/pages/register.js
import axios from 'axios'
// ...
import { useAuth } from '../utils/useAuth'

const Register = () => {
  // ...
  const { user, setIsAuth, setUser } = useAuth() // getting global states

  // redirect user after global state update
  useEffect(() => {
    if (user) {
      Router.replace(`/p/${user}`)
    }
  }, [user])

  // sending user data to register user
  const onFormSubmit = handleSubmit(async (data) => {
    setLoading(true)
    try {
      // sending post request
      const res = await axios.post('/api/user/register', data)
      setIsAuth(res.data.token)  // updating states
      setUser(res.data.user)
      reset()
    } catch (error) {
      setStatus(error.message || 'Something went wrong!')
    }
    setLoading(false)
  })

  return (...)
}
Authenticating user sessions
Create a new file named login.js inside the new /pages/api/user folder to add the login endpoint.
/pages/api/user/login.js
import prisma from '../../../utils/prisma'
import jwt from 'jsonwebtoken'
import bcrypt from 'bcrypt'

export default async function handler(req, res) {
  const { email, password } = req.body

  try {
    // 1. checking for the user
    const user = await prisma.user.findUnique({
      where: { email },
    })
    if (!user) {
      // if user doesn't exist return error
      throw new Error('User does not exist!')
    }

    // 2. check for password match
    const isMatch = await bcrypt.compare(password, user.password)
    if (!isMatch) {
      // if password doesn't match return error
      throw new Error('Incorrect password!')
    }

    // 3. sign and send the Json Web Token with response
    const token = jwt.sign({ userId: user.id }, process.env.JWT_SECRET, {
      expiresIn: '7d',
    })

    res.status(200).json({
      message: 'User logged in!',
      token,
      user: user.id,
      type: 'success',
    })
  } catch (error) {
    console.log(error)
    res.status(500).json({
      message: error.messsage || 'Something went wrong!',
      type: 'error',
    })
  } finally {
    await prisma.$disconnect()
  }
}
Update the web app frontend to allow users to log in using the app.
/pages/login.js
import axios from 'axios'
// ...
import { useAuth } from '../utils/useAuth'

const Login = () => {
  // ...
  const { setIsAuth, user, setUser } = useAuth()

  // redirect user after global state update
  useEffect(() => {
    if (user) {
      Router.replace(`/p/${user}`)
    }
  }, [user])

  const onFormSubmit = handleSubmit(async (data) => {
    setLoading(true)
    try {
   // 1. sending request to the backend
      const res = await axios.post('/api/user/login', data)
      setIsAuth(res.data.token)
      setUser(res.data.user)
      reset()
    } catch (error) {
      setStatus(error.message || 'Something went wrong!')
    }
    setLoading(false)
  })

  return (...)
}
Retrieving user profiles
To display user details on the web page, let's create an endpoint for returning the user profile. Create a new file named index.js inside the /pages/api/user folder.
/pages/api/user/index.js
import prisma from '../../../utils/prisma'

export default async function handle(req, res) {
  const { userId } = req.body
  try {
    // 1. check for user in database
    const user = await prisma.user.findUnique({
      where: { id: userId },
      include: {
        links: true,
        socials: true,
      },
    })
    if (!user) {
      // if user doesn't exist return error
      throw new Error('User does not exist!')
    }
    res
      .status(200)
      .json({ message: 'User found!', profile: user, type: 'success' })
  } catch (error) {
    console.log(error)
    res.status(500).json({
      message: error?.message || 'Something went wrong!',
      type: 'error',
    })
  } finally {
    await prisma.$disconnect()
  }
}
To display the user profile, create a dynamic route that updates the web page using query parameters. Inside the /pages/p/[id].js, you can get the id as the query parameter and update the page data using getStaticProps.
/pages/p/[id].js
import axios from 'axios'
import prisma from '../../utils/prisma'

// ...

const Profile = ({ profile, message, type }) => {...}

export async function getStaticProps({ params }) {
  try {
  // getting user profile
    const { data } = await axios.post(`${baseUrl}/api/user`, {
      userId: params.id,
    })
    return { // sending user data as props
      props: { ...data },
   revalidate: 10
    }
  } catch (error) {
    console.log(error)
    return {
      props: { message: 'User not found! 😕', type: 'error' },
    }
  }
}

export async function getStaticPaths() {
  const users = await prisma.user.findMany({ select: { id: true } })
  return {
    paths: users.map((item) => ({
      params: { id: item.id },
    })),
    fallback: true,
  }
}
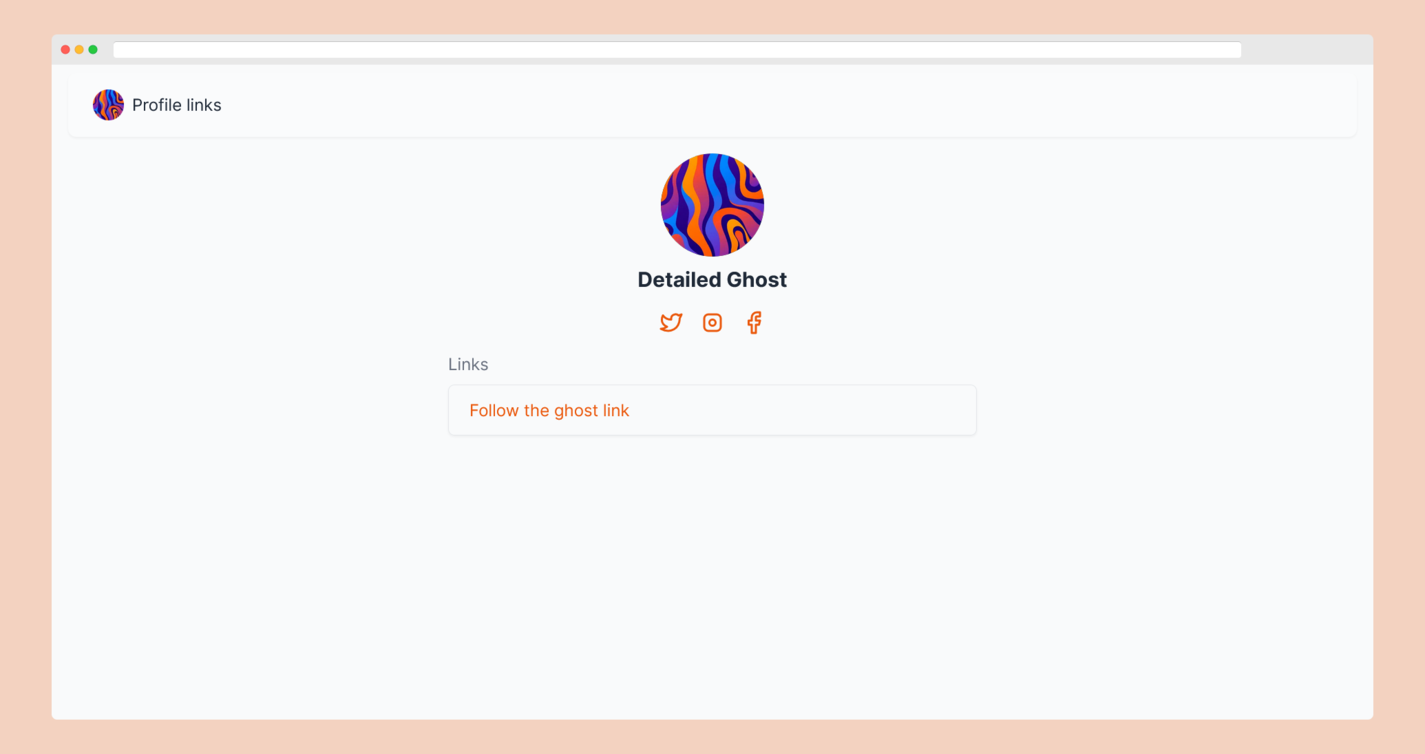
Now you can see the web page with user information, which should look something like this:
Implementing authorization
To secure the API, you need to implement authorization by allowing the user access to a specific asset. To achieve this, you will use JWT tokens to authorize the request. Like node.js, you can add a middleware function to the web app that performs some actions before the main function handler is executed. The best way to use middleware in Next.js serverless functions is to wrap the function handler in the middleware function. Create a new file named authorizationMiddleware.js inside the /utils folder and add the following code:
/utils/authorizationMiddleware.js
import jwt from 'jsonwebtoken'

// 1. take handler function as input
function authorizationMiddleware(handler) {
  return async (req, res) => {
    try {
      // 2. check for valid token in the headers
      const token = req.headers['authorization'].split(' ')[1]
      const { userId } = jwt.verify(token, process.env.JWT_SECRET)
      req.user = userId
      // 3. execute the main request handler
      return await handler(req, res)
    } catch (error) {
      console.log(error)
      return res.status(401).json({ message: 'Unauthorized', type: 'error' })
    }
  }
}

export default authorizationMiddleware
To avoid logging in repeatedly, you can verify the token in the local storage and send the data directly. Create a new file named verify.js inside the /pages/api/user folder to add a new endpoint.
/pages/api/user/verify.js
import authorizationMiddleware from '../../../utils/authorizationMiddleware'
import prisma from '../../../utils/prisma'

// authorization middleware
export default authorizationMiddleware(async function handle(req, res) {
  const userId = req.user
  try {
    // 1. checking for the user
    const user = await prisma.user.findUnique({
      where: { id: userId },
      include: {
        links: true,
        socials: true,
      },
    })
    if (!user) {
      // if user doesn't exist return error
      throw new Error('User does not exist!')
    }

    // 2. send the user data
    res
      .status(200)
      .json({ message: 'User found!', user: user.id, type: 'success' })
  } catch (error) {
    console.log(error)
    res.status(500).json({
      message: error?.message || 'Something went wrong!',
      type: 'error',
    })
  } finally {
    await prisma.$disconnect()
  }
})
This function is similar to logging in, but you must add the middleware to authorize the user. Note that from now on, you’ll need to add the authorization to protect all API endpoints to keep your web app secure.
You’ll send the request in the frontend whenever the user opens the web app. Navigate to the /utils/useAuth.js file and add another function, getUser, to update the user state using the token.
/utils/useAuth.js
import axios from 'axios'
// ...

export const AuthProvider = ({ children }) => {
  // ...

  useEffect(() => {
    const token = localStorage.getItem('token')
    // verifying the user
    const getUser = async (tkn) => {
      const { data: res } = await axios.get('/api/user/verify', {
        headers: {
          Accept: 'application/json',
          'Content-Type': 'application/json',
          Authorization: `Bearer ${tkn}`,
        },
      })
      setUser(res.user) // updating the state
    }
    if (token) {
      setIsAuth(token)
      getUser(token)
    } // ...
  }, [isAuth])

  return (...)
}
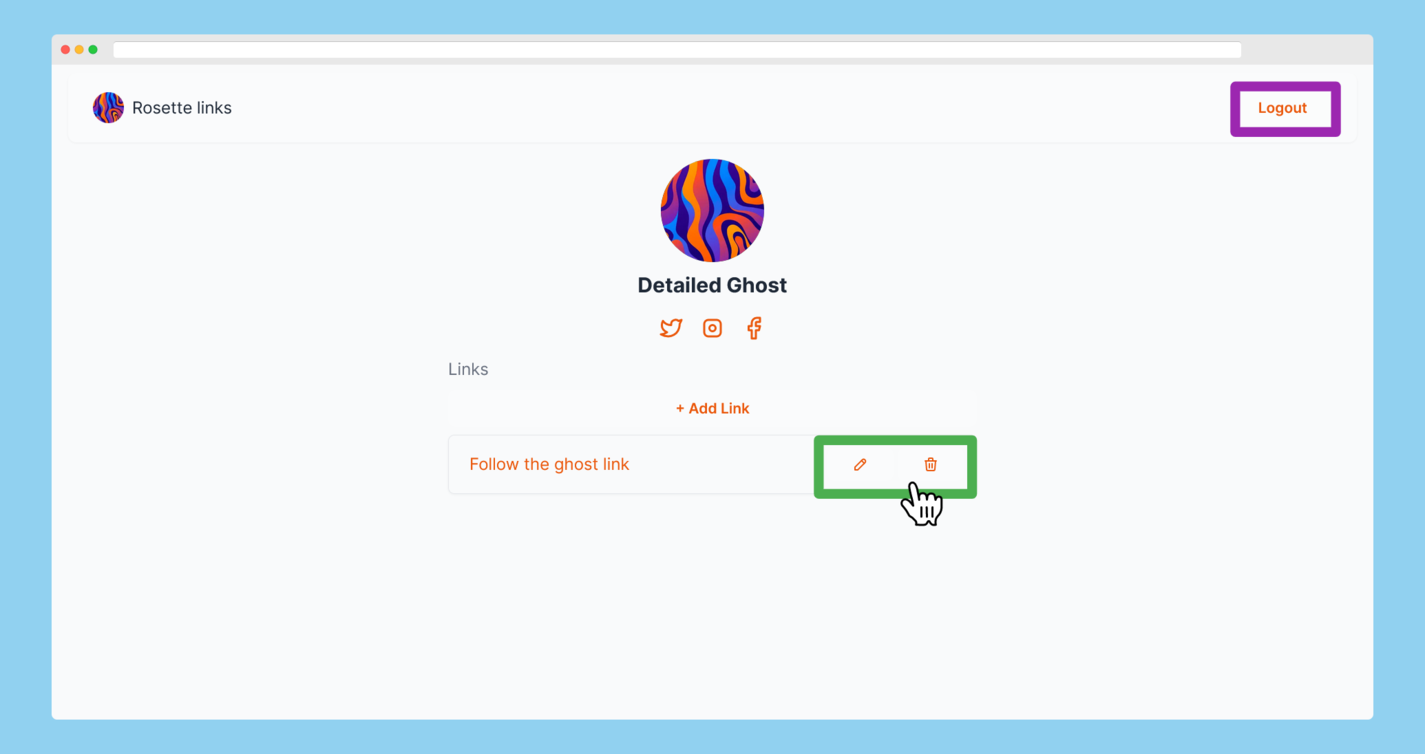
If you reload the "your details" page, you’ll see the active session with some additional buttons.
Adding new links to profiles
Let's move on to implementing the functionality to create, update, and delete links on the user profile. Create a file named create.js inside the new /pages/api/link folder for a new endpoint to add links to the profile. You can add a new entry to the links table using the create function and connect it to the user using userId.
/pages/api/link/create.js
import authorizationMiddleware from '../../../utils/authorizationMiddleware'
import prisma from '../../../utils/prisma'

// authorizing the user
export default authorizationMiddleware(async function handle(req, res) {
  const { data } = req.body
  try {
    const userId = req.user
    // creating new link in table and connecting to user
    const link = await prisma.links.create({
      data: { ...data, User: { connect: { id: userId } } },
    })
    res.status(200).json({ message: 'Link created!', link, type: 'success' })
  } catch (error) {
    console.log(error)
    res.status(500).json({
      message: error?.message || 'Something went wrong!',
      type: 'error',
    })
  } finally {
    await prisma.$disconnect()
  }
})
Now, in the frontend, update the handleAddLink function in the /pages/p/[id].js file to add the functionality. Remember to add the token in the header to access protected endpoints.
/pages/p/[id].js
import axios from 'axios'
// ...

const Profile = ({ profile, message, type }) => {
  const [links, setLinks] = useState(profile?.links || [])
  const { user, isAuth } = useAuth()

  const handleAddLink = async (data) => {
    try {
      // 1. send the post request to the API along with JWT
      const res = await axios.post(
        '/api/link/create',
        { data },
        {
          headers: {
            Accept: 'application/json',
            'Content-Type': 'application/json',
            Authorization: `Bearer ${isAuth}`,
          },
        }
      )
      // 2. update the frontend state
      setLinks((prev) => [...prev, res.data.link])
    } catch (error) {
      console.log(error)
    }
  }

  // ...
  return (...)
}

// ...
Updating links on profiles
To update a specific link, you’ll need to grab the link id connected to the specific user and edit the table using the update function.
/pages/api/link/update.js
import authorizationMiddleware from '../../../utils/authorizationMiddleware'
import prisma from '../../../utils/prisma'

export default authorizationMiddleware(async function handle(req, res) {
  const { id, link } = req.body
  try {
    // 1. garb the user id by authorization
    const userId = req.user
    // 2. find the link by id connected to user id and update
    const data = await prisma.links.update({
      where: { id },
      data: {
        ...link,
        User: {
          connect: { id: userId },
        },
      },
    })
    // 3. send response
    res
      .status(200)
      .json({ message: 'User found!', link: data, type: 'success' })
  } catch (error) {
    console.log(error)
    res.status(500).json({
      message: error?.message || 'Something went wrong!',
      type: 'error',
    })
  } finally {
    await prisma.$disconnect()
  }
})
Then, in the file at /components/ProfileLink.js, update the handleUpdateLink function to add the ability to interact with the link.
/components/ProfileLink.js
import axios from 'axios'
// ...

const ProfileLink = ({ id, title, setLinks, own, token, link }) => {
  const handleUpdateLink = async (data) => {
    try {
      // 1. send the post request to the API along with JWT
      const res = await axios.post(
        '/api/link/update',
        { id, link: data },
        {
          headers: {
            Accept: 'application/json',
            'Content-Type': 'application/json',
            Authorization: `Bearer ${token}`,
          },
        }
      )
      // 2. update the frontend state
      setLinks((prev) => prev.map((i) => (i.id === id ? res.data.link : i)))
    } catch (error) {
      console.log(error)
    }
  }
  const handleDeleteLink = async () => {...}

  return (...)
}
Removing links from profiles
Prisma provides a delete function to delete a specific record from the table.
/pages/api/link/delete.js
import authorizationMiddleware from '../../../utils/authorizationMiddleware'
import prisma from '../../../utils/prisma'

export default authorizationMiddleware(async function handle(req, res) {
  const { id } = req.body
  try {
    // delete the link using id
    await prisma.links.delete({
      where: { id },
    })
    res.status(200).json({ message: 'Link deleted!', type: 'success' })
  } catch (error) {
    console.log(error)
    res.status(500).json({
      message: error?.message || 'Something went wrong!',
      type: 'error',
    })
  } finally {
    await prisma.$disconnect()
  }
})
In the /components/ProfileLink.js file, update the handleDeleteLink function to allow the user to delete the link by clicking the delete button.
/components/ProfileLink.js
// ...

const ProfileLink = ({ id, title, setLinks, own, token, link }) => {
  const handleUpdateLink = async (data) => {...}
  const handleDeleteLink = async () => {
    try {
      // 1. send the post request to the API along with JWT
      await axios.post(
        '/api/link/delete',
        { id },
        {
          headers: {
            Accept: 'application/json',
            'Content-Type': 'application/json',
            Authorization: `Bearer ${token}`,
          },
        }
      )
      // 2. update the frontend state
      setLinks((prev) => prev.filter((i) => i.id !== id))
    } catch (error) {
      console.log(error)
    }
  }

  return (...)
}
After this step, you will have a fully functional serverless web app to add all your links in one place and share your profile in social media bios. If you face any issues, try fixing them using the source code or searching for a solution online.
Deploying your web app to the internet
Now it's time to bring our web application to production. Vercel provides seamless integration for Next.js and serverless functions. To deploy:
- Push your code to GitHub or another Git provider.
- Log in to Vercel using your Git provider and create a new deployment.
- Import the Git repository, add the environment variables in the "Configure Project" page, and hit the "Deploy" button to see your app live.
You can also use other cloud providers for your serverless applications, such as Netlify or AWS (like AWS Lambda), as some of them provide basic support for Next.js and serverless functions.
Build a serverless web application yourself
So far, you've learned about serverless computing and how it helps you build natively scalable applications. You’ve probably followed along and learned to build a serverless web application using various serverless technologies, including PlanetScale as a serverless database and Vercel as the serverless provider.
The serverless web world is continuously evolving, and new advanced features are being introduced to revolutionize the way we develop web applications. You can improve this project by enabling users to control their social media links, profile pictures, and profile themes. Again, this project is just a starting point; you can go serverless in almost all use cases to make better web applications.
If you'd like to read more about serverless web apps, consider reading our article on Laravel Vapor serverless applications. Or, for more about AWS Lambda, read our article about writing AWS Lambda functions in a Ruby web app, which contains more about serverless architecture.

Written by
Giridhar TallaGiridhar loves programming, learning, and building new things. He enjoys working with both JavaScript and Python.