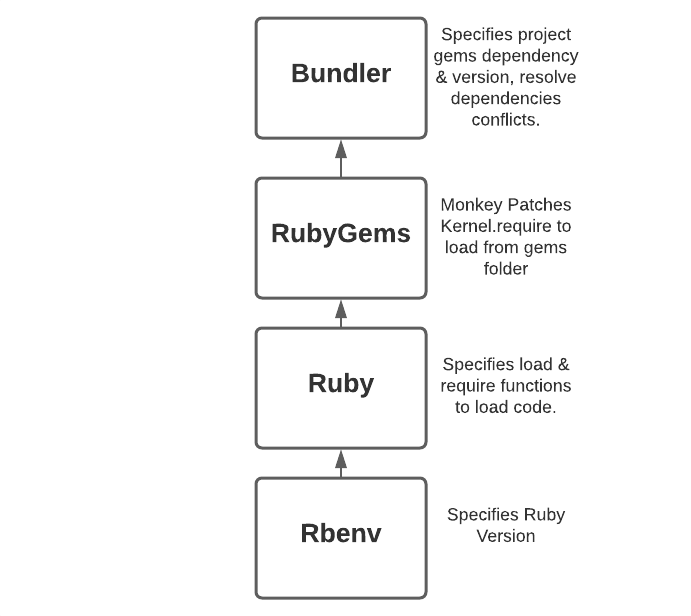
Understanding How Rbenv, RubyGems And Bundler Work Together
Managing dependencies in Ruby usually involves specifying the Ruby and gem versions on which our project relies. In my experience working with Ruby, debugging dependencies has been one of my biggest challenges. Failures aren't common because many things "just work"; however, when things go wrong, they're usually unnecessarily difficult to debug and fix. In this article, I will lay out the pieces involved in dependency management in Ruby. This will assist in debugging these strange issues when they occur.
Ruby Code Loading
By default, the Ruby language provides two major methods for loading code defined elsewhere: load & require.
load 'json.rb'
require 'json.rb'
require_relative 'json.rb'
Both loading methods accept both absolute and relative paths as arguments. However, there are two differentiating factors:
- Multiple calls to
loadwill re-execute the file, whereas multiple calls torequirewill not re-execute the file; instead, it will returnfalse. - Calls to
loadresolves only to absolute and relative paths. Calls torequirechecks up on the$LOAD_PATHwhen the path doesn't resolve to an absolute path.
A third variant is require_relative, which uses relative paths to require code relative to the current file’s location rather than the Ruby process’ working directory.
Rbenv
A version manager is a tool used to manage and easily switch between versions of our interpreter (in this case, Ruby) and specify the location to find respective gems for our project. Version managers are largely language agnostic tools, and various languages have their respective implementations, such as Nvm, n for Node.js, pyenv for Python, and Rbenv, rvm, and chruby for Ruby. Now, let's take rbenv for a spin, shall we?
Install Ruby Version
We use the command rbenv install to install any version of Ruby:
# Install ruby 2.6.1
$ rbenv install 2.6.1
Downloading openssl-1.1.1i.tar.gz...
-> https://dqw8nmjcqpjn7.cloudfront.net/e8be6a35fe41d10603c3cc635e93289ed00bf34b79671a3a4de64fcee00d5242
Installing openssl-1.1.1i...
Installed openssl-1.1.1i to /home/directory/.rbenv/versions/2.6.1

Downloading ruby-2.6.1.tar.bz2...
-> https://cache.ruby-lang.org/pub/ruby/2.6/ruby-2.6.1.tar.bz2
Installing ruby-2.6.1...
ruby-build: using readline from homebrew
Installed ruby-2.6.1 to /home/directory/.rbenv/versions/2.6.1

# Check Installation
$ rbenv versions # Shows all versions installed.
  system
  2.6.1

# Lookup versions available for installation
$ rbenv install -L
1.8.5-p52
1.8.5-p113
1.8.5-p114
...
2.7.0-rc1
2.7.0-rc2
2.7.0
...
truffleruby+graalvm-20.1.0
truffleruby+graalvm-20.2.0
truffleruby+graalvm-20.3.0

# The full list above amounts to about 500 versions, scrolling through the entire list is a lot.
# The command below is an easy shortcut to find your specific version with fzf.
$ rbenv install `rbenv install -L | fzf`
Switch Between Versions
There are a number of ways to identify how to switch between versions of Ruby; invariably, rbenv does the following:
- Checks the
RBENV_VERSION. - Searches for a
.ruby-versionfile in the script's directory and its parent until it hits the root directory. - Searches for a
.ruby-versionfile in$PWDand its parent directories until it hits the root directory. - Uses the global file
~/.rbenv/version.
The priority goes from top to bottom. ~/.rbenv/version is the final fallback and treated as the global version. See below:
# Inside First Project Root

# Select ruby version for project
$ touch .ruby-version && echo "2.7.1" >> .ruby-version

# Verify selected version
$ ruby --version
ruby 2.7.1p83 (2020-03-31 revision a0c7c23c9c) [x86_64-darwin20] # Result

$ rbenv version
2.7.1 (set by /path/to/current/directory/.ruby-version) # Result

# Change selected version
$ : >> .ruby-version && echo "2.6.1" >> .ruby-version

# Verify selection change
$ ruby --version
ruby 2.6.1p33 (2019-01-30 revision 66950) [x86_64-darwin20] # Result

$ rbenv version
2.6.1 (set by /path/to/current/directory/.ruby-version)

# Change selection with RBENV_VERSION while .ruby-version is present
$ export RBENV_VERSION=2.5.1

# Verify selection change
# .ruby-version is ignored.
$ ruby --version
ruby 2.5.1p57 (2018-03-29 revision 63029) [x86_64-darwin20] # Result

$ rbenv version
2.5.1 (set by RBENV_VERSION environment variable) # Result

# Change to a version that is not installed & remove RBENV_VERSION
$ unset RBENV_VERSION & : >> .ruby-version && echo "2.4.1" >> .ruby-version

# Verify selection change
$ ruby --version
rbenv: version `2.4.1' is not installed (set by full/path/to/current/directory/.ruby-version) # Result
Shims and Rehashing
These two concepts need to be properly understood to be able to debug rbenv effectively.
Shims are lightweight bash scripts that exist in your PATH to intercept commands and route them to the appropriate version for execution. On a high level, every command (e.g., rspec) is translated into rbenv exec rspec. See the details below.
First, rbenv creates a shim for all commands (rspec, bundle, etc.) across all installed Ruby versions to intercept calls to the CLI regardless of the version. These shims can be found at ~/.rbenv/shims. Every shim contains the same bash script, as shown below:
#!/usr/bin/env bash
set -e
[ -n "$RBENV_DEBUG" ] && set -x

program="${0##*/}"
if [ "$program" = "ruby" ]; then
   for arg; do
     case "$arg" in
     -e* | -- ) break ;;
     */* )
        if [ -f "$arg" ]; then
         export RBENV_DIR="${arg%/*}"
         break
       fi
       ;;
     esac
   done
 fi

 export RBENV_ROOT="/home/directory/.rbenv"
 exec "/usr/local/Cellar/rbenv/1.1.2/libexec/rbenv" exec "$program" "$@"
Next, the script above roughly translates to the following:
- If the program name is
rubywith an argument-e,- Translate to
rbenv exec ruby <args>
- Translate to
- If the program name is
rubywith a path to a script,- Set the
RBENV_DIRto the the script's directory. This enablesrbenvto search for.ruby-versionin the script's directory before the$PWD. If a.ruby-versionis specified in both locations,rbenvselects the script's directory.
- Set the
- If the program name is not Ruby,
- Translate to
rbenv exec <program-name> <args>.
- Translate to
Finally, rbenv exec <command-name> <args> identifies the correct version to pass the command to by checking the RBENV_VERSION environment variable. Remember, RBENV_VERSION is set by the algorithm defined above.
Shims on your PATH must be prepended; this ensures they're the first point of contact for your Ruby executables and can properly intercept. The best way I found to understand your PATH setup and know whether your shims are intercepting properly is as follows:
$ which -a bundle

/path/to/home/.rbenv/shims/bundle
/usr/bin/bundle
which -a bundle: this naively looks through your PATH and prints out in the order which it is found, locations where bundle can be found. If something is printed before anything in ~/.rbenv/shims, it means your shims aren’t set up properly. rbenv which bundle won't reveal this because the command works in the context of rbenv not searching your PATH.
Rehashing is the process of creating shims. When you newly install a Ruby gem that provides an executable, such as rspec, you need to run rbenv rehash to create the shim so that subsequent calls to rspec can be intercepted by rbenv and passed on to the appropriate Ruby version.
RubyGems
Next is RubyGems. It is available from the official Ruby site. RubyGems is a Ruby packaging system designed to facilitate the creation, sharing, and installation of libraries; in some ways, it is a distribution packaging system similar to, say, apt-get, but targeted at Ruby software. RubyGems is the de-facto method for sharing gems. They are usually installed at ~/.rbenv/versions/{version-number}/lib/ruby/gems/{minor-version}/, or its variant, depending on which version manager is used. Ruby's default required method Kernel.require doesn't provide any mechanism to load gems from the Gems installation directory. RubyGems monkey-patches Kernel.require to
- First, search for gems in the
$LOAD_PATH. - If not found, search for gems in the
GEMS INSTALLATION DIRECTORY.- Once found, add the path to
$LOAD_PATH.
- Once found, add the path to
This works "natively" because Ruby has come with RubyGems by default since version 1.9; previous Ruby versions required RubyGems to be installed manually. Although this works natively, it is also important to know this difference when debugging.
A gem is a bunch of related code used to solve a specific problem. Install a gem and get information about the gem environment as follows:
$ gem install gemname
$ gem env

RubyGems Environment:
    - RUBYGEMS VERSION: 3.1.2
    - RUBY VERSION: 2.7.1 (2020-03-31 patchlevel 83) [x86_64-darwin20]
    - INSTALLATION DIRECTORY: /path/to/home/.rbenv/versions/2.7.1/lib/ruby/gems/2.7.0
    - USER INSTALLATION DIRECTORY: /path/to/home/.gem/ruby/2.7.0
    - RUBY EXECUTABLE: /path/to/home/.rbenv/versions/2.7.1/bin/ruby
    - GIT EXECUTABLE: /usr/bin/git
    - EXECUTABLE DIRECTORY: /path/to/home/.rbenv/versions/2.7.1/bin
    - SPEC CACHE DIRECTORY: /path/to/home/.gem/specs
    - SYSTEM CONFIGURATION DIRECTORY: /path/to/home/.rbenv/versions/2.7.1/etc
    - RUBYGEMS PLATFORMS:
        - ruby
        - x86_64-darwin-20
    - GEM PATHS:
        - /path/to/home/.rbenv/versions/2.7.1/lib/ruby/gems/2.7.0
        - /path/to/home/.gem/ruby/2.7.0
    - GEM CONFIGURATION:
        ...
    - REMOTE SOURCES:
        - https://rubygems.org/
    - SHELL PATH:
        - /path/to/home/.rbenv/versions/2.7.1/bin
How does RubyGems solve this problem? It monkey patches the Kernel's require system with its own require method. With this in-place, when require honeybadger is called, it searches through the gems folder for honeybadger.rb and activates the gem when found.
For example, require 'honeybadger' produces something similar to the following:
spec = Gem::Specification.find_by_path('honeybadger')spec.activate
Activating a gem simply means putting it in the $LOAD_PATH. RubyGems also helps download all of a gem’s dependencies before downloading the gem itself.
Also, Rubygems ships with a nice feature that enables you to open the associated gem's directory with gem open <gem-name>; for example,
This allows us to easily find/trace the specific version of the gem our app is referencing.
Bundler
At this layer, Bundler helps us easily specify all our project dependencies and optionally specify a version for each. Then, it resolves our gems, as well as installs it and its dependencies. Building real-world applications pre-bundler came with a myriad of challenges, such as the following:
- Our applications exist with numerous dependencies, and these dependencies have various other dependencies and their respective versions. Installing the wrong version of one gem will easily break our app, and fixing this problem involved lots of tears.
- Also, two(2) of our dependencies can refer to the same third-level dependency. Finding compatibility was an issue, and if there was any, it was a problem.
- Where we have multiple applications on the same machine, with various dependencies, our application can access any gems installed on the machine, which goes against the principle of least privilege and exposes our application to all gems installed on the machine, regardless of whether they’re malicious.
Bundler solves all three problems and gives us a sane way to manage our app dependencies by doing the following.
Bundler resolves dependencies and generates a lockfile:
# Gemfile
gem 'httparty'
If we run bundle or bundle install, it will generate the lockfile:
GEM
  specs:
    httparty (0.18.1)
      mime-types (~> 3.0)
      multi_xml (>= 0.5.2)
    mime-types (3.3.1)
      mime-types-data (~> 3.2015)
    mime-types-data (3.2020.1104)
    multi_xml (0.6.0)

PLATFORMS
  ruby

DEPENDENCIES
  httparty

BUNDLED WITH
   2.1.4
From the above, the bundler generates the version of httparty to be installed, as well as its own dependencies in the Gemfile.lock. This file is the blueprint of our app dependencies and should be checked into version control. It ensures that our project dependencies are consistent across environments (development, staging, or production).
Bundler resolves compatibility among dependencies
It resolves the dependencies for httparty by finding a suitable version for its dependencies and specifying them. Bundler also tries to resolve dependencies between gems. For example,
# Gemfile
gem 'httparty' # That relies on gem 'mime-types', '>= 3.0.1, < 4.0.1'
gem 'rest-client' # That relies on gem 'mime-types', '>= 2.0.1, < 3.0'
The example above is arbitrary and will result in an error, such as the following:
Bundler could not find compatible versions for gem "mime-types":
In Gemfile:
    httparty was resolved to 0.18.1, which depends on
        mime-types ('>= 3.0.1, < 4.0.1')

    rest-client was resolved to 2.0.4, which depends on
        mime-types ('>= 2.0.1, < 3.0')
This is because two gems have dependencies that are not compatible and cannot be automatically resolved.
Bundler restricts access to gems installed but not specified in our Gemfile
In a sample gemfile like the following,
# Gemfile
gem 'httparty'

# irb
require 'rest-client'

# raises
LoadError (cannot load such file -- rest-client)
it ensures that only the dependencies specified in our Gemfile can be required by our project.
Bundle exec
When you run rspec in a project directory, there is a possibility of running a different version other than what was specified in the Gemfile. This is because the most recent version will be selected to run versus the version specified in the Gemfile. bundle exec rspec ensures rspec is run in the context of that project (i.e., The gems specified in the Gemfile).
Bundle binstubs
Often, we read articles where we run commands like ./bin/rails; this command is similar to bundle exec rails. Binstubs are wrappers around Ruby executables to ease the usage of bundle exec.
To generate a binstub run, use bundle binstubs gem-name. This creates a binstub in the ./bin folder but can be configured with the --path directory if set.
References
To learn more, check out these references:

Written by
Subomi OluwalanaSubomi is a passionate software engineer. His main focuses are Ruby and backend development.