A guide to Laravel events and listeners
Events are occurrences within a system you may be developing in which the system is notified so that your code can respond to that occurrence. It can be described as "Action begets Reaction." For example, if you are building a fintech application, a mail is sent to the admin each time a withdrawal request is made. In turn, the admin can either approve or decline the request. Basically, events notify your program that an activity has occurred and perform any associated follow-up actions.
This article extensively discusses events and listeners in Laravel. Here are a few things you'll learn:
- What are events and listeners in Laravel?
- The relationship between events and observers in Laravel
- The definition of events and listeners
- How to dispatch an event
A complete implementation of this tutorial is available on GitHub. If you have any questions or find any bugs, please feel free to open an issue.
Prerequisites
The following links will help you keep up with this tutorial:
Events and listeners in Laravel
In Laravel, events are a straightforward means to apply the observer pattern for your application's activity. As the name suggests, listeners watch (listen) for events in your application. However, they can only listen for certain events; each listener must first be assigned to a specific event.
The ability of one event to have numerous independent listeners makes events and listeners an excellent tool for decoupling web applications. Laravel provides support with certain default functionality to handle events in an application.
It is a good tool for maintaining abstraction and prioritizing clean code standards. We often overload our classes with functionalities, which causes the functionality of many of our applications to break if the class changes. This is not a good practice, and this is when events come in handy.
The relationship between event handlers and event listeners
The terms "event handler" and "event listener" are occasionally used interchangeably. Although they work together, there is a slight difference between the two.
The listener is a class that performs event instructions. Registering an event handler means that the code is executed after an event occurs. On the other hand, the event listener waits for the event to occur before triggering the code to handle it.
Essentially, the code executed in response to an event is called a handler, while the listener keeps an eye out for when the event occurs.
Laravel observers vs. Laravel events
The observer pattern monitors the system's status and responds when it changes. Although events and listeners are a basic implementation of observer patterns, there are also Model Observers, which represent a comparative approach designed exclusively for eloquent models. The main idea behind observers is that they watch for specific things that only occur in eloquent Models (creating a record, updating a record, deleting a record, etc.). However, the use of events is not limited to models because events are general and applicable anywhere in your application. The model observer is the best option if you listen to many events in a particular eloquent model.
Laravel jobs vs. Laravel event listeners
Generally, events enable you to listen for an activity in your application and provide a follow-up reaction; jobs are scheduled classes on a queue, ready to be executed. While jobs are always explicitly called, events are on the lookout, waiting to be called. For example, a job can be a simple script to calculate the account balance every month; an event can be to send email verification to a new user immediately after a successful sign-up. Events can also be queued. However, jobs do not wait for activity in the application to be executed.
Using events and listeners in Laravel
To explore a use case, let's build a sample subscription API that shows how to use events in Laravel. After a user subscribes, a welcome email is sent to the user and a follow-up email is sent to the admin. Let's dive in🚀!
Create a Laravel Application Create a new Laravel project via the Laravel installer or the Composer command.
laravel new project_name
    or
composer create-project laravel/laravel project_name
Connect to your database
I wrote an article that explains how to connect a Laravel Application to a MySQL database. If you have a different database, connect to it appropriately.
Set up a model and migrations
Use the following Artisan command to create a model and migration simultaneously for subscribers:
php artisan make:model Subscriber -m
This generates a migration file called xxxx_xx_xx_xxxxxx_create_subscribers_table.php in the database/migrations directory and a model file called Subscribers.php in the app/Models directory.
In the migration file, define the fields of the subscribers' table. Here, we only need the subscribers' email. Update the up() method of the migration file.
public function up()
{
    Schema::create('subscribers', function (Blueprint $table) {
        $table->id();
        $table->string('email');
        $table->timestamps();
    });
}
Add the $fillable property to the top of the Subscriber class. This defines which fields on the subscribers' model are fillable.
protected $fillable = ['email'];
Now migrate these changes to your database by running this Artisan command:
php artisan migrate
Set up the mailing system
In this example, you send two emails—a follow-up to the admin and a welcome mail to the subscriber.
To create the Mailable (app/Mail/Welcome.php) and its corresponding view template (resources/views/emails/welcome.blade.php), run the following Artisan command:
php artisan make:mail Welcome --markdown=emails.welcome

php artisan make:mail AdminFollowup --markdown=emails.admin.followup
Update the Welcome mailable with the necessary action details in the mail as you desire. In this tutorial, I only update the subject of the mail.
return new Envelope(
        subject: 'Welcome to this Newsletter',
);
Update the corresponding welcome file in the resources/views/emails/welcome.blade.php directory with the body contents of the welcome mail.
<x-mail::message>
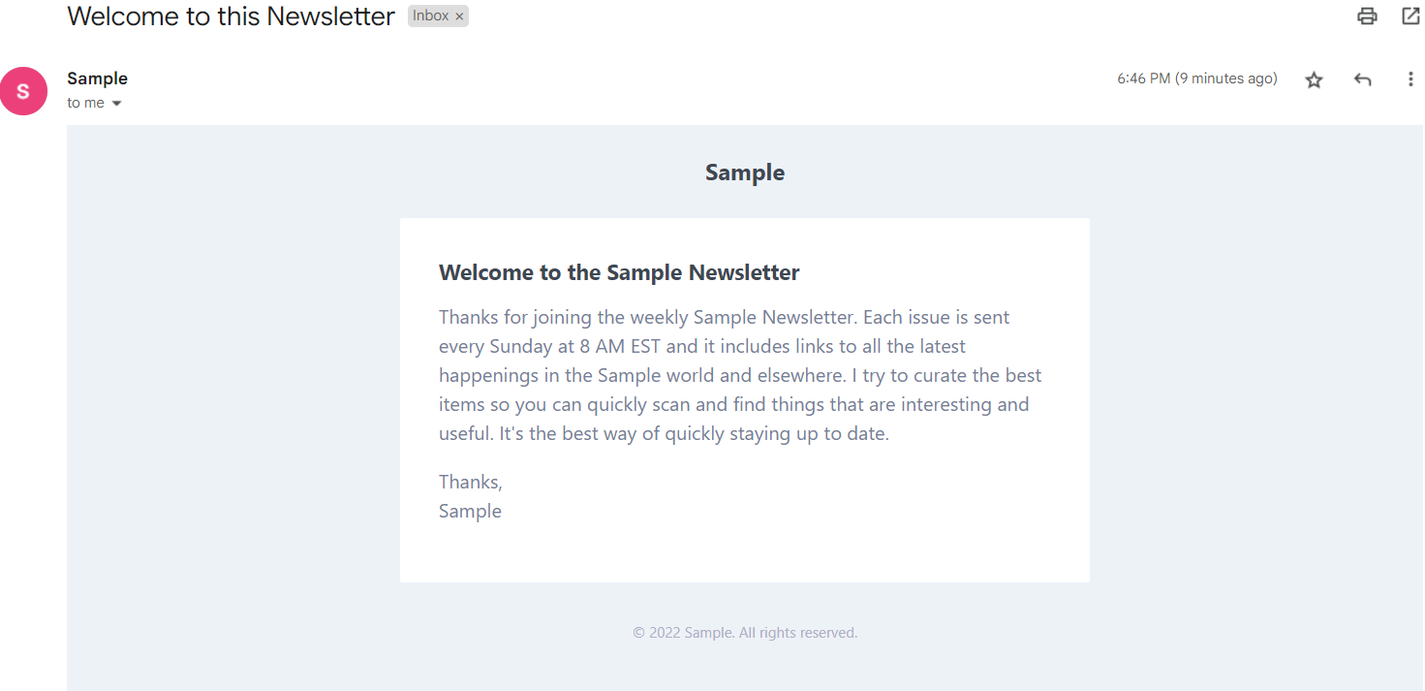
# Welcome to the sample newsletter
Thanks for joining the weekly Sample Newsletter. Each issue is sent every Sunday at 8 AM EST and includes links to all the latest happenings in the Sample world and elsewhere. I attempt to curate the best items so you can quickly scan and find things that are useful and interesting. It's the best way of quickly remaining up-to-date.
Thanks,<br>
{{ config('app.name') }}
</x-mail::message>
Update the Admin mailable with the necessary action details of the mail.
return new Envelope(
    subject: 'New Subscriber: Admin Follow up',
);
Update the corresponding followup file in the resources/views/emails/admin/followup.blade.php directory with the body contents of the follow-up mail.
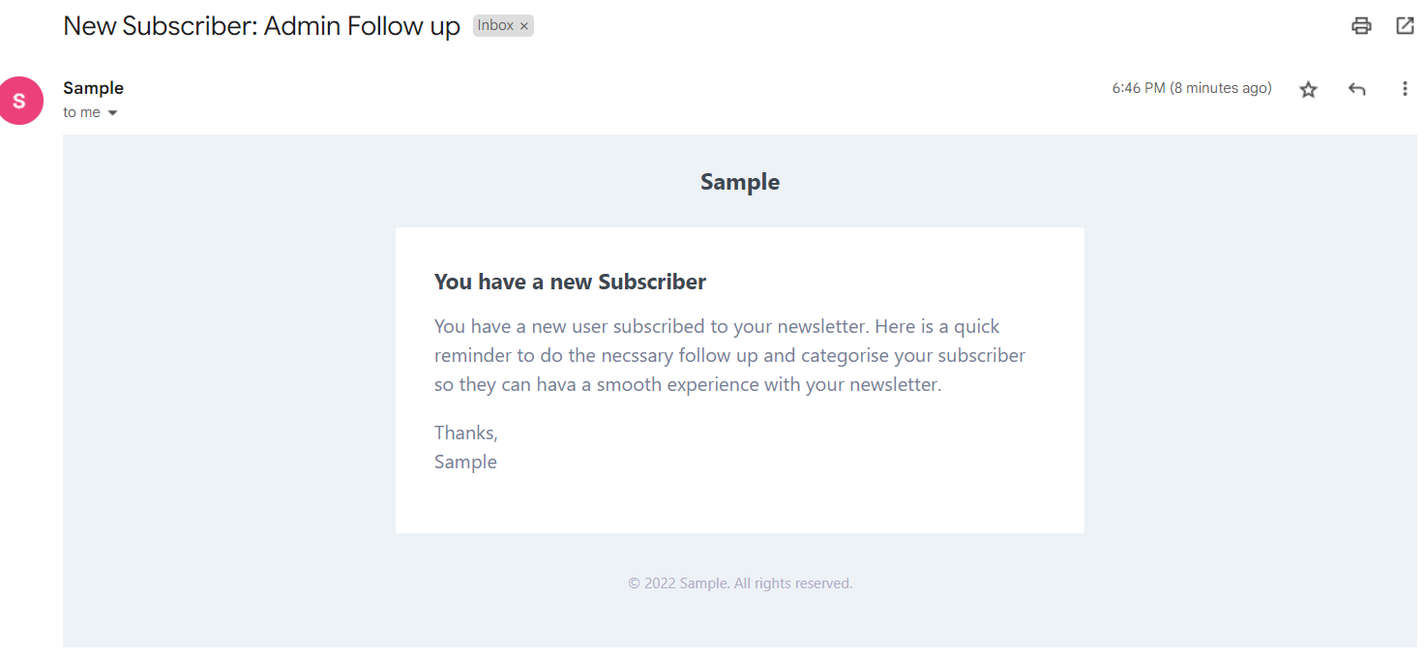
<x-mail::message>
# You have a new subscriber
You have a new user subscribed to your newsletter. Here is a quick reminder to perform the necessary follow up and categorize your subscriber so they can have a smooth experience with your newsletter.

Thanks,<br>
{{ config('app.name') }}
</x-mail::message>
This is merely a sample tutorial. Explore and be as descriptive as possible with your email contents.
To know more about sending emails in Laravel , visit the official documentation.
Lastly, set up the mail environment variables in the .env file. Use the credentials that match the mail configurations you are using for your application.
MAIL_MAILER=smtp
MAIL_HOST=mailhog
MAIL_PORT=1025
MAIL_USERNAME=xxxxx
MAIL_PASSWORD=xxxxx
MAIL_ENCRYPTION=xxxx
MAIL_FROM_ADDRESS="hello@example.com"
MAIL_FROM_NAME="${APP_NAME}"
Create events and listeners
Approaching the core aspect of this tutorial, manually create an event, and corresponding listeners, for when a user registers.
Note: You can either create events and listeners manually and register them on the
EventServiceProvideror first define them and generate them from theEventServiceProviderusingphp artisan event:generate.
To create a new event, run the following Artisan command:
php artisan make:event UserRegistered
This command generates a new file called UserRegistered.php with an event class in the app/Events directory. An event class serves as a data container for event-related data. Update the event class with an instance of all the data required for this event.
public $email;
/**
 * Create a new event instance.
 *
 * @return void
 */
public function __construct($email)
{
    $this->email         = $email;
}
Create two listeners for the UserRegistered event—one to send a welcome mail to the user and another to send the admin a follow-up mail.
You can use the --event flag to define which event should be responded to by the listener you create.
php artisan make:listener SendWelcomeMail --event=UserRegistered

php artisan make:listener SendAdminMail --event=UserRegistered
This command generates two listener classes, as specified in the app/Listeners directory. You can perform all necessary responses to the event that are part of the listener's handle method.
Update the handle() method of the SendWelcomeMail listener to send a welcome email to the new user.
public function handle(UserRegistered $event)
{
    //perfom more actions(if need be)
    Mail::to('user-email-address')->send(new Welcome());
}
Update the handle() method of the SendAdminMail listener to send a follow-up prompt to the admin.
public function handle(UserRegistered $event)
{
    //perfom more actions(if need be)
    Mail::to('user-email-address')->send(new AdminFollowup());
}
Remember to import the necessary mail classes at the beginning of the file.
Update the event service provider
The EventServiceProvider.php is located in the app/Providers directory. It allows you to register your application's event listeners in one place. All events (keys) and listeners(values) are listed in an array through the listen-to property. Update the $listen array of the event service provider in the following manner:
protected $listen = [
    Registered::class => [
        SendEmailVerificationNotification::class,
    ],
    UserRegistered::class => [
        SendWelcomeMail::class,
        SendAdminMail::class
    ]
];
Remember to import the classes where necessary.
Set up the controller
The controller includes all the logic that enables users to subscribe to the newsletter and define every other follow-up action. To create a new controller, run the following Artisan command:
php artisan make:controller SubscriberController
This will create a new file called Subscriber.php in the app/Http/Controllers directory. After creating the file, add the following import statements to import the required classes:
use App\Events\UserRegistered;
use App\Models\Subscriber;
use Illuminate\Http\JsonResponse;
use Illuminate\Http\Request;
use Illuminate\Support\Facades\Validator;
Now, define a method that includes the logic for users to subscribe to the newsletter.
public function subscribe(Request $request){

    //validate the request data
    $validator = Validator::make($request->all(), [
        'email'  =>  'required|email',
    ]);

    if ($validator->fails()) {
        return new JsonResponse(['success' => false, 'message' => $validator->errors()], 422);
    }

    // subscribe to the newsletter
    Subscriber::create([
        'email'=> $request->email
    ]);

  // call the event
    event(new UserRegistered($request->email));

    return new JsonResponse(['success' => true, 'message' => "Thank you for subscribing to the Sample newsletter!"], 200);
}
In the snippet above, first, you validate the data to ensure that the email address is valid. Visit the Laravel official documentation to know more about form request validation. Proceed to create a new subscriber, and then dispatch the event.
To dispatch the event, simply send the event class object to the event() method. The event looks out for its respective listener(s) in the EventServiceProvider and executes its logic.
Set up the routes
You need one route for users to subscribe to your newsletter.
To define this route, add the following code to routes/api.php.
Route::post('/subscribe', [SubscriberController::class, 'subscribe']);
Then, add the import statement to the top of the file.
use App\Http\Controllers\SubscriberController;
Following this pattern implies that if there is more logic to perform after a user subscribes, you do not need to edit the subscribe() method in the controller. Instead, you create a new listener and map it to that event. In this manner, the subscribe() method handles the creation of a subscriber and dispatches an event, while the listener(s) handle(s) the other associated responsibilities.
Testing
Excellent job so far 👍!
We'll be using Postman to test the API. Here is a sample result of the request.
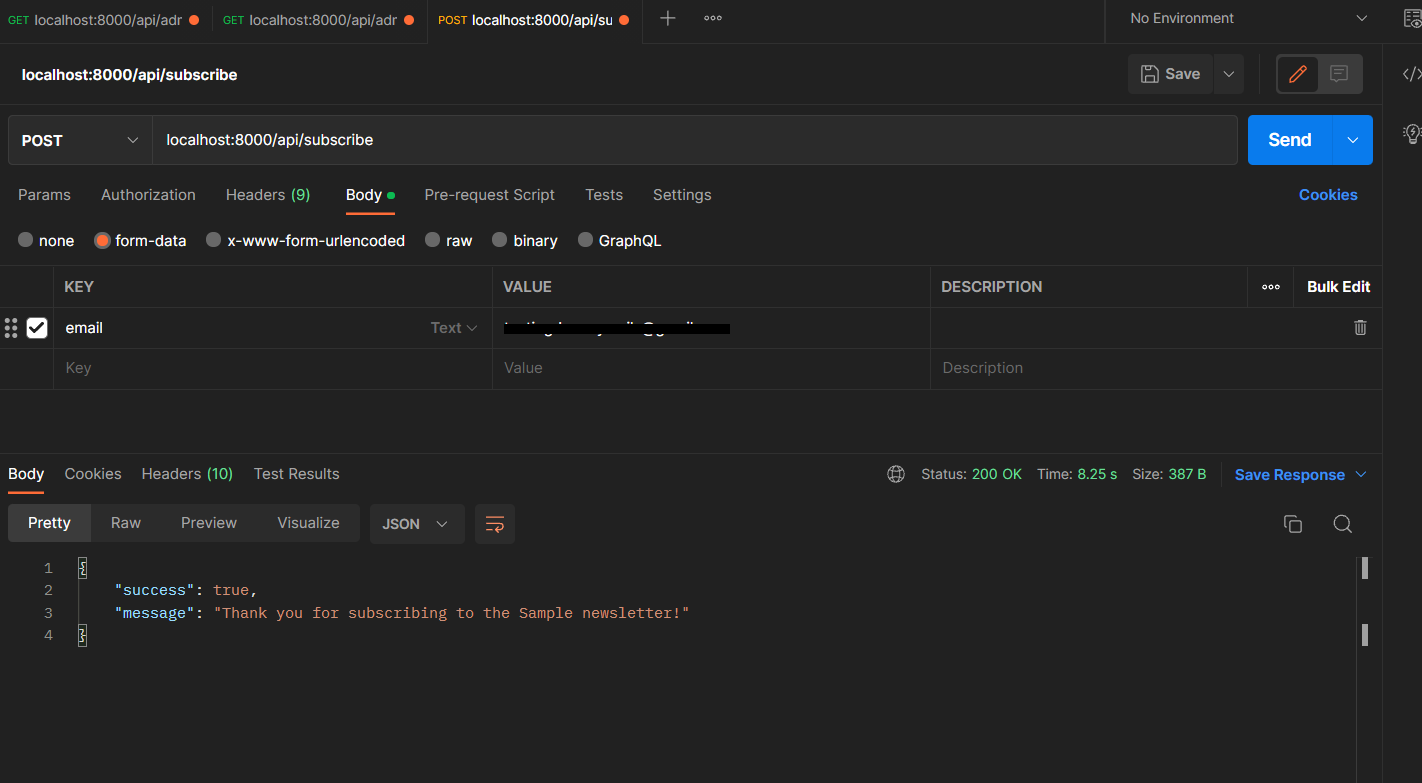
Amazing, it returns successfully! Now, let's check if both listeners worked. We expect an email from the admin and another from the new subscriber.
Well done for making it this far!
Conclusion
In this tutorial, you've learned how to use events and listeners in Laravel. While Laravel events are a broad concept, this tutorial can serve as a great starter guide. You can find more information in the official Laravel documentation. This project has an open-source code and is available on GitHub. I am open to questions, contributions, and conversations on improved ways to handle Laravel events, so please comment on the repository or DM me @twitter.
Thanks for reading! 🤝
