INI vs. YAML: working with configuration files in Python
To run any software on a machine, it needs to meet the requirements of the software. The requirements may include other software modules, adequate storage and memory available, and other device settings. These requirements are specified by the software developers using configuration files. In this article, we will discuss configuration files, their necessity in software projects, and the different types of configuration files. We will also discuss different types of configuration files in Python and how we can work with INI and YAML configuration files in Python.
What are Configuration Files?
Configuration files contain requirements, settings, dependencies, and preferences for a software program or application. These files can be used to specify the settings for software, based on the system configuration. Normally, configuration files contain specific information in the format of key-value pairs. The information can be stored in a simple text file using delimiters or specific file formats, such as INI, XML, or YAML, depending on the requirements. These files can then be read and manipulated using text editors or configuration management tools to update the settings and preferences for the software application. Most of the configuration files include a subset of the following data:
- Layout and appearance of a user interface.
- Hardware requirements to run the software.
- Operating system.
- Location of certain files.
- Required software modules to run the software.
- Defaults settings.
- Version control information, etc.
Using the above information, configuration files allow users and administrators to fine-tune the operation of a system or software program to meet their specific needs and preferences. Having discussed what a configuration file is, let us discuss the need for a configuration file for a software project.
Why Do We Need Configuration Files?
We need configuration files for many reasons; here are some of them:
- Documentation: We use configuration files to document the configuration of a program or an entire software application. This will help the developers understand the requirements and setup of the software.
- Centralized Configuration: You can use configuration files to store settings for multiple programs or systems in a centralized location. This makes it easier to manage and maintain the configuration of a large number of systems.
- Specification of Version Control Information: Configuration files are used to store information about the version of a program or system. This can be useful for tracking changes and maintaining compatibility.
- Integration: If you want to integrate new software into an existing system, configuration files help determine the dependencies and compatibility of the programs. This helps you integrate it smoothly and avoid breaking the entire system.
- Portability: Configuration files can be used to store settings specific to a particular machine or environment. This allows a program or system to be easily moved to a different machine or environment without having to reconfigure everything manually.
- Automating Tasks: Configuration files can be used to automate certain tasks or processes, such as scheduling a task to run at a specific time or setting up a system to automatically start certain programs when it is booted up.
What Are the Different Configuration File Formats?
There are many configuration file formats. The specific format used for any software depends on the program or system with which the configuration file is used. You can keep configuration files in any of the formats according to your requirements. Examples of these formats are as follows:
- Plain text: You can keep configuration files as plain text files that contain settings in the form of key-value pairs, separated by a delimiter, such as a colon or an equals sign. These files can be edited using a text editor.
- XML: Extensible Markup Language (XML) is a widely used format for storing structured data and is often used for configuration files. XML files use a set of tags to define the structure and content of the data and can be edited using a text editor or specialized XML editing software.
- INI: INI files are a type of configuration file commonly used on Windows systems. They consist of sections, each of which contains a set of key-value pairs that define the configuration settings for that section. INI files can be edited using a text editor or specialized configuration tool.
- JSON: JavaScript Object Notation (JSON) is a lightweight data-interchange format often used for storing data in a structured manner. JSON files can be used as configuration files and edited using a text editor or specialized JSON editor.
- YAML: YAML Ain't Markup Language is a human-readable data serialization format often used for configuration files in Linux systems. YAML files are simple text files that use a set of indentation-based rules to define the structure of the data. They can be edited using a text editor.
Configuration files can also be stored in other formats, such as binary files, database files, or proprietary formats specific to a particular program or system. In this article, we will only discuss INI and YAML file formats. Why? INI and YAML files are one of the most used configuration file formats. INI configuration files are used in Windows, whereas YAML files are extensively used in Linux and other Unix-like environments. For example, MLFlow, which is an MLOps software, stores the configuration settings in YAML files. Thus, knowing about INI and YAML files can help you cover almost 75 percent of the digital ecosystem. In the next sections, I will explain how to read, write, and manipulate INI and YAML files in Python.
Working with INI Files in Python
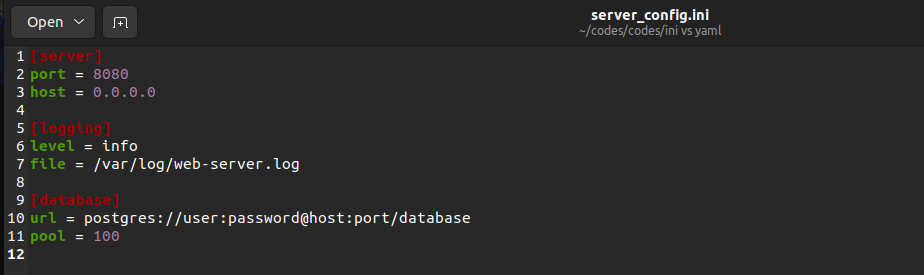
INI files are most often used in the Windows file system. Each INI configuration file is structured in the form of sections and fields. Each file contains different sections, and each section contains different fields with values associated with them. For example, the following is a configuration file for a web server in INI format:
[server]
port = 8080
host = 0.0.0.0

[logging]
level = info
file = /var/log/web-server.log

[database]
url = postgres://user:password@host:port/database
pool = 100
Here, the configuration file contains three sections, namely server, logging, and database. The server section contains two fields- port and host that have the values 8080 and 0.0.0.0, respectively. Similarly, the logging section contains two fields, namely level and file, whereas the database section contains the fields url and pool.
To handle INI configuration files in Python, we will use the configparser module. You can install the configparser module on your machine using the following command:
pip3 install configparser
In Python 2, you can use the following command.
pip install configparser
After installation, you can use the configparser module to work with INI configuration files in Python.
Create a New INI Configuration File in Python
To create a new configuration file in Python, we will use the ConfigParser() function defined in the configparser module.
When we execute the ConfigParser() function, it returns a ConfigParser object. The ConfigParser object has no data in it. We can add sections and fields to the empty ConfigParser object to create a configuration file.
To add a new section with different fields to the ConfigParser object, you first need to create a dictionary object containing the field names as keys and the values of the fields as the associated value to each key. After creating the dictionary, you can add the data to the ConfigParser object using the following syntax.
config_object[section_name]= dict_of_fields
Here,
config_objectis the object returned by theConfigParser()function.section_nameis the name of the section in the configuration file.dict_of_fieldsis the Python dictionary containing fields and their values as key-value pairs. Keys and values of the fields must be of string data type.
After assigning the dictionary containing the field names to the configuration object, you can save the ConfigParser object to an INI file using the write() method.
The write() method, when invoked on a ConfigParser object, takes a file object as its input argument. After execution, it saves the ConfigParser object to the file. You can observe this in the following example:
# Import module
import configparser

# Create a configparser object
config_object = configparser.ConfigParser()
# Add sections to the configuration object
config_object["server"]={"port" : "8080", "host" : "0.0.0.0"}
config_object["logging"]={"level" : "info", "file" : "/var/log/web-server.log"}
config_object["database"]={"url" : "postgres://user:password@host:port/database", "pool" : "100"}
# Save the configuration file
with open("server-config.ini","w") as file_object:
    config_object.write(file_object)
Output File: Configuration File
The file looks as follows:
Instead of the above approach, we can also use the built-in add_section() and set() methods to create a new configuration file. The add_section() method, when invoked on a ConfigParser object, takes the name of the section as its input argument. After execution, it adds the specified section to the ConfigParser object. If the section is already present with the name given to the add_section() method, it raises a DuplicateSectionError exception. The set() method is used to set field names in a ConfigParser object. It has the following syntax.
config_object.set(section_name, field_name, field_value)
Here, the section_name parameter takes the name of the section in which we need to add the new field. The section with section_name must be present in the ConfigParser object. Otherwise, the set() method raises a NoSectionError exception. The field_name contains the name of the field, and the field_value contains the value associated with the field.
You can use the set() method and the add_section() method to create an INI configuration file in Python:
# Import module
import configparser

# Create a configparser object
config_object = configparser.ConfigParser()
# Add sections to the configuration object
config_object.add_section("server")
config_object.add_section("logging")
config_object.add_section("database")
# Add field names to the configuration object for each section
config_object.set("server","port","8080")
config_object.set("server","host","0.0.0.0")
config_object.set("logging","level","info")
config_object.set("logging","file","/var/log/web-server.log")
config_object.set("database","url","postgres://user:password@host:port/database")
config_object.set("database","pool","100")
# Save the configuration file
with open("server-config-1.ini","w") as file_object:
    config_object.write(file_object)
Output file : Configuration File
Read an INI Configuration File in Python
To read an INI configuration file in Python, you first need to open the file using the open() function in read mode. Then, you can read the file using the read() method, as shown in the following example.
with open("server-config-1.ini","r") as file_object:
    config_data=file_object.read()
    print(config_data)
Output:
[server]
port = 8080
host = 0.0.0.0

[logging]
level = info
file = /var/log/web-server.log

[database]
url = postgres://user:password@host:port/database
pool = 100
In this example, the configuration file is read as a text file. If you want to read the configuration file into a ConfigParser object, you can use the read_file() method defined in the configparser module.
To do this, you first need to create an empty configuration object using the ConfigParser() method. Then, you can use the read_file() method to load the INI configuration file into the configuration object. The read_file() method takes the file pointer as its input argument and adds the data present in the file to the ConfigParser object.
Once we get the ConfigParser object, we can use the get() method to get the value in any field. The get() method, when invoked on a ConfigParser object, takes the section name as its first input argument and the field name as its second input argument. After execution, it returns the value in the specified section and field, as shown below.
# Import module
import configparser

# Create configparser object
config_object = configparser.ConfigParser()
with open("server-config-1.ini","r") as file_object:
    config_object.read_file(file_object)
    url=config_object.get("database","url")
    print(url)
Output:
postgres://user:password@host:port/database
Here, if the section name given as input to the get() method is not present in the configuration file, the program will run into a NoSectionError exception. If the field name is not present in the file, the program will run into a KeyError exception.
Update an INI Configuration File in Python
To update a field value in an INI configuration file in Python, we will first create an empty ConfigParser object using the ConfigParser() method. Then, we will load the existing INI file to the ConfigParser object using the read_file() method. Then, we can update a field, add a new section, or add a new field to the configuration file. Let us discuss these.
To update a field value in a ConfigParser object, you can use the following syntax:
config_object [section_name][field_name]=field_value
Here, the config_object is the ConfigParser object. The section_name is the name of the section we want to update. The field_name and field_value are the name of the field and the new value being assigned to the field field_name.
Here, if a field with the name field_name exists, the value associated with the field gets updated. Otherwise, a new field with the name field_name is added to the configuration object.
After adding the field name, you can save the ConfigParser object back to an INI file using the write() method, as shown below.
# Import module
import configparser
# Create configparser object
config_object = configparser.ConfigParser()
# Update the configuration file
with open("server-config.ini","r") as file_object:
config_object.read_file(file_object)
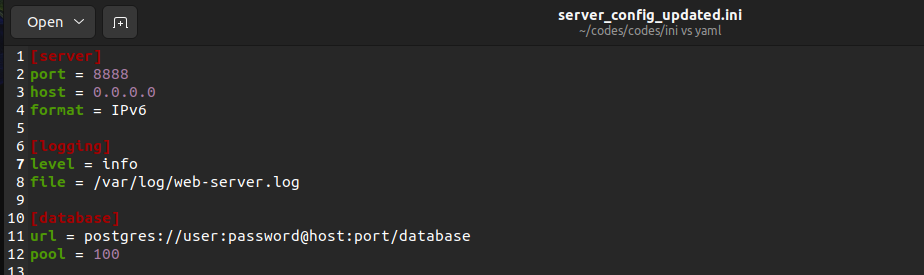
config_object["server"]["port"]="8888"
config_object["server"]["format"]="IPv6"
# Save the updated file
with open("server-config-updated.ini","w") as file_object:
config_object.write(file_object)
Output File: Updated Configuration File
The above file looks as follows.
Instead of using the above approach, you can also use the update() method to update or add a field in the configuration file. The update() method has the following syntax.
config_object[section_name].update(dict_of_fields)
Here, the config_object is the ConfigParser object. The section_name is the name of the section we want to update. The dict_of_fields is a python dictionary containing field names and associated values as key-value pairs. All the keys and values must be strings.
If a field name is already present in the file, it gets updated. Otherwise, a new field is added to the configparser object.
After updating the ConfigParser object, you can save the configuration file using the write() method, as shown below.
# Import module
import configparser

# Create a configparser object
config_object = configparser.ConfigParser()
# Update the configuration file
with open("server-config-1.ini","r") as file_object:
    config_object.read_file(file_object)
    config_object["server"].update({"port":"8888","format":"IPv6"})

# Save the updated file
with open("server-config-updated-1.ini","w") as file_object:
    config_object.write(file_object)
Output: Updated Configuration File
To add a new section to a configuration file, you can use the add_section() method, as discussed while creating the configuration file.
Delete Data From an INI Configuration File in Python
To delete data from an INI configuration file, we can delete either a field or an entire section.
To delete a field from a configuration file, we can use the remove_option() method. The remove_option() method takes the section name as its first input argument and the field name as its second input augment. After execution, it deletes the field from the specified section in the configuration file.
You can observe this in the following example.
# Import module
import configparser
# Create a configparser object
config_object = configparser.ConfigParser()
# Update the configuration file
with open("server-config.ini","r") as file_object:
config_object.read_file(file_object)
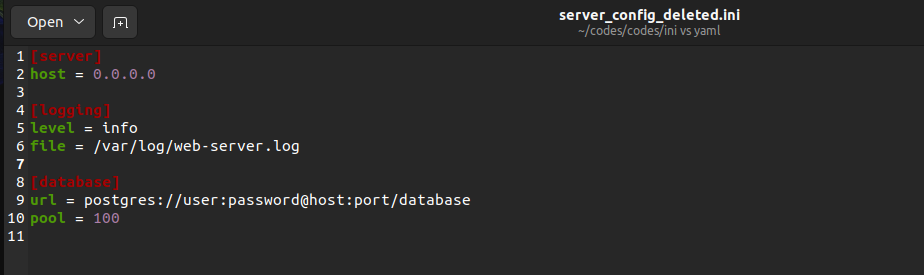
config_object.remove_option("server","port")
config_object.remove_option("server","format")
# Save the updated file
with open("server-config-deleted.ini","w") as file_object:
config_object.write(file_object)
Output: Configuration File After Delete Operation
The output file looks as follows.
Here, if the field name is not present in the original configuration file, nothing happens. However, if the section name given to the remove_option() is not present in the configuration file, it will raise a NoSectionError exception.
To delete a section from an INI configuration file in python, you can use the remove_section() method. The remove_section() method, when invoked on a ConfigParser object, takes the section name as its input argument and removes the section, as shown below.
# Import module
import configparser

# Create a configparser object
config_object = configparser.ConfigParser()
# Update the configuration file
with open("server-config-1.ini","r") as file_object:
    config_object.read_file(file_object)
    config_object.remove_section("server")


# Save the updated file
with open("server-config-deleted-1.ini","w") as file_object:
    config_object.write(file_object)
Output: Configuration File After Delete Operation
Here, if the input section name is not present in the configuration file, nothing happens.
Working with YAML Files in Python
YAML is one of the most commonly used configuration file formats, as it is supported by almost all programming languages. A simple YAML file has the following structure.
- Each YAML document starts with ---.
- The data is stored in key-value pairs and nested data structures are allowed, too.
- Three periods … mark the end of a YAML document.
- Comments start with #, just like python.
Following is an example of a YAML configuration file.
---
id:admin123
password: password1234
server:
  port: 8080
  host: 0.0.0.0

logging:
  level: info
  file: /var/log/web-server.log

database:
  url: postgres://user:password@host:port/database
  pool: 100
…
In the above file, there are three sections, namely server, logging, and database. There are also two fields, namely id and password, that aren't present inside any section. Each field and its value are separated using :.
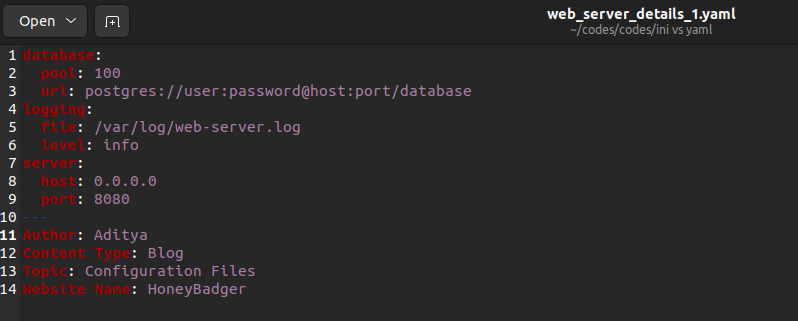
A YAML file can also contain more than one YAML document, as shown below.
---
Author: Aditya
Content Type: Blog
Topic: Configuration Files
Website Name: HoneyBadger
---
Author: Jay
Content Type: Tutorial
Topic: Python
Website Name: AvidPython
…
In the above example, the file contains two YAML documents separated by ---. Now, let us discuss how to work with YAML configuration files in Python. To do this, we will use the PyYAML module. You can install the PyYAML on your machine using the following command:
pip3 install PyYAML
In Python 2, you can use the following command to install the PyYAML module.
pip install PyYAML
Create a New YAML Configuration File in Python
To create a new YAML configuration file in Python, you can create an empty python dictionary. Let’s name it config_dict. Then, we will use the following syntax to add data to the dictionary.
config_dict[section_name]=dict_of_fields
Here, section_name is the name of the section we need to add to the configuration file. The dict_of_fields variable contains a dictionary having all the field names and field values for the specified section. You can also add fields to a YAML file outside the sections. To do this, you can use the following syntax.
config_dict[field_name]=field_value
Here, field_name is the field we want to add to the YAML file with the value field_value. After creating the dictionary, you can use the dump() method to convert the dictionary to a YAML file.
The dump() method takes the dictionary containing configuration data as its first input argument and a file pointer as its second input argument. After execution, it saves the YAML configuration file to the file. To create a YAML configuration file, we will first open a file in write mode using the open() method. Then, we will use the dump() method to save the configuration data to the file.
import yaml
# Create an empty dictionary
config_dict=dict()
# Add configuration data to the dictionary
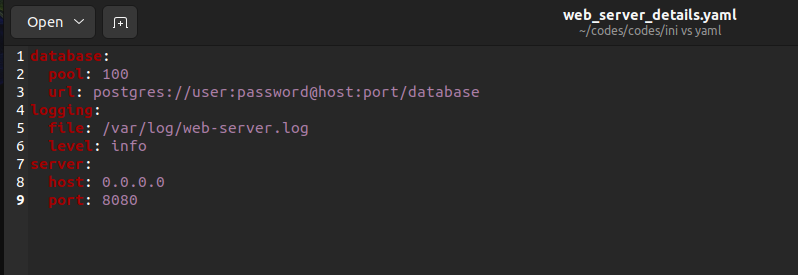
config_dict["server"]={'port': 8080, 'host': '0.0.0.0'}
config_dict["logging"]={'level': 'info', 'file': '/var/log/web-server.log'}
config_dict["database"]={'url': 'postgres://user:password@host:port/database','pool': 100}
# Save the dictionary to a YAML file
with open("web-server-details.yaml","w") as file_object:
yaml.dump(config_dict,file_object)
Output: YAML Configuration File
The file looks as follows.
You can also add more than one YAML document in a single YAML file. To do this, use the dump_all() method instead of the dump() method. Instead of a single dictionary containing configuration data, the dump_all() method takes a list of dictionaries as its input and saves them to the configuration file.
You can observe this in the following example.
import yaml
# Create an empty dictionary
config_dict=dict()
# Add configuration data to the dictionary
config_dict["server"]={'port': 8080, 'host': '0.0.0.0'}
config_dict["logging"]={'level': 'info', 'file': '/var/log/web-server.log'}
config_dict["database"]={'url': 'postgres://user:password@host:port/database','pool': 100}
# Create another dictionary
details_dict= {"Website Name":"HoneyBadger","Author":"Aditya", "Topic":"Configuration Files", "Content Type":"Blog"}
list_of_dicts=[config_dict,details_dict]
# Save data to a YAML file
with open("web-server-details-1.yaml","w") as file_object:
    yaml.dump_all(list_of_dicts,file_object)
Output: YAML Configuration File
The output file looks as follows.
Read a YAML Configuration File in Python
To read a YAML configuration file in Python, we can use the load() method or the load_all() method.
The load() method is used to read a configuration file when it contains only one YAML document. It has the following syntax:
yaml.load(file_ptr, Loader=SafeLoader)
Here, the file_ptr is the file pointer of the YAML file returned by the open() method. The Loader parameter is used to specify how you want to load the configuration file. It can have four values:
BaseLoader: If the Loader parameter is set toBaseLoader, all the data from the configuration file is read as a string.SafeLoader: If theLoaderis set toSafeLoader, theload()method loads the data safely. You can use it while loading files from untrusted sources.FullLoader: When we set theLoaderparameter toFullLoader, it loads the full YAML file but avoids arbitrary code execution. Still, it poses risk if used to load files from untrusted sources.UnsafeLoader: TheUnsafeLoaderoption is used to load configuration files from untrusted sources. It’s generally used for backward compatibility.
After execution, the load() method returns a dictionary containing the configuration data.
To read a YAML configuration file containing a single document, we will first open the file in read mode using the open() method. Then, we will use the load() method to read the configuration data, as shown below.
import yaml
with open("web-server-details.yaml","r") as file_object:
    data=yaml.load(file_object,Loader=yaml.SafeLoader)
    print(data)
Output:
{'database': {'pool': 100, 'url': 'postgres://user:password@host:port/database'}, 'logging': {'file': '/var/log/web-server.log', 'level': 'info'}, 'server': {'host': '0.0.0.0', 'port': 8080}}
Instead of using the load() method, you can use the load_all() method to read a YAML configuration file if it contains more than one document.
The load_all() method returns a generator containing dictionaries. You can use the generator to read the YAML documents, as shown below.
import yaml
with open("web-server-details-1.yaml","r") as file_object:
    generator_obj=yaml.load_all(file_object,Loader=yaml.SafeLoader)
    for data in generator_obj:
        print(data)
Output:
{'database': {'pool': 100, 'url': 'postgres://user:password@host:port/database'}, 'logging': {'file': '/var/log/web-server.log', 'level': 'info'}, 'server': {'host': '0.0.0.0', 'port': 8080}}
{'Author': 'Aditya', 'Content Type': 'Blog', 'Topic': 'Configuration Files', 'Website Name': 'HoneyBadger'}
Update a YAML Configuration File in Python
Once you load a YAML configuration file to a python dictionary, you can perform different operations on the dictionary to update the configuration file. After modifying the dictionary, you can save it to the YAML configuration file using the dump() method.
To update or add a new section to a configuration file, we will use the following syntax:
config_dict[section_name]=dict_of_fields
To update or add a new field outside the sections, you can use the following syntax:
config_dict[field_name]=field_value
To update or add a field inside a section, you can use the following syntax:
config_dict[section_name][field_name]=field_value
After modifying the config_dict, you can save the dictionary to a YAML file using the dump() method, as shown below.
import yaml
file_object=open("web-server-details.yaml","r")
config_dict=yaml.load(file_object,Loader=yaml.SafeLoader)
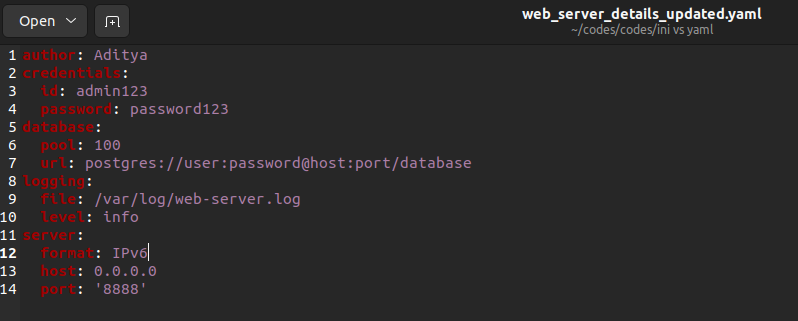
# Add a new section
config_dict["credentials"]={"id":"admin123","password":"password123"}
# Add a new field to an existing section
config_dict["server"]["format"]="IPv6"
# Update an existing field inside a section
config_dict["server"]["port"]="8888"
# Add a new field outside the sections
config_dict["author"]="Aditya"
file_object.close()
with open("web-server-details-updated.yaml","w") as file_object:
yaml.dump(config_dict,file_object)
Output: Updated Configuration File
The file looks as follows.
Instead of using the above approach, you can also use the update() method to add or update sections and fields in a YAML configuration file in python.
To add or update a section to the file, you can use the following syntax:
config_dict.update({section_name:dict_of_fields})
To add multiple sections, you can pass them to the update() method using the following syntax:
section_dict={section1_name:dict_of_fields1, section2_name:dict_of_fields2}
config_dict.update(section_dict)
To add or update a new field inside a section in the configuration file, you can use the following syntax:
config_dict[section_name].update({field_name:field_value})
To add or update a field outside the sections, you can use the following syntax:
config_dict.update({field_name:field_value})
You can also update multiple fields by passing them as key-value pairs in the dictionary passed to the update() method.
After updating the dictionary object, you can save it to a YAML file using the dump() method.
import yaml
file_object=open("web-server-details.yaml","r")
config_dict=yaml.load(file_object,Loader=yaml.SafeLoader)
# Add a new section
config_dict.update({"credentials":{"id":"admin123","password":"password123"}})
# Add a new field or update an existing field inside a section
config_dict["server"].update({"format":"IPv6","port":"8890"})
# Add a new field outside the sections
config_dict.update({"author":"Aditya Raj"})
file_object.close()
with open("web-server-details-updated-1.yaml","w") as file_object:
    yaml.dump(config_dict,file_object)
Output: Updated Configuration File
Delete Data From a YAML Configuration File in Python
To delete data from the configuration file, we will use the pop() method. The pop() method, when invoked on a dictionary, takes a key as its input argument and deletes it from the dictionary.
To delete a section from the configuration file, we will use the following syntax:
config_dict.pop(section_name)
To delete a field inside a section of the dictionary, we will use the following syntax:
config_dict[section_name].pop(field_name)
To delete a field that isn’t inside any section, we will use the following syntax:
config_dict.pop(field_name)
After deleting the required data, you can save the dictionary back to the configuration file using the dump() method, as shown below.
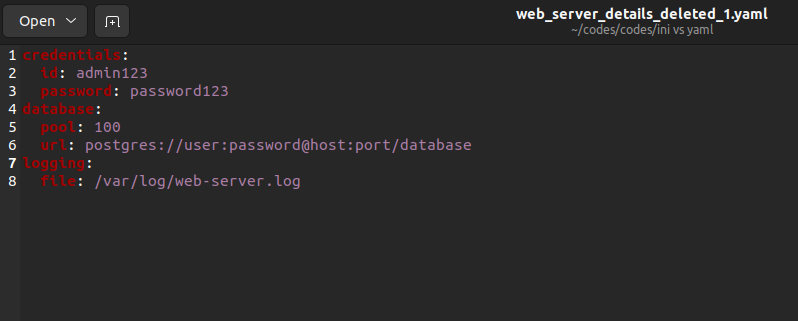
import yaml
file_object=open("web-server-details-updated-1.yaml","r")
config_dict=yaml.load(file_object,Loader=yaml.SafeLoader)
# Delete a section
config_dict.pop("server")
# Delete a field inside a section
config_dict["logging"].pop("level")
# Delete a field outside the sections
config_dict.pop("author")
file_object.close()
with open("web-server-details-deleted-1.yaml","w") as file_object:
    yaml.dump(config_dict,file_object)
Output: Configuration File After Delete Operation
The output file looks as follows.
YAML vs INI: Which Configuration File Format Should You Use?
INI is considered better for simple, flat configurations that need to be used across a wide range of systems. It's easy to read and parse, and it’s supported by many software applications. YAML is better for more complex configurations that need to be edited by humans, as the indentation and data types make it more expressive and easier to read and understand. YAML also allows for comments, which could be used to add explanations or notes to the configuration file. It's also more versatile in terms of encoding, whereas INI has a more limited set of encodings. The chosen format will depend on your specific use case and requirements. If you are writing code that will mostly be used in windows systems, you can choose the INI file format. For UNIX systems, you can choose the YAML file format. Remember, the choice of file format only depends on your preferences. Both file formats work well on all operating systems.
Conclusion
In this article, we first discussed the basics of configuration files and why we need them. Then, we discussed different file formats for configuration files. Next, we performed different operations on INI and YAML configuration files using the configparser and PyYAML modules in Python. Finally, we briefly discussed INI versus YAML to determine which configuration file format you should use.
I hope you enjoyed reading this article. Stay tuned for more informative articles.
Happy Learning!
