Automating Django Tests with Github Actions
When writing tests for your project, there is a repetitive process of running tests every time you make changes, so why not automate it?
GitHub provides a feature called Actions that enables you to automate everything, such as CI/CD, testing, planning, project management, issue labeling, and executing commands, whenever changes are made in the repository. This is done using workflows. You'll learn more as we go further in this tutorial.
In this tutorial, you will learn how to write unit tests for your Django application and run the tests (unit tests and linting tests) automatically when changes are made in the repository. The unit tests will be done with Pytest and the linting test with Flake8. Let’s get started!
Prerequisites
To follow this article, the following is required:
- Basic understanding of Python
- Basic understanding of Django
- Understanding of Git/GitHub
Building a Base Project
In this section, we will build a simple contact list application with Django, which will be used throughout this tutorial.
First, create a new virtual environment for the project, which will come in handy when you are trying to get a list of all the dependencies.
After creating the virtual environment, install Django with the following code:
(env)$ pip install django
Next, run (env)$ django-admin startproject contact_app . to start a new Django project, and then run (env)$ python3 manage.py startapp app to create the app.
Next, you have to add the app you just created to the settings.py file.
INSTALLED_APPS = [
    'django.contrib.admin',
    'django.contrib.auth',
    'django.contrib.contenttypes',
    'django.contrib.sessions',
    'django.contrib.messages',
    'django.contrib.staticfiles',
    'app' #new
]
Set Up the Model
For a contact list application, we know that we need names and phone numbers, which means your app/models.py file will contain the following code:
from django.db import models

# Create your models here.
class Contact(models.Model):
    full_name = models.CharField(max_length=250)
    phone_number = models.CharField(max_length=20)

    def __str__(self):
          return self.full_name
Set Up the View
Now we need to write the logic to tell the templates what to display on the browser. Therefore, in the app/views.py file, paste the following code:
<h2>Contact List</h2>
{% for contacts in contact %}
<li>{{ contacts.full_name: contacts.phone_number }}</li>
{% endfor %}
Set Up the URL
Of course, you can view anything on the browser without setting up the URL, so in the contact_app/urls.py file, update it and insert the following code:
from django.contrib import admin
from django.urls import path
from app.views import contact_list_view

urlpatterns = [
    path('admin/', admin.site.urls),
    path("", contact_list_view, name="contact_list")
]
Next, create a template folder in the app directory to hold the template used to display the blog content. Navigate to your app folder, create a templates/app/contact_list.html file, and paste the following code:
<h2>Contact List</h2>
{% for contacts in contact %}
<li>{{ contacts.full_name }}: {{ contacts.phone_number }}</li> <br>
{% endfor %}
Migrate the models so that you can start adding contacts to the database; to do this, run the following:
(env)$ python manage.py makemigrations
Then run:
(env)$ python manage.py migrate
Populate the Database
To populate the database, go to your terminal the below instruction to go into the Django shell:
(env)$ python manage.py shell
Then run the following code to add each dataset.
>>> from app.models import Contact
>>> Contact.objects.create(full_name="Muhammed Ali",phone_number="3567877909").save()
>>> Contact.objects.create(full_name="Mike Tyson",phone_number="684977545778").save()
Feel free to add more data.
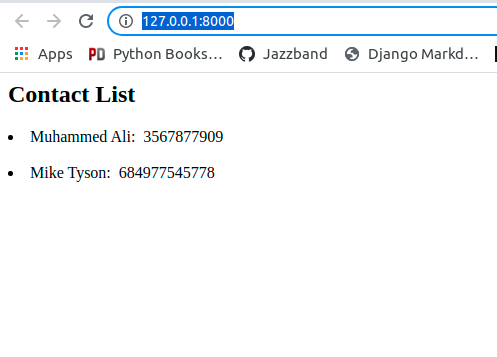
Now run the Django server with (env)$ python manage.py runserver and then open your development server on your browser. You will see the list of contacts you just saved in the database.
How to Write a Unit Test for Django Applications
Here we will test the view, model, and URL we created earlier. To do this, let's first install the dependencies by running the following:
(env)$ pip install pytest pytest-django mixer
Pytest-django is a plugin that enables you to easily work with Django and Pytest.
Next, create a file with the name pytest.ini at the root of your project. The function of the file is to tell Pytest the location of your settings.py file. In the pytest.ini file, paste the following code:
[pytest]
DJANGO_SETTINGS_MODULE = contact_app.settings
Now we can start testing our application; we will start with the model.
Testing the Model
To test the model, we will assert that the data stored in the model are the same data we will get back from the data. This will be done with assertion statements, as you will see in the following code. In your app folder, you'll see a file with the name tests.py; rename it to test_file.py. We are renaming the file because Pytest only recognizes files that begin with "test_"; paste the following code in this file.
import pytest
from app.models import Contact

@pytest.mark.django_db #give test access to database
def test_contact_create():
    # Create dummy data
    contact = Contact.objects.create(full_name="Muhammed Ali", phone_number="75859538350",)
    # Assert the dummy data saved as expected
    assert contact.full_name=="Muhammed Ali"
    assert contact.phone_number=="75859538350"
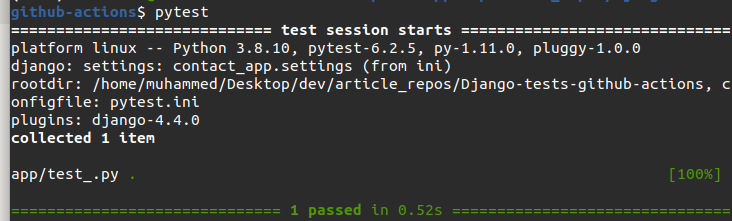
Now, you can run the test by running (env)$ pytest on your terminal, and you will see something like the image below showing that our test passed.
Testing the view
To test the view, we will assert that requesting the view (contact_list_view) will output a HTTP 200 OK success status response code, showing that view is displaying correctly. Below the model test, paste the following code:
from app.views import contact_list_view
from django.urls import reverse

...

@pytest.mark.django_db #
def test_view():
    path = reverse("contact_list")
    request = RequestFactory().get(path) # get the path for the list of contacts
    response = contact_list_view(request)
    assert response.status_code == 200 # assert status code from requesting the view is 200(OK success status response code)
We are giving the test database access because the view references the database when requesting data.
If you run the test, you'll see that the test passes.

💡 Note: After each test function runs, the data added for that test is destroyed, so every test function must have it's own data
Testing the URL
Here, we will test if the path name "contact_list" is the same as resolve(path).view_name. Paste the following code after the rest of your tests in your test file:
def test_url():
    path = reverse('contact_list')
    print(path)
    assert resolve(path).view_name == "contact_list"
Now run the tests and you will see that the test passes as expected.
At the moment, any time we make any changes to our code, we must run tests. This process can become a little too repetitive. What if it was possible to automate running the test? This is where GitHub Actions comes in.
Introduction to GitHub Actions
GitHub Actions is a feature provided by GitHub to assist us in automating processes. The instructions are written in a YAML file and placed directly in the project repository in GitHub.
Here are some terminologies you might come across:
- Workflow: a YAML file that contains a list of instructions for processes.
- Job: Step-by-step instructions for an action.
- Step: Tasks that can run commands in a job.
Set Up GitHub Actions
In your text editor, navigate to the root of your project and create a file with the path .github/workflows/main.yml.
In the main.yml file you just created, paste the code below:
name: test_Django
on: [pull_request, push] # activates the workflow when there is a push or pull request in the repo
jobs:
  test_project:
    runs-on: ubuntu-latest # operating system your code will run on
    steps:
      - uses: actions/checkout@v2
      - uses: actions/setup-python@v2
      - run: pip install flake8
      - run: pip install -r requirements.txt # install all our dependencies for the project
      - run: pytest . # run pytest test
      - run: flake8 . # run flake8 test
As you can see in the code above, we require a requirement.txt file where all the dependencies will be listed. To get the dependencies, go to the root of your project in your terminal and run the following:
pip freeze > requirements.txt
You'll see that requirements.txt file was just created, and we have a list of dependencies in it.
Next, push the code to GitHub, and it will handle the rest.
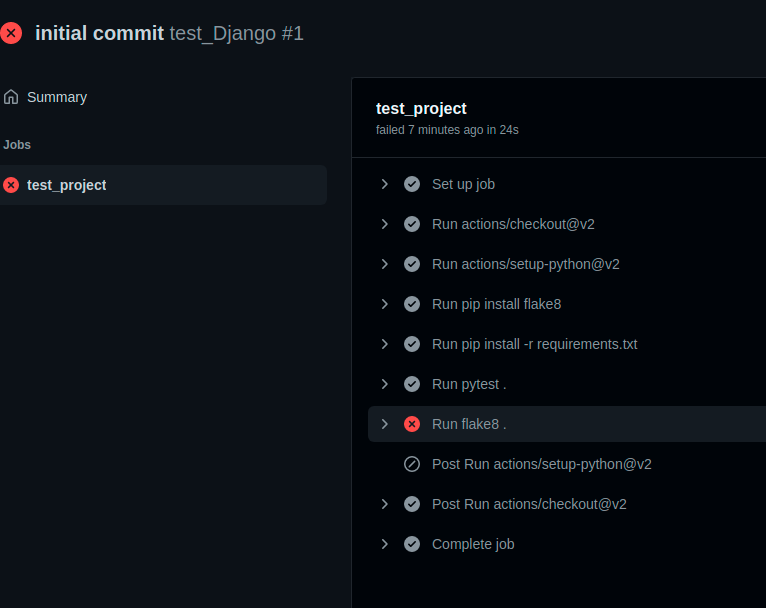
After your code is pushed to GitHub, go to your project on GitHub and click on the “Actions” tab. You’ll see that your GitHub Actions ran completely and that your application has been tested.
The Pytest test passes but the Flake8 test fails, as shown in the following image:
Now, click on Run Flake8, and you will see something like this:
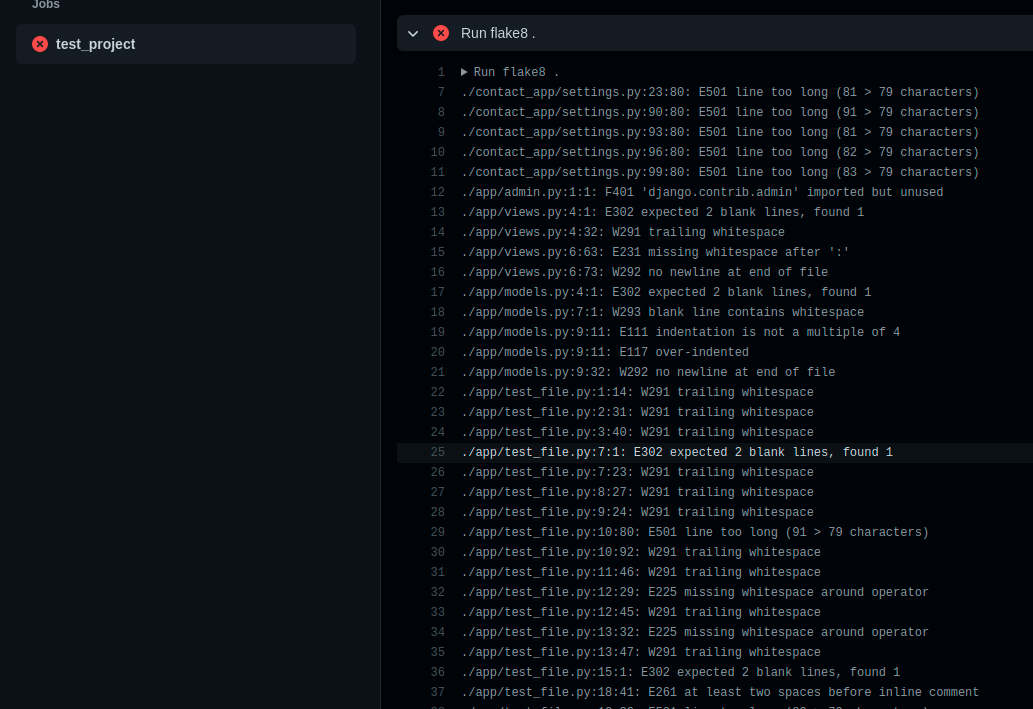
Each line provides the changes you need to make for your test to pass.
Conclusion
In this tutorial, you learned how to write unit tests for the Django application model, view, and URL, as well as automate the process of running tests when your application is pushed to GitHub.
We also added linting tests to the workflow to improve the credibility of the code.
Hopefully, with this article, you will add GitHub Actions to your future projects, perhaps for spell checks, continuous deployment, etc. The code for this tutorial can be found on GitHub.

Written by
Muhammed AliMuhammed is a Software Developer with a passion for technical writing and open source contribution. His areas of expertise are full-stack web development and DevOps.