A step-by-step guide to creating production-ready APIs in Go with Gin and Gorm
APIs, or application programming interfaces, are a way for different software applications to communicate. They are used to share data and functionality between applications and are a vital part of the modern web. Creating useful APIs is crucial for developers looking to build robust and scalable applications.
In the world of backend development, Go has gained significant popularity for its simplicity, performance, and strong community support. With its powerful standard packages and frameworks such as Gin and Gorm, Go has become a powerful tool for developing RESTful APIs.
This step-by-step guide will teach you how to create a production-ready blog API using Go, the Gin web framework for routing and middleware, and Gorm as an ORM (object-relational mapping) tool for databases.
Let's look at the prerequisites for this article in the next section.
Prerequisites
To follow along with this tutorial, you'll need the following:
- A working Go installation
- Basic knowledge of Go. You can check out my Go Beginners Series to get started.
- XAMPP or any other SQL database
- Postman
Introduction to Go and the libraries
In this section, I'll go over a brief introduction of Go, Gorm, and the other libraries that will be used to build the blog API we'll be creating.
Go
Golang, popularly known as Go, is an open-source, compiled, high-level, and statically typed language created in 2007 by Google developers Robert Griesemer, Rob Pike, and Ken Thompson. It was open-sourced in 2009 and has since become famous as large companies have started using it to build significant applications.
Go focuses on improving developers' productivity by providing run-time efficiency, simple syntax, static typing, and other valuable features. Many companies have testified that Go has saved them a lot of development time with its incredible features. You can get started with Go using my Go Beginners Series, which contains short, step-by-step, and hands-on articles explaining the basics of Go.
Gin web framework
Gin is the most popular web framework written in Go. It has over 68 thousand stars on Github, and many Go developers (Gophers) use and recommend it for fast development and performance.
It boasts many incredible features, such as blazing-fast performance, JSON validation, route grouping, and error management.
Let's look at some of the pros and cons of Gin in the following sections.
Pros of the Gin framework
Simplicity and lightweight nature
Gin is widely appreciated for its simplicity and minimalistic design. It offers a straightforward API and follows the principles of the Go language, making it easy to learn and work with. Its lightweight framework results in faster startup times and a reduced memory footprint, which can be advantageous in high-performance applications.
Fast and high performance
Some of the key advantages of Gin include impressive speed and other high-performance characteristics. The framework is built to prioritize speed, leveraging the inherent efficiency of Go. Gin achieves this by utilizing fast HTTP router and middleware components, allowing for rapid development and the efficient handling of requests.
Robust middleware support
Gin provides robust support for middleware, enabling developers to add additional functionality to their applications. Middleware functions can be used for tasks such as logging, authentication, error handling, rate limiting, etc. The middleware ecosystem in Gin is extensive and offers a wide range of pre-built middleware packages that can be easily integrated into your project.
Scalability and concurrency
Gin's design is well-suited for building scalable and concurrent applications. Go's native support for concurrency and Gin's lightweight nature makes the combination ideal for handling many concurrent requests without sacrificing performance. This scalability is particularly valuable for applications that experience high traffic or require real-time updates.
Cons of the Gin framework
A lack of built-in features
While Gin's simplicity is a strength, it can also be considered a limitation. The framework does not provide an extensive set of built-in features compared to a few other web frameworks. Developers may need to rely on third-party libraries or build custom solutions for certain functionalities, which can result in additional effort placed on configuration and maintenance.
Steeper learning curve for beginners
Although Gin's simplicity is advantageous for experienced developers, it may pose a challenge for those new to Go programming. Understanding the underlying concepts of Go and the idiomatic ways of using Gin may require a certain level of familiarity with the language; however, newcomers can still proficiently use Gin through dedication and the use of resources like documentation and community support.
Limited flexibility
Gin follows a specific design philosophy and structure that may limit the flexibility of developers who prefer more freedom in their project architecture. While this structure can benefit small- and medium-sized applications, complex or highly customized projects may require more flexibility, which may not align with Gin's opinionated approach.
Ultimately, the decision to use Gin should be based on your project requirements, the level of flexibility needed, and your familiarity with the Go language. However, if simplicity, performance, and middleware support align with your application's goals, Gin is an excellent choice.
Gorm
Gorm is a popular and fully featured object-relational mapper (ORM) written in Go that has over 32 thousand stars on GitHub. It provides convenient abstractions that simplify database interactions and enhance productivity.
It boasts many fantastic features, such as associations, hooks, transactions, and an SQL builder.
Pros of Gorm
Simplified database interactions
Gorm simplifies the process of working with databases by abstracting away much of the underlying SQL complexity. It provides a high-level API that allows you to interact with databases using simple and intuitive Go code. Gorm handles tasks such as table creation, querying, data manipulation, and relationships, reducing boilerplate code, and accelerating development.
Database agnostic
Gorm is designed to be database-agnostic, meaning it supports multiple database systems such as PostgreSQL, MySQL, SQLite, and more. This flexibility allows you to switch between databases without significant code changes. Gorm's database agnosticism is beneficial for projects that require database portability or may need to support multiple database systems in the future.
Automatic CRUD operations
Gorm automates typical Create, Read, Update, and Delete (CRUD) operations, reducing the need for manual SQL queries. It provides convenient methods like Create, Find, Update, and Delete that handles the underlying SQL generation, making database interactions more efficient and less error-prone. This abstraction simplifies data management and improves productivity.
Association and relationship management
Gorm excels at handling database relationships, such as one-to-one, one-to-many, and many-to-many associations. It provides intuitive methods for defining and managing relationships between entities and allows you to effortlessly work with related data. Gorm's association management capabilities streamline complex data modeling and retrieval, eliminating the need for manual JOIN statements.
Middleware support
Gorm offers middleware support, enabling you to add additional functionalities and behaviors during database operations. Middleware can be used for data validation, timestamp management, logging, and other tasks. This extensibility allows you to customize Gorm's behavior to suit specific project requirements and implement cross-cutting concerns effectively.
Cons of Gorm
Learning curve
Gorm's feature-rich nature and abstraction come with a learning curve. While Gorm simplifies database operations, understanding its concepts, conventions, and API may require an additional level of familiarization. In general, developers new to Gorm or ORM concepts may face a learning curve when attempting to leverage their capabilities thoroughly. However, the Gorm documentation and community resources can help mitigate this challenge.
Performance overhead
Like any ORM, Gorm introduces an additional abstraction layer between the application and the database. This abstraction can result in additional performance overhead compared to writing raw SQL queries. While Gorm's performance is generally acceptable for most applications, projects with highly performance-sensitive requirements or complex questions may benefit from using basic SQL queries instead.
Limited customization
Gorm's primary goal is to provide a simplified API for everyday database operations. While it offers various customization options, there may be cases in which more intricate and specialized database interactions are necessary. In such scenarios, Gorm's abstraction may limit the developer's ability to optimize or fine-tune queries, and developers may potentially require workarounds or direct SQL execution.
Database-specific features
While Gorm supports multiple databases, it may only expose certain advanced features specific to each database system. Database-specific functionalities, such as advanced indexing options or specialized query features, may not be directly accessible through Gorm’s API. In such cases, developers may need to resort to raw SQL or database-specific extensions to leverage these features.
Gorm offers significant advantages in simplifying database interactions; however, before adopting Gorm, you should carefully evaluate your project's requirements, consider the trade-offs, and assess whether Gorm's strengths align with your needs.
Now that you know what Go and Gorm are, as well as their pros, cons, and how to decide whether to use them, we can set up the development environment in the next section.
Environment and folder setup
In this section, we will set up the development environment for the blog API project.
Initialize project
The first step is to initialize a new Go project. Open a new terminal and run the following command to create a new folder. You can name it whatever you like; I'll call mine goblogart:
mkdir goblogart
Next, move into that folder with the following command:
cd goblogart
Then, initialize the new Go project with the go mod command:
go mod init goblogart
Create folders and main file
Run the following command to create all the folders that will hold the project files:
mkdir inits controllers middlewares migrations models
The command above will create five folders:
- inits - contains all the initializer files
- controllers - contains controller files that will handle route functions
- middlewares – contains middleware files
- migrations - contains migration files
- models - contains model files
Install libraries
In this section, you will install all the frameworks and libraries necessary for your project.
Run the following command to install the CompileDaemon package for automatic builds:
go get github.com/githubnemo/CompileDaemon
You’ll then need to install it using the go install command like so:
go install github.com/githubnemo/CompileDaemon
Once that's done, run the following command to install the godotenv package for securing your application's secrets:
go get github.com/joho/godotenv
Next, install the Gin framework with the following command:
go get -u github.com/gin-gonic/gin
Once Gin is installed, run the following command to install Gorm:
go get -u gorm.io/gorm
You'll need a database driver to work with Gorm. Run the following command to install a database driver that will be used to connect with your database:
go get -u gorm.io/driver/mysql
The command above will install a database driver for mysql, the database system that XAMPP provides. Visit the XAMPP Downloads Page to install XAMPP for your machine.
Note: You can use and install drivers for other database systems such as PostgreSQL and MySQL. Visit Gorm's Connecting to the Database page for specific instructions.
Once Gorm and the database driver are installed, run the following command to install the bcrypt package, which will be used to hash passwords:
go get -u golang.org/x/crypto/bcrypt
Next, run the following command to install the jwt-go package, which will be used to generate tokens and authenticate users:
go get -u github.com/golang-jwt/jwt/v5
Once that's done, create a main.go file in the root of your project and add the following code inside it:
package main

import "fmt"

func main() {
 fmt.Println("Hello, World!")
}
Next, you'll need to run the ComplileDaemon command so that the project builds automatically every time you save a file:
CompileDaemon -command="./goblogart"
Once this command is run, you should see a message that ends with a blinking cursor in the command line:

And that's it! You have installed the required libraries and frameworks for your project. Let's set up the database in the next section.
Note: After installing all the necessary frameworks and libraries and building your application, two files named
go.sum,goblogart.exe, andgoblogart.exe~will be automatically created in the root of your application. Do not delete these files because they are crucial for the application to work locally.
Database setup
In this section, you will learn how to connect your application to a database. First, you must store your application's credentials and secrets in a safe place.
Set up environment variables
Create two new files: a .env file in the root folder of your application and a envLoader.go file inside the inits folder.
You need to set a PORT variable—a port in which you can access your application. Add the following code inside the .env file:
PORT=3000
The PORT can be any port number available on your machine, and it must be defined in uppercase. Next, you must load the .env file when the project is initialized. Add the following code inside the envLoader.go file:
package inits

import (
 "log"

 "github.com/joho/godotenv"
)

func LoadEnv() {
 err := godotenv.Load()
 if err != nil {
  log.Fatal("Error loading .env file")
 }
}
Next, call the LoadEnv function and create a / route inside the main.go file. Replace the code inside the main.go file with the following:
package main

import (
 "goblogart/inits"

 "github.com/gin-gonic/gin"
)

func init() {

 inits.LoadEnv()
}

func main() {
 r := gin.Default()

 r.GET("/", func(c *gin.Context) {
  c.JSON(200, gin.H{
   "message": "Hello World!",
  })
 })

 r.Run()
}
Go to localhost:3000 in your browser, where you'll find the following:
{
"message": "Hello World!"
}
Note: The
initfunction will be called automatically and cannot have any parameters.
Create and connect database
Start the Apache and MySQL services on XAMPP. Go to localhost/phpmyadmin and click New on the sidebar. You should see a form like the one below; enter your preferred database name and click the Create button.

Next, add a database connection string DB_URL variable inside the .env file like so:
DB_URL="username:password@tcp(host)/databasename?charset=utf8mb4&parseTime=True&loc=Local"
Note: You will need to replace the
username,password,host, anddatabasenamewith the corresponding values in your database credentials.
Next, create a function that connects to the database using the DB_URL and returns an exported DB variable that can be used in other parts of the application. Create a new file, db.go inside the inits folder and add the following code inside it:
package inits

import (
 "os"

 "gorm.io/driver/mysql"

 "gorm.io/gorm"
)

var DB *gorm.DB

func DBInit() {
 dsn := os.Getenv("DB_URL")
 db, err := gorm.Open(mysql.Open(dsn), &gorm.Config{})
 if err != nil {
  panic("failed to connect database")
 }

 DB = db
}
Note: This connection function will not work for other database systems, such as Postgres. Visit the Connecting to a Database page on the Gorm documentation for instructions on setting up other types of databases.
Next, add the following code inside the init function inside the main.go file:
func init() {
// same as before...
 inits.DBInit()
}
Save all your files and ensure that there are no errors in the terminal before continuing to the next step.
Finally, open Postman and send a GET request to http://localhost:3000, and you should get the same response like this:
{
"message": "Hello World!"
}
That's it for the database connection. Let's set up the models and migrations in the next section.
Models and migrations
Now that the environment and database connection are all set, let's create the models and migrations, which are used to interact with the database from your code—you can create, delete, and update tables and columns with these models and migrations.
Create a postModel.go file inside your models folder and paste the following code inside it:
package models

import "gorm.io/gorm"

type Post struct {
 gorm.Model
 Title  string
 Body   string
 Likes  int
 Draft  bool
 Author string
}
The code above declares the file as a models package, imports the gorm package, and defines a Post struct with the fields Title, Body, Likes, Draft, and Author. This struct is recognized as a model with the gorm.Models line that precedes the fields.
Next, create a migrations.go file inside the migrations folder and add the following lines of code:
package main

import (
 "goblogart/inits"
 "goblogart/models"
)

func init() {
 inits.LoadEnv()
 inits.DBInit()
}

func main() {
 inits.DB.AutoMigrate(&models.Post{})
}
The code above declares the file as a main package, imports the inits and models packages, and uses the init function to run the LoadEnv and DBInit functions. Finally, it defines a main function that calls the AutoMigrate method on the DB variable with the Post model as an argument.
Finally, run the migrations with the terminal using the following command:
go run migrations/migrations.go
You should now have a posts table inside your database like so:

The Gorm library will automatically create the id, created_at, updated_at, and deleted_at columns for you.
Let's work on the create, read, update, and delete (CRUD) operations for posts in the next section.
Posts CRUD operations
Now that the models, migrations, and database tables are set, let's create the controller functions to create, read, update, and delete posts.
Create a postController function inside the controllers folder and add the following code:
package controllers

import (
 "goblogart/inits"
 "goblogart/models"
 "fmt"

 "github.com/gin-gonic/gin"
)
The code above declares the file as part of the controllers package and imports the required packages, inits, models, and gin.
The CreatePost function
The CreatePost function is responsible for adding a post to the database. Incorporate the following code to the postController file:
func CreatePost(ctx *gin.Context) {

 var body struct {
  Title  string
  Body   string
  Likes  int
  Draft  bool
  Author string
 }

 ctx.BindJSON(&body)

 post := models.Post{Title: body.Title, Body: body.Body, Likes: body.Likes, Draft: body.Draft, Author: body.Author}

 fmt.Println(post)
 result := inits.DB.Create(&post)
 if result.Error != nil {
  ctx.JSON(500, gin.H{"error": result.Error})
  return
 }

 ctx.JSON(200, gin.H{"data": post})

}
The code above defines a body struct that represents the request data, binds it to JSON, defines a post variable with type models.Post that binds body to the Post model, and defines a result variable that contains the result of the Create method on DB. It then checks if there are any error and returns them if there are any; if not, it returns a 200 response with the new post.
The GetPosts function
The GetPosts function is responsible for getting all posts from the database. Add the following code to the postController file:
func GetPosts(ctx *gin.Context) {

 var posts []models.Post

 result := inits.DB.Find(&posts)
 if result.Error != nil {
  ctx.JSON(500, gin.H{"error": result.Error})
  return
 }

 ctx.JSON(200, gin.H{"data": posts})

}
The code above defines a posts slice with a model.Post type, creates a result variable that uses the Find method on DB and stores the posts inside the posts slice, checks for errors, and returns a 200 response with the returned posts.
The GetPost function
The GetPost function is responsible for getting a single post with the id from the database. Add the following code to the postController file:
func GetPost(ctx *gin.Context) {

 var post models.Post

 result := inits.DB.First(&post, ctx.Param("id"))
 if result.Error != nil {
  ctx.JSON(500, gin.H{"error": result.Error})
  return
 }

 ctx.JSON(200, gin.H{"data": post})

}
The code above defines a post variable with the models.Post type, creates a result variable that uses the First method on DB with the given id and stores the post inside the post slice, checks for errors, and returns a 200 response with the returned post.
The UpdatePost function
The UpdatePost function is responsible for updating a post in the database. Add the following code to the postController file:
func UpdatePost(ctx *gin.Context) {

 var body struct {
  Title  string
  Body   string
  Likes  int
  Draft  bool
  Author string
 }

 ctx.BindJSON(&body)

 var post models.Post

 result := inits.DB.First(&post, ctx.Param("id"))
 if result.Error != nil {
  ctx.JSON(500, gin.H{"error": result.Error})
  return
 }

 inits.DB.Model(&post).Updates(models.Post{Title: body.Title, Body: body.Body, Likes: body.Likes, Draft: body.Draft, Author: body.Author})

 ctx.JSON(200, gin.H{"data": post})

}
The code above will define a body struct that represents the request data, bind it to JSON, define a post variable with type models.Post that binds body to the Post model, and define a result function that contains the result of the First method with the given id on the DB variable. It then checks if there are any errors and, if so, returns them; if not, it returns a 200 response with the updated post.
The DeletePost function
The DeletePost function is responsible for deleting a post from the database. Add the following code to the postController file:
func DeletePost(ctx *gin.Context) {

 id := ctx.Param("id")

 inits.DB.Delete(&models.Post{}, id)

 ctx.JSON(200, gin.H{"data": "post has been deleted successfully"})

}
The code above defines a variable, id, that extracts the id of the post from the URL, uses the Delete method with the models.Post type and the id on the DB variable, and returns a 200 response with a success message.
Routes setup
Now that the create, read, update, and delete functions for posts are in place, you may set up each function with its corresponding route in the main.go file.
The CreatePost route
To connect the CreatePost to a route, replace the code inside the main function of the main.go file with the following code:
 r := gin.Default()

 r.POST("/", controllers.CreatePost)

 r.Run()
The code above defines a variable, r, an engine instance of Gin defines a route for the CreatePost function in the postController file and uses the Run method to start the server. You also need to import the controllers package at the top of the main.go file like so:
import (
        // same as before...
 "goblogart/controllers"
)
And that's it! You can now test the route in Postman. Send a POST request to the localhost:3000/ with the following JSON data:
{
    "title":"How to use Type Hinting in PHP",
    "body":"Errors, also known as bugs, are developers' biggest nightmare. Bugs are so ubiquitous that everything you do after building a website or app involves finding and fixing them. What if there was a way to reduce the number of errors you must fix after pushing a project to production? In this article, I will explain everything you need to know about type-hinting in PHP, which will help you achieve this goal. We’ll begin by exploring what type-hinting in PHP is, and then I’ll show you how to start using it in your applications. However, before we begin, let's examine what you need to know to get the most out of this article.",
    "likes":0,
    "draft": true,
    "author": "Adebayo Adams"
}
The request should return a new post like so:
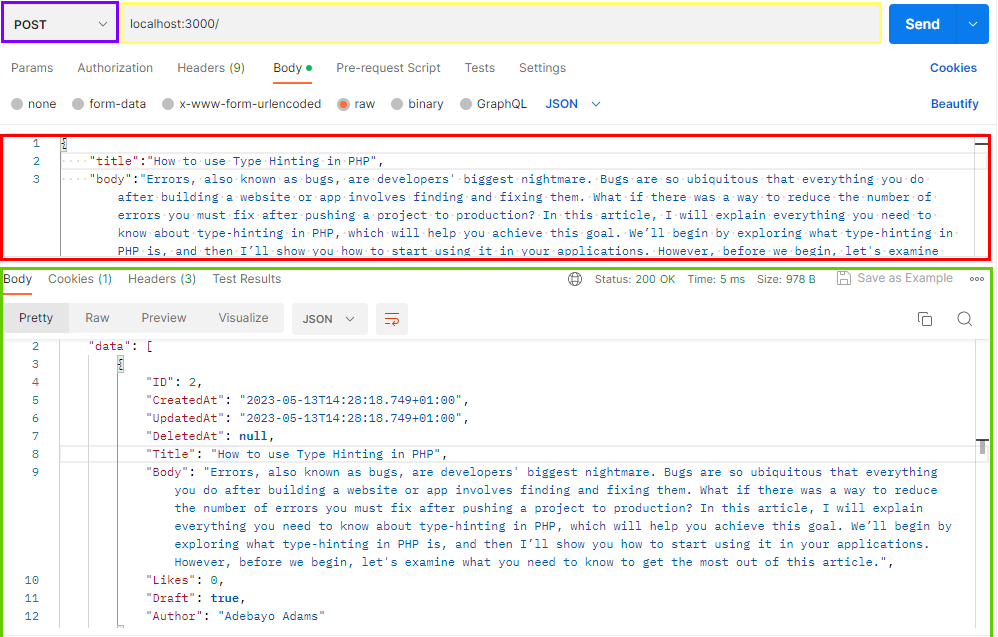
- The purple box - type of request.
- The yellow box - URL of the route.
- The red box - JSON data sent to the server.
- The green box - result from the server.
The GetPosts route
To connect the GetPosts to a route, add the following code below the previous route inside the main function of the main.go:
r.GET("/", controllers.GetPosts)
This request doesn't send any data to the server. Send a GET request to the localhost:3000/. You should get a response like this:
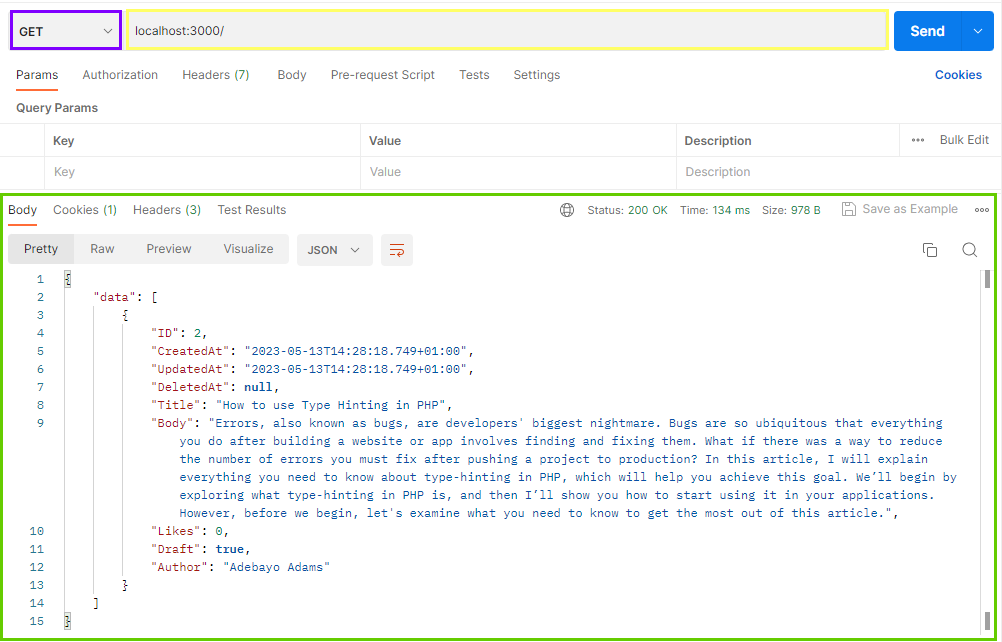
- The purple box - type of request
- The yellow box - URL of the route
- The green box - result from the server
The GetPost route
To connect the GetPost to a route, add the following code below the previous route inside the main function of the main.go:
r.GET("/:id", controllers.GetPost)
This request needs a post's id at the end of the URL to work correctly. Send a GET request to the localhost:3000/id and you should get a response like this:
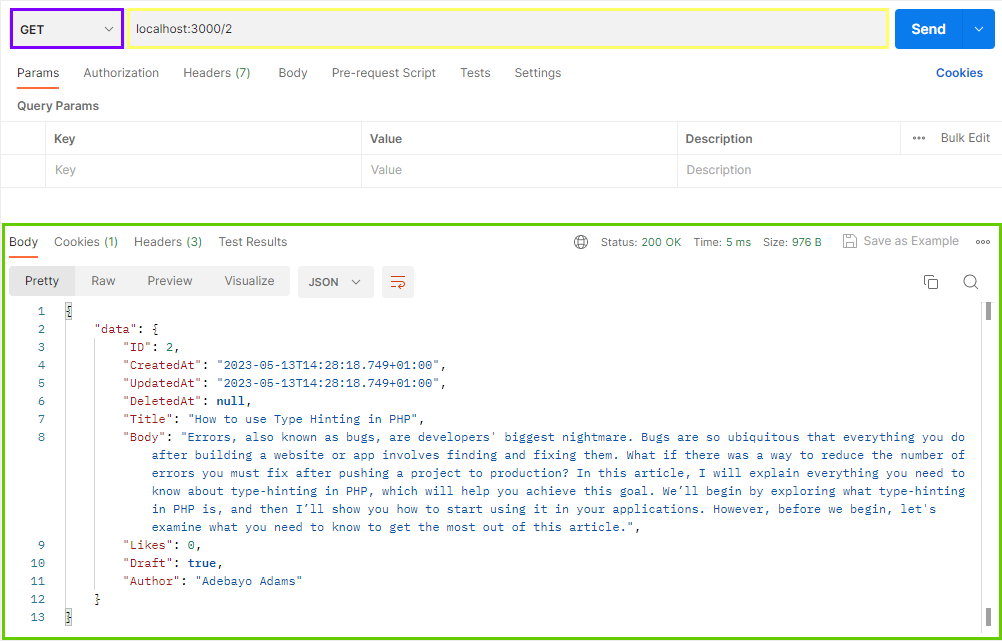
- The purple box - type of request
- The yellow box - URL of the route
- The green box - result from the server
The UpdatePost route
To connect the UpdatePost to a route, add the following code below the previous route inside the main function of the main.go:
r.PUT("/:id", controllers.UpdatePost)
To work correctly, this request needs both the post's id at the end of the URL and the data that requires updating. Send a PUT request with the field you want to update as JSON to the localhost:3000/id. You should get a response similar to this:
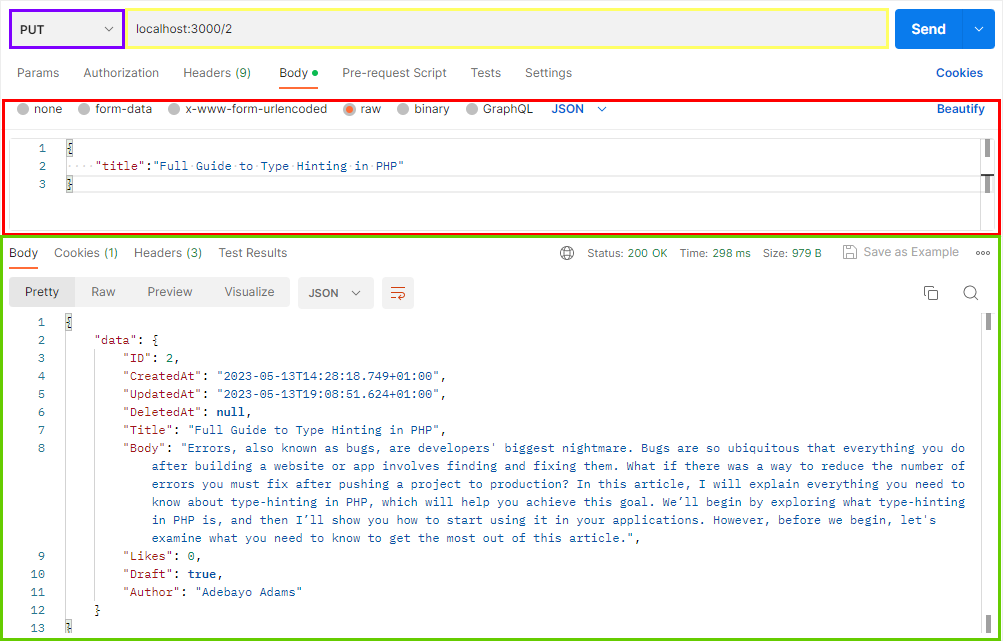
- The purple box - type of request.
- The yellow box - URL of the route
- The red box - JSON data sent to the server
- The green box - result from the server
The DeletePost route
To connect the DeletePost to a route, add the following code below the previous route inside the main function of the main.go:
r.DELETE("/:id", controllers.DeletePost)
This request needs a post's id at the end of the URL to work correctly. Send a DELETE request to the localhost:3000/2. You should get a response like this:
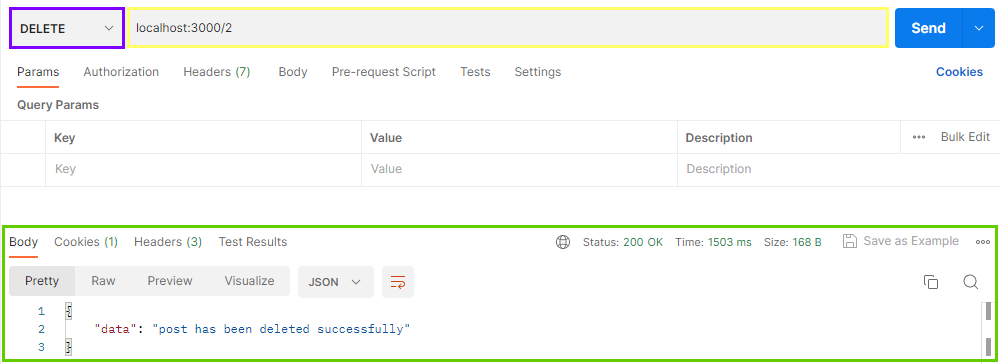
- The purple box - type of request.
- The yellow box - URL of the route.
- The green box - result from the server.
Now that the post's controller functions and routes are complete and working correctly, let's set up the user controller and authentication in the next section.
The User model, controller, and authentication
In this section, we will explore table relationships, user authentication with JWT, and middleware.
User table and the has-many relationship
Create a userModel.go file inside the models folder and add the following code:
package models

import "gorm.io/gorm"

type User struct {
 gorm.Model
 Name     string
 Email    string `gorm:"unique"`
 Password string
 Posts    []Post
}
The code above declares the file as a models package, imports the gorm package, and defines a User struct with the fields Name, Email, Password, and Posts. This struct is recognized as a model with the gorm.Models line preceding the fields.
The Posts field in the code above is the array that holds each user's posts. To connect this to the user, add a UserID field to the Post model like so:
// same as before...
type Post struct {
 gorm.Model
// same as before...
 UserID uint `gorm:"user_id"`
}
This new line of code will add a new user_id column to the posts table in the database. Next, introduce the following code to the body struct inside the postController's CreatePost function:
func CreatePost(ctx *gin.Context) {

 var body struct {
    // same as before...
UserID uint `json:"user_id"`
 }

// same as before...
}
Next, add the following code below the ctx.BindJSON(&body) line inside the CreatePost function:
func CreatePost(ctx *gin.Context) {
// same as before...
 user, exists := ctx.Get("user")

 if !exists {
  ctx.JSON(500, gin.H{"error": "user not found"})
  return
 }

 body.UserID = user.(models.User).ID

// same as before...
}
Next, update the post variable inside the function to look like this:
post := models.Post{Title: body.Title, Body: body.Body, Likes: body.Likes, Draft: body.Draft, Author: body.Author, UserID: body.UserID}
These additions will enable the function to get the logged in user ID and attach it to the new post.
Next, add the new User model to the migrations file as follows:
func main() {
// same as before...
inits.DB.AutoMigrate(&models.User{})
}
Afterwards, run the migrations to update your database with the following command:
go run migrations/migrations.go
You should see a new users table in your database, and the posts table should now have a user_id column. The Post model and the User model are now connected with the has many relationship, which means a user can have as many posts as possible.
Note: The posts in the database before the relationship have the value of
NULLin theiruser_idcolumns.
User Signup function
Create a userController file inside the controllers folder and add the following code:
package controllers

import (
 "goblogart/inits"
 "goblogart/models"

 "github.com/gin-gonic/gin"
 "golang.org/x/crypto/bcrypt"
)
The code above declares the file as part of the controllers package and imports the init, models, gin, and bcrypt packages.
Next, add the following lines of code to the file to create the Signup function for users:
func Signup(ctx *gin.Context) {
 var body struct {
  Name     string
  Email    string
  Password string
 }

 if ctx.BindJSON(&body) != nil {
  ctx.JSON(400, gin.H{"error": "bad request"})
  return
 }

 hash, err := bcrypt.GenerateFromPassword([]byte(body.Password), 10)

 if err != nil {
  ctx.JSON(500, gin.H{"error": err})
  return
 }

 user := models.User{Name: body.Name, Email: body.Email, Password: string(hash)}

 result := inits.DB.Create(&user)

 if result.Error != nil {
  ctx.JSON(500, gin.H{"error": result.Error})
  return
 }

 ctx.JSON(200, gin.H{"data": user})

}
The code above validates the request data, hashes the password, binds the data to the user variable, adds the user to the database, and returns the new user data.
User Login function
The Login function validates users and generate authorization cookies.
Add a SECRET variable inside the .env folder like so:
SECRET="FGNMfvbnmVBNM23456789$%^&*(*&^%$%^&*&^%$%^&^%$%^&^%$#)"
The SECRET key will be used to encode and decode the token generated after logging in.
Note: The
SECRETvalue can be any value that cannot be guessed easily.
Next, add the following code below the Signup function:
func Login(ctx *gin.Context) {
 var body struct {
  Email    string
  Password string
 }

 if ctx.BindJSON(&body) != nil {
  ctx.JSON(400, gin.H{"error": "bad request"})
  return
 }

 var user models.User

 result := inits.DB.Where("email = ?", body.Email).First(&user)

 if result.Error != nil {
  ctx.JSON(500, gin.H{"error": "User not found"})
  return
 }

 err := bcrypt.CompareHashAndPassword([]byte(user.Password), []byte(body.Password))

 if err != nil {
  ctx.JSON(401, gin.H{"error": "unauthorized"})
  return
 }

 // generate jwt token
 token := jwt.NewWithClaims(jwt.SigningMethodHS256, jwt.MapClaims{
  "id":  user.ID,
  "exp": time.Now().Add(time.Hour * 24 * 30).Unix(),
 })

 tokenString, err := token.SignedString([]byte(os.Getenv("SECRET")))

 if err != nil {
  ctx.JSON(500, gin.H{"error": "error signing token"})
  return
 }

 ctx.SetSameSite(http.SameSiteLaxMode)
 ctx.SetCookie("Authorization", tokenString, 3600*24*30, "", "localhost", false, true)
}
The code above will validate the user by finding the user in the database with the email, hashing and comparing the password, generating a jwt token, and setting a cookie that expires in 30 days.
The GetUsers function
The GetUsers function returns all the users and their posts from the database. Add the following code to the Login function:
func GetUsers(ctx *gin.Context) {
 var users []models.User

 err := inits.DB.Model(&models.User{}).Preload("Posts").Find(&users).Error

 if err != nil {
  fmt.Println(err)
  ctx.JSON(500, gin.H{"error": "error getting users"})
  return
 }

 ctx.JSON(200, gin.H{"data": users})

}
The code above will get all the users and their posts from the database.
User validation middleware
After generating the token to be used for authorization, create a validate function that will be used to validate the token and expiration. Add the following code below the GetUsers function:
func Validate(ctx *gin.Context) {
 user, err := ctx.Get("user")
 if err != false {
  ctx.JSON(500, gin.H{"error": err})
  return
 }
 ctx.JSON(200, gin.H{"data": "You are logged in!", "user": user})
}
The code above will use the middleware you’ll create next to authenticate the user. Create an authMiddleware.go file inside the middlewares folder and add the following code to it:
package middlewares

import (
 "fmt"
 "goblogart/inits"
 "goblogart/models"
 "net/http"
 "os"
 "time"

 "github.com/gin-gonic/gin"
 "github.com/golang-jwt/jwt/v5"
)

func RequireAuth(ctx *gin.Context) {
 tokenString, err := ctx.Cookie("Authorization")

 if err != nil {
  ctx.JSON(401, gin.H{"error": "unauthorized"})
  ctx.AbortWithStatus(http.StatusUnauthorized)
  return
 }
 token, err := jwt.Parse(tokenString, func(token *jwt.Token) (interface{}, error) {
  if _, ok := token.Method.(*jwt.SigningMethodHMAC); !ok {
   return nil, fmt.Errorf("Unexpected signing method: %v", token.Header["alg"])
  }

  return []byte(os.Getenv("SECRET")), nil
 })

 if claims, ok := token.Claims.(jwt.MapClaims); ok && token.Valid {
  if float64(time.Now().Unix()) > claims["exp"].(float64) {
   ctx.JSON(401, gin.H{"error": "unauthorized"})
   ctx.AbortWithStatus(http.StatusUnauthorized)
   return
  }

  var user models.User
  inits.DB.First(&user, int(claims["id"].(float64)))
  if user.ID == 0 {
   ctx.JSON(401, gin.H{"error": "unauthorized"})
   ctx.AbortWithStatus(http.StatusUnauthorized)
   return
  }

  ctx.Set("user", user)
  fmt.Println(claims["foo"], claims["nbf"])
 } else {
  ctx.AbortWithStatus(http.StatusUnauthorized)
 }
 ctx.Next()
}
The code above will get the cookie from the request, decode and validate it, check if it is still valid, find the user in the database, and set the user variable.
The Logout function
The Logout function returns all the users and their posts from the database. Add the following code to the useController file below the Validate function:
func Logout(ctx *gin.Context) {
 ctx.SetSameSite(http.SameSiteLaxMode)
 ctx.SetCookie("Authorization", "", -1, "", "localhost", false, true)
 ctx.JSON(200, gin.H{"data": "You are logged out!"})
}
The code above will delete the cookie used by the logged-in user and return a message.
User routes
Now that the user controller and middleware functions are done let's connect each of them to a route and test them.
The Signup route
Add the following code to the main.go file below the posts' routes:
r.POST("/user", controllers.Signup)
Send a POST request to locahost:3000/users with the following JSON data:
{
    "name": "Adams Adebayo",
    "email":"adea@ml.com",
    "password": "12345"
}
You should get a response that looks like this:
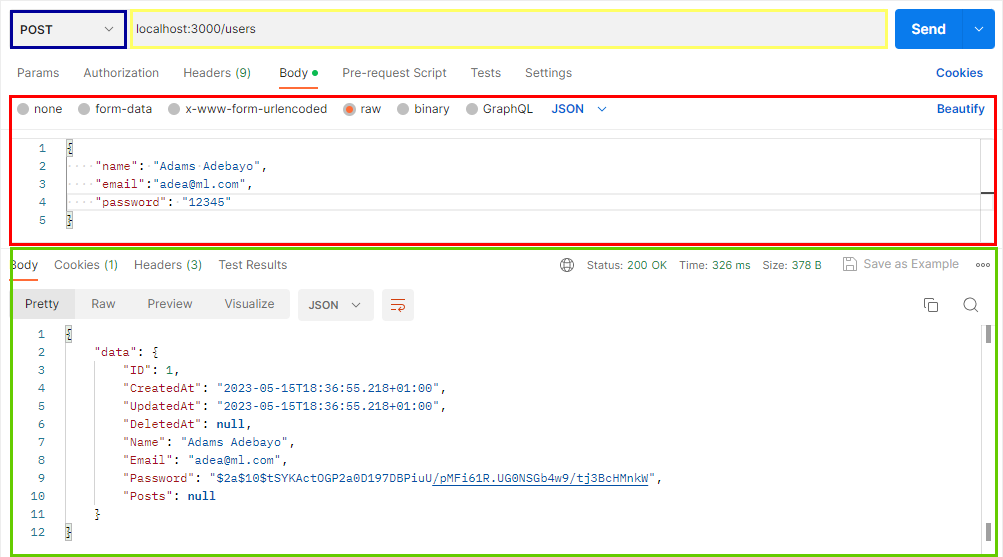
- The purple box - type of request
- The yellow box - URL of the route
- The red box - JSON data sent to the server
- The green box - result from the server
The Login route
Add the following code to the main.go file below the previous route:
r.POST("/login", controllers.Login)
Send a POST request to locahost:3000/users with the following JSON data:
{
    "email":"adea@ml.com",
    "password": "12345"
}
You should get the result with a cookie:
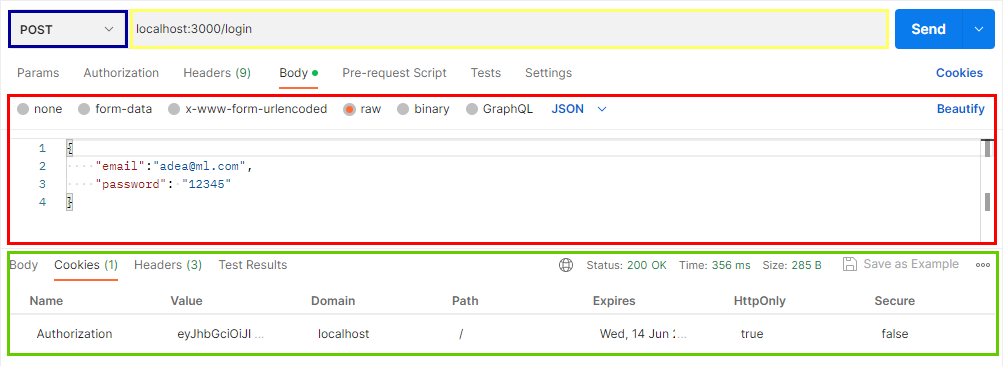
- The purple box - type of request
- The yellow box - URL of the route
- The red box - JSON data sent to the server
- The green box - result from the server
The Validate route
Add the following code to the main.go file below the previous route:
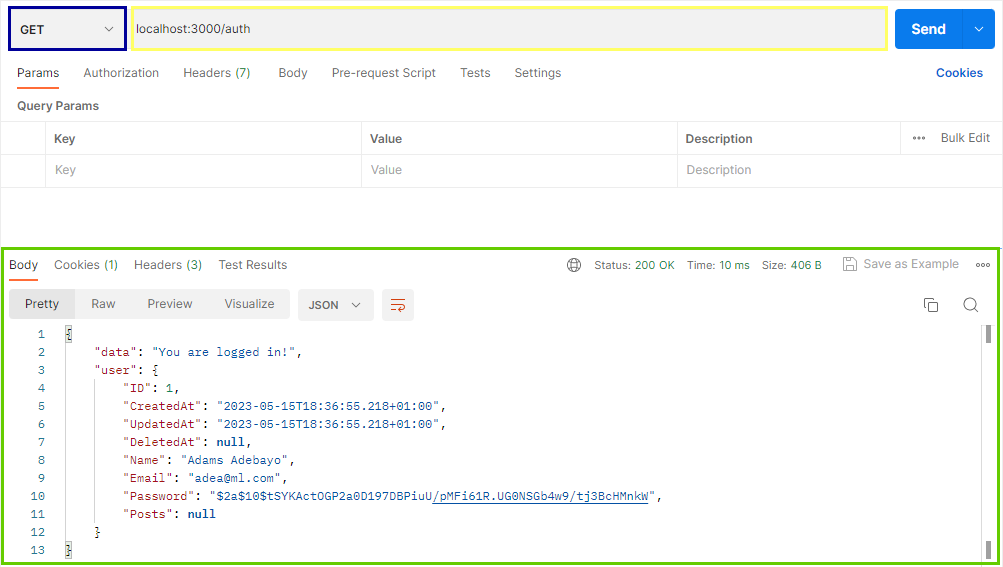
r.POST("/auth", controllers.Validate)
This request doesn't send any data to the server. Send a GET request to locahost:3000/auth and you should receive a response that looks like this:
The GetUsers route
Add the following code to the main.go file below the previous route:
r.GET("/users", controllers.GetUsers)
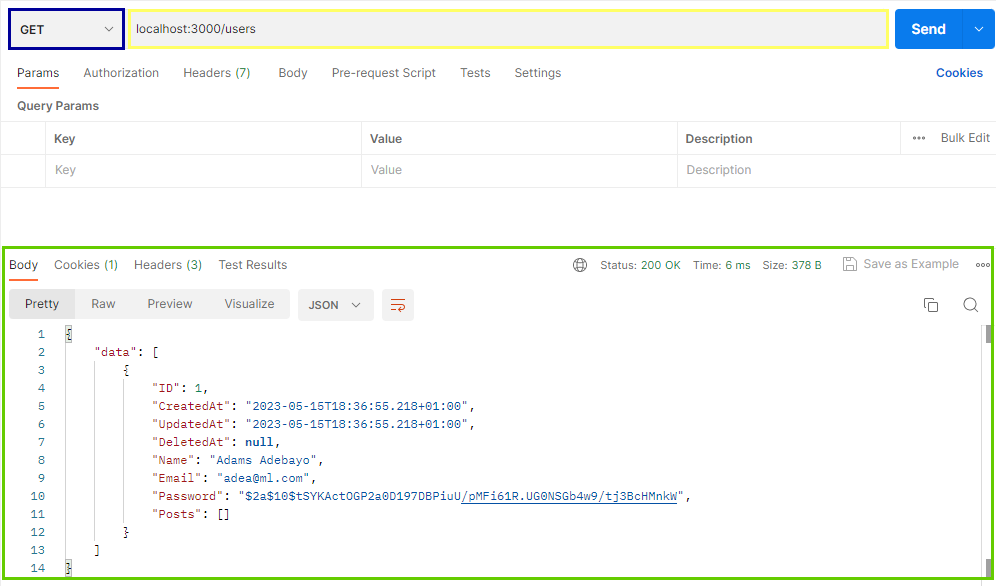
This request doesn't send any data to the server. Send a GET request to locahost:3000/users, and you should get a response that looks like this:
The Logout route
Add the following code to the main.go file below the previous route:
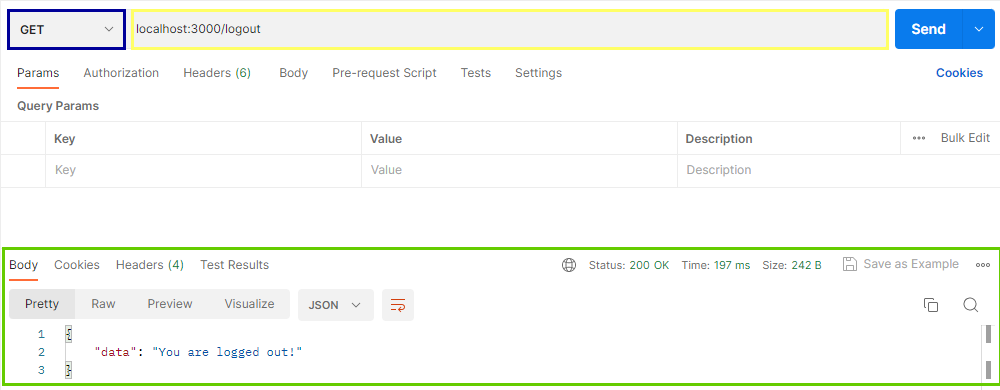
r.GET("/logout", controllers.Logout)
This request doesn't send any data to the server. Send a GET request to locahost:3000/logout and you should obtain a response that is similar to this:
Relationship test
Now that all the user functions and authentications are working, let's test the has many relationships. Edit the CreatePost route in the main.go file to look like this:
r.POST("/", middlewares.RequireAuth, controllers.CreatePost)
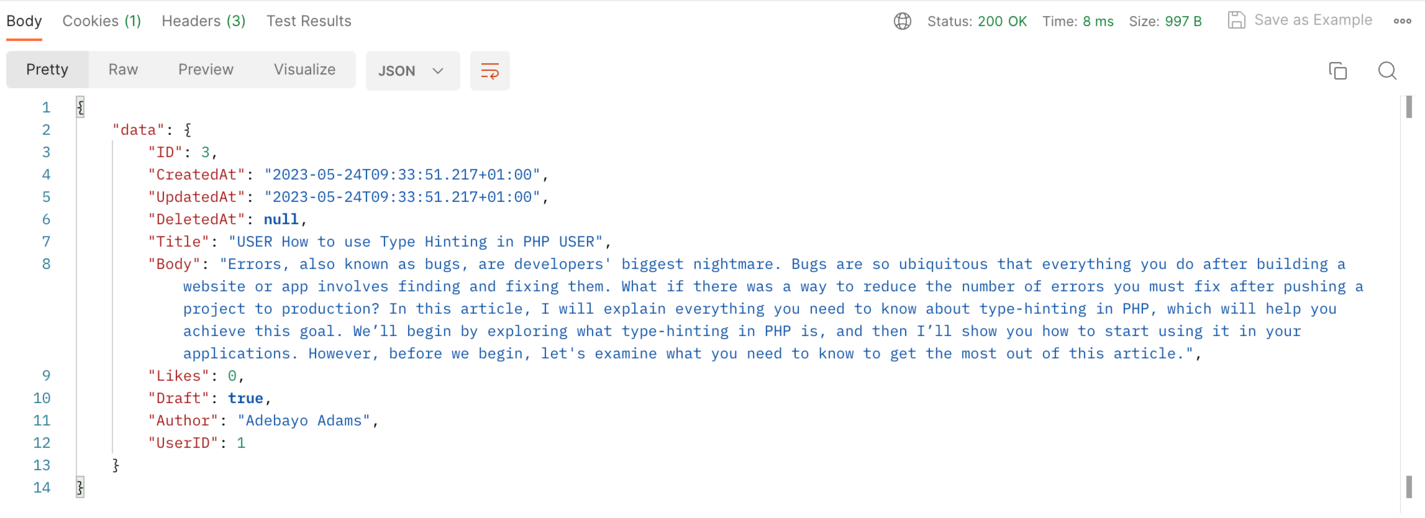
Next, log in with the user you created earlier, validate it with the /auth route, and create a post. You should get a response that looks like this:
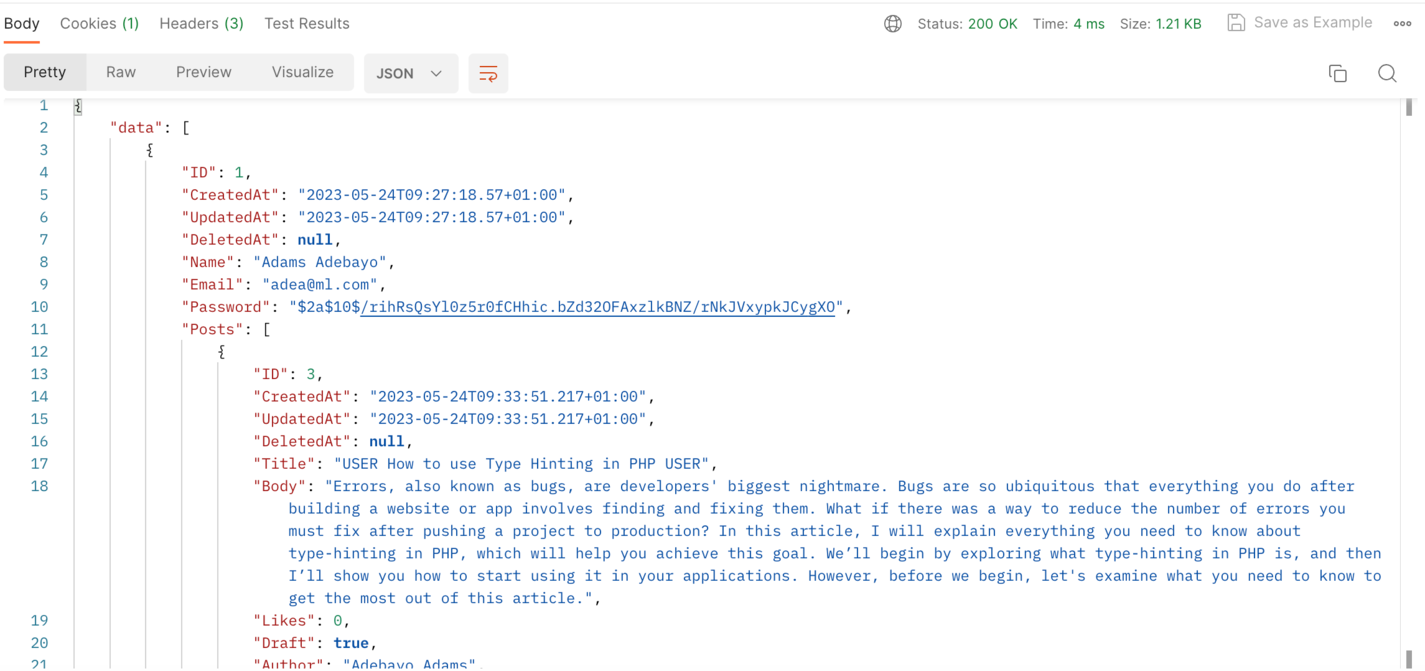
You should now have a post with the logged-in user ID as the user_id field in the database. The GetUsers route should now return all users with their posts:
Conclusion
And that's it! You have just built a working CRUD API with Gin and Gorm. You have learned the pros and cons of Go, Gin, and Gorm; why you should use them; how to set up a proper development environment; and how to use Go, Gin, Gorm, JWT, and Bcrypt to create a CRUD API. You've also explored how to deal with models, migrations, controllers, table relationships, etc.
Thank you so much for reading. Happy coding!

Written by
Adebayo AdamsBeing a self taught developer himself, Adams understands that consistent learning and doing is the way to become self sufficient as a software developer. He loves learning new things and firmly believes that learning never stops.