A Starlette middleware guide for FastAPI and Python developers
Most web applications start clean with a handful of route handlers, each focused on a single business logic. As the app moves to production, the audit team wants every request logged, and the security team wants API key validation on all routes. As the app grows, we might introduce rate limiting, CORS for a new frontend, and a request ID for distributed tracing. If we keep adding these functionalities to every route handler, each handler will end up with duplicate infrastructure code wrapped around the actual business logic. This will make it difficult to maintain and debug the application if any issues occur.
Middlewares help us avoid this mess by implementing functionalities in composable layers that wrap the entire application, rather than duplicating code in every route handler. This article discusses what middlewares are, how to configure built-in Starlette middlewares in FastAPI/Starlette applications, and how to build custom middlewares for cases the built-in middlewares do not cover. The article also discusses middleware execution order when using multiple middlewares to help you get a clear understanding of how middlewares execute during request and response processing.
Let’s discuss how to build middlewares in Starlette/FastAPI web applications, starting with the fundamentals of middlewares.
What is middleware in a web application?
A middleware in a web application is a software component that sits between the ASGI server and the application endpoints, processing requests and responses. It applies functionalities such as authentication, logging, and monitoring to every route handler in the web application.
- When a web application receives a request, the middleware intercepts it, inspects it, and modifies it if required before passing it to the route handler or to the next middleware if there are more than one middlewares.
- When a route handler returns a response, the middleware intercepts it, inspects it, and modifies it if required before the application sends it back to the ASGI server.
To understand this, consider the following diagram:
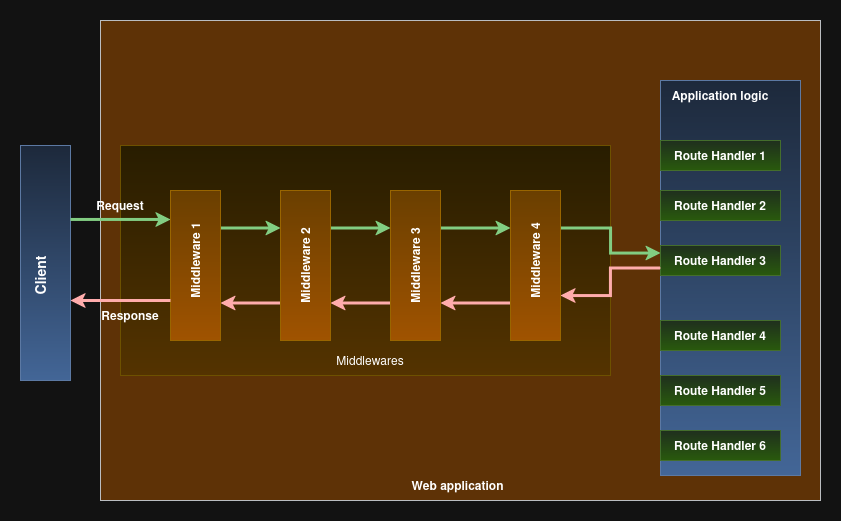
In this diagram, the web application has four middlewares:
- Middleware 1 can filter requests based on whether they originate from allowed sources.
- Middleware 2 can filter out non-HTTPS requests.
- Middleware 3 can perform authentication.
- Middleware 4 can calculate the time taken to process a request, among other functionalities.
Despite the different purposes of the middlewares, each request and response passes through all of them.
You can think of middlewares as a pipeline of software components that implement a functionality that applies globally across all the route handlers of a web application, rather than to individual route handlers. Without middlewares, we would repeat the logic in every route handler if it needs to be applied to every request and response. Middlewares are also one of the primary places to implement cross-cutting observability. Since every request passes through them, they're well suited for recording request timing, capturing errors, enriching logs with request context, and forwarding telemetry to monitoring tools such as Honeybadger.
What is a Starlette middleware?
Starlette middleware is an intermediate processing layer between ASGI servers -- such as uvicorn -- and the application's route handler. Starlette middlewares intercept incoming requests to the Starlette or FastAPI application before they reach the route handler, and process the outgoing responses before they are returned to the server. Given that Starlette is an Asynchronous Server Gateway Interface (ASGI) framework, Starlette middlewares also support asynchronous request handling.
Starlette provides several built-in middlewares, including CORSMiddleware, SessionMiddleware, TrustedHostMiddleware, HTTPSRedirectMiddleware, and GZipMiddleware. We can also create custom middlewares for Starlette/FastAPI applications using the BaseHTTPMiddleware class from the starlette package. Additionally, we can implement pure ASGI middlewares by writing an ASGI application that accepts the scope, receive, and send parameters of the web application.
Before starting with middleware implementations, let’s discuss the built-in Starlette middlewares, including their syntax and functionality.
Built-in Starlette middlewares
We will discuss five built-in Starlette middlewares, i.e., CORSMiddleware, SessionMiddleware, HTTPSRedirectMiddleware, TrustedHostMiddleware, and GZipMiddleware, starting with CORSMiddleware.
CORSMiddleware
Browsers enforce the same-origin policy. A page loaded from one network endpoint isn’t allowed to make fetch requests to another network endpoint, unless the server explicitly permits it. CORSMiddleware handles this issue by intercepting every incoming request and adding appropriate access-control response headers. We can configure a CORSMiddleware in Starlette as follows:
from starlette.middleware import Middleware
from starlette.middleware.cors import CORSMiddleware

cors_middleware = Middleware(CORSMiddleware,
                             allow_origins=["*"],
                             allow_methods=["GET", "POST"],
                             allow_headers=["Content-Type", "X-API-Key"],
                             expose_headers=["X-Request-ID"],
                             allow_credentials=False,
                             max_age=3600)
In the above middleware definition:
- The
allow_originsparameter accepts a list of origin strings that are permitted to make cross-origin requests. To allow cross-origin requests for all the origins, you can pass the list['*']as input to theallow_originsparameter. - The
allow_credentialsparameter, when set toTrue, permits the browser to include cookies and authorization headers in cross-origin requests. If it is set to True,allow_origins,allow_methods, andallow_headerscannot be set to[*]. - The
allow_methodsparameter takes a list of methods the browser is allowed to use in cross-origin requests. By default, it is set to["GET"]. - The
allow_headersparameter defines the request headers the browser is allowed to include. Althoughallow_headersdefaults to[], 'Accept', 'Accept-Language', 'Content-Language', and 'Content-Type' headers are always allowed for CORS requests. - The
expose_headersparameter defines the response headers the browser is allowed to read from cross-origin responses via JavaScript. It also defaults to[]. However, browsers expose a set of safe headers like 'Cache-Control', 'Content-Language', 'Content-Length', 'Content-Type', 'Expires', 'Last-Modified', and 'Pragma' by default. - The
max_ageparameter specifies the maximum time in seconds that the browser can cache CORS responses. It defaults to 600 seconds.
SessionMiddleware
SessionMiddleware adds signed cookie-based session support to a Starlette or FastAPI application. When we add SessionMiddleware to a Starlette/FastAPI application, a request.session dictionary becomes available to every route handler. At the end of each request, Starlette serializes the session dictionary to JSON, Base64-encodes the result, signs it with a secret key, and writes the signed object in the session cookie. On the next request, the middleware reads the cookie, verifies the signature, Base64-decodes it, and deserializes the payload back into the request.session object. You can configure SessionMiddleware in Starlette as follows:
from starlette.middleware import Middleware
from starlette.middleware.sessions import SessionMiddleware

session_middleware = Middleware(SessionMiddleware,
                                secret_key="honeybadger-secret-key",
                                session_cookie="calculator_session",
                                max_age=3600,
                                https_only=True,
                                same_site="lax")
In the above middleware definition:
- The
secret_keyparameter takes the HMAC signing key as its input. Rotating the key invalidates all existing sessions and logs out all active users. - The
session_cookieparameter takes the name of the cookie written to the client. It defaults to "session". - The
max_ageparameter specifies the cookie's lifetime in seconds, with a default of 14 days. - The
same_siteparameter controls when the browser sends cookies in cross-site contexts. When set to the default value "lax", the browser sends the cookie on top-level navigations but not on cross-site sub-requests. When set to "strict", the browser never sends the cookie cross-site. When we set thesame_siteparameter to "none", the browser always sends the cookie, but it requires thehttps_onlyparameter to be set to True. - The
https_onlyparameter sets the cookie'sSecureflag. When set to True, it restricts the cookie transmission to only HTTPS connections.
The session data lives in the cookie, which is signed but not encrypted. Hence, you shouldn't store any secrets in the request.session object. Also, the cookie sizes are limited to 4096 bytes. Hence, you should use it only for state variables like user ID, CSRF token, preference flag, and OAuth state parameter.
HTTPSRedirectMiddleware
The HTTPSRedirectMiddleware enforces HTTPS by automatically redirecting all incoming HTTP requests to their HTTPS equivalents, ensuring that communication with the Starlette/FastAPI application is encrypted. It inspects the scope['scheme'] attribute of every incoming request and responds with a 307 Temporary Redirect to the equivalent https or wss URL for every HTTP or ws request. We can configure HTTPSRedirectMiddleware in Starlette as follows:
from starlette.middleware import Middleware
from starlette.middleware.httpsredirect import HTTPSRedirectMiddleware

https_middleware = Middleware(HTTPSRedirectMiddleware)
The HTTPSRedirectMiddleware takes no configuration parameter. It redirects every plaintext request and lets the encrypted requests pass through unchanged. In terms of position, the HTTPSRedirectMiddleware should stay in the outermost layers of the middleware stack.
TrustedHostMiddleware
TrustedHostMiddleware enforces a list of allowed hostnames, protecting the web application against HTTP Host header attacks. TrustedHostMiddleware reads the host header from every incoming request and compares it against an allowed list of hosts. Requests with a host not on the allowed list receive a 400 Bad Request response and do not proceed further. We can configure TrustedHostMiddleware in Starlette as follows:
from starlette.middleware import Middleware
from starlette.middleware.trustedhost import TrustedHostMiddleware

trusted_host_middleware = Middleware(TrustedHostMiddleware,
                                     allowed_hosts=["calculator.honeybadger.io",
                                                    "*.honeybadger.io",
                                                    "localhost",
                                                    "127.0.0.1"],
                                     www_redirect=True)
In this definition:
- The
allowed_hostsparameter takes a list of exact domain names or*prefixed wildcard domains. The hostname matching is performed on exact values by default, while the matching subdomains are supported via the*prefix. If you pass a list with single*i.e.["*"]to theallowed_hostsparameter, it allows all the hosts, effectively disabling the protection provided by TrustedHostMiddleware. - The
www_redirectparameter redirects the requests from hostmyapp.comtowww.myapp.comif onlywww.myapp.comis present in theallowed_hostslist.
The TrustedHostMiddleware also resides at the outermost layers of the middleware stack so that requests from invalid domain names are rejected before any other layer processes them.
GZipMiddleware
GZipMiddleware handles response compression by compressing the response body with the GZip algorithm whenever the client advertises support through the Accept-Encoding: gzip header. Depending on the content, GZip compression can reduce the size of JSON and HTML responses significantly, resulting in lower latency and reduced bandwidth consumption. We can configure GZipMiddleware in Starlette as follows:
from starlette.middleware import Middleware
from starlette.middleware.gzip import GZipMiddleware

gzip_middleware = Middleware(GZipMiddleware,
                             minimum_size=1024,
                             compresslevel=6)
In this definition:
- The
minimum_sizeparameter defines the lower limit of response size in bytes to be Gzipped. Response bodies smaller thanminimum_sizebytes aren't compressed. - The
compresslevelparameter controls the speed and ratio of compression and takes integers ranging from 1 to 9 as its input. Level 1 performs faster compression, while level 9 compresses more aggressively but with slower compression. For most API responses, level 6 provides the right balance between compression and time.
If the client supports GZip encoding and the response body exceeds minimum_size, GZipMiddleware replaces the response body with a compressed version and adds Content-Encoding: gzip to the response headers. It also adds Vary: Accept-Encoding to the header so that caching proxies store separate compressed and uncompressed copies keyed by the client's Accept-Encoding.
Apart from built-in Starlette middlewares, we can also define custom middlewares in our Starlette or FastAPI applications. Let's discuss custom middleware implementation using different approaches.
Implementing custom Starlette middlewares
We can use two approaches to implement custom Starlette middlewares, i.e., pure ASGI middlewares and middlewares based on the BaseHTTPMiddleware class. Let's discuss each approach individually.
Pure ASGI middleware
An ASGI app is defined by three core arguments, i.e., scope, receive, and send, which form the communication interface between an ASGI server (such as uvicorn) and a Starlette/FastAPI application.
scopecontains a dictionary that has connection metadata such as connection type, HTTP method, URL path, query parameters, protocol details, headers, client information, and server information.receiveis an async callable used by the Starlette/FastAPI app to receive events or messages from the ASGI server.sendis an async callable used to send events or messages back to the ASGI server.
We can use these core components to build pure ASGI middlewares for a Starlette or FastAPI application. To do this, we can define a class with __init__ and __call__ methods with the following specifications:
- The
__init__method takes anappparameter as its input and assigns it to theappattribute of the class object. Here,appis the next ASGI callable in the chain, which can be another middleware or the Starlette/FastAPI application itself. Any additional configuration parameters required by the middleware are also passed to__init__. - The
__call__method takes scope, receive, and send as its input. In this method, we define asend_wrapperclosure that intercepts each outgoing message before forwarding it tosend. If we need to modify the request body, we buffer it viareceive, then supply areceive_wrapperthat replays the modified body downstream. - To modify the response, we define a
send_wrapperclosure that intercepts each outgoing message before forwarding it to the realsend. - Finally, we invoke the execution chain using the call
await self.app(scope, receive, send_wrapper)orawait self.app(scope, receive_wrapper, send)orapp(scope, receive_wrapper, send_wrapper)based on whether we are modifying the responses, the requests, or both.
The CustomMiddleware class in the following example shows how to define a pure ASGI middleware that processes requests for connection type "http" and lets the requests with "websocket" and "lifespan" connection types go untouched:
class CustomMiddleware:
    def __init__(self, app):
        self.app = app

    async def __call__(self, scope, receive, send):
        if scope["type"] == "http":
            # We can access scope["method"], scope["path"], scope["headers"] here.

            # Buffer the incoming request body.
            body = b""
            more_body = True
            while more_body:
                message = await receive()
                body += message.get("body", b"")
                more_body = message.get("more_body", False)

            # ... inspect or modify `body` here ...
            # e.g. new_body = body.replace(b"x", b"y")
            new_body = body

            # Build receive_wrapper to replay the request body downstream,
            # since the original `receive` has already been drained above.
            async def receive_wrapper():
                return {
                    "type": "http.request",
                    "body": new_body,
                    "more_body": False,
                }

            # send_wrapper: intercept each outgoing message before forwarding.
            async def send_wrapper(message):
                if message["type"] == "http.response.start":
                    # We can modify message["status"] and message["headers"] here.
                    pass
                elif message["type"] == "http.response.body":
                    # We can modify message["body"] here.
                    pass
                await send(message)

            await self.app(scope, receive_wrapper, send_wrapper)
            return

        await self.app(scope, receive, send)
To better understand this code, let's build a pure ASGI middleware that calculates the time taken to process a request and appends it to the response headers. To do this, we will define a TimingMiddleware class as follows:
import time

class TimingMiddleware:
    def __init__(self, app):
        self.app = app

    async def __call__(self, scope, receive, send):
        if scope["type"] == "http":
            # Record start time
            start = time.perf_counter()

            async def send_wrapper(message):
                if message["type"] == "http.response.start":
                    # Calculate duration
                    duration = time.perf_counter() - start
                    # Append the duration to response header
                    message["headers"].append(
                        (b"X-Process-Time", f"{duration:.4f}s".encode())
                    )
                await send(message)

            await self.app(scope, receive, send_wrapper)
            return
        await self.app(scope, receive, send)
In this code:
- We first defined the
__init__method that takes anappparameter as its input and assigns it to theappattribute of the middleware. - Next, we defined the
__call__method that first filters the "http" type connection and records the start time. - Inside the if block in the
__call__method, we defined asend_wrapperclosure that intercepts the message returned by the app, calculates the duration, adds the duration as a header in the message, and passes the message tosend. - Finally, we call the app using the
self.appattribute of the middleware by passingscope,receive, andsend_wrapper. - For requests other than "http" type, the
__call__method callsself.appdirectly usingscope,receive, andsend, as we don't want to process those requests. - We haven't buffered the request body or defined
receive_wrapper, as we don't want to modify the request body.
Using low-level ASGI attributes like scope, receive, and send to define custom middlewares is tedious. Instead, we can use the BaseHTTPMiddleware class defined in the starlette.middleware.base module to build custom Starlette middlewares for simple tasks like inspecting the request body or modifying the response header and status.
Custom middlewares using BaseHTTPMiddleware
In cases where we only want to inspect the request and modify only the response status/headers, BaseHTTPMiddleware middleware helps us implement custom middlewares without much complexity. To implement a middleware using BaseHTTPMiddleware, we just need to inherit the BaseHTTPMiddleware class and implement a dispatch() method for processing requests and responses.
- The
dispatch()method should take the request and an awaitable objectcall_nextas its input.call_nextis similar toself.app()in the pure ASGI version, which runs the rest of the middleware stack and the endpoint, and returns a response. - We can inspect the request before calling
call_next. - After execution,
call_nextreturns the response of the web application for a given request. We can modify the response status or headers if required and return it to the ASGI server.
We can define a CustomMiddleware class by inheriting BaseHTTPMiddleware and implementing the dispatch() method as follows:
from starlette.middleware.base import BaseHTTPMiddleware
from starlette.requests import Request


class CustomMiddleware(BaseHTTPMiddleware):
    async def dispatch(self, request: Request, call_next):
        # Here, we can inspect the request using request.method, request.url, request.headers, request.state, etc.
        response = await call_next(request)
        # Here, we can modify the response status and headers using response.status_code, response.headers, etc.
        return response
Using the above specification, we can define the TimingMiddleware class using BaseHTTPMiddleware as follows:
import time
from starlette.middleware.base import BaseHTTPMiddleware
from starlette.requests import Request


class TimingMiddleware(BaseHTTPMiddleware):
    async def dispatch(self, request: Request, call_next):
        # Capture start time
        start_time = time.perf_counter()
        response = await call_next(request)
        # Calculate duration
        duration = time.perf_counter() - start_time
        # Add duration to response header
        response.headers["X-Process-Time"] = f"{duration:.4f}s"
        return response
In this code, we record the start time and wait for the call_next() function to return the response for the request. After receiving the response, we calculate the time taken to generate the response, add it as a header to the response, and return the response. The client application can see the x-process-time header in the response header.
Both approaches to create custom Starlette middlewares have their own advantages and disadvantages. For instance, middlewares created using BaseHTTPMiddleware only process requests with scope type "http". They do not work on WebSocket connections. However, BaseHTTPMiddleware is sufficient for tasks like logging, authentication, rate limiting, and request-ID injection. On the contrary, pure ASGI middlewares are useful for applications that must intercept WebSocket traffic, preserve streaming, share context variables, or operate in high-throughput environments. Pure ASGI middlewares are also the preferred choice when you want to modify the request or response body.
Now that we have a basic understanding of what middlewares are and how to define them, let’s discuss how to add middlewares to a Starlette application to see them in action.
How to add a middleware in a Starlette application?
We can add a middleware to a Starlette application using two approaches:
- Using the
add_middleware()method - By passing a list of middlewares to the Starlette constructor
To discuss both these approaches, we will use the calculator app from the FastAPI error handling article. You can build a calculator app in Starlette as follows:
from starlette.applications import Starlette
from starlette.requests import Request
from starlette.responses import JSONResponse
from starlette.routing import Route


# Define a function for the root API endpoint
async def root(request: Request):
    return JSONResponse(
        status_code=200,
        content={"type": "METADATA", "output": "Welcome to Calculator by HoneyBadger."},
    )


# Define a function for the calculate API endpoint
async def calculation(request: Request):
    data = await request.json()
    num1, num2, operation = data["num1"], data["num2"], data["operation"]
    if operation == "add":
        result = num1 + num2
    elif operation == "subtract":
        result = num1 - num2
    elif operation == "multiply":
        result = num1 * num2
    elif operation == "divide":
        result = num1 / num2
    else:
        return JSONResponse(
            status_code=404,
            content={"type": "FAILURE", "reason": "Not a valid operation"},
        )
    return JSONResponse(status_code=200, content={"type": "SUCCESS", "output": result})


# Define the API endpoints
routes = [
    Route("/", root),
    Route("/calculate/", calculation, methods=["POST"]),
]

# Initialize the app
app = Starlette(routes=routes)
You can download the complete code for the Starlette calculator app from this link.
Add middleware to a Starlette application using the add_middleware() method
The add_middleware() method, when invoked on a Starlette app object, takes a Starlette middleware class and the inputs for the middleware class parameters as its input arguments. After execution, it adds the middleware to the outermost layer of the middleware stack of the application. For example, we can add CORSMiddleware to a Starlette application as shown below:
# Insert complete starlette calculator app code
...

from starlette.middleware.cors import CORSMiddleware
app.add_middleware(CORSMiddleware,
                   allow_origins=["*"],
                   allow_methods=["GET", "POST"],
                   allow_headers=["Content-Type", "X-API-Key"],
                   expose_headers=["X-Request-ID"],
                   allow_credentials=False,
                   max_age=3600
                   )
You can download the complete code for the above example from this link. You can run the Starlette app using uvicorn and send a request as follows:
curl -i http://127.0.0.1:8080/calculate/ -X POST -H "Content-Type: application/json" -d '{"operation": "add", "num1":10, "num2": 10}'
The app will give an output as follows:
HTTP/1.1 200 OK
date: Mon, 22 Jun 2026 16:05:00 GMT
server: uvicorn
content-length: 30
content-type: application/json

{"type":"SUCCESS","output":20}
We can also add custom middleware to a Starlette application the same way we add a built-in middleware. For example, we can add TimingMiddleware to the Starlette application as follows:
# Insert complete starlette calculator app code
...

class TimingMiddleware(BaseHTTPMiddleware):
    async def dispatch(self, request: Request, call_next):
        start_time = time.perf_counter()
        response = await call_next(request)
        duration = time.perf_counter() - start_time
        response.headers["X-Process-Time"] = f"{duration:.4f}s"
        return response

app.add_middleware(CORSMiddleware,
                   allow_origins=["*"],
                   allow_methods=["GET", "POST"],
                   allow_headers=["Content-Type", "X-API-Key"],
                   expose_headers=["X-Request-ID"],
                   allow_credentials=False,
                   max_age=3600
                   )
app.add_middleware(TimingMiddleware)
You can download the complete code for the above example from this link. Sending a request to the above application will give an output as follows:
HTTP/1.1 200 OK
date: Mon, 22 Jun 2026 16:07:10 GMT
server: uvicorn
content-length: 30
content-type: application/json
x-process-time: 0.0009s

{"type":"SUCCESS","output":20}
In the output, you can observe that the header contains the x-process-time attribute, which wasn't present in the earlier response.
Add middleware to Starlette application by passing a list of middlewares to the constructor
Instead of adding middlewares one by one to the Starlette application, we can use the Middleware class to create a list of Starlette middlewares we want to add to the application. Then, we can add the list of middlewares to the middleware parameter of the Starlette constructor, as shown below:
# Code till endpoint definition in the starlette calculator app
...

from starlette.middleware.cors import CORSMiddleware
from starlette.middleware.base import BaseHTTPMiddleware
from starlette.requests import Request
from starlette.middleware import Middleware
import time

class TimingMiddleware(BaseHTTPMiddleware):
    async def dispatch(self, request: Request, call_next):
        start_time = time.perf_counter()
        response = await call_next(request)
        duration = time.perf_counter() - start_time
        response.headers["X-Process-Time"] = f"{duration:.4f}s"
        return response


cors_middleware = Middleware(CORSMiddleware,
                             allow_origins=["*"],
                             allow_methods=["GET", "POST"],
                             allow_headers=["Content-Type", "X-API-Key"],
                             expose_headers=["X-Request-ID"],
                             allow_credentials=False,
                             max_age=3600)
timing_middleware = Middleware(TimingMiddleware)
# Initialize the app
app = Starlette(routes=routes, middleware=[cors_middleware, timing_middleware])
You can download the complete code for the above example from this link. When we execute this code, we get the following response from the web app:
HTTP/1.1 200 OK
date: Mon, 22 Jun 2026 16:10:27 GMT
server: uvicorn
content-length: 30
content-type: application/json
x-process-time: 0.0011s

{"type":"SUCCESS","output":20}
As you can see, the server response remains the same even when we add the middlewares to the Starlette application in a different way.
How to add a Starlette middleware in a FastAPI application?
FastAPI is built on top of Starlette, i.e., the FastAPI class inherits the Starlette class. Thus, we can add Starlette middlewares to a FastAPI application using the add_middleware() method as well as by passing a list of middlewares to the FastAPI constructor. Additionally, FastAPI provides the @app.middleware("http") decorator to add custom functions as middlewares. Let's discuss all these approaches individually.
We will use the following calculator app to demonstrate how to add the middlewares to the FastAPI application:
from fastapi import FastAPI, HTTPException
from pydantic import BaseModel
from fastapi.responses import JSONResponse

app = FastAPI()


# Define the root API endpoint
@app.get("/")
async def root():
    return JSONResponse(status_code=200,
                        content={"type": "METADATA", "output": "Welcome to Calculator by HoneyBadger."})


# Define the input data model
class InputData(BaseModel):
    num1: float
    num2: float
    operation: str


# Define the calculate API endpoint
@app.post("/calculate/")
async def calculation(input_data: InputData):
    num1 = input_data.num1
    num2 = input_data.num2
    operation = input_data.operation
    if operation == "add":
        result = num1 + num2
    elif operation == "subtract":
        result = num1 - num2
    elif operation == "multiply":
        result = num1 * num2
    elif operation == "divide":
        result = num1 / num2
    else:
        result = None
    if result is None:
        raise HTTPException(status_code=404, detail={"type": "FAILURE", "reason": "Not a valid operation"})
    else:
        return JSONResponse(status_code=200, content={"type": "SUCCESS", "output": result})
You can download the above source code from this link.
Add a middleware to a FastAPI application using add_middleware()
We can add a Starlette middleware to a FastAPI application by passing the middleware class and its parameters as input to the add_middleware() method as follows:
# Existing imports
...

from starlette.middleware.cors import CORSMiddleware

app = FastAPI()
app.add_middleware(CORSMiddleware,
                   allow_origins=["*"],
                   allow_methods=["GET", "POST"],
                   allow_headers=["Content-Type", "X-API-Key"],
                   expose_headers=["X-Request-ID"],
                   allow_credentials=False,
                   max_age=3600
                   )

# Existing endpoint definition
...
You can download the working code for this example using this link. When we run this FastAPI application and send a request, we get an output as follows:
HTTP/1.1 200 OK
date: Mon, 22 Jun 2026 16:17:49 GMT
server: uvicorn
content-length: 32
content-type: application/json

{"type":"SUCCESS","output":20.0}
We can also add multiple middlewares to the FastAPI application using add_middleware() by using the method multiple times as follows:
# Existing imports
...

from starlette.middleware.cors import CORSMiddleware
from starlette.middleware.base import BaseHTTPMiddleware
from starlette.requests import Request
import time


class TimingMiddleware(BaseHTTPMiddleware):
    async def dispatch(self, request: Request, call_next):
        start_time = time.perf_counter()
        response = await call_next(request)
        duration = time.perf_counter() - start_time
        response.headers["X-Process-Time"] = f"{duration:.4f}s"
        return response


app = FastAPI()

app.add_middleware(CORSMiddleware,
                   allow_origins=["*"],
                   allow_methods=["GET", "POST"],
                   allow_headers=["Content-Type", "X-API-Key"],
                   expose_headers=["X-Request-ID"],
                   allow_credentials=False,
                   max_age=3600
                   )
app.add_middleware(TimingMiddleware)

# Existing endpoint definitions
...
You can download the complete code for the above example fromthis link. As we have added TimingMiddleware to the FastAPI application, the response returned by this application contains the x-process-time attribute in the response headers, as shown below:
HTTP/1.1 200 OK
date: Mon, 22 Jun 2026 16:17:01 GMT
server: uvicorn
content-length: 32
content-type: application/json
x-process-time: 0.0036s

{"type":"SUCCESS","output":20.0}
Add a middleware to a FastAPI application using FastAPI's @app.middleware("http") decorator
Instead of defining a custom middleware by implementing a class, we can use the @app.middleware("http") decorator to define a middleware. The middleware defined using this approach has the same functionality as a custom middleware defined using the BaseHTTPMiddleware class.
Here, instead of defining the dispatch() method in the custom middleware class and adding the middleware to the FastAPI app, we use the @app.middleware("http") decorator to implement the functionality of the dispatch() method directly in a function. For example, we can implement TimingMiddleware using the @app.middleware("http") decorator as follows:
# Existing imports
...
import time
from fastapi import Request

app = FastAPI()


@app.middleware("http")
async def timing_middleware(request: Request, call_next):
    start_time = time.perf_counter()
    response = await call_next(request)
    duration = time.perf_counter() - start_time
    response.headers["X-Process-Time"] = f"{duration:.4f}s"
    return response

# Existing endpoint definitions
...
You can download the complete source code for the above example from this link. The response from the above application looks as follows:
HTTP/1.1 200 OK
date: Mon, 22 Jun 2026 16:19:45 GMT
server: uvicorn
content-length: 32
content-type: application/json
x-process-time: 0.0043s

{"type":"SUCCESS","output":20.0}
As you can see, this output has the same structure as the output generated from the FastAPI application that used the TimingMiddleware class. Thus, the @app.middleware("http") decorator combines the steps defining a custom middleware class and adding it to the FastAPI application into a single function definition.
Add middlewares to a FastAPI application in the FastAPI constructor
We can pass a list of middlewares to the middleware parameter of the FastAPI constructor to add middlewares to the FastAPI application as follows:
# Existing imports
...

from starlette.middleware.cors import CORSMiddleware
from starlette.middleware.base import BaseHTTPMiddleware
from starlette.requests import Request
from starlette.middleware import Middleware
import time


class TimingMiddleware(BaseHTTPMiddleware):
    async def dispatch(self, request: Request, call_next):
        start_time = time.perf_counter()
        response = await call_next(request)
        duration = time.perf_counter() - start_time
        response.headers["X-Process-Time"] = f"{duration:.4f}s"
        return response


cors_middleware = Middleware(CORSMiddleware,
                             allow_origins=["*"],
                             allow_methods=["GET", "POST"],
                             allow_headers=["Content-Type", "X-API-Key"],
                             expose_headers=["X-Request-ID"],
                             allow_credentials=False,
                             max_age=3600)

timing_middleware = Middleware(TimingMiddleware)

app = FastAPI(middleware=[cors_middleware, timing_middleware])

# Existing endpoint definitions
...
You can download the complete source code for the above example from this link. The response from this application looks as follows:
HTTP/1.1 200 OK
date: Mon, 22 Jun 2026 16:21:23 GMT
server: uvicorn
content-length: 32
content-type: application/json
x-process-time: 0.0021s

{"type":"SUCCESS","output":20.0}
As discussed, we can add multiple Starlette middlewares in a single FastAPI or Starlette application. However, the order in which the middlewares are added to an application is important. A middleware placed earlier in the middleware chain intercepts, modifies, redirects, or even terminates a request before it reaches the next middleware. Therefore, middlewares should be ordered so that inexpensive validation and security checks occur before more expensive operations. For example, we shouldn’t use an authentication middleware before TrustedHostMiddleware or HTTPSRedirectMiddleware. If a request originates from an untrusted host, there is no point in running the authentication logic if we are to block or redirect the request at the next step.
Hence, understanding starlette middleware order matters for building secure and efficient applications, as an incorrect ordering can introduce unnecessary processing overhead or even create security vulnerabilities. Let's discuss the order in which the middlewares process incoming requests when we add them to a FastAPI or Starlette application using different approaches.
Using multiple Starlette middlewares in an application
In this section, we will use different approaches to add middlewares to a FastAPI application and observe the order in which the middlewares process requests and responses. This will help you understand the middleware execution order in different situations. For demonstration, we will use three cases:
- When all the middlewares are passed to the FastAPI constructor
- When all the middlewares are added to the FastAPI application using the
add_middleware()method or the@app.middleware("http")constructor - A combination of both approaches.
Starlette middleware execution order when the middlewares are passed to the FastAPI constructor
When we add middlewares to a FastAPI or Starlette application by passing the list of middlewares to the FastAPI() or Starlette() constructor, the middlewares are added to an app.user_middleware list in the same order they are mentioned in the list.
- The first element of the list becomes the outermost middleware and processes the request first. Other middlewares process the request subsequently in the same order they appear in the list.
- After the application processes the request and returns a response, the last middleware in the list processes the response first, whereas the first middleware in the list processes the response last.
To understand this, consider the following code example:
app = FastAPI(middleware=[
    Middleware(M1),
    Middleware(M2),
    Middleware(M3),
])
In this application, M1 is the first middleware in the list and becomes the outermost middleware in the middleware stack. Hence, M1 processes each request first, and M3 at the end. For every request, the middleware execution order will be M1-> M2-> M3. For processing responses, the middleware execution order will be M3-> M2-> M1.
Starlette middleware execution order when middlewares are added to the FastAPI application using the add_middleware() method
The add_middleware() method inserts the new middleware at the beginning of the app.user_middleware list. Hence, every new middleware added with app.add_middleware() becomes the outermost middleware in the middleware stack. To understand this, consider the following example:
app = FastAPI()
app.add_middleware(M4)
app.add_middleware(M5)
app.add_middleware(M6)
In this app, M6 will be the outermost middleware and M4 the innermost. Hence, the middleware execution order for request processing will be M6-> M5-> M4 and for response processing M4-> M5-> M6.
The middlewares added to a FastAPI application using the @app.middleware("http") decorator process requests and responses in the same way as those added using the add_middleware() method.
Starlette middleware execution order when using both the constructor parameter and the add_middleware() method
When we add middlewares to a FastAPI or Starlette app by passing them to the middleware parameter in the constructor as well as using the add_middleware() method, the middlewares passed to the constructor are first registered. Then, the middlewares added using the add_middleware() method, and the @app.middleware("http") decorator are added to the app in the order they appear in the code.
To understand the complete execution order, let's consider that we have passed middlewares M1, M2, and M3 in a list to the middleware parameter of the FastAPI() constructor. Then, we add a middleware M4 to the application using the add_middleware() method. Next, we define a middleware M7 using the @app.middleware("http") decorator. Then, we add two middlewares, M5 and M6, to the FastAPI application using the add_middleware() method. Finally we add a middleware M8 to the FastAPI application using the @app.middleware("http") decorator, as shown below:
app = FastAPI(middleware=[
    Middleware(M1),
    Middleware(M2),
    Middleware(M3),
])

# Add middleware using add_middleware method
app.add_middleware(M4)


# Add middleware using decorator
@app.middleware("http")
async def m7(request: Request, call_next):
    # Middleware M7
    ...


# Add middlewares using add_middleware method
app.add_middleware(M5)
app.add_middleware(M6)


# Add middleware using decorator
@app.middleware("http")
async def m8(request: Request, call_next):
    # Middleware M8
    ...
In the above application, the middlewares [M1, M2, M3] will be first added to the app.user_middleware list. After this, M4, M7, M5, M6, and M8 are added to the start of the list in the same order they are present in the code. Hence, the final order of the middlewares in the app.user_middleware list becomes [M8, M6, M5, M7, M4, M1, M2, M3]. Thus, the middleware execution order while processing requests will be M8-> M6-> M5 -> M7-> M4 -> M1-> M2 -> M3, whereas the middleware execution order while processing responses will be in the opposite order.
To understand the middleware execution order in a better manner, we will implement a middleware class that prints its name when it processes a request or a response. Then, we will configure different instances of the middleware in a FastAPI application and observe the execution order, as shown in the following code:
from fastapi import FastAPI, Request
from starlette.middleware import Middleware


class Tagger:
    def __init__(self, app, name):
        self.app = app
        self.name = name

    async def __call__(self, scope, receive, send):
        if scope["type"] != "http":
            await self.app(scope, receive, send)
            return
        print(f"→ Processing request: {self.name}")

        async def send_wrapper(message):
            if message["type"] == "http.response.start":
                print(f"← Processing response:  {self.name}")
            await send(message)

        await self.app(scope, receive, send_wrapper)


# Add middlewares to FastAPI constructor
app = FastAPI(middleware=[
    Middleware(Tagger, name="M1"),
    Middleware(Tagger, name="M2"),
    Middleware(Tagger, name="M3"),
])

# Add middleware using add_middleware
app.add_middleware(Tagger, name="M4")


# Add middleware using decorator
@app.middleware("http")
async def m7(request: Request, call_next):
    print("→ Processing request: M7")
    response = await call_next(request)
    print("← Processing response:  M7")
    return response


# Add middlewares using add_middleware
app.add_middleware(Tagger, name="M5")
app.add_middleware(Tagger, name="M6")


# Add middleware using decorator
@app.middleware("http")
async def m8(request: Request, call_next):
    print("→ Processing request: M8")
    response = await call_next(request)
    print("← Processing response:  M8")
    return response


@app.get("/")
async def root():
    print("   [route handler]")
    return {"ok": True}
In this code, we have defined eight middlewares using the Tagger class. Every time we send a request to this FastAPI application, all the middlewares print their names to standard output, allowing us to observe the middleware execution order. You can download the source code from this link.
Now, if you deploy this application and send a request to the root API endpoint using the CURL command, you will get an output as follows:
HTTP/1.1 200 OK
date: Mon, 22 Jun 2026 16:26:21 GMT
server: uvicorn
content-length: 11
content-type: application/json

{"ok":true}
If you look at the terminal running the uvicorn server for this FastAPI application, you can see the following output for each request.
→ Processing request: M8
→ Processing request: M6
→ Processing request: M5
→ Processing request: M7
→ Processing request: M4
→ Processing request: M1
→ Processing request: M2
→ Processing request: M3
   [route handler]
← Processing response:  M3
← Processing response:  M2
← Processing response:  M1
← Processing response:  M4
← Processing response:  M7
← Processing response:  M5
← Processing response:  M6
← Processing response:  M8
INFO:     127.0.0.1:58424 - "GET / HTTP/1.1" 200 O
As you can observe, the middleware execution order for request and response processing is the same as the order we discussed above.
Now that we know the working and execution order of Starlette middlewares, let's discuss the common pitfalls and considerations for using Starlette middlewares in FastAPI applications.
Common pitfalls and key considerations for using Starlette middlewares
Middleware execution order is important
The middleware execution order is easy to get wrong. When we add middlewares to a FastAPI/Starlette application using a list of middlewares, the first middleware in the list becomes the outermost middleware. However, when we add middlewares to an application using the add_middleware() method, the last middleware to be added to the application becomes the outermost middleware.
In practice, CORSMiddleware, TrustedHostMiddleware, and HTTPSRedirectMiddleware should be the outermost middlewares. Post these, you can have middlewares such as RequestID, Logging, Authentication, and GZipMiddleware in the inner middleware stack.
- CORSMiddleware, TrustedHostMiddleware, and HTTPSRedirectMiddleware should be present earlier in the middleware list passed to the FastAPI/Starlette constructor. However, they should be added to an application using the
add_middleware()method at the end. - Middlewares like RequestID, Logging, Authentication, and GZipMiddleware should be present at the end of the middleware list passed to the FastAPI/Starlette constructor. However, they should be added to an application using the
add_middleware()method before other middlewares.
The recommended middleware stack for a FastAPI/Starlette application is CORSMiddleware-> TrustedHostMiddleware-> HTTPSRedirectMiddleware-> RequestID-> Logging-> Authentication-> GZipMiddleware. Hence, they should be present in the same order in the list passed to the FastAPI/Starlette constructor and should be added to the application using the add_middleware() method in the reverse order.
BaseHTTPMiddleware does not support WebSockets
As we discussed earlier, middlewares created using BaseHTTPMiddleware filter requests by scope type "http" and directly forward requests with scope type "websocket". If you want to implement middlewares that should process requests with scope type "http" as well as "websocket", you must implement a pure ASGI middleware and handle requests of both scope types separately.
Avoid heavy work in middleware
Every request to a web application passes through every middleware, regardless of what the request does. If a middleware performs a database lookup, an external HTTP call, or other expensive I/O on every request, it will add time and resource cost to each request. Also, a middleware I/O operation is serial with the rest of the request path. Hence, a slow I/O in a middleware will add latency to every request, even if the actual request handler takes sub-millisecond time to process the request.
To avoid this issue, you should keep the middleware logic lightweight. You can cache results that are stable across requests rather than redoing I/O operation on every request. If you want to implement a logic that only applies to specific API endpoints, use FastAPI's dependency injection system instead of middleware.
Avoid 500 HTTP error responses with no type or reason
If an API endpoint raises an unhandled exception, the exception propagates back up into the middleware. Without error handling, the exception will escape the middleware stack entirely and bypass FastAPI's exception handlers, resulting in a raw 500 HTTP response with no type/reason structure.
You should always wrap the call_next method in the middleware in a try-except block to handle application exceptions and return a structured error response consistent with the rest of the API whenever an API endpoint throws an unhandled error.
Implement error handling correctly
It is easier to write a broad Exception handler block in the middleware and return a 500 error response. However, if you don't log the exception, you lose all diagnostic information, including stack trace, exception type, and request context. This will make production incidents nearly impossible to debug. Hence, always log the full exception with context before returning an error response.
In summary: middlewares and monitoring
Since monitoring and error tracking apply uniformly across all routes, the middleware layer is a natural integration point for tools like Honeybadger. Middlewares can record request context, intercept unhandled exceptions, and report them to Honeybadger, helping surface issues in production. Honeybadger provides full-stack logging & observability, combining error tracking, logging, uptime monitoring, and performance monitoring into a single tool that you can use to catch errors before they snowball.
In this article, we discussed what Starlette middlewares are and how they work. We also discussed how to define custom Starlette middlewares along with middleware execution order. You should now be able to design a secure and efficient middleware stack in your FastAPI/Starlette application with correct registration and execution order. This will help you keep common observability and error-handling code out of the route handlers while ensuring your application complies with all security and compliance requirements. To further strengthen observability and monitor your application’s errors, logs, uptime, and performance before problems reach your users, you can sign up for a free trial of Honeybadger.
