Next.js vs React: What’s the difference and which should you use?
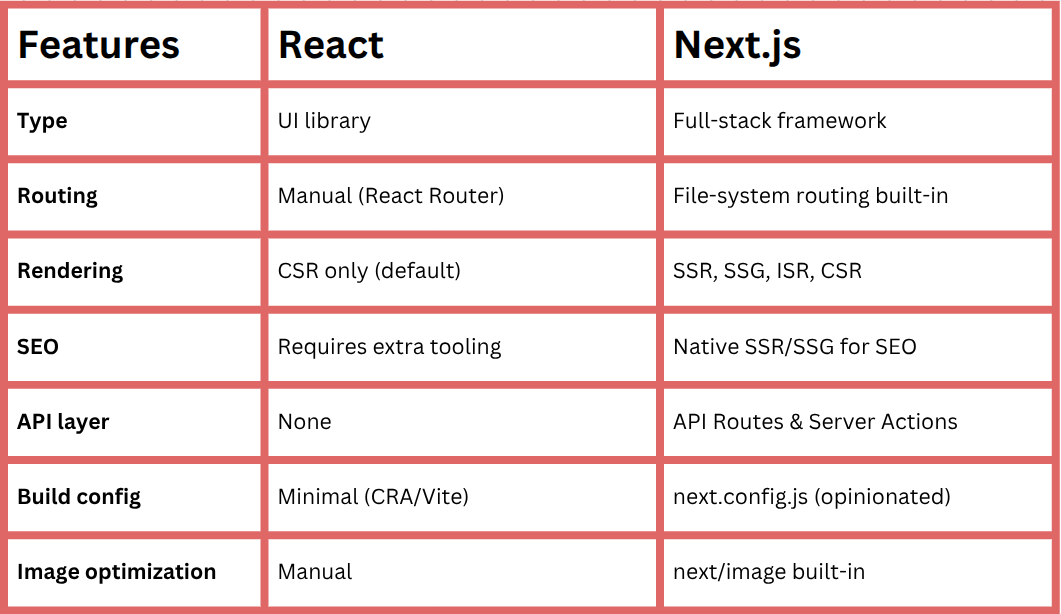
The Next.js vs React question is not really a comparison between two competing tools — Next.js is built on top of React. React itself is a UI rendering JavaScript library used for building user interfaces across platforms, including web applications and mobile apps with React Native, while Next.js is a framework that wraps React and makes concrete decisions about routing, data fetching, and server-side concerns. Understanding this relationship is the starting point for every project decision you will make when building web applications.
React handles one job extremely well: taking a component tree and turning it into DOM output, then reconciling changes efficiently. Every other layer like how you fetch data, how you route between pages, what runs on the server versus the client is deliberately left to the developer or to third-party libraries. Next.js packages those decisions into a cohesive framework, adding server-side rendering, file-system-based routing, built-in image optimization, and an API routing layer that runs alongside your JavaScript code. This makes it particularly useful for complex projects that require coordination between the front-end and back-end.
This article covers what each tool does at a technical level, how they differ in behavior and file structure, how their rendering modes work, and answers the common question: what is Next.js vs React in practical terms?
What is React?
React's core contribution to web development is the component-based architecture combined with a virtual DOM diffing algorithm. Before React, updating the DOM in response to state changes meant either re-rendering entire page sections or writing granular imperative update logic that quickly became unmaintainable.
React introduced a declarative model: describe what the user interface should look like for a given state, and let the reconciler determine the minimum set of real DOM mutations required. This approach transformed web development workflows and made React a widely adopted JavaScript library for building complex user interfaces.
The component and hook model
A React component is a function that accepts props and returns JSX. The function re-runs whenever its state or props change, and React reconciles the output against the previous virtual DOM snapshot. Hooks like useState and useEffect let you attach stateful behavior and side effects to functional components without resorting to class syntax.
In practice, components are composed hierarchically, where child components receive data and callbacks from their parents. This composition model is what enables React to scale cleanly in complex projects, especially when managing deeply nested user interface trees.
// src/components/UserCard.tsx

import { useState, useEffect } from 'react';

interface User {
  id: number;
  name: string;
  email: string;
}
interface UserCardProps {
  userId: number;
}

export function UserCard({ userId }: UserCardProps) {
  const [user, setUser] = useState<User | null>(null);
  const [loading, setLoading] = useState(true);

  useEffect(() => {
    fetch(`/api/users/${userId}`)
      .then((res) => res.json())
      .then((data) => {
        setUser(data);
        setLoading(false);
      });
  }, [userId]);

  if (loading) return <div>Loading...</div>;
  if (!user) return <div>User not found</div>;

  return (
    <div className="card">
      <h2>{user.name}</h2>
      <p>{user.email}</p>
    </div>
  );
}
This component fetches a user when the userId prop changes, tracks the loading state, and renders conditionally based on that state. The useEffect dependency array [userId] ensures the fetch only re-runs when userId changes, not on every render. This pattern is idiomatic React, but notice that the data fetch happens entirely in the browser after the component mounts. There is no concept of running this on a server.
What React deliberately leaves out
React provides no routing system. Navigation between views requires installing a library like React Router or TanStack Router. React also has no built-in data fetching convention, no server-side rendering pipeline, no image optimization, and no API routes server. You can combine React with Express for server-side rendering and with third-party libraries like SWR or TanStack Query for caching, but you must assemble these pieces yourself across multiple JavaScript files.
This is not a weakness. For applications that run entirely in the browser, including dashboards and progressive web apps, the absence of framework opinions means less configuration overhead and more flexibility in your dependency choices. The cost is that you own the architecture decisions.
React also benefits from a large and active community, which means most problems you encounter already have established patterns or libraries.
What is Next.js and how does it extend React?
Next.js extends the React component model with conventions and runtime capabilities that React itself does not provide. The two most significant additions are the rendering pipeline (Server-Side Rendering (SSR), Static Site Generation (SSG), and Incremental Static Regeneration (ISR)) and the file-based routing system. Everything else—like API handling, image optimization, the Edge Runtime, font loading, and middleware—builds on top of those two foundations.
The App Router and Server Components
Next.js 13 introduced the App Router, which changed the default rendering model. In the App Router, every component is a React Server Component (RSC) unless you explicitly opt out with the 'use client' directive.
Server Components render on the server, can await async operations directly in the component body, and never ship their JavaScript code or the data-fetching JavaScript libraries they use to the client bundle. This results in automatic code splitting, where only the required interactive parts of the application are sent to the browser.
// app/users/[id]/page.tsx - runs on the server, zero client JS

interface PageProps {
  params: Promise<{ id: string }>;
}

async function getUser(id: string) {
  const res = await fetch(`https://api.example.com/users/${id}`, {
    next: { revalidate: 60 }, // ISR: revalidate this data every 60 seconds
  });
  if (!res.ok) throw new Error('Failed to fetch user');
  return res.json();
}

export default async function UserPage({ params }: PageProps) {
  const { id } = await params;
  const user = await getUser(id);
  return (
    <main>
      <h1>{user.name}</h1>
      <p>{user.email}</p>
    </main>
  );
}
This is fundamentally different from the React example above. The component is declared async and awaits the data directly, without useEffect, useState, or state management libraries. The fetch happens at request time on the server. The client receives pre-rendered HTML. The next: { revalidate: 60 } option activates Incremental Static Regeneration, so after the initial render, Next.js regenerates the page in the background when a request arrives after 60 seconds, serving the stale version until the fresh one is ready.
Client Components and the 'use client' boundary
When a component needs interactivity, you add 'use client' at the top of the file. This converts the component to a Client Component, which is hydrated in the browser. The boundary between Server and Client Components is explicit and composable: a Server Component can render interactive child components, but a Client Component cannot render a Server Component directly. This separation enables granular automatic code splitting and reduces bundle size.
// app/components/AddToCartButton.tsx
'use client';

import { useState } from 'react';

interface AddToCartButtonProps {
  productId: string;
  price: number;
}

export function AddToCartButton({ productId, price }: AddToCartButtonProps) {
  const [added, setAdded] = useState(false);

  async function handleClick() {
    await fetch('/api/cart', {
      method: 'POST',
      body: JSON.stringify({ productId, quantity: 1 }),
      headers: { 'Content-Type': 'application/json' },
    });
    setAdded(true);
  }

  return (
    <button onClick={handleClick} disabled={added}>
      {added ? 'Added to cart' : `Add to cart- $${price}`}
    </button>
  );
}
The product page itself (a Server Component) fetches product data on the server and renders HTML, while interactive child components handle user interactions like adding items to a cart. This pattern keeps user interfaces fast and lightweight. This granular control over the client bundle size is one of the most architecturally significant advantages Next.js provides over a pure React SPA (Single Page Application).
Key differences
The divergence between Next.js and a standalone React application becomes concrete when you compare how each handles routing, the rendering pipeline, project layout, search engine visibility, and runtime performance. These are not surface-level configuration differences; they reflect fundamentally different execution models.
Routing
React has no router. You install React Router and configure routes manually across multiple JavaScript files. Next.js uses file-based routing. Creating a file automatically registers a route. This removes boilerplate and makes it easier to scale routing in complex projects.
// src/main.tsx - React + React Router v6

import { createBrowserRouter, RouterProvider } from 'react-router-dom';
import { RootLayout } from './layouts/RootLayout';
import { HomePage } from './pages/HomePage';
import { ProductPage } from './pages/ProductPage';
import { NotFound } from './pages/NotFound';
import ReactDOM from 'react-dom/client';

const router = createBrowserRouter([
  {
    path: '/',
    element: <RootLayout />,
    errorElement: <NotFound />,
    children: [
      { index: true, element: <HomePage /> },
      { path: 'products/:id', element: <ProductPage /> },
    ],
  },
]);

ReactDOM.createRoot(document.getElementById('root')!).render(
  <RouterProvider router={router} />
);
Next.js uses a file-based routing system. Creating a file at app/products/[id]/page.tsx automatically registers the route /products/:id. The folder structure is the route definition. Layouts, loading states, error boundaries, and not-found pages are handled by special files (layout.tsx, loading.tsx, error.tsx, not-found.tsx) placed in the corresponding route segment directory.
app/
├── layout.tsx          → root layout, wraps all routes
├── page.tsx            → renders at /
├── loading.tsx         → Suspense fallback for /
├── error.tsx           → error boundary for /
├── products/
│   ├── page.tsx        → renders at /products
│   └── [id]/
│       ├── page.tsx    → renders at /products/:id
│       └── loading.tsx → Suspense fallback for /products/:id
└── api/
    └── cart/
        └── route.ts    → API endpoint at /api/cart
The file-system router removes an entire category of configuration work. You do not write route declarations, import pages manually, or manage a separate router configuration object. The trade-off is that your folder structure becomes load-bearing.
Rendering modes
A plain React application renders entirely in the browser. The server sends a mostly empty HTML document with a script tag, and React bootstraps the application in the client. This is client-side rendering (CSR). Next.js supports multiple rendering strategies and enables automatic code splitting at the route and component level. This significantly improves performance for large web applications. Search engines and users on slow connections both receive no meaningful content until the JavaScript parses, executes, and renders.
Next.js supports four rendering strategies, and you can mix them within a single application. Static site generation renders pages at build time, the HTML is computed once and served as a static file on every request.
Server-side rendering (SSR) renders on each request, allowing you to fetch fresh data per user or session. Incremental Static Regeneration (ISR) generates the page statically but revalidates it on a configurable interval. Client-side rendering is available for components marked with 'use client'.
// app/blog/[slug]/page.tsx

// Generate static paths at build time (static site generation)
export async function generateStaticParams() {
  const posts = await fetch('https://api.example.com/posts').then(r => r.json());
  return posts.map((post: { slug: string }) => ({ slug: post.slug }));
}

// Revalidate every 10 minutes (ISR)
export const revalidate = 600;

export default async function BlogPost({ params }: { params: Promise<{ slug: string }> }) {
  const { slug } = await params;
  const post = await fetch(`https://api.example.com/posts/${slug}`).then(r => r.json());
  return (
    <article>
      <h1>{post.title}</h1>
      <div dangerouslySetInnerHTML={{ __html: post.content }} />
    </article>
  );
}
The generateStaticParams function tells Next.js which slugs to pre-render at build time as part of static site generation. Setting revalidate = 600 on the module activates ISR. After ten minutes, the next request triggers a background regeneration. The page still serves instantly from cache while the fresh version is being built. This combination is the standard pattern for content-heavy sites: fast initial load time from static files, with eventual consistency as content changes.
SEO implications
Search engines index HTML content. A CSR React application sends an empty div; the content arrives only after JavaScript executes, which introduces indexing uncertainty and delays. Googlebot does execute JavaScript, but not instantly, and social media crawlers (Open Graph, Twitter Cards) typically do not execute JavaScript at all, meaning link previews for a CSR app will be blank.
Next.js pages rendered via server-side rendering or static site generation (SSG) deliver fully populated HTML on the initial response. You can set metadata like page titles, descriptions, Open Graph tags, and canonical URLs using the built-in Metadata API routes, which generate the correct <head> tags at render time on the server:
// app/products/[id]/page.tsx

import type { Metadata } from 'next';

interface PageProps {
  params: Promise<{ id: string }>;
}

export async function generateMetadata({ params }: PageProps): Promise<Metadata> {
  const { id } = await params;
  const product = await fetch(`/api/products/${id}`).then(r => r.json());
  return {
    title: `${product.name} - Acme Store`,
    description: product.description,
    openGraph: {
      title: product.name,
      images: [{ url: product.imageUrl }],
    },
  };
}

export default async function ProductPage({ params }: PageProps) {
  const { id } = await params;
  const product = await fetch(`/api/products/${id}`).then(r => r.json());
  return <ProductDetail product={product} />;
}
Note that the fetch in generateMetadata and the fetch in the page component both request the same URL. Next.js deduplicates these automatically using the built-in fetch cache. The network request is made once, even though you wrote it twice. This is a concrete example of the framework reducing accidental complexity.
Quick reference for React vs Next.js:
When to use React on its own
Standalone React (scaffolded with Vite or Create React App) is the appropriate choice when your application does not need server-side rendering, has no SEO requirements, and benefits from a thinner dependency footprint. The most common category is authenticated internal tooling: admin dashboards, CRM interfaces, data visualization tools, analytics platforms, and developer consoles. These applications sit behind a login screen, and the route structure is driven by application state (using state management libraries) rather than URL semantics.
React can also be extended beyond the web using React Native, allowing you to reuse concepts and patterns when building mobile apps.
A Vite-based React setup produces a minimal project with fast web development server startup and highly optimized production builds via Rollup. There is no server process to manage, no framework conventions to learn, and no build-time rendering pipeline to reason about.
If your team is familiar with React but not with Next.js-specific concepts like the App Router, Server Components, or the distinction between server-side and client-side data fetching, a plain React setup removes that cognitive surface area.
# Scaffold a React + TypeScript app with Vite
npm create vite@latest my-app -- --template react-ts
cd my-app
npm install

# Install Router for client-side navigation
npm install react-router-dom

# Install TanStack Query for data fetching and caching
npm install @tanstack/react-query
This combination of Vite, React Router, and TanStack Query covers the needs of most internal web applications. TanStack Query handles caching, background refetching, loading, and error states, among other things—with considerably less boilerplate than manually managing state with useEffect. For web applications where all data fetching is client-side anyway, this stack is competitive with Next.js in terms of developer experience.
Integrating React into an existing back-end
Another valid use of standalone React is when you have an existing server-side framework like Rails, Django, Laravel, or Spring, and you want to embed React components into specific pages rather than migrate to a JavaScript-first stack.
Third-party tools like Inertia.js let Rails or Laravel applications render React components server-side and manage navigation without a full SPA migration. In this architecture, Next.js would be redundant: the host framework already handles routing and server rendering.
When Next.js makes more sense
Next.js makes more sense when your application needs server-side rendering (SSR) for SEO or performance, when you want to colocate your API routes with your front-end code, or when you are building a content-heavy site where static site generation with revalidation provides both performance and freshness.
Public-facing applications with SEO requirements
Marketing sites, e-commerce websites, documentation, blogs, SaaS landing pages, and any application where pages need to rank in search results are natural fits for Next.js. Unlike React, the ability to combine static generation for high-traffic stable pages with ISR for frequently changing content, and server-side rendering (SSR) for personalized or session-dependent pages—all within a single codebase—is architecturally easy to implement.
Consider a product listing page on an e-commerce site. You want the page to load instantly (static or ISR for performance), include accurate metadata for search engines and social sharing (server-side rendering or static site generation (SSG) for SEO), and show personalized pricing or stock information (partial hydration with a Client Component making a client-side fetch after the static shell renders).
All of this is expressible in Next.js with standard patterns; in a plain React SPA, it requires either a separate server-side rendering (SSR) infrastructure or accepting the SEO limitations of client-side rendering.
Full-stack applications without a separate API service
Next.js Route Handlers let you define API endpoints that run alongside your front-end code, share type definitions, and deploy together as a single unit. For web development projects where the API and the UI are maintained by the same team and the back-end complexity does not justify a separate service, this is a significant simplification:
// app/api/orders/route.ts - runs on the server, not in the browser

import { NextRequest, NextResponse } from 'next/server';
import { db } from '@/lib/db'; // direct database access from the API route
import { auth } from '@/lib/auth';

export async function GET(request: NextRequest) {
  const session = await auth();
  if (!session) {
    return NextResponse.json({ error: 'Unauthorized' }, { status: 401 });
  }

  const { searchParams } = new URL(request.url);
  const page = parseInt(searchParams.get('page') ?? '1', 10);
  const limit = 20;

  const orders = await db.order.findMany({
    where: { userId: session.user.id },
    orderBy: { createdAt: 'desc' },
    skip: (page - 1) * limit,
    take: limit,
  });

  return NextResponse.json({ orders, page });
}
This API route has direct database access, it imports a Prisma client, queries the database, and returns JSON. The front-end components in the same codebase can call this endpoint with a simple fetch('/api/orders'). TypeScript types for the response can be shared between the route handler and the calling component without publishing a separate package or running a code generation step. For small to medium teams building full-stack web applications, this tight coupling is a feature, not a liability.
Server Actions for form handling and mutations
Next.js Server Actions allow you to define server-side mutation functions that can be called directly from Client Components without going through an explicit REST endpoint. This is the pattern to reach for when you need form submissions, data mutations, or any user-triggered server-side operation:
// app/actions/createPost.ts
'use server';

import { revalidatePath } from 'next/cache';
import { db } from '@/lib/db';
import { auth } from '@/lib/auth';

export async function createPost(formData: FormData) {
  const session = await auth();
  if (!session) throw new Error('Unauthenticated');

  const title = formData.get('title') as string;
  const content = formData.get('content') as string;

  await db.post.create({
    data: {
      title,
      content,
      authorId: session.user.id,
    },
  });

  revalidatePath('/blog'); // purge the cached blog listing
}

// app/blog/new/page.tsx
'use client';

import { createPost } from '@/app/actions/createPost';

export default function NewPostForm() {
  return (
    <form action={createPost}>
      <input name="title" placeholder="Post title" />
      <textarea name="content" placeholder="Write your post..." />
      <button type="submit">Publish</button>
    </form>
  );
}
The form's action prop accepts the createPost server action directly. When submitted, Next.js serializes the form data and sends it to the server function, which executes in the Node.js runtime with full access to the database and environment variables. The revalidatePath call purges the Next.js cache for the /blog route, so the updated post list appears on the next request without a manual cache invalidation step. This entire pattern (form, mutation, cache invalidation) requires no custom API endpoint.
Next.js vs React: The architectural decision
The separation is cleaner than it might initially appear. React alone handles use cases where the application runs entirely in the browser and focuses on user interfaces through a component-based architecture. It's ideal for internal tools, authenticated dashboards, and single-page web applications without SEO requirements. This includes building interactive user interfaces for internal tooling, where client-side rendering is perfectly acceptable. Add Next.js when your web application needs to deliver server-rendered HTML for SEO or performance, when you want to run server-side logic alongside your front-end without maintaining a separate service, or when the file-system router and built-in optimizations justify the additional framework layer.
The practical signal to watch for is the nature of your first meaningful page render. If a blank loading screen is acceptable because the web application sits behind authentication and your users do not discover it via search, React's CSR model is okay. If search engine visibility is important, or the site needs to be fast for unauthenticated users on variable network connections, the server-side rendering capabilities of Next.js are important features.
One area worth monitoring is the Server Components model. The RSC architecture changes how you reason about data fetching and bundle size in ways that are not entirely settled. The mental model of interleaving server and client components, managing cache invalidation with revalidatePath and revalidateTag, and understanding which dependencies run only on the server has a meaningful learning curve. For developers new to both React and Next.js, starting with plain React as a JavaScript library and introducing Next.js only when you need server-side rendering or static site generation is a lower-risk path than beginning with the full App Router feature set.
If you liked this article and want to learn more about JavaScript, join the Honeybadger newsletter.

Written by
Muhammed AliMuhammed is a Software Developer with a passion for technical writing and open source contribution. His areas of expertise are full-stack web development and DevOps.