First published Sep 22, 2022
Building a Django Chat App with WebSockets
Django is well known for being used to develop servers for HTTP connections and requests for applications. Unfortunately, when building Django chat app or any chat app that requires the connection to remain open for a two-way connection, using an HTTP connection is inefficient.
WebSockets provide a means of opening a two-way connection between the client and the server so that all users connected to the open network can get related data in real time. It is a stateful protocol, which means connection authentication is only required once; the client credential is stored, and there is no further need for authentication until the connection is lost.
In this article, I’ll briefly introduce you to WebSocket and its usefulness. Then, I’ll show you how to use it in Django using Django channels and create WebSocket connections with JavaScript to connect with the Django server.
We will build a simple chatbox to make things more realistic. You can find the code on GitHub.
Prerequisites
- Basic understanding of Django.
- Basic understanding of JavaScript.
Characteristics of WebSockets
- WebSockets is a bidirectional protocol. Therefore, the client and server can exchange data simultaneously without delays or intervention. WebSockets is considered full-duplex communication for the same reason.
- WebSockets is a stateful protocol. Therefore, after initial connection authentication, the client credential is saved, and further authentication is not required until the connection is lost.
- WebSockets don't need any special browsers to function; it works on all browsers.
When to use WebSockets
WebSockets are used when you want to build any kind of real-time chat application, ranging from complex applications, such as multiplayer games played on the internet, to less complex ones, such as chat applications.
An alternative method of building a chat app without using WebSockets is to use JavaScript to query the database after a few seconds to get current data from the chatbox. For example, you could add a database connection to store messages in a chat log. As you can imagine, this is not scalable because if there are thousands of users, the number of requests it could generate might cause the server to crash. Additionally, this method will not work when you want to build something like a video call application.
How to use Django WebSockets
Using WebSockets in Django utilizes asynchronous Python and Django channels, making the process straightforward. Using Django channels, you can create an ASGI server, and then create a group where users can send text messages to all the other users in the group in real time. This way, you are not communicating with a particular user, but with a group, multiple users can be added.
If you are chatting with your friend on Twitter, you and your friend are in one group, represented by the chatbox.
Configure Django to use ASGI
If you don’t already have a Django project, create a folder where you want to store the code for your project, cd into it, and run startproject to create a new Django project:
django-admin startproject project .
Now, create a new Django chat app by running $ python3 manage.py startapp app.
You need to inform your Django project that a new app has been added. To do this, update the project/settings.py file and add 'app' to the INSTALLED_APPS list. It’ll look like this:
# project/settings.py
INSTALLED_APPS = [
   ...
   'chat',
]
Now install Django channels by running the following command on your command line.
pip install channels
Update the project/settings.py file and add 'channels' to the INSTALLED_APPS list:
# project/settings.py
INSTALLED_APPS = [
   ...
   'channels',
]
While you are in the settings.py file, you need to set a configuration to enable the Django channel and Django to communicate with each other using a message broker. We can use a tool like Redis for this, but for this tutorial, we will use the local backend. Paste the following code into your settings.py file:
ASGI_APPLICATION = "project.routing.application" #routing.py will be created later
CHANNEL_LAYERS = {
    'default': {
        'BACKEND': "channels.layers.InMemoryChannelLayer"
        }
    }
In the code above, ASGI_APPLICATION is needed to run the ASGI server and tell Django what to do when an event happens. This configuration will be placed in a file named routing.py.
Build a minimalistic Django chat app
Next, we will create a chat app chatbox that authenticated users can access via a URL and chat with each other. To get this going, open your app/views.py file and paste the code below to pass the chatbox name from the URL to the HTML file (chatbox.html):
from django.shortcuts import render

def chat_box(request, chat_box_name):
    # we will get the chatbox name from the url
    return render(request, "chatbox.html", {"chat_box_name": chat_box_name})
Now, replace the code you have in project/urls.py with the following code. This will handle the chatbox name stated in the browser (http://127.0.0.1:8002/chat/**chatboxname**/).
from django.contrib import admin
from django.urls import path
from app.views import chat_box

urlpatterns = [
    path("admin/", admin.site.urls),
    path("chat/<str:chat_box_name>/", chat_box, name="chat"),
]
Next, let’s start working on the consumers. Consumers in channels help structure your code as a series of functions to be called whenever an event happens. Consumers are usually written in asynchronous Python. To start, create a new file in app/ folder named consumers.py and paste the code shown below. What the following code is doing is handling what happens when the server connects, disconnects, receives a request, or sends a text.
import json
from channels.generic.websocket import AsyncWebsocketConsumer

class ChatRoomConsumer(AsyncWebsocketConsumer):
    async def connect(self):
        self.chat_box_name = self.scope["url_route"]["kwargs"]["chat_box_name"]
        self.group_name = "chat_%s" % self.chat_box_name

        await self.channel_layer.group_add(self.group_name, self.channel_name)

        await self.accept()

    async def disconnect(self, close_code):
        await self.channel_layer.group_discard(self.group_name, self.channel_name)
    # This function receive messages from WebSocket.
    async def receive(self, text_data):
        text_data_json = json.loads(text_data)
        message = text_data_json["message"]
        username = text_data_json["username"]

        await self.channel_layer.group_send(
            self.group_name,
            {
                "type": "chatbox_message",
                "message": message,
                "username": username,
            },
        )
    # Receive message from chat room group.
    async def chatbox_message(self, event):
        message = event["message"]
        username = event["username"]
        #send message and username of sender to websocket
        await self.send(
            text_data=json.dumps(
                {
                    "message": message,
                    "username": username,
                }
            )
        )

    pass
This Python code defines a Django Channels consumer that manages Django WebSockets connections for a real-time chat application. The ChatRoomConsumer class inherits from AsyncWebsocketConsumer and handles the complete lifecycle of a Django WebSocket connection. When a user connects, the connect method extracts the chatbox name from the URL parameters, creates a unique group name for that chat room, adds the user's channel to that group (allowing multiple users to join the same chat room), and accepts the WebSocket connection. When a user disconnects, the disconnect method cleanly removes their channel from the group to prevent memory leaks and ensure they no longer receive messages.
The message handling happens through two coordinated methods that enable broadcasting to all users in a chat room. The receive method is triggered whenever a message arrives from a client's WebSocket. It parses the JSON data to extract the message text and username, then uses the channel layer to broadcast this data to everyone in the group. The chatbox_message method receives these broadcast messages and forwards them back to the individual WebSocket connections, ensuring that when one user sends a message, all other users in the same chat room receive it instantly. This pattern creates a publish-subscribe system where messages are distributed to all active participants in real-time.
Now, let’s add the code for routing.py, which was mentioned earlier. Create a file in your /project folder named routing.py and paste the following code:
from channels.auth import AuthMiddlewareStack
from channels.routing import ProtocolTypeRouter, URLRouter
from django.urls import re_path
from app import consumers

# URLs that handle the WebSocket connection are placed here.
websocket_urlpatterns=[
                    re_path(
                        r"ws/chat/(?P<chat_box_name>\w+)/$", consumers.ChatRoomConsumer.as_asgi()
                    ),
                ]

application = ProtocolTypeRouter(
    {
        "websocket": AuthMiddlewareStack(
            URLRouter(
               websocket_urlpatterns
            )
        ),
    }
)
Next, let’s build the frontend for the application. Create a file in app/templates with the name chatbox.html, and then paste the code shown below. Most of this code is the starter template code from b Bootstrap, just to give the application some styling.
<html lang="en">

<head>
    <!-- Required meta tags -->
    <meta charset="utf-8">
    <meta name="viewport" content="width=device-width, initial-scale=1, shrink-to-fit=no">

    <!-- Bootstrap CSS -->
    <link rel="stylesheet" href="https://stackpath.bootstrapcdn.com/bootstrap/4.5.2/css/bootstrap.min.css"
        integrity="sha384-JcKb8q3iqJ61gNV9KGb8thSsNjpSL0n8PARn9HuZOnIxN0hoP+VmmDGMN5t9UJ0Z" crossorigin="anonymous">

</head>

<body>

    <div class="container">
        <div class="row d-flex justify-content-center">
            <div class="col-3">
                <form>
                    <div class="form-group">
                        <label for="exampleFormControlTextarea1" class="h4 pt-5">Chatbox</label>
                        <textarea class="form-control" id="chat-text" readonly rows="10"></textarea><br>
                    </div>
                    <div class="form-group">
                        <input class="form-control" placeholder="Enter text here" id="input" type="text"></br>
                    </div>
                    <input class="btn btn-primary btn-lg btn-block" id="submit" type="button" value="Send">
                </form>
            </div>
        </div>
    </div>
    {% comment %} Get data for username and chatbox name{% endcomment %}
    {{ request.user.username|json_script:"user_username" }}
    {{ chat_box_name|json_script:"room-name" }}


    <!-- Optional JavaScript -->
    <!-- jQuery first, then Popper.js, then Bootstrap JS -->
    <script src="https://code.jquery.com/jquery-3.5.1.slim.min.js"
        integrity="sha384-DfXdz2htPH0lsSSs5nCTpuj/zy4C+OGpamoFVy38MVBnE+IbbVYUew+OrCXaRkfj" crossorigin="anonymous">
    </script>
    <script src="https://cdn.jsdelivr.net/npm/popper.js@1.16.1/dist/umd/popper.min.js"
        integrity="sha384-9/reFTGAW83EW2RDu2S0VKaIzap3H66lZH81PoYlFhbGU+6BZp6G7niu735Sk7lN" crossorigin="anonymous">
    </script>
    <script src="https://stackpath.bootstrapcdn.com/bootstrap/4.5.2/js/bootstrap.min.js"
        integrity="sha384-B4gt1jrGC7Jh4AgTPSdUtOBvfO8shuf57BaghqFfPlYxofvL8/KUEfYiJOMMV+rV" crossorigin="anonymous">
    </script>
</body>

</html>
The HTML above creates a simple chat interface using Bootstrap for styling. The page features a centered chatbox with a textarea that displays the chat log messages in read-only mode, an input field where users can type their messages, and a send button to submit them. The layout is responsive and uses Bootstrap's grid system to center a 3-column-wide form on the page. The design is clean and minimal, focusing on functionality with standard Bootstrap components like form controls and a primary button.
At the bottom of the HTML, there are two Django template tags that inject important data into the page as JSON scripts. These tags capture the current user's username and the chatbox/chat room name, making them accessible to JavaScript code that will be added later. The page also includes all necessary Bootstrap dependencies (jQuery, Popper.js, and Bootstrap JS) loaded from CDNs. The next step involves adding custom JavaScript code above these script tags to handle WebSocket connections and real-time message functionality, enabling the WebSocket chat application to send and receive messages dynamically.
Next, we’ll develop the JavaScript code that will fetch the data and handle the WebSocket connection from the frontend side. Paste the following code above the first <script> tag in the HTML file that you just created.
<script>
   const user_username = JSON.parse(document.getElementById('user_username').textContent);
   document.querySelector('#submit').onclick = function (e) {
      const messageInputDom = document.querySelector('#input');
      const message = messageInputDom.value;
      chatSocket.send(JSON.stringify({
          'message': message,
          'username': user_username,
      }));
      messageInputDom.value = '';
   };

   const boxName = JSON.parse(document.getElementById('box-name').textContent);
   # Create a WebSocket in JavaScript.
   const chatSocket = new WebSocket(
      'ws://' +
      window.location.host +
      '/ws/chat/' +
      boxName +
      '/'
   );

   chatSocket.onmessage = function (e) {
      const data = JSON.parse(e.data);
      document.querySelector('#chat-text').value += (data.message + ' sent by ' + data.username   + '\n') // add message to text box
   }
</script>
This JavaScript code handles the real-time chat functionality by managing WebSocket communication between the client and server. First, it retrieves the current user's username from the JSON script tag embedded in the HTML and sets up a click event listener on the send button. When the user clicks send, it captures the message from the input field, packages it along with the username into a JSON object, sends it through the WebSocket connection, and then clears the input field for the next message.
The second part establishes the WebSocket connection itself by extracting the chatbox name from the page and constructing a WebSocket URL using the current host and a specific chat endpoint pattern. It then sets up a message handler that listens for incoming messages from the server. Whenever a new message arrives through the WebSocket, it parses the JSON data and appends the message along with the sender's username to the chat textarea, creating a simple but functional real-time chat experience where users can see messages as they're sent. Now, run the following commands to migrate the authentication model so that you can create new users to test the application:
python manage.py migrate
You can create new users by running the following:
python manage.py createsuperuser
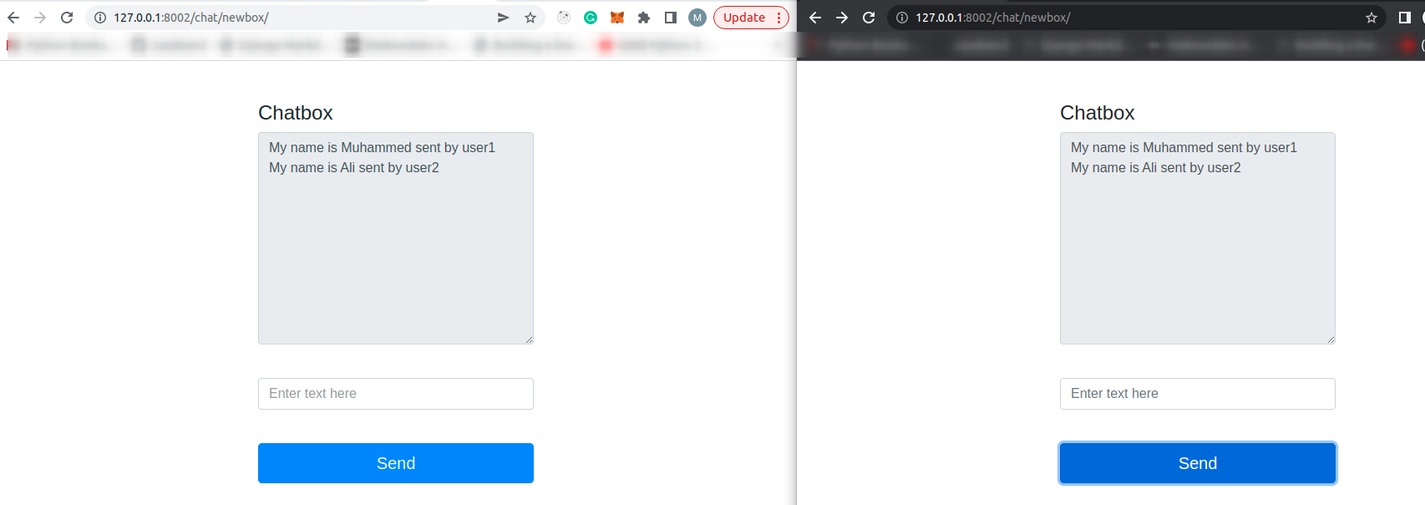
Finally, you can test the chat app by running it and logging in to two users using Django admin. You will be able to do this by logging in to each of the users on different browsers. Then, open the URL 127.0.0.1:8000/chat/newbox/ on each of the browsers, and when you send a text, each user receives the text in real time.
Building on the knowledge gained
In this article, you've learned the fundamentals of WebSocket technology and why it’s essential for building real-time applications like a modern chat app. You saw how Django Channels bridges Django’s traditional HTTP request-response model with persistent WebSocket connections, using the Asynchronous Server Gateway Interface (ASGI) to support real-time communication. By building a functional chat room, you gained hands-on experience with consumers, routing via ProtocolTypeRouter, and managing WebSocket connections from the browser using JavaScript.
Although we successfully built a real-time chat application, this is just the foundation. One of the most important next steps is adding a database connection to persist chat messages and chat logs, allowing users to retrieve conversation history when they rejoin a chat room. This turns a simple demo into a production-ready chat system. For more performance, replacing the in-memory channel layer with Redis as the message broker is strongly recommended. You could also look into how to handle exception in the chat app.
You can further enhance the experience by implementing features such as typing indicators, read receipts, online presence tracking, timestamps for chat messages, and file sharing. At this stage, middleware like AuthMiddlewareStack becomes important for securing WebSocket connections and ensuring authenticated users can only access authorized chat rooms.
With these foundations in place, you’re well-equipped to build advanced real-time systems and Django chat apps using Django Channels.

Written by
Muhammed AliMuhammed is a Software Developer with a passion for technical writing and open source contribution. His areas of expertise are full-stack web development and DevOps.