Running Solid Queue in production Rails apps
Background jobs are essential to many Ruby on Rails apps. Since the introduction of ActiveJob, Rails developers have been able to manage their background jobs as natively as they do their database records. Still, ActiveJob requires you to select (and support) a backend adapter that will implement ActiveJob's backend. Many use Redis, a memory cache, to queue and process background jobs. Redis comes with incredible speed but is yet another dependency to maintain.
Solid Queue is a new backend for ActiveJob. It was announced at Rails World, along with Solid Cache. Like Solid Cache, Solid Queue moves away from memory solutions like Redis and towards the database. Solid Queue takes advantage of speed increases of databases in recent years to power background job processing at scale. Rather than processing your background jobs in memory, it queues and processes them in your database. This comes with a slower speed but allows you to have more space for queues, as database space is much cheaper than memory space. When paired with Mission Control, Solid Queue can make background job processing and monitoring easier and more affordable for developers.
You can follow along with the tutorial and even view the final project here on Github.
Writing a background job with ActiveJob in Rails
It's possible that you already have some background jobs you'd like to migrate to use Solid Queue, but in case you don't, we'll write one in this section. Background jobs that lean on ActiveJob will work across ActiveJob adapters, so writing a background job is not unique to Solid Queue, Redis, or most any other ActiveJob backend.
To give us a functional example we can deploy, we'll make a simple animal shelter app similar to the ones we've made in other tutorials. We'll quickly set up a full-stack Rails app that lets you create, read, update, and delete dogs from the database. We'll also add a feature to track when the last time the dog was walked, and then we'll set up a background job to update an attribute on the model if the dog needs to be walked.
Setup a Rails App
To begin, create a new Rails 7.1 app:
rails _7.1.1_ new animal-shelter-notifier
Next, cd into that directory and use the scaffold to generate most of what we need for tracking dogs:
rails generate scaffold Dog name:string last_walked_at:datetime
This will generate a model, database migration, controller, and views for the Dog resource. Next, run the migration with:
rails db:migrate
Finally, run the development server with rails s and visit localhost:3000/dogs
You'll see an empty list of dogs with a button to create a new dog. After the next section, we'll create some dogs to test out the background job.
Writing a background job to send a notification when a dog is created
Next, we'll write a background job to notify us when it's been more than 8 hours since a dog was last walked. This would be a great time to implement something like Twilio to notify a user via text, but for this example, we'll just print the notification with puts.
We'll run a single job to check if any dogs need to be walked and notify the user. You can start by generating the job with:
rails generate job walk_reminder
This will create app/jobs/walk_reminder_job.rb and a corresponding test. We'll write a very simple implementation for the perform method - your app/jobs/walk_reminder_job.rb should look like this:
class WalkReminderJob < ApplicationJob
  queue_as :default

  def perform(dog)
    if dog.last_walked_at < 8.hours.ago
      puts "Reminder! Time to walk: #{dog.name}"
      # Here you could also send an email or notification
    end
  end
end
This will only send a notification if the dog hasn't been walked in the last 8 hours as of the time of creation. This isn't super helpful in practice because the job is only run once. Having the job reschedule itself for the future after running would make this more useful, as would a cron job that calls the job for every dog on a regular cadence. For this tutorial, we'll stick with this simplified implementation.
We want to call this job whenever we create a new dog so that if it's been more than 8 hours since the dog was walked, the console prints "Reminder! Time to walk: #{dog.name}". In your DogsController, edit the create method to call the job on successful save:
def create
  @dog = Dog.new(dog_params)

  respond_to do |format|
    if @dog.save
      WalkReminderJob.perform_later(@dog)
      format.html { redirect_to dog_url(@dog), notice: "Dog was successfully created." }
      format.json { render :show, status: :created, location: @dog }
    else
      format.html { render :new, status: :unprocessable_entity }
      format.json { render json: @dog.errors, status: :unprocessable_entity }
    end
  end
end
Using Solid Queue for ActiveJob
Using Solid Queue for ActiveJob is about as straightforward as any other ActiveJob adapter. First, add the gem to the Gemfile:
gem "solid_queue"
Then, install the gem with:
bundle install
Next, generate migrations and configurations by running:
rails generate solid_queue:install
Then, run the migrations with:
rails db:migrate
Finally, if for some reason the install script hasn't already, set your ActiveJob adapter in your environment config files, production.rb, development.rb, and any other environment relevant to you:
config.active_job.queue_adapter = :solid_queue
Demonstrating the background job
First, you need to start the Solid Queue supervisor by running:
bundle exec rake solid_queue:start
In a new terminal, start your Rails application with:
rails s
Next, visit localhost:3000/dogs. You'll see an empty list of dogs as well as a "new" button. Click that button, and you'll see a simple form for creating a new Dog in the database:
 Create a dog with a last walked date of your current day at 3 hours ago, and create another dog with a last walked date of several days ago.
Visiting http://localhost:3000/dogs again should show you a list of the dogs you created:

Looking at the console that's running the Solid Queue supervisor, you'll see both dogs caused a job to be created, and that one of those jobs resulted in output!
[SolidQueue] Starting Dispatcher(pid=38038, hostname=Jefferys-Air.attlocal.net, metadata={:polling_interval=>1, :batch_size=>500})
[SolidQueue] Starting Worker(pid=38039, hostname=Jefferys-Air.attlocal.net, metadata={:polling_interval=>0.1, :queues=>"*", :thread_pool_size=>5})
[SolidQueue] Claimed 1 jobs
Reminder! Time to walk: Bear
[SolidQueue] Claimed 1 jobs
Deploying a Rails app with Solid Queue
One of Solid Queue's greatest benefits, when compared to Redis-backed alternatives like Sidekiq, is simplicity in deployment. When using something that relies on Redis for ActiveJob, you have to deploy, maintain, and monitor a Redis instance. With Solid Queue, you only need to manage the database, and it's likely you're already doing that!
As you ran the application locally, you probably noticed that you needed one process to run the Rails server and another process to run the Solid Queue supervisor. While your configuration will vary depending on your deployment process, this generally means you need one service to run the rails server and another to run the Solid Queue supervisor. In Heroku, for example, this means running two dynos, one of the worker types. On Render, this means running a background worker service.
Still, deploying another service is additional overhead and cost. If the trade-offs are right for you, you can run the Solid Queue supervisor together with your app server using the built-in puma plugin.
Using the Puma plugin will simplify your deployment, but it means background jobs will share resources with your web server. If your background jobs consume sufficient resources, then your application's performance will suffer. However, if your background job needs are trivial, this can be a good option.
If you want to use the Puma plugin, add the following line to config/puma.rb:
plugin :solid_queue # Run Solid Queue with rails server
If you use the Puma plugin, when you run rails s, your shell will be quickly filled with logs from Solid Queue. You can silence this output by adding the following to your config/development.rb:
config.solid_queue.silence_polling = true
Monitoring and managing background jobs with Mission Control
Mission Control - Jobs was released shortly after Solid Queue as a tool to inspect job queues and retry or delete failed jobs. Having observability into how jobs are performing is important for insight and even incident response, and Mission Control brings it right into your application. To install Mission Control, add the gem to your Gemfile:
gem "mission_control-jobs"
Then:
bundle install
Next, mount it in your routes file by adding it to your config/routes.rb:
Rails.application.routes.draw do
  # ...
  mount MissionControl::Jobs::Engine, at: "/jobs"
  # ...
end
Restarting the rails server and visiting localhost:3000/jobs will now show you the Mission Control UI:

Monitoring queues
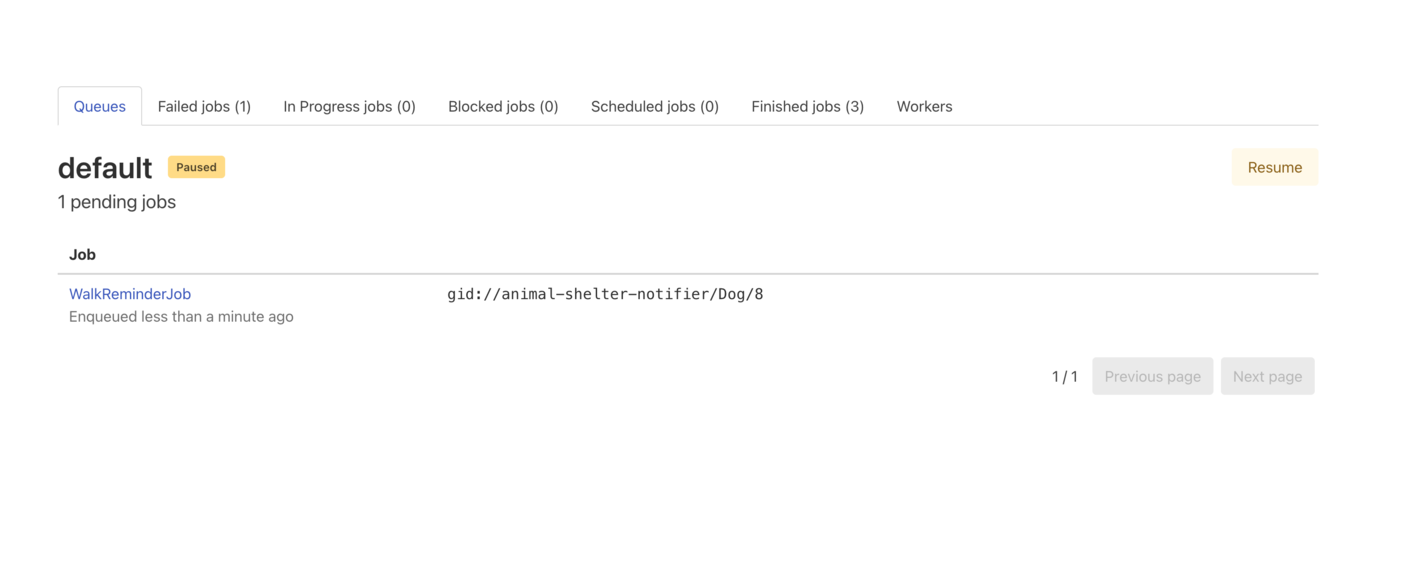
The first tab shows the queues in your application. In our example application, we only used the default queue, so that's all that is shown. If your application has more than one queue, you can view them here. Clicking into a queue shows all the pending jobs, as well as a pause button.
If you pause the default queue and then create a new dog, you'll see the job has been queued as pending:
 Unpausing the job causes it to process and then show up under finished jobs, which provides helpful details for jobs that have been completed.
You can also use this dashboard to retry or discard failed jobs, inspect blocked jobs, and monitor Solid Queue workers.
Monitoring background jobs with Honeybadger
While Mission Control lets you retroactively see when jobs fail, it doesn't let you know right away when jobs are failing. Monitoring Solid Queue jobs with Honeybadger ensures you find out about failing jobs before your customers.
To start, create a Honeybadger account and add a new project. Select Rails as your framework, then follow the instructions for setup. This includes adding the gem to your Gemfile:
gem "honeybadger"
Next, install that gem with:
bundle install
Lastly, run the install command provided on the website.
bundle exec honeybadger install your-api-key-here
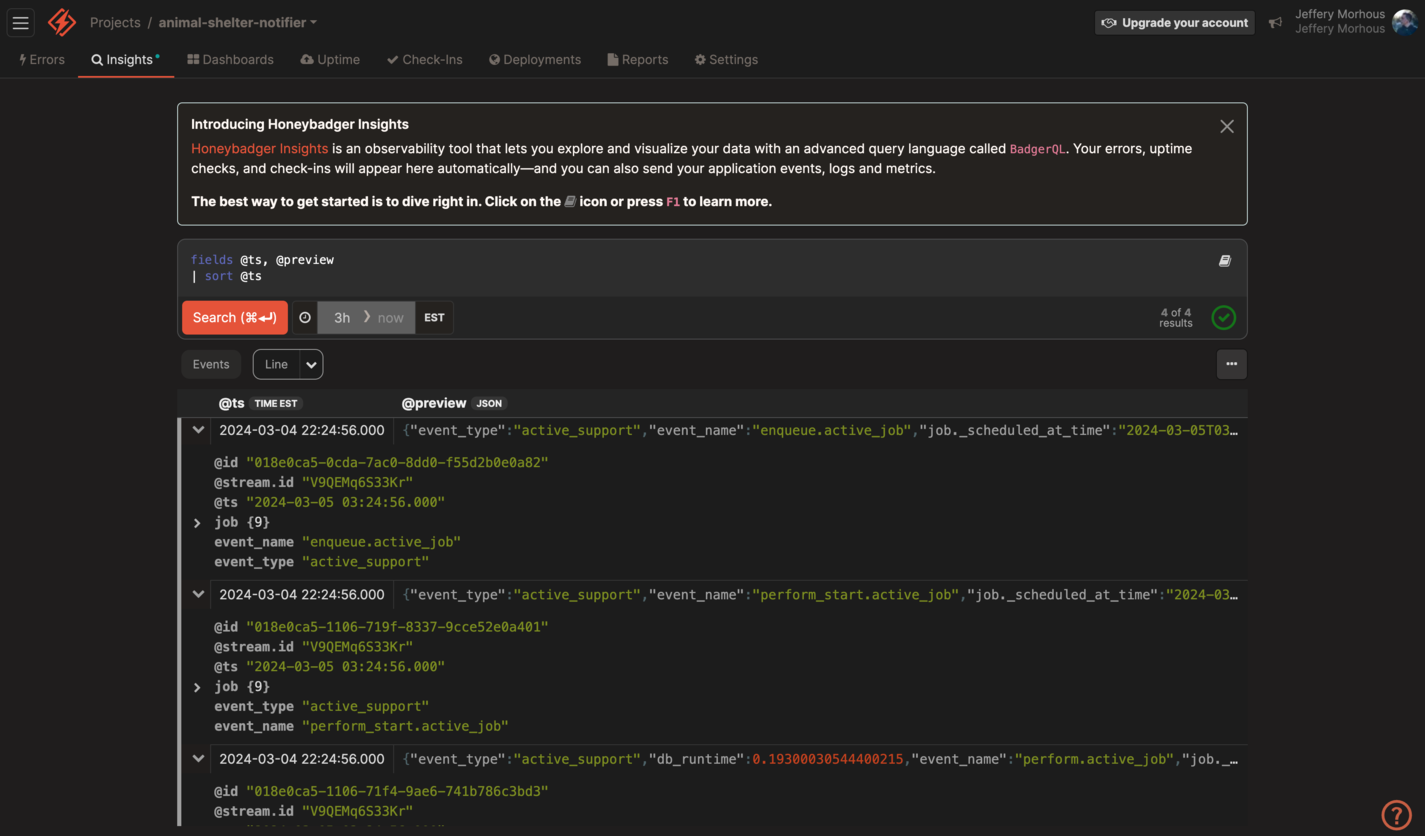
This is everything you need to start reporting errors from your background jobs to Honeybadger! If you want more insight into your background jobs, even if they don't raise an exception, you can leverage Honeybadger Insights, which lets you collect custom events.
First, in config/initializers/ create a file called instrumentation.rb, where we'll integrate ActiveSupport notifications with Honeybadger insights:
ActiveSupport::Notifications.subscribe(/\.active_job$/) do |*args|
  event = ActiveSupport::Notifications::Event.new(*args)
  Honeybadger.event("active_support", event.payload.compact.merge(event_name: event.name))
end
This will send data to Honeybadger insights when ActiveJob has events. To send data to Honeybadger from your local rails server, you'll need to set the environment variable:
HONEYBADGER_REPORT_DATA=true rails server

Conclusion
The introduction of Solid Queue as a new backend for ActiveJob represents a significant shift in how Ruby on Rails applications handle background job processing. Moving away from in-memory solutions like Redis to database-based queuing with Solid Queue offers a more integrated and potentially cost-effective approach for developers. While Redis provides incredible speed and efficiency for processing background jobs, it introduces an additional dependency that requires maintenance and extra cost, especially when scaling. Solid Queue, on the other hand, leverages the advancements in database technology to offer a robust solution that integrates seamlessly with Rails applications, reducing the complexity and cost of deployment.
The project we walked through demonstrates how Solid Queue, in conjunction with Mission Control for monitoring and managing background jobs, can simplify the development and maintenance of Rails applications with background processing needs. By integrating Solid Queue, developers can leverage their existing database infrastructure, avoiding the overhead of managing additional services like Redis. This approach not only simplifies deployment but also offers a cost-effective solution for scaling background job processing.
Remember to recognize the tradeoffs involved in moving from Redis to Solid Queue. While Solid Queue offers benefits in terms of integration and cost, it may not match the speed and efficiency of Redis for certain high-volume or latency-sensitive applications. Developers must carefully consider their application's specific needs and weigh the tradeoffs between speed, cost, and complexity when choosing between Redis and Solid Queue.

Written by
Jeffery MorhousJeff is a Software Engineer working in healthcare technology using Ruby on Rails, React, and plenty more tools. He loves making things that make life more interesting and learning as much he can on the way. In his spare time, he loves to play guitar, hike, and tinker with cars.