Building A Full-Stack Application With Vue, Vuex and Rails
Building full-stack applications with scalability in mind can be intimidating, especially when building with the latest version of Vue and Vuex, which have full typescript support. This article will teach its readers everything they need to know about building scalable full-stack applications from state management with Vuex 4.0 to handle API requests and database interactions by exploring a CRUD application that manages prescription of treatments to unhealthy livestock. The backend will be built with Rails, exposing basic CRUD APIs for integration by the frontend.
Most companies adopted API-based development architecture since it gives the frontend development team more flexibility to choose a suitable frontend tool for development. Although this may not be the best option, it has been a reliable option, and many companies have adopted this development architecture since it adds more flexibility to the team.
Prerequisites
Before we get started, make sure you have the following to keep up with this tutorial:
- Rails V6.x
- Node.js V10.x
- Prior working knowledge of Ruby on Rails
- Prior working knowledge of TypeScript
- Prior working knowledge of Vue.js
What we will build
In this tutorial, we will build a full-stack CRUD application that manages the prescription of treatments for unhealthy livestock. Users will be able to create, update, and delete prescriptions for livestock. The CRUD APIs will be built using Rails, exposing the CRUD APIs for integration by the frontend, which will be built with Vue 3. Each of these stacks will run on different ports as independent applications.
Basic Architecture of the Full-stack App
Our full-stack application is made up of both client and server applications running independently, with each component of the client application interacting with the CRUD APIs issued by the server application through Vuex for proper management of the application state. The backend application stores all prescription data in a Sqlite 3 database while exposing the CRUD APIs to the frontend application.
Backend Service Setup
In a folder of your preference, create a Rails app by running the following command:
rails new vet_clinic_api --api
This will tell Rails to create this project as an API, thereby removing all the frontend dependencies(view files).
Database Configuration
We will use Sqlite 3, which is the default database for Rails applications.
rails g scaffold prescriptions vet_prescription:text prescribed_by:text disease:text livestock:text completed:boolean
By running the above command, Rails will scaffold an initial structure for our migration, test, model, controller, route:
rails db:migrate
This command will add our tables to the database.
Seeding the Database
Let’s seed our database with some prescription data.
Add the code snippet below to db/migrate/seed.rb
//db/migrate/seed.rb

Prescription.destroy_all
Prescription.create!([{
    vet_prescription:"Achyranthes aspera",
    prescribed_by:"Dr Chucks",
    disease:"Rabbies",
    livestock:"goat",
    completed:false
},
{
    vet_prescription:"Achyranthes aspera",
    prescribed_by:"Dr Rex",
    disease:"Rabbies",
    livestock:"Dog",
    completed:false
},
{
    vet_prescription:"ethnovet",
    prescribed_by:"Dr Chucks",
    disease:"Pox",
    livestock:"Sheep",
    completed:false
}])
p "Created #{Prescription.count} prescriptions"
This file will store the initial data for seeding the database so that when the app starts up, we’ll have some existing prescription data.
Run the following command to execute the code in db/migrate/seed.rb, which seeds the database with some predefined prescription data:
rails db:seed
With these few commands, we created a functional CRUD API with Rails. How easy was it? (smiles)
CORS Configuration
Since we’ll be exposing our CRUD APIs to the frontend, and both the frontend and backend servers will be running on a different PORT, we need to set up a CORS configuration on the Rails backend to grant access to data sharing between the frontend and backend.
Locate the Gemfile in the project root and uncomment the following line of code:
# gem 'rack-cors'
Add the following code to config/environments/initializers/cors.rb:
//config/environments/initializers/cors.rb
Rails.application.config.middleware.insert_before 0, Rack::Cors do
  allow do
    origins '*'
    resource '*',
      headers: :any,
      methods: [:get, :post, :put, :patch, :delete, :options, :head]
  end
end
The above snippet allows the Rails CRUD API to be accessible from frontend apps running on any PORT.
Run the following command to start the Rails server:
rails s
Navigate to localhost:3000/prescriptions to get a JSON response for all prescriptions.
Consider using Rails if you are working with clients who change their projects’ workflow frequently. With Rails, it’s easy to implement features with a few commands and lines of code. This is my personal opinion, though.
Introducing Vue
Vue is a progressive framework for building user interfaces. Vue introduces concepts, such as Virtual DOM, render functions, and server-side rendering capabilities, to provide significant performance optimization for web applications.
Vue 3 comes with lots of new features and changes for developers. These features are designed to improve the overall stability of the framework, as well as its speed and maintainability.
We’ll make use of the composition API, one of the most anticipated features of Vue 3. It is a new way to create Vue components, with a more organized and efficient approach to writing code, and full TypeScript type-checking support.
Introducing Vuex
Vuex is a state management library created by the Vue team, and it is based on the same flux architecture as Redux. It is specifically designed for Vue and allows better organization of your store. Vuex will become crucial if your Vue application state gets more complex as it grows. The latest stable release of Vuex, v4.0.0, supports the Composition API introduced in Vue 3, as well as a more robust inference for TypeScript.
Setting up the Frontend Application
The frontend will be setup with Vue 3 and typeScript, while Vuex will be used for application state management.
Let’s start by using the Vue-CLI tool to create a Vue 3 app with typescript support.
Install the Vue-CLI tool globally with the following command:
npm install --global @vue/cli
Create a new Vue 3 app with typescript and Vuex support with the command below:
vue create vet_clinic_frontend
Choose the manually select feature option and hit the space key to select the following options:
- Choose Vue version
- Babel
- TypeScript
- Linter / Formatter
Next, choose Vue 3.x(Preview) as the version for the project.
- Enter yes to use the class-style component syntax.
- Enter yes to use Babel alongside TypeScript.
- Select any linter of your choice.
Once the Vue 3 app is generated successfully, we will have a Vue 3 project setup with Vuex (V4.x) and full typescript support.
We’ll add type safety to the application using typescript.
To start the development server, run the command below in your terminal and head over to http://localhost:8080 to preview your project in the browser.
We will use the Bulma CSS framework for styling our application. Run the following command to install Bulma CSS:
npm install bulma
To import Bulma CSS, add the following code to App.vue:
//App.vue
<style lang="scss">
@import "~bulma/css/bulma.css";
</style>
Setting up the Application Store
The application store will be setup with Vuex. To make changes to the store, actions will be dispatched from the component, which triggers the mutations, thereby updating the store.
Take the following steps to set up the application store:
- Create the state objects.
- Set up the mutations that will occur in our application.
- Create the actions that will commit to these subsequent mutations.
- Create getters for components to directly compute state data.
State
A state is a store object that holds application-level data that needs to be accessed by all components.
Create a state.ts file in the store directory with the following code snippet:
//src/store/state.ts
export type Prescription = {
  id: number;
  vet_prescription: string;
  prescribed_by: string;
  disease: string;
  livestock: string;
  completed: boolean;
  editing: boolean;
};
export type Data = {
  vet_prescription: string;
  prescribed_by: string;
  disease: string;
  livestock: string;
};
export type State = {
  loading: boolean;
  prescriptions: Prescription[];
  data: Data | null;
  showCreateModal: boolean;
  showEditModal: boolean;
  showPrescriptionModal: boolean;
  editModalPrescriptionId: number | undefined;
  showPrescriptionId: number | undefined;
};
export const state: State = {
  loading: false,
  prescriptions: [],
  data: null,
  showCreateModal: false,
  showEditModal: false,
  showPrescriptionModal: false,
  editModalPrescriptionId: undefined,
  showPrescriptionId: undefined,
};
Here, we add some type safety to Prescription and Data. We also export types because they will be used in the definitions of getters, mutations, and actions. Finally, we cast the State type to the state.
Mutations
Mutations are methods that, when triggered, modify the store. They receive the state as the first argument and payload as the second, eventually modifying the application state with the payload. To create mutations, the Vuex docs recommend using constants for mutation types.
Create a mutations.ts file in the store directory with the following code snippet:
//src/store/mutations.ts
import { MutationTree } from "vuex";
import { State, Prescription, Data } from "./state";

export enum MutationType {
  CreatePrescription = "CREATE_PRESCRIPTION",
  SetPrescriptions = "SET_PRESCRIPTIONS",
  CompletePrescription = "COMPLETE_PRESCRIPTION",
  RemovePrescription = "REMOVE_PRESCRIPTION",
  EditPrescription = "EDIT_PRESCRIPTION",
  UpdatePrescription = `UPDATE_PRESCRIPTION`,

  SetLoading = "SET_LOADING",
  SetCreateModal = "SET_CREATE_MODAL",
  SetEditModal = "SET_EDIT_MODAL",
  SetPrescriptionModal = "SET_PRESCRIPTION_MODAL",
}
The above snippet uses the enum symbol to hold all the possible names of mutations in our app.
Next, we will declare a contract (type) for each MutationType, as follows:
//src/store/mutation.ts
export type Mutations = {
  [MutationType.CreatePrescription](state: State, prescription: Data): void;

  [MutationType.SetPrescriptions](state: State, prescription: Prescription[]): void;

  [MutationType.CompletePrescription](state: State, prescription: Partial<Prescription> & { id: number }): void;

  [MutationType.RemovePrescription](state: State, prescription: Partial<Prescription> & { id: number }): void;

  [MutationType.EditPrescription](state: State, prescription: Partial<Prescription> & { id: number }): void;

  [MutationType.UpdatePrescription](state: State, prescription: Partial<Prescription> & { id: number }): void;

  [MutationType.SetLoading](state: State, value: boolean): void;

  [MutationType.SetCreateModal](state: State, value: boolean): void;

  [MutationType.SetEditModal](state: State, value: { showModal: boolean; prescriptionId: number | undefined }): void;

  [MutationType.SetPrescriptionModal](state: State, value: { showModal: boolean; prescriptionId: number | undefined }): void;
};
Then, we will implement the contracts declared for each MutationType, as follows:
//src/store/mutation.ts
export const mutations: MutationTree<State> & Mutations = {
  [MutationType.CreatePrescription](state, prescription) {
    state.data == prescription;
  },
  [MutationType.SetPrescriptions](state, prescriptions) {
    state.prescriptions = prescriptions;
  },
  [MutationType.CompletePrescription](state, newPrescription) {
    const prescription = state.prescriptions.findIndex((prescription) => prescription.id === newPrescription.id);
    if (prescription === -1) return;
    state.prescriptions[prescription] = { ...state.prescriptions[prescription], ...newPrescription };
  },
  [MutationType.RemovePrescription](state, Prescription) {
    const prescription = state.prescriptions.findIndex((prescription) => prescription.id === Prescription.id);
    if (prescription === -1) return;
    //If prescription exist in the state, remove it
    state.prescriptions.splice(prescription, 1);
  },
  [MutationType.EditPrescription](state, Prescription) {
    const prescription = state.prescriptions.findIndex((prescription) => prescription.id === Prescription.id);
    if (prescription === -1) return;
    //If prescription exist in the state, toggle the editing property
    state.prescriptions[prescription] = { ...state.prescriptions[prescription], editing: !state.prescriptions[prescription].editing };
    console.log("prescription", state.prescriptions[prescription]);
  },
  [MutationType.UpdatePrescription](state, Prescription) {
    state.prescriptions = state.prescriptions.map((prescription) => {
      if (prescription.id === Prescription.id) {
        return { ...prescription, ...Prescription };
      }
      return prescription;
    });
  },

  [MutationType.SetLoading](state, value) {
    state.loading = value;
  },
  [MutationType.SetCreateModal](state, value) {
    state.showCreateModal = value;
  },
  [MutationType.SetEditModal](state, value) {
    state.showEditModal = value.showModal;
    state.editModalPrescriptionId = value.prescriptionId;
  },
  [MutationType.SetPrescriptionModal](state, { showModal, prescriptionId }) {
    state.showPrescriptionModal = showModal;
    state.showPrescriptionId = prescriptionId;
  },
};
MutationTree is a generic type shipped with the Vuex package. We used it in the above snippet to declare a type of mutation tree.
The mutation tree and mutations ensure that the contract is implemented correctly; otherwise, Typescript will trigger an error.
Actions
Actions are methods that trigger mutations. When handling asynchronous tasks, such as making request to an API, actions are used before calling the corresponding mutations with the API response as payload. We will get a clear implementation for this scenario as we create our actions.
Before creating actions, we will install Axios to handle all our Http request to the Rails server, as follows:
npm install axios --save
Create an actions.ts file in the store directory with the following code snippet:
//src/store/actions.ts
import { ActionContext, ActionTree } from "vuex";
import { Mutations, MutationType } from "./mutations";
import { State, Prescription, Data } from "./state";
import axios from "axios";
const apiUrl = "http://localhost:3000/prescriptions";
export enum ActionTypes {
  GetPrescriptions = "GET_PRESCRIPTIONS",
  SetCreateModal = "SET_CREATE_MODAL",
  SetEditModal = "SET_EDIT_MODAL",
  RemovePrescription = "REMOVE_PRESCRIPTION",
  CreatePrescription = "CREATE_PRESCRIPTION",
  UpdatePrescription = "UPDATE_PRESCRIPTION",
}
Similarly, the above snippet uses the enum symbol to hold all the possible names of actions in our app.
Next, we will declare a contract (type) for each ActionType, as follows:
//src/store/actions.ts
type ActionAugments = Omit<ActionContext<State, State>, "commit"> & {
  commit<K extends keyof Mutations>(key: K, payload: Parameters<Mutations[K]>[1]): ReturnType<Mutations[K]>;
};

export type Actions = {
  [ActionTypes.GetPrescriptions](context: ActionAugments): void;
  [ActionTypes.SetCreateModal](context: ActionAugments): void;
  [ActionTypes.SetEditModal](context: ActionAugments): void;
  [ActionTypes.RemovePrescription](context: ActionAugments, Prescription: { id: number }): void;
  [ActionTypes.CreatePrescription](context: ActionAugments, data: Data): void;
  [ActionTypes.UpdatePrescription](context: ActionAugments, prescription: Prescription): void;
};
The ActionAugments type restricts all commits only to their declared mutations and also to check the payload type.
Next, we will implement the contract (types) declared for each ActionType. Add the code below to the action.ts file:
//src/store/actions.ts
export const actions: ActionTree<State, State> & Actions = {
  async [ActionTypes.GetPrescriptions]({ commit }) {
    commit(MutationType.SetLoading, true);

    const response = await axios.get(apiUrl);

    commit(MutationType.SetLoading, false);
    commit(MutationType.SetPrescriptions, response.data);
  },

  async [ActionTypes.SetCreateModal]({ commit }) {
    commit(MutationType.SetCreateModal, true);
  },

  async [ActionTypes.SetEditModal]({ commit }) {
    commit(MutationType.SetEditModal, { showModal: true, prescriptionId: 1 });
  },

  //Optimistic update
  async [ActionTypes.RemovePrescription]({ commit }, Prescription) {
    if (Prescription != undefined) {
      commit(MutationType.RemovePrescription, Prescription);
    }

    const response = await axios.delete(`${apiUrl}/${Prescription.id}`);
  },

  async [ActionTypes.CreatePrescription]({ commit, dispatch }, Prescription) {
    const response = await axios.post(apiUrl, Prescription);
    dispatch(ActionTypes.GetPrescriptions);
  },

  async [ActionTypes.UpdatePrescription]({ commit, dispatch }, Prescription) {
    if (Prescription != undefined) {
      commit(MutationType.UpdatePrescription, Prescription);
      const response = await axios.patch(`${apiUrl}/${Prescription.id}`, Prescription);
      dispatch(ActionTypes.GetPrescriptions);
    }
  },
};
Here, we created an actions variable that stores all the implemented actions. Similarly, the ActionTree<State> & Actions ensures that the contract (type Actions) is implemented correctly; otherwise, Typescript will trigger an error.
We also set up our asynchronous call to the Rails API endpoint in the GetPrescriptions action and triggered the SetPrescriptions mutation type with the response data as the payload. We also set up SetCreateModal, SetEditModal, CreatePrescription, UpdatePrescription, and RemovePrescription actions.
Getters
Getters are methods that receive the state as its first parameter and return computed information from the store state.
Create a getters.ts file in the store directory with the following code snippet:
//src/store/getters.ts
import { GetterTree } from "vuex";
import { State, Prescription } from "./state";
export type Getters = {
  completedPrescriptionCount(state: State): number;
  totalPrescriptionCount(state: State): number;
  getPrescriptionById(state: State): (id: number) => Prescription | undefined;
};
export const getters: GetterTree<State, State> & Getters = {
  completedPrescriptionCount(state) {
    return state.prescriptions.filter((prescription) => prescription.completed).length;
  },
  totalPrescriptionCount(state) {
    return state.prescriptions.length;
  },
  getPrescriptionById: (state) => (id: number) => {
    return state.prescriptions.find((prescription) => prescription.id === id);
  },
};
The above code snippet defines the following getters:
completedPrescriptionCount– A function that gets the total number of completed prescriptions in our state.totalPrescriptionCount– A function that gets the total number of prescriptions in our state.getPrescriptionById– A function that gets a prescription by its ID.
We have also added some type safety to Getters.
Store
Let’s wire our state, mutations, actions, and getters to the global Vuex store. We’ll update store/index.ts, as follows:
//src/store/index.ts
import { createStore, Store as VuexStore, CommitOptions, DispatchOptions, createLogger } from "vuex";
import { State, state } from "./state";
import { Mutations, mutations } from "./mutations";
import { Actions, actions } from "./actions";
import { Getters, getters } from "./getters";
export const store = createStore<State>({
  plugins: process.env.NODE_ENV === "development" ? [createLogger()] : [],
  state,
  mutations,
  actions,
  getters,
});
export function useStore() {
  return store as Store;
}
export type Store = Omit<VuexStore<State>, "getters" | "commit" | "dispatch"> & {
  commit<K extends keyof Mutations, P extends Parameters<Mutations[K]>[1]>(key: K, payload: P, options?: CommitOptions): ReturnType<Mutations[K]>;
} & {
  dispatch<K extends keyof Actions>(key: K, payload?: Parameters<Actions[K]>[1], options?: DispatchOptions): ReturnType<Actions[K]>;
} & {
  getters: {
    [K in keyof Getters]: ReturnType<Getters[K]>;
  };
};
The state, mutations, actions, and getters are required to create a store by passing an object containing them into the createStore method. During development, the createLogger plugin logs the state (the previous state and next state) and mutations to the console.
To have the store accessible in all our application’s components; we need to inject it into the entire application. Fortunately, the Vue-CLI tool has already imported the entire store and passed it within the application’s Vue instance.
Integrating the Vuex Store into the Component
In this tutorial, the Vue 3 composition API will be used to create all of components in our frontend application.
App Component
Our frontend should render a list of prescription data as soon as it launches. We’ll dispatch the GetPrescription action within the component’s mounted() lifecycle hook. To access the store within a component, the useStore hook, which returns our store, will be executed.
//src/App.vue
<script lang="ts">
import { computed, defineComponent, onMounted } from "vue";
import PrescriptionList from "./components/PrescriptionList.vue";
import { useStore } from "./store";
import { ActionTypes } from "./store/actions";
export default defineComponent({
  components: { PrescriptionList },
  setup() {
    const store = useStore();
    const loading = computed(() => store.state.loading);
    onMounted(() => store.dispatch(ActionTypes.GetPrescriptions));
    const completedCount = computed(() => store.getters.completedPrescriptionCount);
    const totalCount = computed(() => store.getters.totalPrescriptionCount);
    return { loading, completedCount, totalCount };
  },
});
</script>
<template>
  <nav class="navbar" role="navigation" aria-label="main navigation">
    <div class="navbar-brand">
      <a class="navbar-item" href="https://bulma.io">
        <img src="https://bulma.io/images/bulma-logo.png" width="112" height="28" />
      </a>
    </div>
    <div id="navbarBasicExample" class="navbar-menu">
      <div class="navbar-start">
        <a class="navbar-item"> Home </a>
        <a class="navbar-item"> About </a>
      </div>
    </div>
  </nav>
  <div class="container mx-auto mt-4">
    <h1 class="is-size-3 has-text-centered p-2 has-text-weight-bold is-success">Vet clinic Frontend</h1>
    <h3 class="has-text-centered p-2">Manage records of treated livestock in your farm</h3>
    <div v-if="loading">
      <h3 class="has-text-centered mt-4">Loading...</h3>
    </div>
    <div v-else>
      <p class="has-text-centered mt-2">{{ completedCount }} of {{ totalCount }} treated.</p>
      <PrescriptionList />
    </div>
  </div>
</template>
<style>
@import "~bulma/css/bulma.css";
</style>
Here, we’ve created three computed properties:
completedCount, which calls thecompletedPrescriptionCountgetter method to retrieve the total number of completed treatments.totalCount, which calls thetotalPrescriptionCountgetter method to retrieve the total number of prescriptions.loading, which gets the loading property of the state.
With the Vue 3 composition API, the methods and properties required by the template must be returned to be accessible in the template. Notice how we’ve returned loading, completedCount, and totalCount.
PrescriptionList Component
This component will be responsible for retrieving the list of prescriptions from the backend and passing the prescription data to it child component.
Create PrescriptionList.vue inside the components folder with the following code:
//src/components/PrescriptionList.vue
<template>
  <table class="table is-hoverable is-striped">
    <thead>
      <tr>
        <th><abbr title="Position">Prescription Id</abbr></th>
        <th>Treated</th>
        <th>Prescription</th>
        <th><abbr title="Won">Prescribed By</abbr></th>
        <th><abbr title="Drawn">Disease</abbr></th>
        <th><abbr title="Drawn">Livestock</abbr></th>
        <th><abbr title="Lost">Actions</abbr></th>
      </tr>
    </thead>
    <tbody v-if="prescriptions">
      <tr v-for="prescription in prescriptions" :key="prescription.id">
        <PrescriptionListItem v-bind="prescription" />
      </tr>
    </tbody>
    <tfoot>
      <CreateModal v-show="showCreateModal"></CreateModal>
      <button class="button  is-success" @click="setModal">Create Prescription</button>
    </tfoot>
  </table>
  <EditModal v-if="showEditModal" :id="editModalPrescriptionId"></EditModal>
  <Prescription v-if="showPrescriptionModal" :id="showPrescriptionId"></Prescription>
</template>
<script>
import CreateModal from "./CreateModal";
import EditModal from "./EditModal";
import Prescription from "./Prescription";
import PrescriptionListItem from "./PrescriptionListItem";
import { defineComponent, computed } from "vue";
import { useStore } from "@/store";
import { MutationType } from "@/store/mutations";
export default defineComponent({
  name: "Table",
  components: {
    CreateModal,
    PrescriptionListItem,
    Prescription,
    EditModal,
  },
  setup() {
    const store = useStore();
    const setModal = () => {
      store.commit(MutationType.SetCreateModal, true);
    };
    const showCreateModal = computed(() => store.state.showCreateModal);
    const showEditModal = computed(() => store.state.showEditModal);
    const editModalPrescriptionId = computed(() => store.state.editModalPrescriptionId);
    const showPrescriptionModal = computed(() => store.state.showPrescriptionModal);
    const showPrescriptionId = computed(() => store.state.showPrescriptionId);
    const prescriptions = computed(() => store.state.prescriptions);
    return { showCreateModal, setModal, prescriptions, showEditModal, showPrescriptionModal, editModalPrescriptionId, showPrescriptionId };
  },
});
</script>
<style scoped>
table {
  width: 100%;
}
.fa {
  font-size: 1.2rem;
  margin-left: 15px;
}
.fa:hover {
  font-size: 1.4rem;
}
</style>
The setModal method invokes the mutation that sets showCreateModal in the state to true, resulting in launching the modal for creating prescriptions.
We’ve created the following computed properties:
showCreateModal, which gets theshowCreateModalproperty of the state.showEditModal, which gets theshowEditModalproperty of the state.showPrescriptionModal, which gets theshowPrescriptionModalproperty of the state.prescription, which gets the list of prescription from the state.showPrescriptionId, which gets theshowPrescriptiondproperty of the state.editPrescriptionId, which gets theeditPrescriptionIdproperty of the state.
Prescription Component
This component will receive the prescription ID as a prop from the PrescriptionList component. ID props will be used to fetch a prescription with the corresponding ID via the getPrescriptionById getters method and render the prescription properties in the browser.
Create Prescription.vue inside the components folder with the following code:
//src/components/Prescription.vue
<template>
  <div class="modal is-active">
    <div class="modal-background"></div>
    <div class="modal-content">
      <h1>VIEW PRESCRIPTION</h1>
      <div class="card">
        <div class="card-content">
          <div class="media">
            <div class="media-content">
              <p class="title is-4">Livestock: {{ prescription.livestock }}</p>
              <p class="subtitle is-6"><b>Prescribed by:</b> {{ prescription.prescribed_by }}</p>
              <p class="subtitle is-6"><b>Disease:</b> {{ prescription.disease }}</p>
            </div>
          </div>
          <div class="content">
            <p class="subtitle is-6">Prescription: {{ prescription.vet_prescription }}</p>
          </div>
        </div>
      </div>
    </div>
    <button class="modal-close is-large" @click="closeModal" aria-label="close"></button>
  </div>
</template>
<script lang="ts">
import { computed } from "vue";
import { useStore } from "@/store";
import { MutationType } from "@/store/mutations";
export default {
  name: "PrescriptionModal",
  props: {
    id: { type: Number, required: true },
  },
  setup(props: any) {
    const store = useStore();
    const prescription = computed(() => store.getters.getPrescriptionById(Number(props.id)));
    const closeModal = () => {
      store.commit(MutationType.SetPrescriptionModal, {
        showModal: false,
        prescriptionId: undefined,
      });
    };
    return { closeModal, prescription };
  },
};
</script>
<style scoped>
h1 {
  color: #ffffff;
  text-align: center;
  font-size: 2rem;
  margin-bottom: 3rem;
}
</style>
The closeModal method commits the SetPrescriptionModal mutation, which sets the showModal property in the state to false, while the prescription computed property calls the getPrescriptionById getter method to retrieve a prescription by its Id.
CreateModal Component
This component is responsible for creating prescriptions.
Create CreateModal.vue inside the components folder with the following code:
//src/components/CreateModal.vue
<template>
  <div class="modal is-active">
    <div class="modal-background"></div>
    <div class="modal-content">
      <form @submit.prevent="createPrescription">
        <div class="field">
          <label class="label">Prescribed By</label>
          <div class="control">
            <input v-model="prescribedBy" class="input" type="text" placeholder="Enter prescriber's name" />
          </div>
        </div>
        <div class="field">
          <label class="label">Prescription</label>
          <div class="control">
            <textarea v-model="prescription" class="textarea" placeholder="Enter prescription"></textarea>
          </div>
        </div>
        <div class="field">
          <label class="label">Disease</label>
          <div class="control">
            <input v-model="disease" class="input" type="text" placeholder="Enter name of disease" />
          </div>
        </div>
        <div class="field">
          <label class="label">Livestock</label>
          <div class="control">
            <input v-model="livestock" class="input" type="text" placeholder="Enter livestock" />
          </div>
        </div>
        <div class="field is-grouped">
          <div class="control">
            <button type="submit" class="button is-link">Submit</button>
          </div>
          <div class="control" @click="closeModal">
            <button class="button is-link is-light">Cancel</button>
          </div>
        </div>
      </form>
    </div>
    <button class="modal-close is-large" @click="closeModal" aria-label="close"></button>
  </div>
</template>
<script lang="ts">
import { defineComponent, reactive, toRefs } from "vue";
import { useStore } from "@/store";
import { Data } from "@/store/state";
import { MutationType } from "@/store/mutations";
import { ActionTypes } from "@/store/actions";
export default {
  name: "CreateModal",
  setup() {
    const state = reactive({
      prescription: "",
      prescribedBy: "",
      disease: "",
      livestock: "",
    });
    const store = useStore();
    const createPrescription = () => {
      if (state.prescription === "" || state.prescribedBy === "" || state.disease === "" || state.livestock === "") return;
      const prescription: Data = {
        vet_prescription: state.prescription,
        prescribed_by: state.prescribedBy,
        disease: state.disease,
        livestock: state.livestock,
      };
      store.dispatch(ActionTypes.CreatePrescription, prescription);
      state.prescription = "";
      state.prescribedBy = "";
      state.disease = "";
      state.livestock = "";
    };
    const closeModal = () => {
      store.commit(MutationType.SetCreateModal, false);
    };
    return { closeModal, ...toRefs(state), createPrescription };
  },
};
</script>
The createPrescription method dispatches an action that makes a post request to the server, thereby creating a new prescription, while the closeModal method commits the SetPrescriptionModal mutation (which sets the showModal property in the state to false).
Working with forms and input element requires two-way data binding, and as such, we used Vue 3’s reactive method to store values used in the input fields.
Note: When using reactive, we need to use toRefs to convert the reactive object to a plain object, where each property on the resulting object is a ref pointing to the corresponding property in the original object.
EditModal Component
This component is responsible for updating prescriptions. Its logic is similar to the CreatePrescription component we discussed in the previous section.
Create EditModal.vue inside the components folder with the following code:
//src/components/EditModal.vue
<template>
  <div class="modal is-active">
    <div class="modal-background"></div>
    <div class="modal-content">
      <form @submit.prevent="updatePrescription">
        <h1>Edit Modal</h1>
        <div class="field">
          <label class="label">Prescribed By</label>
          <div class="control">
            <input v-model="prescribedBy" class="input" type="text" placeholder="Enter prescriber's name" />
          </div>
        </div>
        <div class="field">
          <label class="label">Prescription</label>
          <div class="control">
            <textarea v-model="prescription" class="textarea" placeholder="Enter Prescription"></textarea>
          </div>
        </div>
        <div class="field">
          <label class="label">Disease</label>
          <div class="control">
            <input v-model="disease" class="input" type="text" placeholder="Enter name of disease" />
          </div>
        </div>
        <div class="field">
          <label class="label">Livestock</label>
          <div class="control">
            <input v-model="livestock" class="input" type="text" placeholder="Enter livestock" />
          </div>
        </div>
        <div class="field is-grouped">
          <div class="control">
            <button type="submit" class="button is-link">Submit</button>
          </div>
          <div class="control" @click="closeModal">
            <button class="button is-link is-light">Cancel</button>
          </div>
        </div>
      </form>
    </div>
    <button class="modal-close is-large" @click="closeModal" aria-label="close"></button>
  </div>
</template>
<script lang="ts">
import { defineComponent, reactive, toRefs, computed, onMounted } from "vue";
import { useStore } from "@/store";
import { Prescription } from "@/store/state";
import { MutationType } from "@/store/mutations";
import { ActionTypes } from "@/store/actions";
export default {
  name: "EditModal",
  props: {
    id: { type: Number, required: true },
  },
  setup(props: any) {
    const state = reactive({
      prescription: "",
      prescribedBy: "",
      disease: "",
      livestock: "",
    });
    const store = useStore();
    const setFields = () => {
      const prescription = store.getters.getPrescriptionById(Number(props.id));
      if (prescription) {
        console.log("prescription si kolo", prescription);
        state.prescription = prescription.vet_prescription;
        state.prescribedBy = prescription.prescribed_by;
        state.disease = prescription.disease;
        state.livestock = prescription.livestock;
      }
    };
    onMounted(() => {
      setFields();
    });
    const updatePrescription = () => {
      if (state.prescription === "" || state.prescribedBy === "" || state.disease === "" || state.livestock === "") return;
      const prescription: Prescription = {
        id: props.id,
        vet_prescription: state.prescription,
        prescribed_by: state.prescribedBy,
        disease: state.disease,
        livestock: state.livestock,
        completed: false,
        editing: false,
      };
      store.dispatch(ActionTypes.UpdatePrescription, prescription);
      state.prescription = "";
      state.prescribedBy = "";
      state.disease = "";
      state.livestock = "";
    };
    const closeModal = () => {
      store.commit(MutationType.SetEditModal, { showModal: false, prescriptionId: undefined });
    };
    return { closeModal, ...toRefs(state), updatePrescription };
  },
};
</script>
<style scoped>
label {
  color: #ffffff;
}
h1 {
  color: #ffffff;
  text-align: center;
  font-size: 2rem;
  margin-bottom: 3rem;
}
</style>
The createPrescription method dispatches an action that makes a put request to the server, thereby updating an existing prescription by its ID, while the closeModal method commits the SetPrescriptionModal mutation that sets the showModal property in the state to false. Calling the setFields method on the onMounted lifecycle hook triggers the getPrescriptionById getters method to fetch a prescription from the store by its ID and then updates the properties in the reactive object with the fetched prescription properties as soon as the component is mounted on the DOM.
Launching the Final Project
In the root directory of your Rails API server, run the following command to start the server:
rails server
Now, you can run the frontend application with the following command:
npm run serve
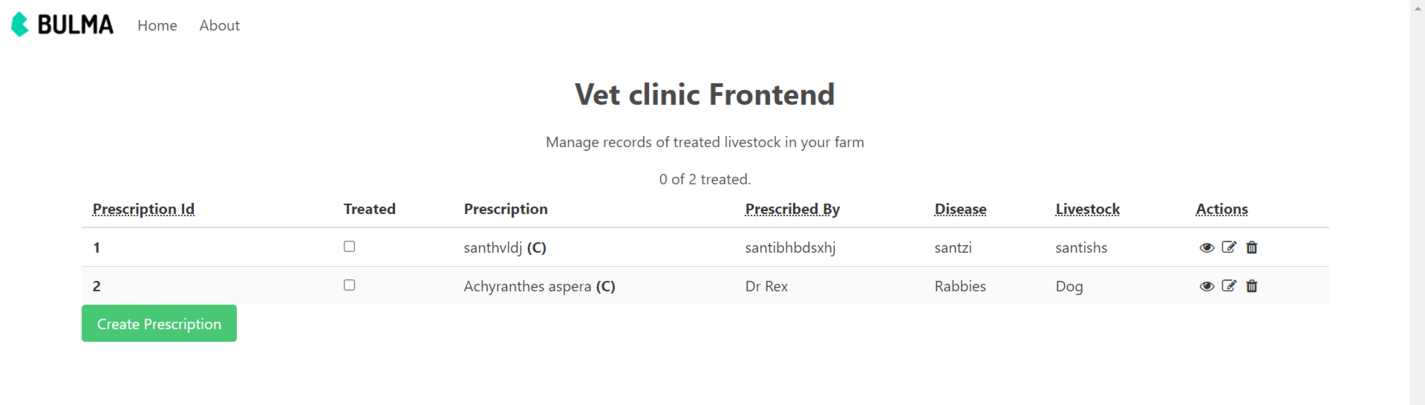
Finally, your application should be as follows:
Conclusion
We have built a CRUD API server with Rails and our frontend application on Vue 3 composition API and Vuex, all running on different servers while integrating both stacks to build a fullstack web application. I hope you have learned a great deal from this tutorial. Please reach out in the comment section below if you have any questions or suggestions. Here is the GitHub repo for the full-stack application built in this tutorial.

Written by
John Emmanuel
John is a fullstack software developer, mentor, and writer. He's am an open source enthusiast. In my spare time, I enjoy watching sci-fi movies and cheering for Arsenal FC.