---
title: Account-based subdomains in Rails
published: "2024-04-09"
publisher: Honeybadger
author: Aestimo Kirina
category: Ruby articles
tags:
- Ruby
- Rails
description: "Account-based subdomains are a powerful feature that can give your app extra security by isolating user data while giving your users the ability to customize their experience. In this article, you'll learn what account-based subdomains are, why they matter, and how to implement them in a Rails application."
url: "https://www.honeybadger.io/blog/rails-account-subdomains/"
---
For many applications, access is usually through a single domain, such as _yourapp.com_. This way, the application developer is able to offer a unified experience to all users. This works great most of the time, but imagine a situation where you need to give each user a customized experience; how would you achieve this?
One of the ways you can customize the user experience in a single application is by using account-based subdomains. Instead of giving users a single entry point into your app, offer them customized subdomains: _user1.exampleapp.com_, _user2.exampleapp.com_, and so forth. With account-based subdomains, you essentially give users an individualized entry point where they can manage their app experience as they wish.
In this article, you'll learn what account-based subdomains are all about, why they matter, and when you should use them. You'll iteratively build a simple Ruby on Rails application that implements account-based subdomains, which should provide foundational knowledge you can use when building your next app.
## Pre-requisites
Here's what you'll need to follow along with this tutorial:
- Ruby on Rails 7 installed on your development machine (we'll use version 7.1.1 for this tutorial).
- Some experience using Ruby and Rails since we won’t cover beginner concepts in this tutorial.
_You can find the source code for the example app we'll be building [here](https://github.com/iamaestimo/todo_app_with_subdomains)._
## What are account-based subdomains?
Account-based subdomains are a common feature of multi-tenant applications and are subdomains named after user accounts: _user1.exampleapp.com_, _account1.exampleapp.com_, and so forth.
Each subdomain acts as an individualized entry point for users belonging to that account. This fine-grained separation of users gives you two main advantages:
- **Personalization** - Since users are separated at the account level, it's often easier to offer personalized user experiences, such as custom branding and settings.
- **Security** - A major concern for any app developer building a multi-tenant app is security, especially how to prevent users from accessing other user accounts. With an account subdomain-based structure, you have more control when it comes to isolating user data.
As you can see, account-based subdomains are great for separating user data in multi-tenant environments.
You can use them in a multi-tenant app that utilizes either a single database or multiple databases. For this tutorial, we'll use a multi-tenant single database because it is simpler to implement.
## The app we'll be building
The app we'll be building is a Ruby on Rails 7 to-do app featuring account-based subdomains that allow different users to log into their own accounts and create to-do task lists that cannot be accessed by other users.
## Creating the app skeleton
Spin up a new Rails 7 application by running the command below:
```shell
rails new todo_app -css=tailwind
```
_It's not necessary to use Tailwind CSS for your app; you can use whatever meets your needs._
Now `cd` into the app directory and run the command below to create the database (we use SQLite to keep things simple):
```shell
cd todo_app rails db:create
```
## Adding basic user authentication
There’s no need to recreate things from the ground up. Let' use the Devise gem to quickly build out a user authentication system for our to-do app.
Start by adding the Devise gem to the app's `Gemfile`:
```ruby
# Gemfile # ... gem 'devise' # ...
```
Then run `bundle install`, followed by `rails devise:install`. Additionally, make sure to follow the instructions that will be printed to console after the Devise installation, especially the one on adding the line `config.action_mailer.default_url_options = { host: 'localhost', port: 3000 }` to the development configuration. Otherwise, you might experience weird configuration errors.
Next, create the basic user model by running the commands shown below:
```shell
rails generate devise User && rails db:migrate
```
Up to this point, you should have:
- A working user model
- Basic authentication routes, including login and logout routes.
Next, let's add a root route to act as our app's home page.
## Adding a homepage
We don't need to create a dedicated home page; instead, let's define the login page as the app's homepage by modifying the `routes.rb` file as shown below:
```ruby
# config/routes.rb Rails.application.routes.draw do # ... devise_scope :user do root 'devise/sessions#new' end end
```
Now spin up the app's server with `bin/dev`, and you should be greeted by the user login page when you visit `localhost:3000`.
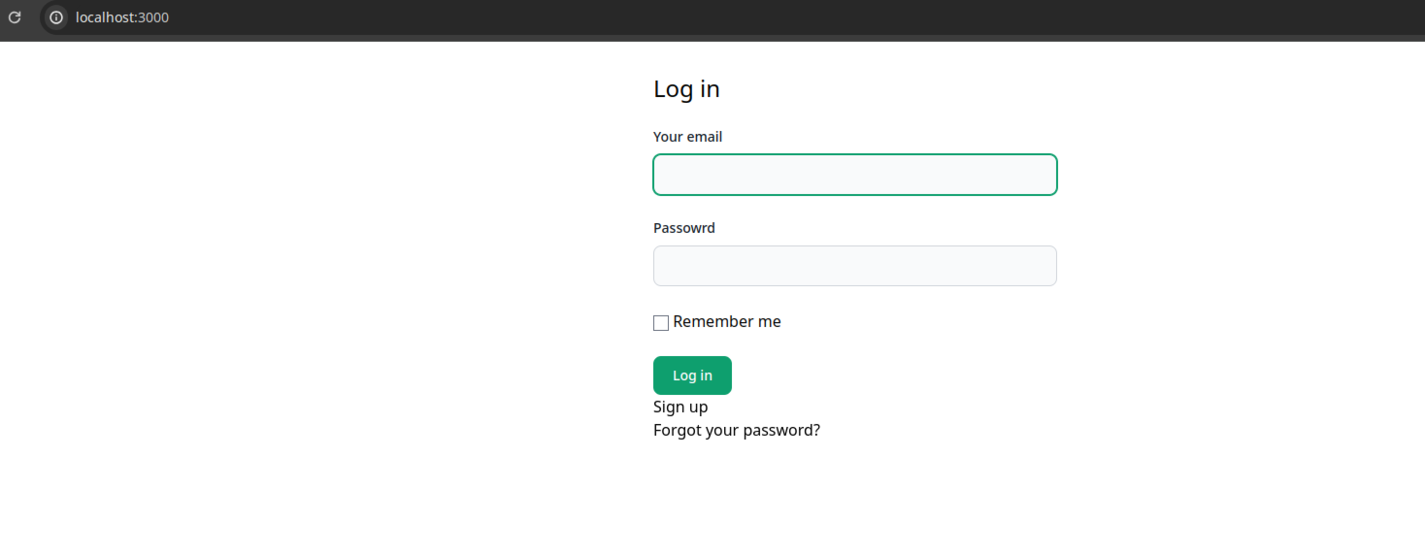
We’re making good progress so far. Let's now shift our attention to the `Todo` model next.
## Modeling to-dos
Let's now add the Todo model with the command shown below:
```shell
rails generate scaffold Todo title description:text status:boolean users:references
```
Then run the migration that will be generated with `rails db:migrate`.
Finally, open up the `User` model and modify it to associate it with the newly created `Todo` model:
```ruby
# app/models/user.rb class User < ApplicationRecord # ... has_many :todos end
```
Next, let's make sure a to-do is associated with the user who created it.
## Associating to-dos to users
Open the `todos_controller.rb` file and modify the `create` method as shown below:
```ruby
# app/controllers/todos_controller.rb class TodosController < ApplicationController # ... def create @todo = Todo.new(todo_params) @todo.user_id = current_user.id # Add this line # ... end # ... end
```
Now, whenever a new to-do is created, its `user_id` field is populated with the currently logged in user's ID.
With that done, it would be a good idea to redirect users to the index of to-dos after successful login.
Let's build this functionality next.
## Redirecting users to the to-do index
Open the application\_controller.rb file and add the following lines:
```ruby
# app/controllers/application_controller.rb class ApplicationController < ActionController::Base # ... def after_sign_in_path_for(resource) todos_path end end
```
Additionally, let's also ensure that all `Todo`_CRUD_ actions can only be performed by authenticated users:
```ruby
# app/controllers/todos_controller.rb class TodosController < ApplicationController before_action :authenticate_user! # ... end
```
Go ahead and register a couple of users. Then log in as these users and create a few to-do items. Now, since we haven't created any separation in the user data, it's possible for users to access each other's data, as shown in the following screenshot.
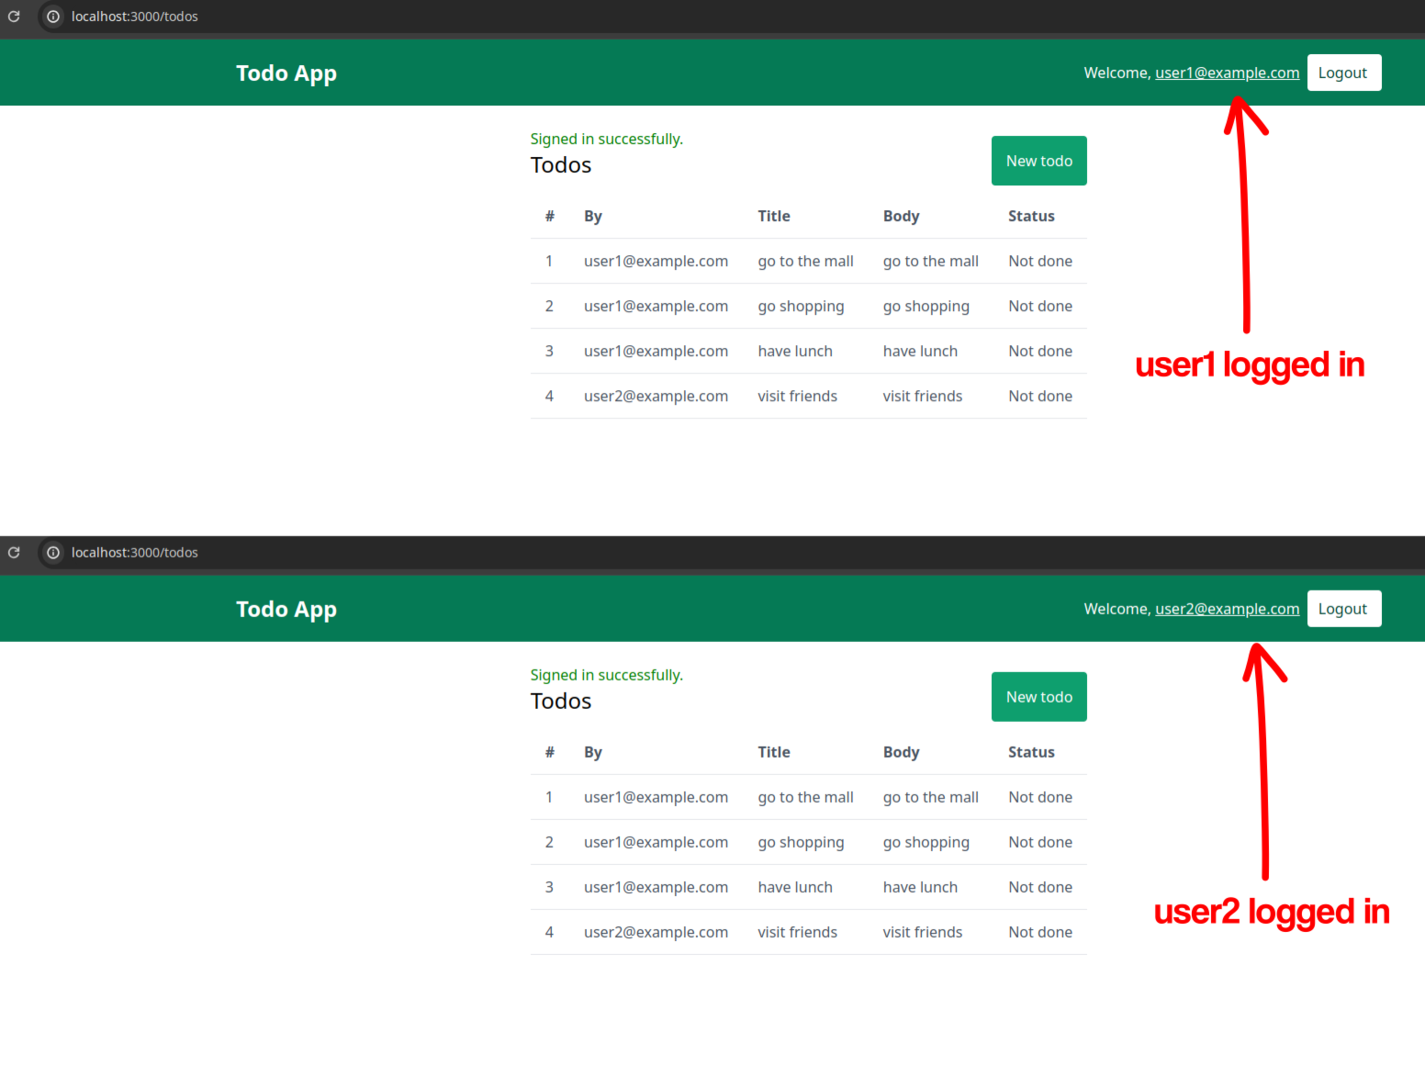
Next, let's work on user-data separation and the account-based subdomain structure so that whenever _user1_ logs into their dashboard, they are only able to see their to-do items. Likewise, _user2_ and other users of the application will only be able to see their own data.
## Separating user data and implementing account-based subdomains
When it comes isolating user data in a multi-tenant environment, there are a few options:
- **Separate databases and schemas for all users** - It's possible to isolate each user by creating separate databases and schemas for each one. This is the most secure strategy, but it’s very complex to implement and costly to maintain.
- **Same database, separate schema for all users** - Another very secure strategy with separate schemas for each user but still uses the same database. Relatively costly and complex to set up and maintain.
- **Same database, same schema for all users** - This is the most common and the most cost-effective method employed by many app developers when dealing with multiple users or accounts. Here, all users share the same database and schema, and it’s the strategy we’ll follow for the app we're building.
It's possible to build multi-tenant functionality with subdomains using various gems, such as the [Apartment](https://github.com/influitive/apartment) gem, [acts\_as\_tenant](https://github.com/erwinm/acts_as_tenant), [activerecord\_multi\_tenant](https://github.com/citusdata/activerecord-multi-tenant), and others. However, for this tutorial, we will not use any gems for this purpose.
Our first task will be to create a Tenant model to store information about the tenant (or account), including the subdomain name.
## Setting up the tenant structure
Create a new model named `Account` with the attributes `subdomain` and `user_id`:
```shell
rails generate model Account subdomain user:references
```
In a real-world multi-tenant application, you would structure this type of tenant model in such a way that multiple users (i.e., members of the same tenant or account) can be associated with a tenant. However, since ours is a simple app, we'll assume that a single tenant is associated with a single user.
Now modify the `User` and `Todo` models as shown below:
```ruby
# app/models/user.rb class User < ApplicationRecord # ... has_one :account, dependent: :destroy end
```
And the Todo model:
```ruby
# app/models/todo.rb class Todo < ApplicationRecord belongs_to :account end
```
Next, let's modify the user creation action so that an account is created automatically upon user creation.
## Creating accounts upon user creation
To automatically create an account upon user creation, we'll need to modify the `create` action in the Devise registrations controller. Run the following command to generate this controller:
```shell
rails generate devise:controllers users -c=registrations # Depending on how you've setup the user sessions, you might also need to generate the sessions controller as well... rails generete devise:controllers users -c=sessions
```
Now modify the `routes.rb` file as shown below:
```ruby
# config/routes.rb Rails.application.routes.draw do # ... devise_for :users, controllers: { sessions: 'users/sessions', registrations: 'users/registrations' } # ... end
```
Next, we need to allow a user enter a `name` attribute when they register since we'll use this as the subdomain attribute when creating an account.
Open the newly generated `registrations_controller` and modify it by whitelisting the `name` attribute as shown below:
```ruby
# app/controllers/users/registrations_controller.rb class Users::RegistrationsController < Devise::RegistrationsController before_action :configure_sign_up_params, only: [:create] protected def configure_sign_up_params devise_parameter_sanitizer.permit(:sign_up, keys: [:name]) end end
```
Then add the name field in the new user registration form:
```erb
Sign up
<%= form_for(resource, as: resource_name, url: registration_path(resource_name)) do |f| %> <%= f.label :name %> <%= f.text_field :name, autofocus: true %>
<% end %>
```
Additionally, generate a new migration to add the name column in the users table:
```shell
rails generate migration add_column_name_to_users name rails db:migrate
```
Then make sure to whitelist this new attribute in the registrations controller:
```ruby
# app/controllers/users/registrations_controller.rb class Users::RegistrationsController < Devise::RegistrationsController before_action :configure_sign_up_params, only: [:create] protected def configure_sign_up_params devise_parameter_sanitizer.permit(:sign_up, keys: [:name]) end end
```
Finally, we'll need to modify the `create` action in the same registrations controller to allow for the creation of an associated `Account` when a new user is created:
```ruby
# app/controllers/users/registrations_controller.rb class Users::RegistrationsController < Devise::RegistrationsController after_action :create_user_account, only: :create protected def create_user_account Account.create(user_id: resource.id, subdomain: resource.name) end end
```
You also need to modify redirect behavior after a user successfully registers. Let's keep things simple and redirect the user to the to-dos index like so:
```ruby
# app/controllers/users/registrations_controller.rb class Users::RegistrationsController < Devise::RegistrationsController # ... protected # ... def after_sign_up_path_for(resource) todos_path end end
```
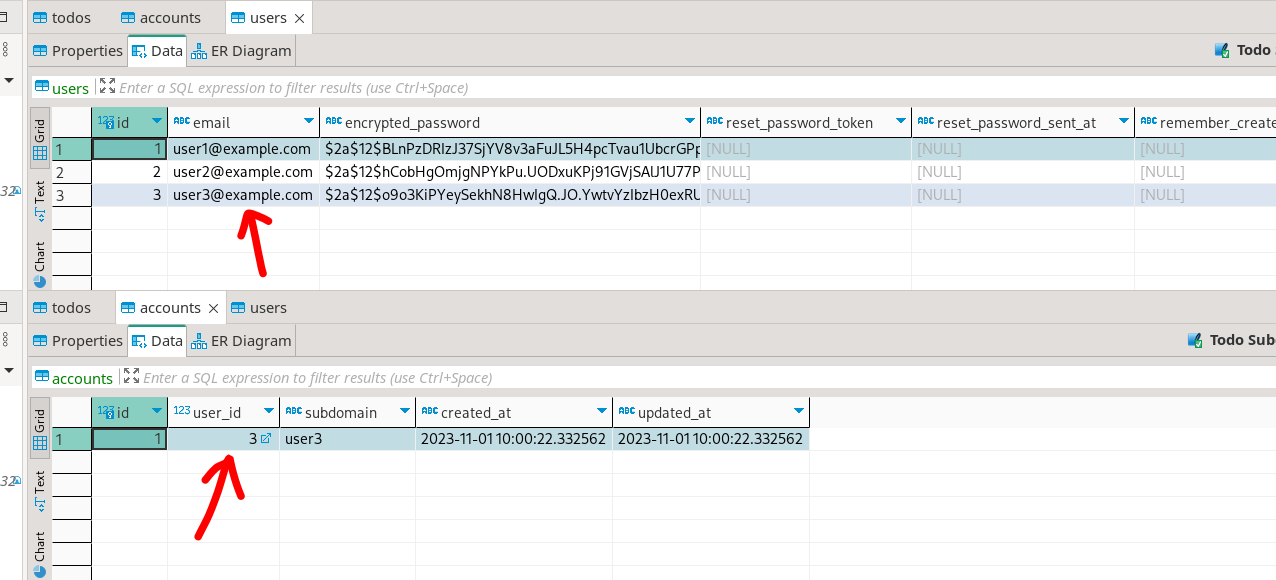
With that done, whenever a new user registers, an associated tenant account is created for them.
## Account-based subdomains
So far, we have created all the building blocks for setting up account-based subdomains in our to-do app. Let's put these together and finalize the build.
We’ll start by modifying the `routes.rb` file to add a subdomain constraint as shown below:
```ruby
# config/routes.rb Rails.application.routes.draw do # ... constraints subdomain: /.*/ do resources :todos end # ... end
```
Here, we set up a routing constraints block for wild-card subdomains and then nest the `todos` resource within it. Route constraints are convenient routing structures that enable developers to define specific conditions under which a route matches (you can read more on the topic [here](https://guides.rubyonrails.org/routing.html).)
Before moving on, we should note that by default, Rails sets the top-level domain name length to 1. However, since we're working with localhost as our domain and need to test out subdomains, we need to set this to 0. Open the development config file and add the line below:
```ruby
# config/environments/development.rb config.action_dispatch.tld_length = 0
```
Next, modify the create action in the to-dos controller to assign an account\_id automatically like so:
```ruby
# app/controllers/todos_controller.rb class TodosController < ApplicationController # ... def create @todo = Todo.new(todo_params) @todo.account_id = current_user.account.id # ... end # ... end
```
Then modify the index action to make sure to-dos are scoped to the current account:
```ruby
# app/controllers/todos_controller.rb class TodosController < ApplicationController # ... def index if request.subdomain.present? current_account = Account.find_by_subdomain(request.subdomain) else current_account = current_user.account end @todos = Todo.where(account_id: current_account.id) end # ... end
```
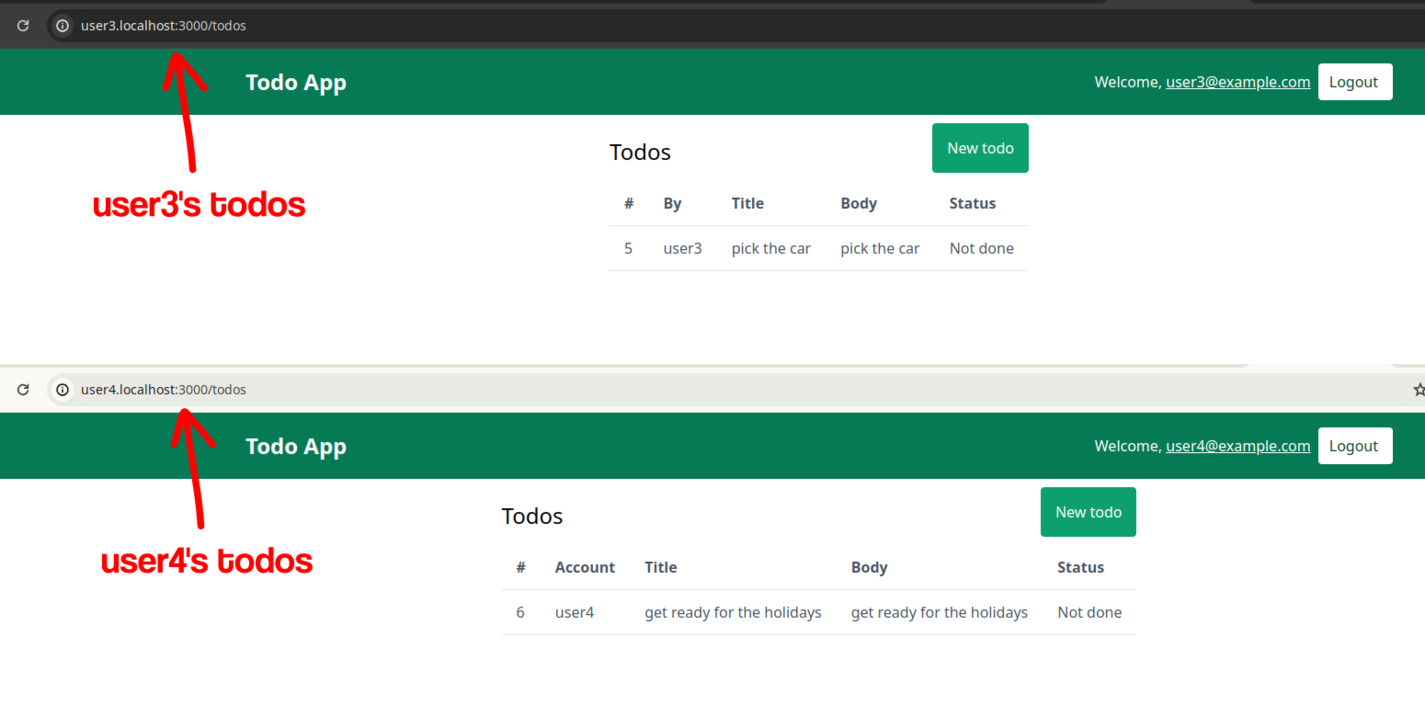
Now if you create a few to-do items while logged in as different users, you should be able to see the data isolation at work in the to-dos listing as shown in the screenshot below:
## Wrapping up
In this article, we've explained how to easily implement account-based subdomains in your Rails application. We've also learned why account-based subdomains are a powerful and useful tool. Obviously, the setup we've implemented is not production-ready, but it provides a good foundation upon which to base your next app build.
There are several ways to improve the structure of the app we've built, including utilizing custom middleware to match subdomain requests to the app's resources, using concerns to abstract away some of the code in the to-dos controller, and much more that we won't get into for now. Hopefully, you'll take it as a challenge to implement these on your own.
Happy coding!
---
## Try Honeybadger for FREE
Intelligent logging, error tracking, and Just Enough APM™ in one dev-friendly platform. Find and fix problems before users notice.
[Start free trial](https://app.honeybadger.io/users/sign_up)
[See plans and pricing](https://www.honeybadger.io/plans/)