---
title: Build a Discord Bot with Python and Flask
date: "2022-12-15"
publisher: Honeybadger
author: Muhammed Ali
category: Python articles
tags:
- Python
- Flask
- Discord
description: "In this tutorial, learn how to use Python to interact with the Discord API—and build a bot using Flask."
url: "https://www.honeybadger.io/blog/python-flask-discord-bot/"
---
[Discord](http://discord.com) is a platform that enables people to talk over voice, video, and text, as well as hang out with their friends and communities. Discord provides a way to section different groups of people with Server/Guild.
In this article, you will learn how to use some features provided by Discord API. We will begin by explaining how to set up Discord OAuth2 for authentication, followed by building a simple discord bot and attaching it to some servers, and finally, displaying the servers where the bot is attached on the frontend.
When working with Discord, a lot of functionality will need to be handled asynchronously because Discord uses [WebSockets](https://developer.mozilla.org/en-US/docs/Web/API/WebSockets_API) to build real-time communication between the Discord API and the application. With that said, we will have to use a version of Flask that handle asynchronous requests perfectly [Quart](https://pypi.org/project/quart/).
You can find the full project on [GitHub](https://github.com/khabdrick/Flask_discord).
### Prerequisites
- Basic knowledge of Python and Flask.
- Python installed.
- Discord account and about five servers created.
## Authenticate Discord with OAuth2
Later in this article, we will be building something like a dashboard where you can see all the servers that have your bot attached to it. You may not want everyone to be able to access that page, so you can use the OAuth2 system provided by Discord.
To do this, go to the [Discord developer portal](https://discord.com/developers/applications), and \*\*\*\*on the Discord developer portal page, click the “**New Application**” button in the top right corner. Then, fill in the “Name” field and submit.
Next, click the **OAuth2** dropdown and then click the Add Redirect button. This is where you will add the URL that will handle the redirect after authentication. The URL we will be using for the redirect is [http://127.0.0.1:5000/callback](http://127.0.0.1:5000/callback). Also, take note of the `CLIENT ID` and `CLIENT SECRET` because we will need them in the code.
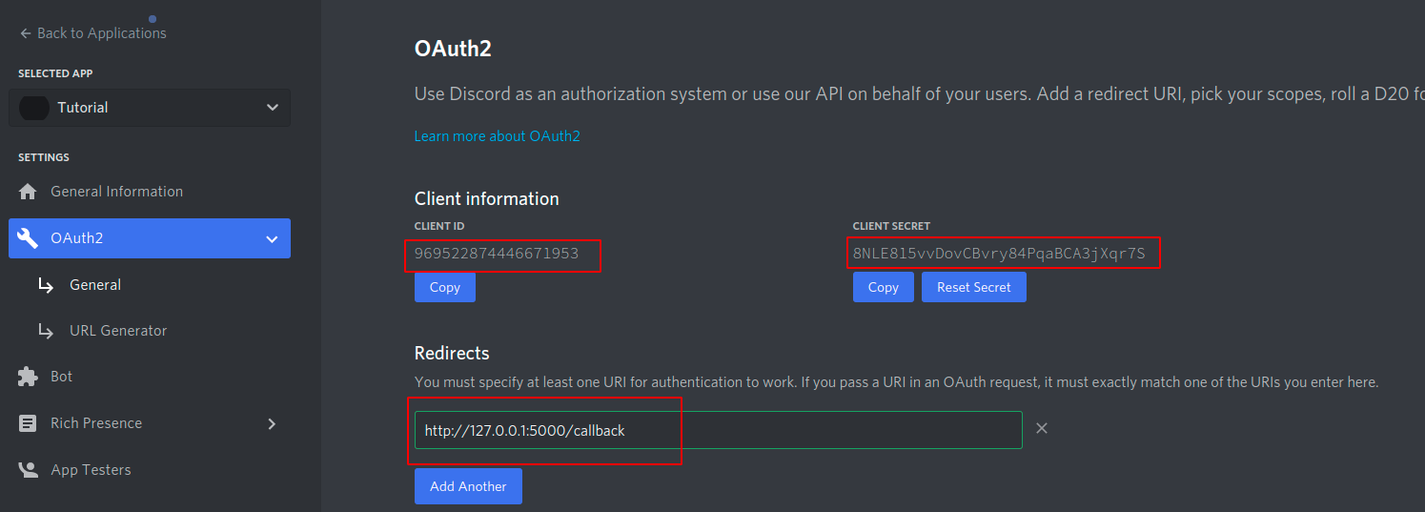_Set OAuth2 callback URL_
On the **OAuth2** dropdown, click the **URL Generator** tab and select the scope that you see on the image below. Then, copy the URL generated. This URL will be used to connect the bot to the server.
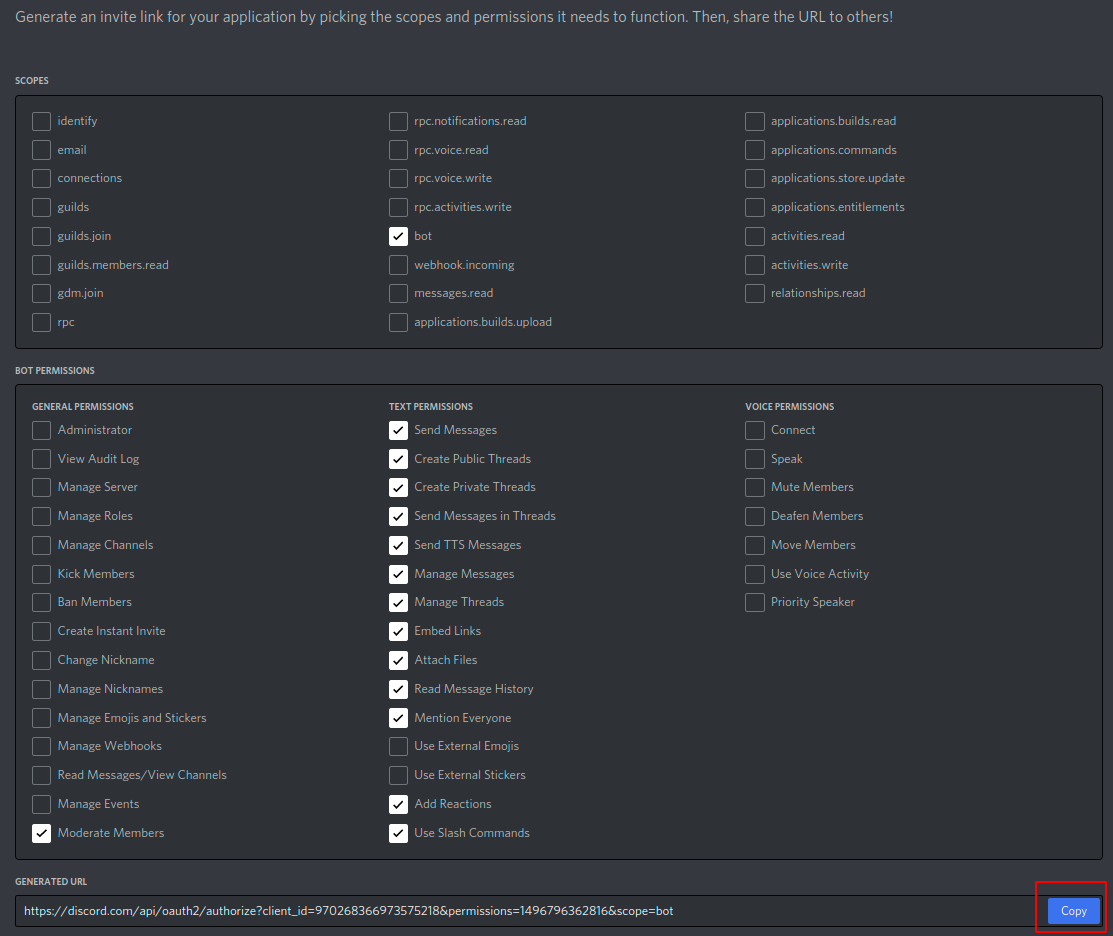_URL generator page_
Open the URL on the browser, select the server you want to connect the bot to it, and submit all the redirects.
Now, let’s install the dependencies with the following command.
```bash
pip install quart quart-discord discord-ext-ipc discord
```
### Building the Authentication System
First, create a new file with name _main.py_ and paste the following code. The code below is initializing the credentials and routes required to authenticate with Discord.
```python
from quart import Quart, render_template, redirect, url_for from quart_discord import DiscordOAuth2Session import os os.environ[ "OAUTHLIB_INSECURE_TRANSPORT" ] = "1" # this is required because OAuth 2 utilizes https. app = Quart(__name__) app.config["SECRET_KEY"] = "test123" app.config["DISCORD_CLIENT_ID"] = 969522874446671953 # Discord client ID. app.config[ "DISCORD_CLIENT_SECRET" ] = "dfp9GSgUHqvIMBSEIsrG9DW1XMnJskhl" # Discord client secret. app.config[ "DISCORD_REDIRECT_URI" ] = "http://127.0.0.1:5000/callback" # URL to your callback endpoint. discord = DiscordOAuth2Session(app) #handle session for authentication @app.route("/") async def home(): return await render_template("home.html", authorized=await discord.authorized) @app.route("/login") async def login(): return await discord.create_session() # handles session creation for authentication @app.route("/callback") async def callback(): try: await discord.callback() except Exception: pass return redirect(url_for("dashboard")) #dashboard function will be created later in the a
```
Remember the credentials I told you to take note of earlier? You will need to input them in the code above. If you are building a real-world project, you will need to make sure to keep those credentials secure.
If you notice in the code above, we used a file `home.html`; this is the page that the will handle the authentication button. In the same folder where `main.py` is located, create a new directory and file `templates/home.html` and paste the code below.
```html
Home Page
Welcome to the Home page!
Click here to login:
```
## Creating the Discord Bot
In this section, we will be creating a simple bot that says, “Hello There!”, when it is pinged. To accomplish this, we will use two tools that we installed earlier: `discord-ext-ipc` and `discord`. `discord` is a Discord library for Python, and `discord-ext-ipc` provides a server for bot services.
Start by creating a file named `bot.py` and paste the following code. The code below sends "Hello there!" anytime it is pinged.
```python
import discord from discord.ext import commands, ipc class MyBot(commands.Bot): def __init__(self, *args, **kwargs): super().__init__(*args, **kwargs) self.ipc = ipc.Server(self, secret_key="this_is_secret") #used tonnect ipc server to other servers async def on_ready(self): """Called upon the READY event""" print("Bot is ready.") async def on_ipc_ready(self): """Called upon the IPC Server being ready""" print("Ipc server is ready.") async def on_ipc_error(self, endpoint, error): """Called upon an error being raised within an IPC route""" print(endpoint, "raised", error) my_bot = MyBot(command_prefix="$", intents=discord.Intents.default()) #prefix to ping the bot @my_bot.command() async def hello(ctx): await ctx.send("Hello there!") # response from the bot when you send $hello my_bot.ipc.start() my_bot.run("OTY5NTIyODc0NDQ2NjcxOTUz.Ymuoig.OMsQ8sCsk5pY1cJSdn5yyDB8Bhc")
```
For the bot to work, you need to get the bot token from the [Discord developer portal](https://discord.com/developers/applications), in the **Bot** tab.
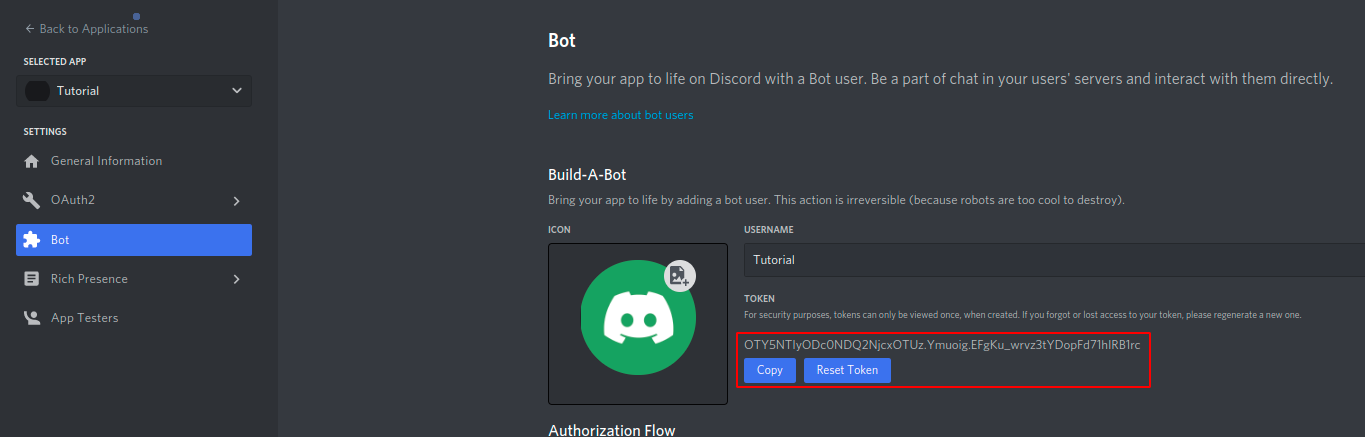_Get Discord bot token_
## Building the Dashboard
To build the dashboard, we need write functions in `bot.py` to get the number of guilds where the bot is present and the guild IDs of the guilds where the bot is present. We need the guild IDs for the bot so that we can match it with the list of all user guilds that we get in the application (`main.py`), and then display the guild’s details where they match.
You can do this by pasting the following code above `my_bot.ipc.start()` in your `bot.py` file.
```python
@my_bot.ipc.route() async def get_guild_count(data): return len(my_bot.guilds) # returns the len of the guilds to the client @my_bot.ipc.route() async def get_guild_ids(data): final = [] for guild in my_bot.guilds: final.append(guild.id) return final # returns the guild ids where the bot is
```
Now we need to write the function for the dashboard in the `main.py` file. Paste the following code, below in `callback()`.
```python
@app.route("/dashboard") async def dashboard(): guild_count = await ipc_client.request("get_guild_count") # get func we created aearlier for guild count guild_ids = await ipc_client.request("get_guild_ids") # get func we created aearlier for guild IDs try: user_guilds = await discord.fetch_guilds() # fetch data for user's guilds user = await discord.fetch_user() #fetch data for user except: return redirect(url_for("login")) # redirect to login page if user is not logged in same_guilds = [] for guild in user_guilds: if guild.id in guild_ids: same_guilds.append(guild) return await render_template( "dashboard.html", guild_count=guild_count, matching=same_guilds, user=user ) if __name__ == "__main__": app.run(debug=True)
```
Then add the code below to the top of the `main.py` file.
```python
from discord.ext import ipc ipc_client = ipc.Client( secret_key="this_is_token" ) # secret_key must be the same as your IPC server
```
You may have noticed in `dashboard()` that we are rendering a template (`dashboard.html`) we have not created.
Create a new file with the name `dashboard.html` in templates/ and paste the following code.
```html
Dashboard
Hello, {{user.name}}! Please select a server to get started
The Bot is in: {{guild_count}} servers
Bot's guilds
{% for guild in matching %}
{{ guild.name }}
{% endfor %}
```
## Testing
To begin, let’s start the server for the bot and the application. You can start the server for the bot by running `python bot.py`, and you can start the app on another command-line window with `python main.py`. Now go to [Discord](http://discord.com/app) and select one of the guilds/servers to which you attached the bot, and you will notice on the top right that your bot is active. Ping the bot by texting “$hello”, and you should get “Hello There!” as the response.
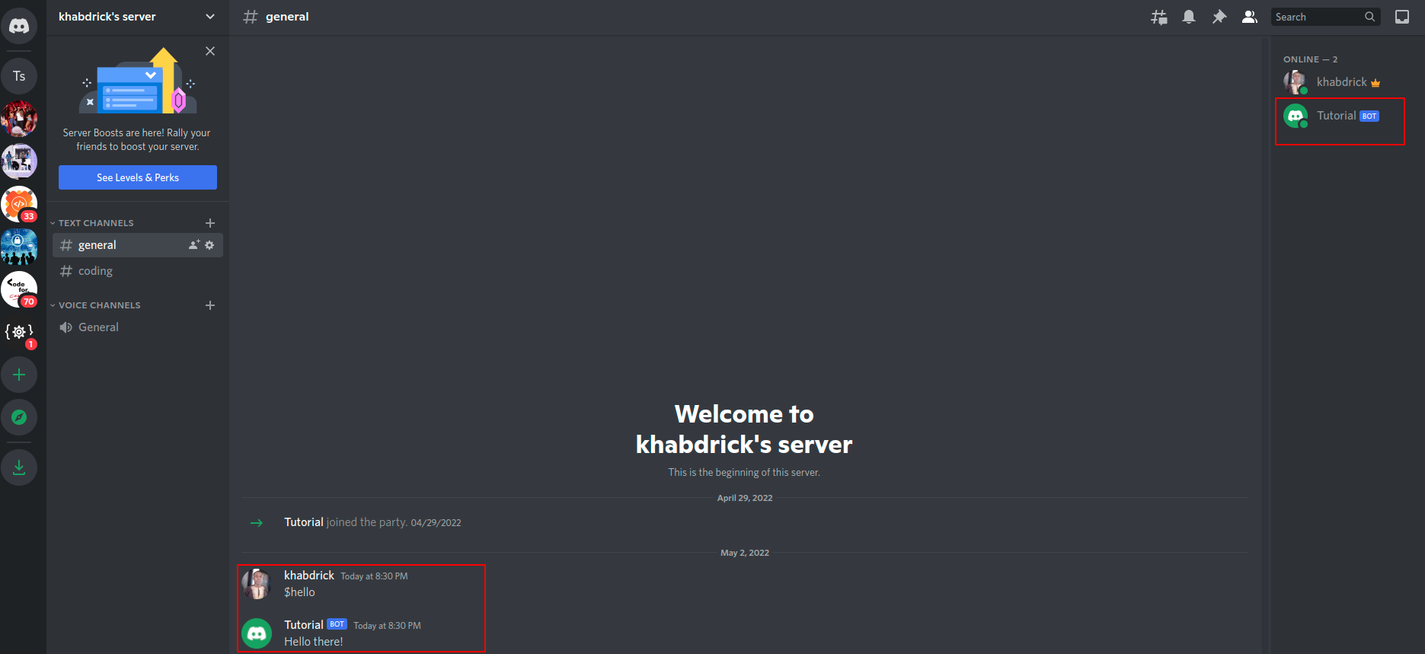_Output from the whole code_
You can test the application by going to [localhost for Flask](http://127.0.0.1:5000/); hit the login button to log in, and then you will be redirected to the dashboard.
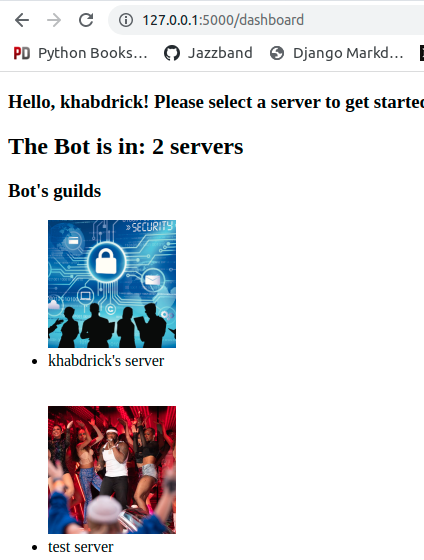_Dashboard display_
## Conclusion
In this article, you’ve learned how to use each feature provided by Discord API. First, we learned how to set up Discord OAuth2 for authentication. Then, we built a simple discord bot and attached it to some servers/guilds. Finally, we displayed the servers where we attached the bot on the frontend.
You may have noticed that in the tutorial, I didn’t pay attention to the design of the application. This could be where you can improve from where I left off. Of course, you can always improve on the complexity of the bot as needed.
Finally, please remember to always secure your Discord credentials.
---
## Try Honeybadger for FREE
Intelligent logging, error tracking, and Just Enough APM™ in one dev-friendly platform. Find and fix problems before users notice.
[Start free trial](https://app.honeybadger.io/users/sign_up)
[See plans and pricing](https://www.honeybadger.io/plans/)