---
title: A friendly introduction to PHP testing
date: "2024-10-16"
publisher: Honeybadger
author: Mauro Chojrin
category: PHP articles
tags:
- PHP
description: "Unit, integration, acceptance, TDD, BDD, oh-em-gee! How should you implement PHP testing, and when? Jump into this article to learn the different testing tools and methodologies available in PHP and how to use them."
url: "https://www.honeybadger.io/blog/php-testing/"
---
In the last few years, there has been a lot of movement around new and exciting PHP testing tools. While this is great news, stepping back a little and understanding the underlying concepts before jumping in is vital to writing great PHP tests.
When we talk about testing tools and methodologies, we're referring to _automated_ testing tools. Writing code that tests your PHP apps is a great way to build confidence that your application will behave as you expect.
**Automated testing** refers to using software tools designed specifically to run an application with a particular set of inputs and check the produced output against a known set of expectations. In essence, it's not very different from _regular_ (i.e., manual) testing. It's just way better.
## Why is automated testing a good idea?
Automated tests help to significantly reduce bugs and increase the quality of software. Similarly, when applied to established applications, it helps prevent the appearance of _regression bugs_, which introduce errors when adding new features/improvements to working code.
You may be skeptical if you have never used automated testing tools. After all, if the testing tools are software, how do you keep _them_ from having bugs? Fair enough. The trick here is to write the tests so that, should they contain a bug, it would be trivial to find and fix. Usually, this means writing small tests and combining them into test suites.
The bottom line is that automated testing, including unit testing, can seem like a waste of time at first, as it consumes many resources at the beginning of a project, but the long-term payoff is absolutely worth it. Investing in a good test suite for your PHP code helps you move faster over the long term.
## What types of automated testing exist?
As you probably already guessed, there are several types of automated testing beyond just unit testing. The main difference is what exactly is being tested. You can think of it as how close to the code you want the lens to be. On the most extreme end, you find a unit test, and on the more distant end is acceptance testing.
Another way to categorize the tests is by how much knowledge about the system being tested you have. In this scheme, you'll find what’s referred to as white-box vs. black-box testing. In the first case, you have access to and the ability to understand the code, while in the latter, the implementation of the code is ignored.
Notably, the different kinds of tests are not necessarily mutually exclusive. In fact, in most cases, the more layers of tests you add to your projects, the better.
In the following sections, I'll show you how to implement some specific tools in a somewhat real project. These examples have been built and tested against PHP 8.0 on an Ubuntu box, and I used Google Chrome as a Web browser. If your setup doesn't exactly match these specifications, you may need to tweak the commands a little.
### Unit tests
Let's start at the most granular level: a unit test. In unit testing, you're trying to determine whether a particular _unit of code_ complies with a set of expectations.
For instance, if you were creating a calculator class, you'd expect to find the following methods in it:
- `add`
- `subtract`
- `multiply`
- `divide`
In the case of the `add` method, the expectation is rather clear; it should return the result of adding two numbers. Unit testing can help you validate this!
Therefore, our class could look like this:
```php
declare(strict_types=1); class Calculator { public function add(int $a, int $b): int { return $a + $b; } }
```
There are many tools you can use to prove the correct implementation of this method. The most popular one (by far!) is [phpUnit](https://phpunit.de/), a popular unit testing library.
The first thing you should do to add it to your project is install the tool. The best way to go about it is to add it as a dependency of the project. Assuming that your project is built using Composer, all you need to do is run:
```bash
composer require --dev phpunit/phpunit
```
This will produce a new file inside your `vendor/bin` directory: `phpunit`.
So, before going any further, make sure everything is in place. Run `vendor/bin/phpunit --version`. If everything goes well, you should see something like this:
```bash
PHPUnit 9.6.21 by Sebastian Bergmann and contributors.
```
Great! You're ready to test your code! That's not saying much if you haven't written any tests, right? So, how do you **write your first unit test using phpUnit?**
Start by creating a new directory called `tests` at the root of your project.
In it, create a file named `CalculatorTest.php` and put the following inside of it:
```php
assertEquals(8, $sut->add(5, 3)); } }
```
Before running the test, a few things need to be in place for unit testing with phpUnit:
1. A phpUnit configuration file (`phpunit.xml.dist`) at the project root.
2. A bootstrap script to bring autoloading in.
3. An autoload definition.
Don't worry about this part; it sounds much worse than it actually is.
The phpUnit config is just a shortcut to avoid explicitly feeding options every time you run the `phpunit` command. In our case, a simple one will do, like this:
```xml
```
The most important part of this file is the definition `bootstrap="tests/bootstrap.php"`, which establishes `tests/bootstrap.php` as the entry point to our test suite, hence the need to create such a file.
The contents of `tests/bootstrap.php` don't need to be very elaborate either. This will do just fine:
```php
numbers = $numbers; $this->calculator = $calculator; } public function sum() : int { $acum = 0; foreach ($this->numbers as $number) { $acum = $this->calculator->add($acum, $number); } return $acum; } }
```
In this example, you can see how the `Calculator` class is being _injected_ into `NumberCollection`. While we could have written the PHP code in to have the constructor create the Calculator instance, it would have made our tests, especially unit tests, much harder to write, among other problems.
In fact, to have a really solid structure, we should be using a `CalculatorInterface` as the constructor parameter, but we’ll leave this for a different discussion.
I'll leave the unit tests for this class as homework for you and move right into the integration test. In such a test, what I want to determine is whether the two classes work together and eventually produce the result I'm looking for.
How will I do that? Well, not much different from what I've done so far. This is what the test will look like:
```php
assertEquals(array_sum($numbersList), $numberCollection->sum(), 'Sum doesn\'t match'); } }
```
And then, by running `vendor/bin/phpunit tests/NumberCollectionTest.php` I get the following:
```bash
PHPUnit 9.6.21 by Sebastian Bergmann and contributors. . 1 / 1 (100%) Time: 00:00.003, Memory: 4.00 MB OK (1 test, 1 assertion)
```
The difference between this and a unit test is that in the latter, I'd use a mock instead of the actual Calculator class since what I want to test is just the NumberCollection, thus assuming the Calculator works as expected.
### Acceptance tests
Another category of tests you can use is acceptance tests. These tests are meant to be performed by non-technical people, which means that a user is simply pushing buttons and smiling at the results (or crying or yelling, you never know).
This kind of test would clearly not be very repeatable, much less efficient, right? The purpose of this kind of test is to simulate what a real user would do.
In the case of a PHP application, chances are that we're talking about a web application. Therefore, to test it, a Web browser would certainly come in handy.
There are many tools you can use for this purpose, but one I particularly like is [CodeCeption](https://codeception.com/). What I like most about CodeCeption is that it's a unified tool that can be used to perform several types of tests, acceptance tests being just one of them.
Start by running `composer require "codeception/codeception" --dev` to bring the dependency into the project. This will download and install all the required libraries inside your `vendor` directory.
Next, initialize CodeCeption's environment with the command `php vendor/bin/codecept bootstrap`, which should produce the following output:
```bash
❯ php vendor/bin/codecept bootstrap Bootstrapping Codeception File codeception.yml created <- global configuration Adding codeception/module-phpbrowser for PhpBrowser to composer.json Adding codeception/module-asserts for Asserts to composer.json 2 new packages added to require-dev ? composer.json updated. Do you want to run "composer update"? (y/n)
```
Answer `y` and wait for it to complete downloading all the auxiliary packages.
Now, there's a lot to do here to really take advantage of CodeCeption. For the moment, let's focus on putting together an acceptance test. To do this, we'll need an application that can be tested via a browser.
Let's go back to our little Calculator and add a web UI to it.
Create a `web` directory at the root of your project and put the following code inside an `index.php` file:
```php
Numbers entered:
Sum: sum();?>
```
Now, run the built-in web browser by running `php -S localhost:8000 -t web`, and voilá, you’ve got a nice web UI at `http://localhost:8000`, which should look similar to the following:
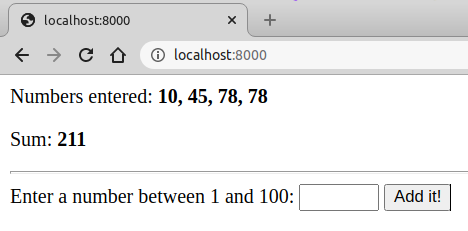
Now that we have everything in place let's go return our original goal: put together an acceptance test. To do this, we'll need to tweak the default configuration a bit.
Open the file `tests/acceptance.suite.yml` and edit it to look like this:
```yaml
# Codeception Test Suite Configuration # # Suite for acceptance tests. # Perform tests in browser using the WebDriver or PhpBrowser. # If you need both WebDriver and PHPBrowser tests - create a separate suite. actor: AcceptanceTester modules: enabled: - WebDriver: url: http://localhost:8000 browser: chrome - \Helper\Acceptance step_decorators: ~
```
Here, we're asking CodeCeption to run our tests in an actual Web browser, so we will need the support of a couple of auxiliary tools:
1. CodeCeption's WebDriver module
2. [ChromeDriver](https://chromedriver.chromium.org/home)
To install the WebDriver module, simply run:
```bash
composer require codeception/module-webdriver --dev
```
To install ChromeDriver, first check your Chrome version by going to Help -> About Chrome. Once you know the exact version number you have installed, go [here](https://chromedriver.chromium.org/downloads) and download the version that matches your installation.
When ready, run `./chromedriver --url-base=/wd/hub --white-list-ip 127.0.0.1` to init the Chrome driver server
It’s time to see some actual PHP code, isn't it? Let's go straight to it!
Use this command to create your first CodeCeption-based acceptance test: `vendor/bin/codecept g:cest acceptance First`, and then open the file `tests/acceptance/FirstCest.php` to find the following:
```php
amOnPage('index.php'); $I->amGoingTo('put a new number into the collection'); $I->see('Numbers entered:'); $I->see('Sum:'); $newNumber = rand(1, 100); $I->fillField('newNumber', $newNumber); $I->click('Add it!'); $I->wait(2); $I->see('Numbers entered: '.$newNumber); $I->see('Sum: '.$newNumber); }
```
Then, run:
```bash
vendor/bin/codecept run acceptance
```
By now, you'll see why I like CodeCeption so much. If not, take a look back at the test you just wrote. Note how clear and easy it was to write. It’s certainly much cleaner and elegant that its bare phpUnit counterpart, right?
The fact is, behind the scenes CodeCeption uses phpUnit to actually run the tests, but it takes the experience to a whole new level.
## PHP testing methodologies
In the realm of software testing, there are many approaches to _how_ to write tests, as well as _when_ to write them. Let's have a quick look at two of the most popular testing methodologies.
### TDD in PHP
TDD stands for **Test Driven Development**. The idea here is to [write your tests **before** writing the actual code](https://www.honeybadger.io/blog/laravel-tdd/). Sounds strange, doesn't it? How will you know what to test before the code is written? This is exactly the idea. It's about writing the minimum code needed to pass the tests.
If tests are well designed, the very fact that they're passing should be proof that the code matches its functional requirements and there's no _extra_ code.
In terms of tools, there's not really much to add to what we’ve already discussed. Usually, phpUnit is the preferred tool for these kind of tests; the only thing that changes is the order of execution.
### BDD in PHP
BDD certainly is a different way to think about software testing. The idea of BDD is somewhat similar to TDD in the sense that it's based on a cycle of the following:
1. Test
2. Write some running code
3. Adjust
4. Go back to 1
However, the way the tests are written is radically different. In fact, tests are supposed to be written in a language that can be understood by developers and business people (i.e., examples). There is a language designed specifically for this purpose; it's called [Gherkin](https://cucumber.io/docs/gherkin/).
Let's look at a quick example of what this would mean in our Calculator app:
```
Feature: Numbers collection In order to calculate the sum of a series of numbers As a user I need to be able to input numbers Rules: - Numbers should be integers between 1 and 100 Scenario: Input the first number Given the number series is empty When I enter 2 Then The number series should contain only 2 And The sum should be 2 Scenario: Input the second number Given the number series contains 5 When I enter 10 Then The number series should contain 5 and 10 And The sum should be 15
```
To do something with this definition, we need to bring Behat in. As usual, we'll rely on Composer to help with this task.
Issue the command `composer require --dev behat/behat`. Then, we need to initialize the test suite with the command `vendor/bin/behat --init`. This command will create the basic structure needed for Behat to run. The most important part of this is the creation of the `features` directory, where our feature descriptions will live.
So, naturally, the next step is to take the Gherkin text we wrote and save it to a `.feature` file. In our case, let's call it `number_collection.feature`.
Okay, we're ready to get our hands dirty. Run `vendor/bin/behat --append-snippets`, and you'll see how Behat interprets your feature, recognizing two scenarios and eight steps.
Since this is the first time you’ve run Behat on this project, there's quite a bit of work ahead. After all, the text definition looks great, but when it comes to having a computer check it against reality, I'm afraid AI hasn’t developed that far yet. We're going to have to help it by filling in the blanks.
Ultimately, you should end up with a `features/bootstrap/FeatureContext.php` PHP test file that looks like this:
```php
numberCollection = new NumberCollection([], new Calculator()); } /** * @Given the number series is empty */ public function theNumberSeriesIsEmpty() { } /** * @When I enter :arg1 */ public function iEnter(int $arg1) { $this->numberCollection->append($arg1); } /** * @Then The number series should contain only :arg1 */ public function theNumberSeriesShouldContainOnly(int $arg1) { $numbers = $this->numberCollection->getNumbers(); Assert::assertContains($arg1, $numbers); Assert::assertCount(1, $numbers); } /** * @Then The sum should be :arg1 */ public function theSumShouldBe(int $arg1) { Assert::assertEquals($arg1, $this->numberCollection->sum()); } /** * @Given the number series contains :arg1 */ public function theNumberSeriesContains(int $arg1) { $this->numberCollection->append($arg1); } /** * @Then The number series should contain :arg1 and :arg2 */ public function theNumberSeriesShouldContainAnd(int $arg1, int $arg2) { Assert::assertContains($arg1, $this->numberCollection->getNumbers()); Assert::assertContains($arg2, $this->numberCollection->getNumbers()); } }
```
Don't get confused by the fact that phpUnit assertions are being used here; any other assertion library would work just as well.
Behat is great, but it's not the only option. In fact, CodeCeption also features Gherkin support.
## Exploring other PHP testing tools
You can get the full example of the tests we built in this tutorial from [GitHub](https://github.com/mchojrin/calculator) if you want to check it out and follow along yourself.
Beyond those we've explored in this article, there are some other tools I haven't had the chance to try out myself but are popular choices for testing PHP:
- Infection: a mutation testing tool
- Pest: [a testing framework](https://www.honeybadger.io/blog/laravel-pest-architecture-testing/) that follows Laravel coding standards
- Atoum: a simple PHP testing framework
- phpSpec: another BDD framework for PHP
As you can see, there's a lot going on in the PHP testing arena. There are many people working on pushing the limits when it comes to software quality, and many options for you to build well-tested software with more than just unit testing. If you're not yet using any of these wonderful tools, now is the time to start!
---
## Try Honeybadger for FREE
Intelligent logging, error tracking, and Just Enough APM™ in one dev-friendly platform. Find and fix problems before users notice.
[Start free trial](https://app.honeybadger.io/users/sign_up)
[See plans and pricing](https://www.honeybadger.io/plans/)