---
title: How to create notifications in Laravel
published: "2023-03-09"
publisher: Honeybadger
author: Funke Faith Olasupo
category: PHP articles
tags:
- PHP
- Laravel
description: "This article provides a comprehensive guide on how to create notifications in Laravel. Learn what notifications are, which channels Laravel supports, how to send live database notifications, and more!"
url: "https://www.honeybadger.io/blog/php-laravel-notifications/"
---
When building applications, notifications are essential because they improve user experience and interaction. It would be helpful if you frequently alerted users to various changes or activities while they use applications. It can involve sending an SMS about their login activity for security purposes or email notifications when an order status changes. Often, these notifications only offer a brief explanation of the state changes. Laravel supports [several delivery channels](https://laravel.com/docs/9.x/notifications) for sending notifications, including emails, SMS, and Slack. Additionally, notifications may be kept in a database and displayed on your Web interface. Here are a few things you'll learn in this guide:
- What are notifications?
- Notification Channels supported by Laravel.
- How to use live database notifications in Laravel.
- How to use email notifications in Laravel.
- Other Laravel-supported notification delivery channels.
## Laravel Notifications
Notifications can be considered brief, direct messages sent to users to inform them of important information and events or to prompt a response in the application. Ideally, they keep users updated and increase user engagement. Laravel provides support for sending notifications via a variety of channels. By default, it includes [mail](https://laravel.com/docs/9.x/notifications#mail-notifications), [Slack](https://laravel.com/docs/9.x/notifications#slack-notifications), [database](https://laravel.com/docs/9.x/notifications#database-notifications), broadcast, and [Vonage](https://www.vonage.com/communications-apis/) channels. By using the Laravel Artisan command, you can quickly create notifications. You can also customize the notification's details.
## Laravel's Notification Channels
Laravel allows you to select from various notification channels to send notifications in your application. You can use more than one channel.
- **Mail** — These notifications are sent as an email to users.
- **SMS** — Users receive these SMS notifications on their mobile phones.
- **Database** — These notifications are stored in the database, and you can display them to the user with a custom UI.
- **Slack** — These notifications are sent to Slack channels.
### Community-Driven Notifications
Check out the community-driven [Laravel Notification Channels website](http://laravel-notification-channels.com/) if you want to use other channels, such as Telegram.
You can also decide to [create drivers to deliver notifications via other channels](https://laravel.com/docs/9.x/notifications#custom-channels).
In this tutorial, we'll build a Laravel application that sends notifications via [email](https://laravel.com/docs/9.x/notifications#mail-notifications) and [database](https://laravel.com/docs/9.x/notifications#database-notifications) channels. The source code for the final application is available on [GitHub](https://github.com/Roxie-32/laravel-notifications.git).
## How to Send Database Notifications
The notifications are kept in a database table when sent via the database channel. The type of notification and the JSON data that identifies the notification are both included in this table.
### Create a New Laravel Project
You can create a new Laravel project via the Composer command or the Laravel installer:
```bash
laravel new project_name //Or composer create-project laravel/laravel project_name
```
This will create a new Laravel application in a new directory named _project\_name._
### Connect to Your Database
[Here](https://dev.to/roxie/how-to-connect-laravel-application-to-mysql-database-5han) is an article I wrote that explains how to [connect a Laravel Application to a MySQL database](https://dev.to/roxie/how-to-connect-laravel-application-to-mysql-database-5han). If you have a different database, make sure to connect it appropriately.
### Set Up a Default Authentication Scaffold
Laravel Auth provides a prebuilt authentication UI and functionality to interact with. Install the Laravel UI package with this command:
```bash
composer require laravel/ui
```
Then create a bootstrap auth scaffold. A bootstrap authentication scaffold provides a default UI and basic authentication for registration and login in Laravel. You can install it with the `Artisan` command:
```bash
php artisan ui bootstrap --auth
```
Next, install the `npm` packages to generate the `css` and `js` files and run the environment.
```bash
npm install npm run dev
```
Finally, run your migrations to create your database tables with this command:
```bash
php artisan migrate
```
### Run the Application
Run this `Artisan` command to serve the project:
```bash
php artisan serve
```
The application is served on port `8000` by default, and if you visit `http://localhost:8000/` on your browser, you should view this landing page with the `login` and `register` options at the top right.

Upon successful registration or login, you can view your dashboard. All these basic authentication processes and UI are handled by the `laravel/ui` package installed earlier.

### Create a Notifications Table
You need to create a database table to contain all your notifications. It can be queried anytime to display notifications to the user interface. To generate a migration with a proper notification table schema, you may use this `Artisan` command:
```bash
php artisan notifications:table
```
This creates a _create\_notifications\_table.php_ in the _database/migrations_ directory, which defines the schema of the notifications table. Now you can migrate to your database by running the following:
```bash
php artisan migrate
```
### Generating Notifications
Each notification in Laravel is represented by a single class, normally stored in the _app/Notifications_ directory. It will be generated when you run the `make:notification` Artisan command:
```php
php artisan make:notification DepositSuccessful
```
This generates a _DepositSuccessful.php_ file with a new notification class in the _app/Notifications_ directory. This class includes a `via()` method that specifies the channel and body message-building methods to assist in formatting the notification data for the selected channel.
The notification class should have a defined `toDatabase` or `toArray` function. This method should return a simple PHP array after receiving a `$notifiable` entity. The returned array will be stored in the `data` column of your notifications table after being encoded as JSON.
### Formatting Database Notifications
You want to notify users whenever they make a successful deposit in the app of the amount they deposited. Update the `__construct()` method in the _DepositSuccessful.php_ file to match this example:
```php
protected $amount; public function __construct($amount) { $this->amount=$amount; }
```
Now the deposit amount has been injected in the `construct()` method, so it can be used in generating mail messages.
Now, you need to specify the notification channel to use by updating the `via()` method:
```php
public function via($notifiable) { return ['database']; }
```
Next, update the `toArray()` or `toDatabase()` method with the details of the notification. You must define either a `toDatabase()` or `toArray()` method, and it should return a simple PHP array stored in the `data` column of the notifications table.
```php
public function toArray($notifiable) { return [ 'data' =>' Your deposit of '. $this->amount.' was successful' ]; }
```
> The `toArray()` is used by both the database broadcast channel. If you want to use both channels in the app with different array representations, you should define `toDatabase()` and `toArray()`. However, `toArray()` is the default.
### Add the Notifiable Trait
Laravel notification offers two methods to send notifications. It includes the `Notifiable` trait or `Notification` facade. In this tutorial, we will focus on the Notifiable trait. By default, Laravel includes the Notifiable trait in the `app/Models/User` model. It should match this example:
```php
class User extends Authenticatable { use HasApiTokens, HasFactory, Notifiable; . .//Other model definitions . }
```
### Set Up the Deposit Model and Migration
First, create the model and database migration simultaneously by running the command below:
```bash
php artisan make:model Deposit -m
```
This creates a [Model](https://laravel.com/docs/8.x/eloquent) file called _Deposit.php_ in the _app/Models_ directory and a [Migration](https://laravel.com/docs/8.x/migrations#introduction) file called _create\_deposits\_table.php_ in the _database/migrations_ directory.
Update _Deposit.php_ by adding the code below to the top of the file, which enables Model [mass assignment](https://laravel.com/docs/8.x/eloquent#mass-assignment).
```php
protected $guarded = [];
```
Then, update the `up()` method in the _create\_deposits\_table.php_ migration file with deposit details to be stored, as shown in the example below:
```php
public function up() { Schema::create('deposits', function (Blueprint $table) { $table->id(); $table->string('amount'); $table->foreignId('user_id')->references('id')->on('users')->constrained()->onDelete('cascade')->onUpdate('cascade'); $table->timestamps(); }); }
```
Then, run your migrations to the database again.
```bash
php artisan migrate
```
### Set Up Controller
It would be best if you defined the logic for making a deposit and sending the notification after a successful deposit in the [controller](https://laravel.com/docs/9.x/controllers). To create the controller, run this Artisan command:
```bash
php artisan make:controller DepositController
```
A new file _DepositController.php_ is created in the _app/Http/Controllers_ directory.
With the file created, add the `import` statements below to import the classes that the controller will use:
```php
use App\Models\Deposit; use App\Models\User; use App\Notifications\DepositSuccessful; use Illuminate\Http\Request; use Illuminate\Support\Facades\Auth;
```
Add a `_construct()` method to declare the `auth` middleware, which allows only authenticated users to make a deposit.
```php
public function __construct() { $this->middleware('auth'); }
```
Define a `deposit()` method to include logic for making a deposit and sending a successful deposit notification.
```php
public function deposit(Request $request){ $deposit = Deposit::create([ 'user_id' =>Auth::user()->id, 'amount' => $request->amount ]); User::find(Auth::user()->id)->notify(new DepositSuccessful($deposit->amount)); return redirect()->back()->with('status','Your deposit was successful!'); }
```
Notifications are sent using either the `notify()` method from the [Notifiable](https://laravel.com/docs/9.x/notifications#using-the-notifiable-trait)[trait](https://laravel.com/docs/9.x/notifications#using-the-notifiable-trait) or [Notification](https://laravel.com/docs/9.x/notifications#using-the-notification-facade)[facade](https://laravel.com/docs/9.x/notifications#using-the-notification-facade). The facade is useful when sending notifications to multiple entities, such as a collection of users. Although we use `notify()` for this guide, here is an example of using `Notification` facade.
```php
$users = User::all(); Notification::send($users, new DepositSuccessful($deposit->amount));
```
> Note: The Notifiable trait has already been imported into the User model. You can import it into any model you need to send notifications.
### Set Up the Routes
You will add a new [route](https://laravel.com/docs/8.x/routing) in _routes/web.php_.
```php
Route::post('/deposit', [App\Http\Controllers\DepositController::class,'deposit'])->name('deposit');
```
### Modify the View
Add a basic form to the homepage for a user to deposit _resources\\views\\home.blade.php_ directory.
```php
```
Awesome job👍! Let's make things more interesting by including a bell notification on the navbar showing the number of unread notifications. You can also display both read and unread notifications. Laravel's `Notifiable` trait provides another excellent feature that can help you track both read and unread notifications. You can also [mark a notification as read or delete a notification entirely](https://laravel.com/docs/9.x/notifications#marking-notifications-as-read).
### Update the Controller, Route, and View with the MarkasRead Feature
Define a new method, `markAsRead()` in the _DepositController.php_ to mark all unread notifications as read.
```php
public function markAsRead(){ Auth::user()->unreadNotifications->markAsRead(); return redirect()->back(); }
```
Now, add the corresponding route to the _routes/web.php ._
```php
Route::get('/mark-as-read', [App\Http\Controllers\DepositController::class,'markAsRead'])->name('mark-as-read');
```
You will update the _resources\\views\\layouts\\app.blade.php_ with a few changes for this feature. First, include this CDN link to [Font Awesome](https://cdnjs.com/libraries/font-awesome) in the blade file to enable you to use the bell icon.
```php
```
Now, add this example before the full name and logout dropdown immediately after the `else` statement.
```php
```
This will result in a bell icon with a badge count of the unread notifications before the full name and logout dropdown on the dashboard. It also has a dropdown of all notifications, with the unread ones at the top. The dropdown also has an option to mark all notifications as read so that the badge count returns to 0 (which means there are no unread notifications).
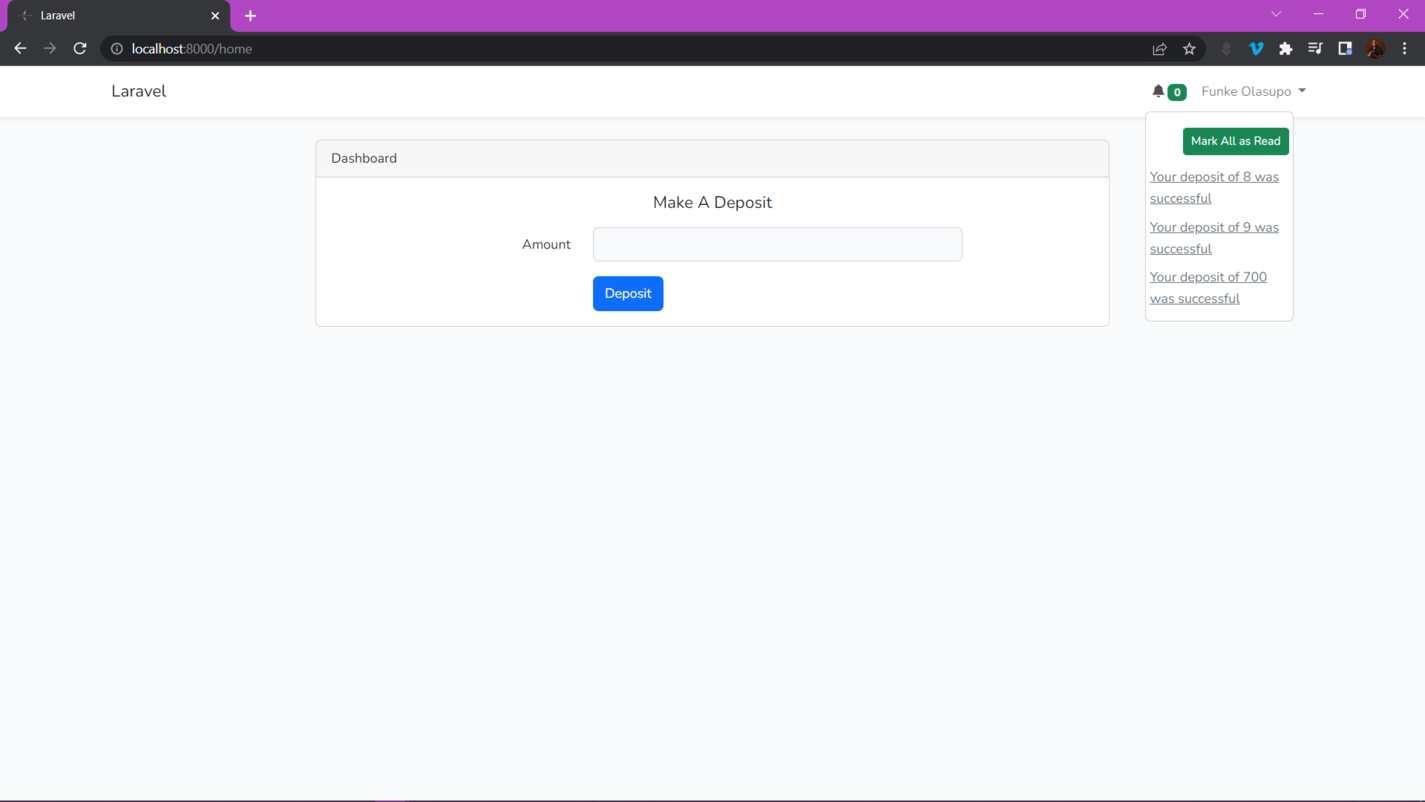
Amazing job🤩! At this point, you can proceed to test by making a deposit to view how your notifications display on the dashboard after it's successful.
## How to Send Email Notifications
However, let's go a bit further and include email notifications. When a deposit is made, we want to display notifications in the dashboard and send an email to the user.
### Update `.env` Mail Configurations
You need to update these environment variables with valid mailer credentials that your app will need to send emails to users.
```php
MAIL_MAILER= MAIL_HOST= MAIL_PORT= MAIL_USERNAME= MAIL_PASSWORD= MAIL_ENCRYPTION= MAIL_FROM_ADDRESS= MAIL_FROM_NAME="${APP_NAME}"
```
### Formatting Mail Notifications
In the `DepositSuccessful` notification class you created earlier, update the `via()` method to include email.
```php
public function via($notifiable) { return ['mail','database']; }
```
Afterward, define the `toMail()` method with the mail messages. This method should return an `Illuminate/Notifications/Messages/MailMessage` instance after receiving a `$notifiable` entity.
You can now build email messages with the help of a few simple methods provided by the `MailMessage` class. A "call to action" and lines of text are possible in mail messages.
```php
public function toMail($notifiable) { $url = url('/home'); return (new MailMessage) ->greeting('Hello,') ->line('Your deposit of '. $this->amount. ' was successful.') ->action('View dashboard', url('/home')) ->line('Thank you for using our application!'); }
```
Small transactional emails can be formatted quickly and easily using these methods provided by the `MailMessage` object. A beautiful, responsive HTML email template with a plain-text counterpart will be generated from the message components by the mail channel. In this example, we supplied a call to action(button), a line of text, and a greeting.
**Hurrah 😎! We are done building 👍. Now, let's perform some testing and see if it works.**
## Testing
If you make a successful deposit, you will get a notification in your dashboard that looks like this:
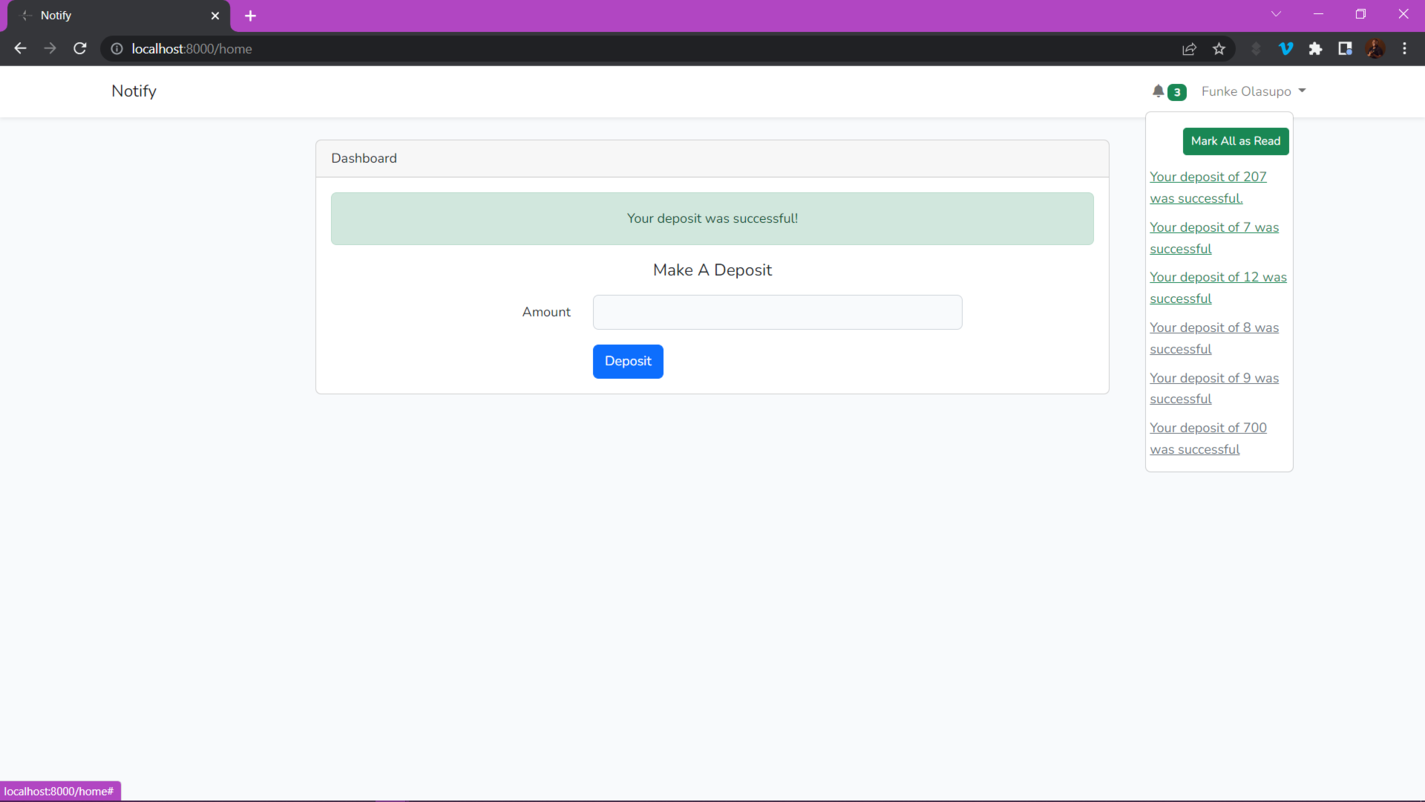
Notice that the badge number only counts the unread notifications. However, the dropdown lists all notifications, starting with the unread ones. If you decide to `mark all as read`, it refreshes, and your notification badge count returns to 0 because you have read all the current notifications.
You will also receive a mail notification that looks like this:
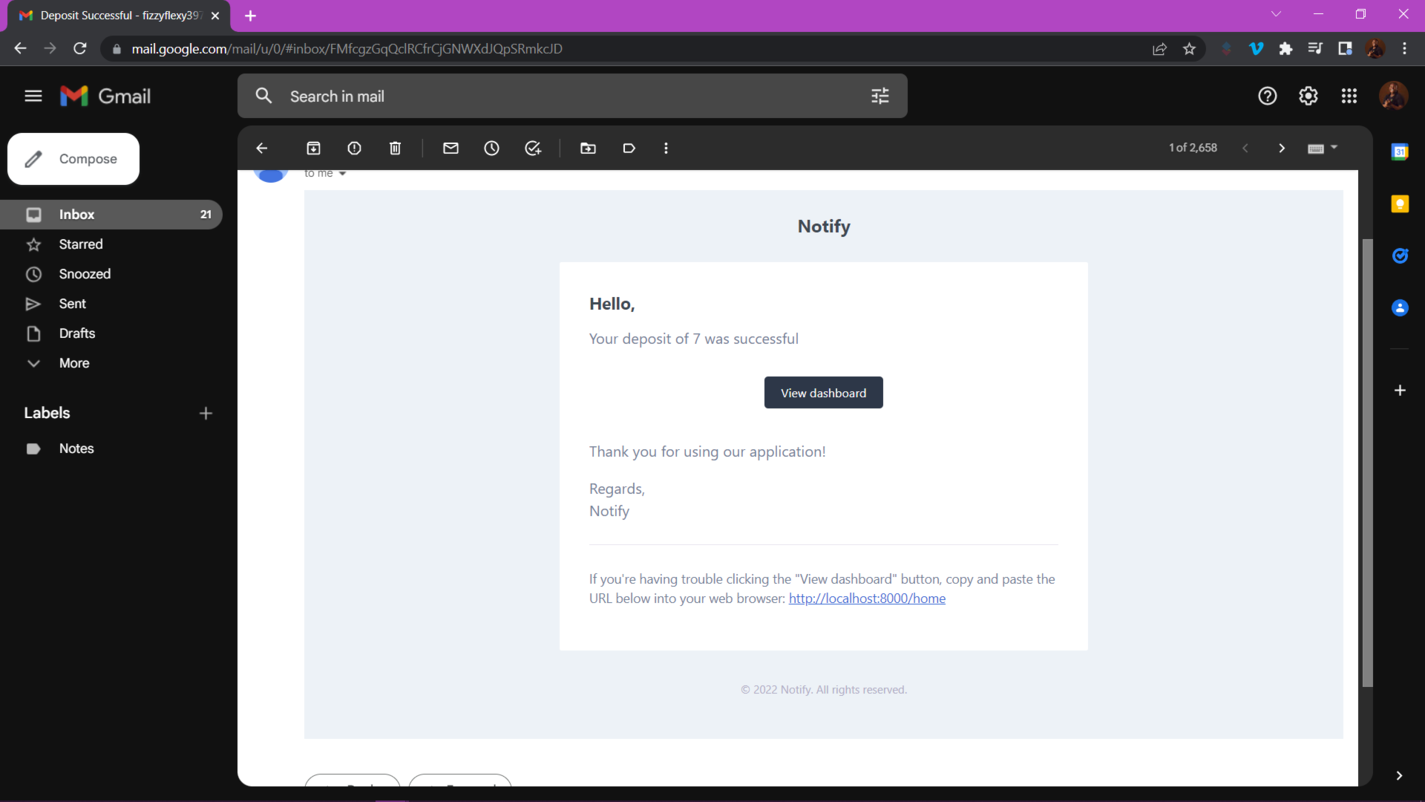
Notice that the greeting, line of text, and call to action (button) have been formatted to a responsive email template.
## Conclusion
In this article, you have gained an in-depth understanding of Laravel Notifications. It is a broad concept, but this can be a great practical guide. Check out the [official Laravel documentation](https://laravel.com/docs/9.x/notifications) to learn more about [Laravel Notifications](https://laravel.com/docs/9.x/notifications). It provides various flexible options, and you can customize these channels to tailor your application needs or [create your drivers to deliver notifications via other channels](https://laravel.com/docs/9.x/notifications#custom-channels). The code for this project is open-source and available [on GitHub](https://github.com/Roxie-32/laravel-notifications.git).
I am open to questions, contributions, and conversations on better ways to implement notifications, so please comment on the repository or DM me [@twitter](https://twitter.com/OlasupoFunke).
Thanks for reading🤝.
---
## Try Honeybadger for FREE
Intelligent logging, error tracking, and Just Enough APM™ in one dev-friendly platform. Find and fix problems before users notice.
[Start free trial](https://app.honeybadger.io/users/sign_up)
[See plans and pricing](https://www.honeybadger.io/plans/)