---
title: "Next.js error handling: a practical guide"
published: "2026-06-18"
publisher: Honeybadger
author: Farhan Hasin Chowdhury
category: JavaScript articles
tags:
- JavaScript
- Nextjs
- Error Handling
description: "Next.js gives developers a structured way to handle errors at every level of an application — from form validation to root-level crashes. Learn how to manage expected errors with return values, catch uncaught exceptions with error boundaries, and set up automatic error reporting in production."
url: "https://www.honeybadger.io/blog/next-js-error-handling/"
---
Every Next.js application has to deal with errors, whether it's a failed API call, invalid user input, or a bug that slips into production. The App Router gives you built-in tools to handle each of these cases differently, keeping your UI intact and your users informed.
No matter how carefully you write your code, things will go wrong. An API will go down, a user will submit unexpected input, or a bug will surface in production. Next.js error handling, especially with the App Router, gives you a structured way to deal with both the errors you expect and the ones that catch you off guard. In this article, I'll walk you through how to handle errors at every level of a Next.js application and show you how to integrate Honeybadger so that no error goes unnoticed.
## Handling expected errors
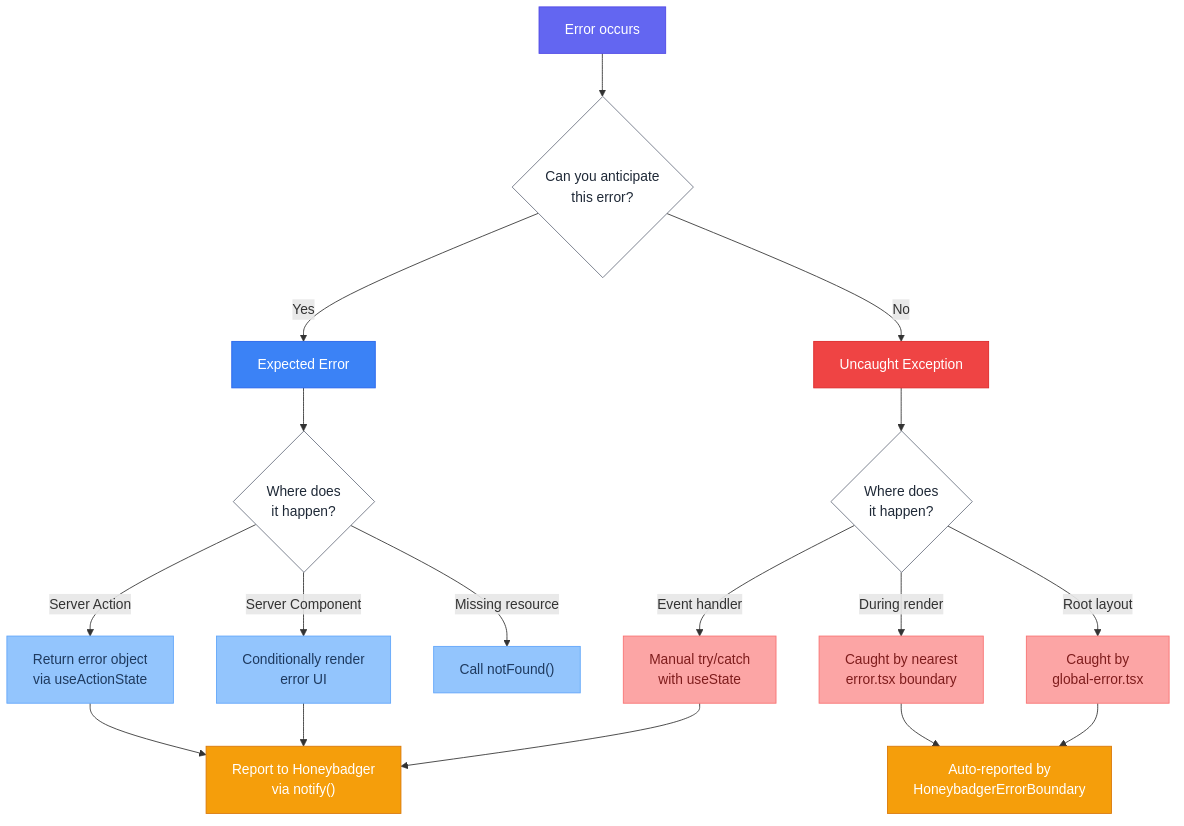
Expected errors are the ones you can anticipate: a user submits a form without filling in the required fields, an API request returns a 404, or an authentication check fails. These aren't bugs. They're normal outcomes of how web applications work. The key principle in Next.js is to **model expected errors as return values, not thrown exceptions**. You return a value that describes what went wrong and let the UI respond accordingly.
### Server Actions
Let's start with Server Actions. Imagine you have a form that lets users create a new blog post. The Server Action needs to validate the input and communicate with an API, and either step could fail:
```ts
// app/actions.ts 'use server' export async function createPost(prevState: any, formData: FormData) { const title = formData.get('title') if (!title || typeof title !== 'string' || title.trim().length === 0) { return { message: 'Title is required.' } } const res = await fetch('https://api.example.com/posts', { method: 'POST', headers: { 'Content-Type': 'application/json' }, body: JSON.stringify({ title: title.trim() }), }) if (!res.ok) { return { message: 'Failed to create post. Please try again.' } } // If we get here, everything worked }
```
Instead of throwing an error, the function returns an object with a `message` property. On the client, you consume this with React's `useActionState` hook:
```tsx
'use client' import { useActionState } from 'react' import { createPost } from './actions' export function PostForm() { const [state, formAction, pending] = useActionState(createPost, { message: '' }) return ( ) }
```
The hook gives you the current state (including the error message), the form action, and a pending boolean. When the Server Action returns an error, the component re-renders and the error message appears below the form. The user sees exactly what went wrong and can try again.
### Server Components
In Server Components, you can check whether a request succeeded and conditionally render different UI:
```tsx
export default async function PostPage({ params }: { params: Promise<{ id: string }> }) { const { id } = await params const res = await fetch(`https://api.example.com/posts/${id}`) if (!res.ok) { return (
Could not load this post
The server returned an error. Please try again later.
) } const post = await res.json() return (
{post.title}
{post.content}
) }
```
You fetch data, check the response, and if it's not ok, you return a fallback UI instead of the normal content. This same pattern works when you fetch data in any Server Component.
### Handling 404s with `notFound()`
Next.js provides a dedicated `notFound()` function from `next/navigation` for the 404 case. When you call it, Next.js stops rendering the current page and shows a 404 UI instead:
```tsx
import { notFound } from 'next/navigation' export default async function PostPage({ params }: { params: Promise<{ id: string }> }) { const { id } = await params const post = await getPost(id) if (!post) { notFound() } return (
{post.title}
{post.content}
) }
```
By default, Next.js renders a generic 404 error page when `notFound()` is called. But you can create a custom error page by adding a `not-found.tsx` file in the same route segment. For example, if you place a `not-found.tsx` file inside `app/blog/`, it will render your custom error page whenever `notFound()` is called from any page within that route segment.
## Handling uncaught exceptions
The other type of error is the ones you didn't see coming — a null reference, a third-party library throwing unexpectedly, or a network request failing in a way you didn't account for. These are actual bugs. Next.js handles them with **error boundaries**, a React concept where a component catches errors during rendering and displays a fallback UI instead of crashing the entire component tree. The App Router builds this directly into the file system routing convention.
### The error.tsx convention
Create a file called `error.tsx` in any route segment. It must be a Client Component and receives two props: the `error` object and an `unstable_retry` function that lets the user try again (the `unstable_` prefix means this API may change in a future release):
```tsx
// app/dashboard/error.tsx 'use client' export default function DashboardError({ error, unstable_retry, }: { error: Error & { digest?: string } unstable_retry: () => void }) { return (
Something went wrong
An unexpected error occurred while loading the dashboard.
) }
```
When an uncaught error occurs anywhere within the `app/dashboard/` route segment or its children, Next.js will catch the error and render this fallback UI instead of crashing the page. The `unstable_retry` function re-renders the segment without a full page reload, which is handy for transient errors like network timeouts.
Note the `digest` property on the error object. When a server-side error occurs, Next.js replaces the original error message with a hash to avoid leaking sensitive details like database queries or file paths. The full error message stays in your server-side logs.
### Nested error boundaries
Errors bubble upward through the route hierarchy until they hit the nearest error boundary, so you can be strategic about where you place your `error.tsx` files.
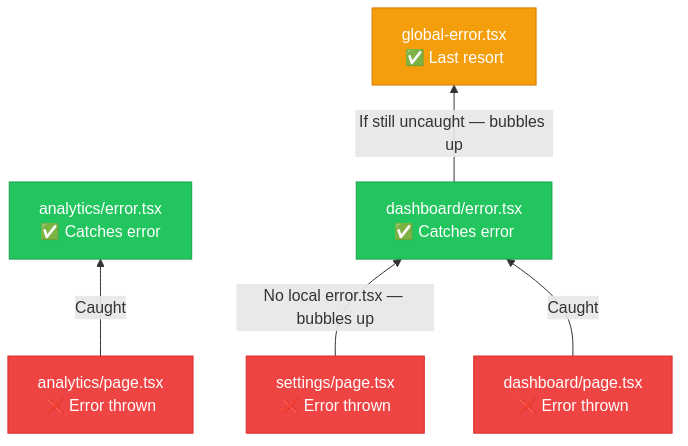
For example, imagine a dashboard with a sidebar and a main content area. By placing `error.tsx` at the right level, you can contain a crash to just the affected area while keeping the sidebar functional:
```text
app/ dashboard/ error.tsx # Catches errors from all dashboard child routes layout.tsx # Dashboard layout with sidebar (stays intact) page.tsx # Main dashboard page analytics/ error.tsx # Catches errors only in the analytics section page.tsx settings/ page.tsx # Errors here bubble up to dashboard/error.tsx
```
If the analytics page crashes, only that section shows the error UI — the sidebar stays intact. If settings crashes, the error bubbles up to `dashboard/error.tsx` since it doesn't have its own error boundary.
### global-error.tsx
`error.tsx` can't catch errors in the root layout since it wraps everything. For that, Next.js provides `app/global-error.tsx`, which replaces the **entire page** when triggered and must define its own `` and `` tags:
```tsx
// app/global-error.tsx 'use client' export default function GlobalError({ error, unstable_retry, }: { error: Error & { digest?: string } unstable_retry: () => void }) { return (
Something went wrong
We encountered an unexpected error. Please try refreshing the page.
) }
```
In practice, errors in the root layout are rare, but having a global error page in place ensures your users never see a completely broken page.
### Event handler errors
There's an important limitation to be aware of: error boundaries only catch errors that occur **during rendering**. If an error happens inside an event handler, like an `onClick` or `onSubmit` callback, the nearest error boundary won't catch it because event handlers run outside of React's rendering cycle.
For these cases, you need to catch errors manually with a try/catch block:
```tsx
'use client' import { useState } from 'react' export function DeleteButton({ id }: { id: string }) { const [error, setError] = useState(null) const handleDelete = async () => { try { const res = await fetch(`/api/posts/${id}`, { method: 'DELETE' }) if (!res.ok) { setError('Failed to delete this post. Please try again.') } } catch (e) { setError('Something went wrong. Please check your connection.') } } return (
{error &&
{error}
}
) }
```
This is a common pattern in client-side error handling. One exception: if you use `useTransition` and throw an error inside `startTransition`, that error _will_ bubble up to the nearest error boundary, even from an event handler.
## Capturing and reporting Next.js errors with Honeybadger
Proper error handling in the UI is one thing, but in production, you also need to know when errors are happening, how often, and what's causing them. Users almost never report bugs, and digging through server-side logs is tedious at best.
[Honeybadger's Next.js integration](https://docs.honeybadger.io/lib/javascript/integration/nextjs/) plugs into your application to automatically catch errors on both the server side and client side, group duplicates, and notify you with enough context to actually fix things.
### Installation and setup
First, install the required packages:
```bash
npm install @honeybadger-io/react @honeybadger-io/nextjs
```
Then run the setup command to generate the configuration files:
```bash
npx honeybadger-copy-config-files
```
This creates configuration files for the server, client, and edge runtimes, as well as `error.tsx` and `global-error.tsx` files for the App Router. Next, add your API key to your environment variables:
```env
NEXT_PUBLIC_HONEYBADGER_API_KEY=your_api_key NEXT_PUBLIC_HONEYBADGER_REVISION=your_deployment_revision
```
Finally, wrap your Next.js config with Honeybadger's setup function to enable source map uploads and error reporting:
```js
// next.config.js const { setupHoneybadger } = require('@honeybadger-io/nextjs') const nextConfig = {} module.exports = setupHoneybadger(nextConfig)
```
Source maps are uploaded automatically, so stack traces in Honeybadger point to your original source code instead of minified bundles.
### Wrapping your app with the error boundary
Wrap your application with Honeybadger's error boundary in your root layout so any unhandled React component error is automatically reported:
```tsx
// app/layout.tsx import { Honeybadger, HoneybadgerErrorBoundary } from '@honeybadger-io/react' export default function RootLayout({ children }: { children: React.ReactNode }) { return ( {children} ) }
```
Honeybadger will now capture uncaught client-side exceptions and React component errors. You can also add the `showUserFeedbackFormOnError` prop to show a feedback form when an error occurs, letting users describe what they were doing.
### Manual error reporting
For errors you handle gracefully but still want to track, use `Honeybadger.notify()`:
```ts
import { Honeybadger } from '@honeybadger-io/react' try { await submitOrder(orderData) } catch (error) { Honeybadger.notify(error) return { message: 'Order failed. Please try again.' } }
```
You can also attach context to help with debugging:
```ts
Honeybadger.setContext({ user_id: currentUser.id, user_email: currentUser.email, })
```
When an error shows up in Honeybadger's dashboard, you'll know exactly which user was affected and have a full stack trace pointing to the exact line of code.
## Next.js error handling best practices
To recap, here's how I think about Next.js error handling.
For expected errors, return values instead of throwing. Use `useActionState` in Server Actions and conditional rendering in Server Components to handle errors gracefully. Use `notFound()` for missing resources instead of rolling your own 404 logic.
For uncaught exceptions, place `error.tsx` files at the right levels of your route hierarchy so a crash in one section doesn't take down the whole page. Add `global-error.tsx` as a safety net for root layout errors. And remember that error boundaries don't catch errors in event handlers, so you'll need try/catch there.
Finally, don't rely on users to tell you when things break. Set up error monitoring so you find out about production issues before your users do.
That covers the full picture of error handling in Next.js, from data fetching and form validation to production error management. If you want to try Honeybadger with your Next.js project, you can [sign up for a free trial](https://www.honeybadger.io/plans/) and have error reporting running in a few minutes.
---
## Try Honeybadger for FREE
Intelligent logging, error tracking, and Just Enough APM™ in one dev-friendly platform. Find and fix problems before users notice.
[Start free trial](https://app.honeybadger.io/users/sign_up)
[See plans and pricing](https://www.honeybadger.io/plans/)