---
title: Laravel code-quality tools
date: "2023-05-08"
publisher: Honeybadger
author: Wern Ancheta
category: PHP articles
tags:
- PHP
- Laravel
description: "Keep your Laravel code in top shape and avoid bugs with these five tools designed to improve code quality, catch bugs early, ensure uniform coding style, and follow best practices."
url: "https://www.honeybadger.io/blog/laravel-code-quality-tools/"
---
As developers, it is our responsibility to keep our code in tip-top shape as much as possible. This is helpful in maintaining and extending code, as well as in avoiding bugs.
In PHP, a number of tools can help us achieve quality and bug-free code, including PHP Mess detector, PHP CodeSniffer, PHPStan, and Psalm. These are all great tools, but they're not easy to integrate on a Laravel project.
In this article, well be looking at five tools specifically made to help you catch bugs early, improve the quality of your Laravel code, ensure uniform coding style, and make it easy to follow best practices while working with Laravel projects.
Specifically, we will be covering the following tools:
- Laravel Pint
- PHP Insights
- Larastan
- Laravel Psalm plugin
- Enlightn
We'll also cover text-editor integration and continuous integration using those tools.
## Prerequisites
This tutorial assumes that you have set up your PHP development environment. It also assumes experience with PHP and Laravel.
To make full use of this tutorial, I highly recommend following along so that you can see and test for yourself how these tools work.
To aid with this, please clone the following repo: [food-order-app-laravel-tdd](https://github.com/anchetaWern/food-order-app-laravel-tdd):
```bash
git clone https://github.com/anchetaWern/food-order-app-laravel-tdd cd food-order-app-laravel-tdd git checkout tdd
```
Next, rename the `.env.example` file to `.env` and update the `DB_PASSWORD` with your local database password.
Once that's done, set up the project by executing the following commands:
```bash
composer install npm install php artisan config:cache php artisan migrate php artisan db:seed
```
That should install all the composer and frontend dependencies, update the config, and migrate and seed the database.
I recommend installing GitHub for desktop or any other Git GUI tool of your choice so that you can see what the tools does to your code.
## What is static code analysis?
Static analysis allows you to check code for issues without running it. It basically reads the code, understands it, and compares it against a certain rule to verify correctness. Here's an example:
```bash
function calculateSalary(int $days_worked, int $hours_worked_per_day): int { ... } calculateSalary('20', 8);
```
Just by looking at it, we already know that the code will fail because we've supplied a string instead of an integer for the first argument. This is essentially how static code analysis works. However, for it to do its job well, you need to already be using types in your code (either via [type declarations](https://www.php.net/manual/en/language.types.declarations.php) or [DocBlocks](https://docs.phpdoc.org/3.0/guide/references/phpdoc/basic-syntax.html)). This will make the checks more effective at helping to find issues in your code.
Note that static analyzers are smart enough to infer most types, so adding types to your old project isn't required to take advantage of them.
Static analyzers scan your whole codebase at once. This means that the context in which they work differs from that of humans doing a code review. They know how the different files are connected all at once, which is why they're capable of detecting issues that can't normally be caught in a code review.
You might be wondering why static analyzers are needed when we already use tools like PHPUnit or Pest to test our code. Well, it's because those tools aren't usable right away. You have to write the tests first before you can use them to detect issues in your code. Often, it is also time-consuming to run them because they need to execute your code. This is the main difference between static and dynamic analysis. The former scans the code, while the latter runs the code to detect issues.
Using a code analysis tool has the following benefits:
- Enforce coding standards set by your team.
- Ensure that a uniform coding style is followed.
- Spot potential issues early, which means fewer bugs are shipped to production.
- Improve code quality.
- Detect security vulnerabilities.
## Laravel pint
Laravel Pint is the newest tool for checking code quality. Starting with Laravel 9, Pint is automatically installed when you create a new Laravel app. It also comes with a default configuration for the checks. This makes it easy to get started with since you don't have to do anything else. The only disadvantage is that it's only supported for PHP 8 projects.
### Installation
If you're on an older Laravel version, you can install Pint with the following command:
```bash
composer require laravel/pint --dev
```
### Usage
To use Pint, execute the following:
```bash
./vendor/bin/pint --test
```
This will show all the issues that Pint detects in your code:
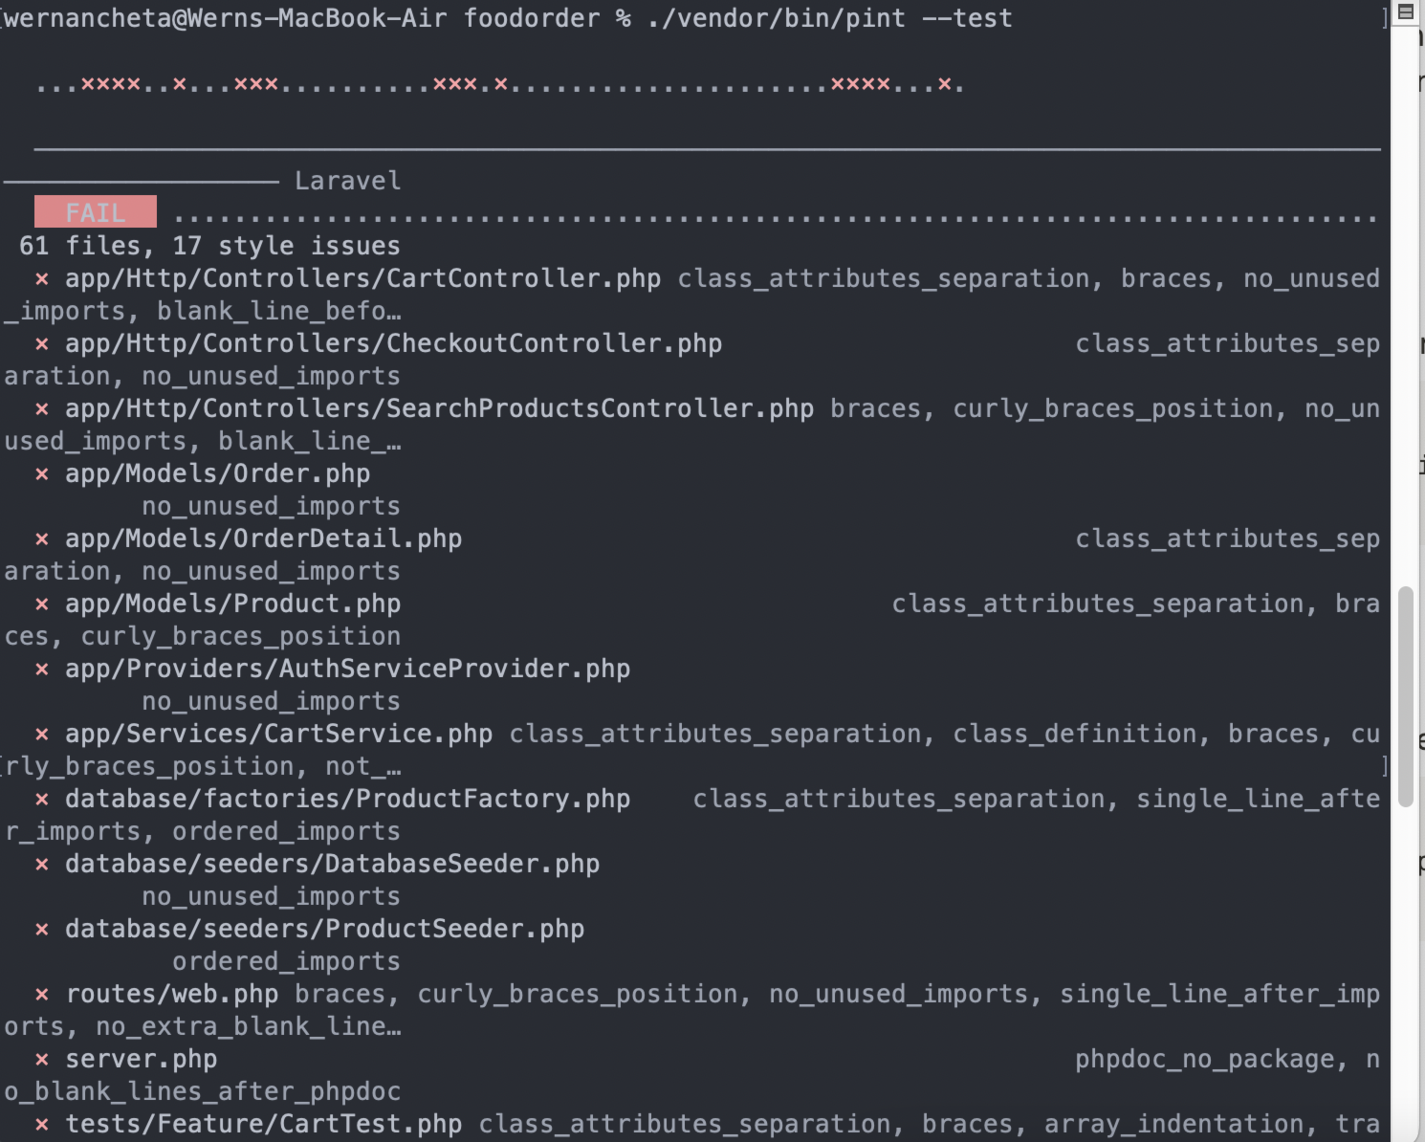
That should give you an idea what rules it's using. The output isn't simple to read, so it's recommended to set Pint to automatically fix the issues for you instead:
```bash
./vendor/bin/pint
```
You can then view it on your Git GUI tool of choice to see what sort of changes it's making:
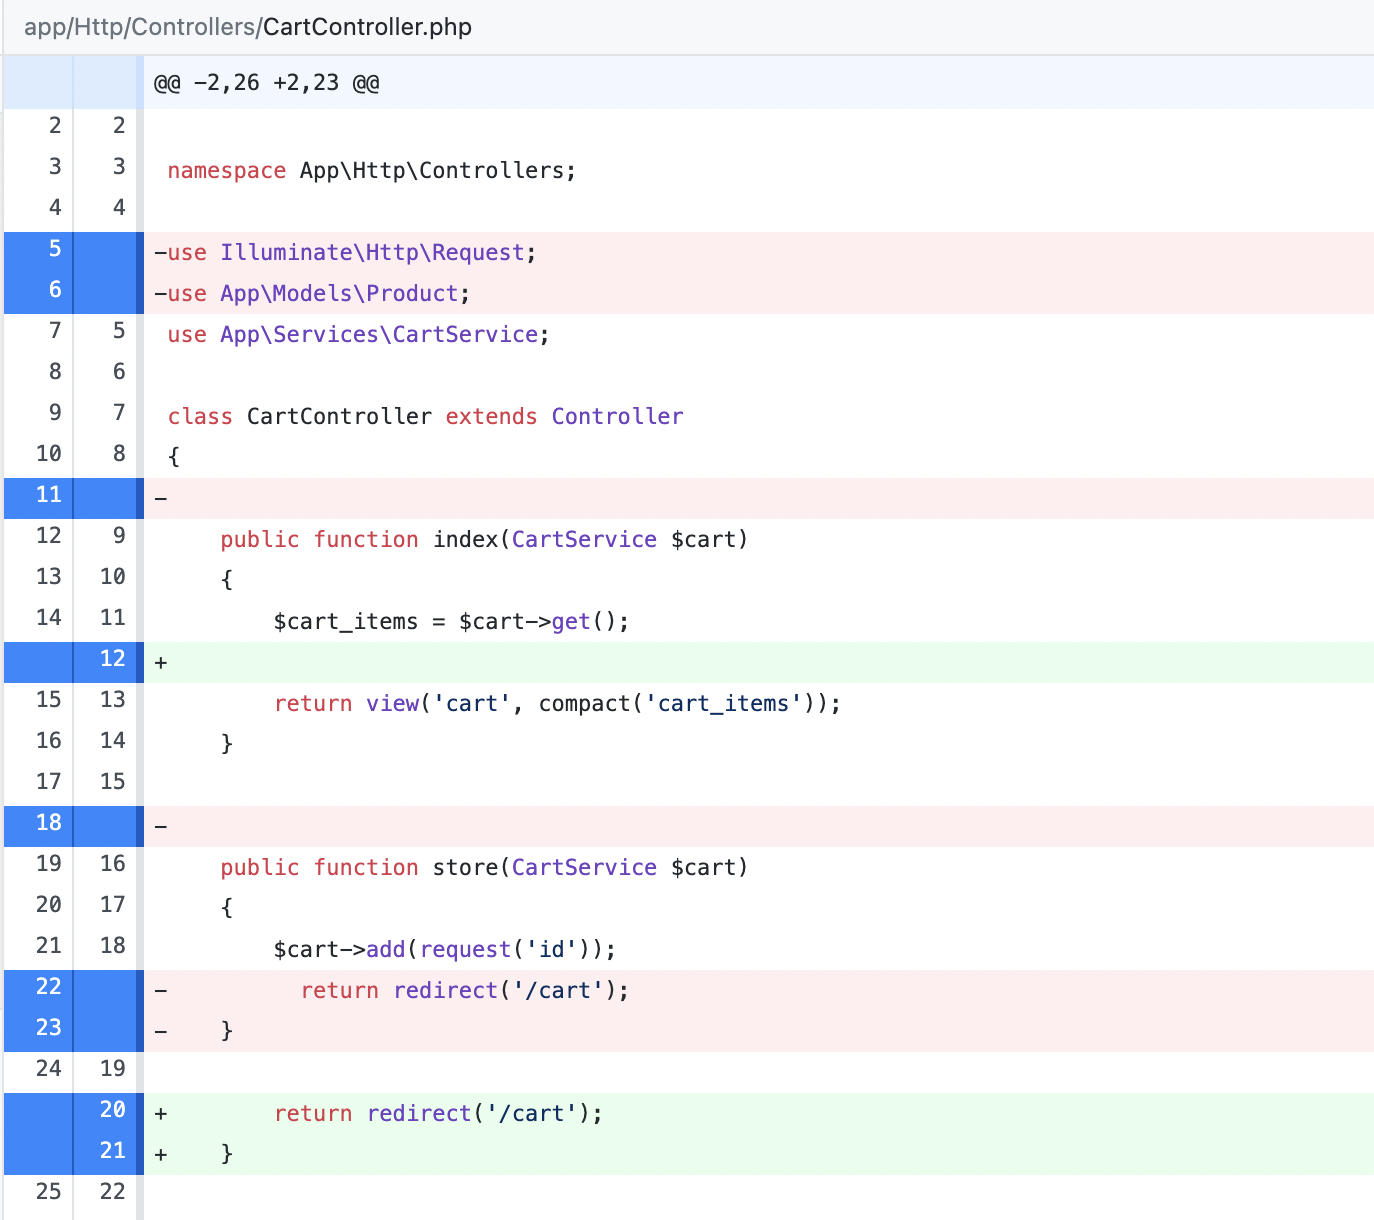
In the screenshot above, you can see that it automatically removes unused imports and includes additional whitespace to improve readability. However, it does more than that depending on your code. Be sure to review the changes it's making before committing them. If something doesn't feel right, then you can simply revert the changes and manually implement the changes it recommends.
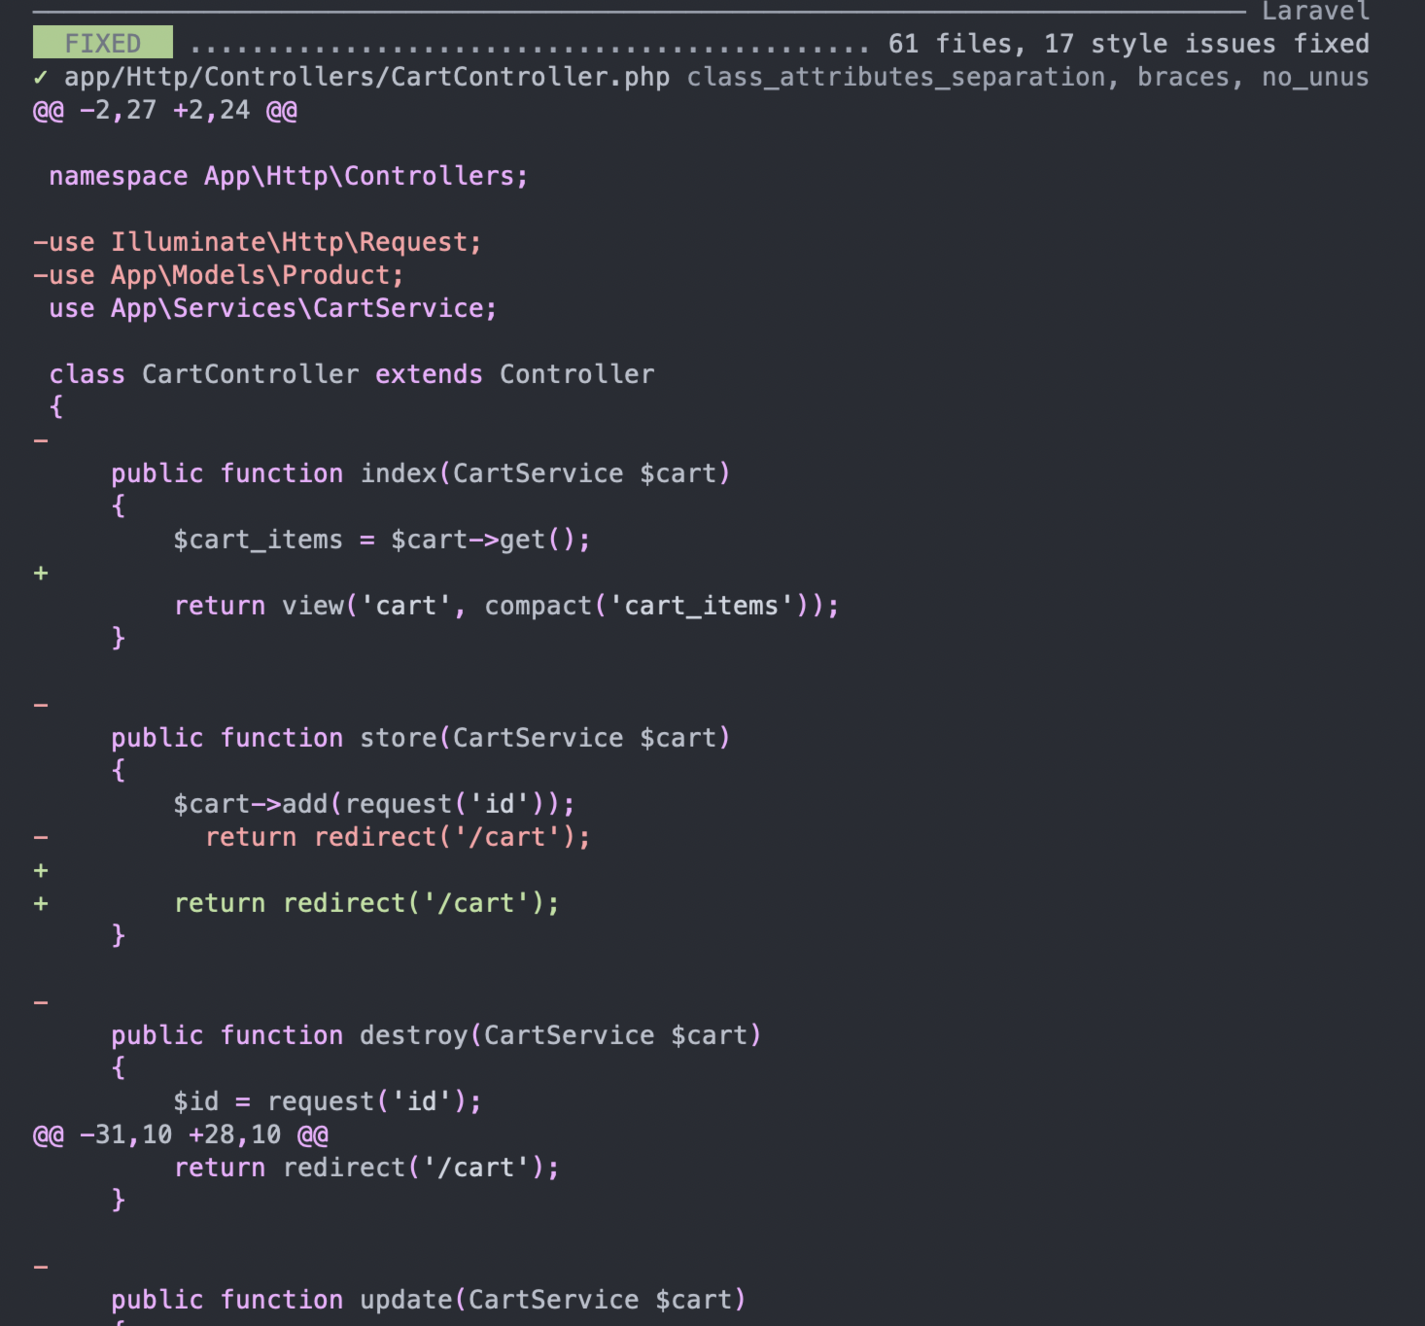
If you don't have a Git GUI tool installed, you can have Pint print the changes it makes for you:
```bash
./vendor/bin/pint -v
```
Here's a sample output:
### Configuration
Pint uses the `laravel` preset rules by default, so you don't have to do anything else if you want to use the [rules within it](https://laravel.com/docs/9.x/contributions#coding-style). You can configure Pint by creating a `pint.json` file at the root of your project directory:
```bash
{ "preset": "laravel" }
```
Other supported presets are `symfony` and `psr12`. You can change it like so:
```bash
pint --preset psr12
```
If you don't want to use any of those presets, your only option is to specify the all the rules by hand. Pint is built on top of [PHP CS Fixer](https://github.com/FriendsOfPHP/PHP-CS-Fixer) so you can use all the rules that it has. You can use the [PHP-CS-Fixer configurator](https://mlocati.github.io/php-cs-fixer-configurator/#version:3.11) to cherry-pick your own set of rules.
There's a lot, so you'll most likely base your rules on an existing set. For example, there's the CS Fixer set:
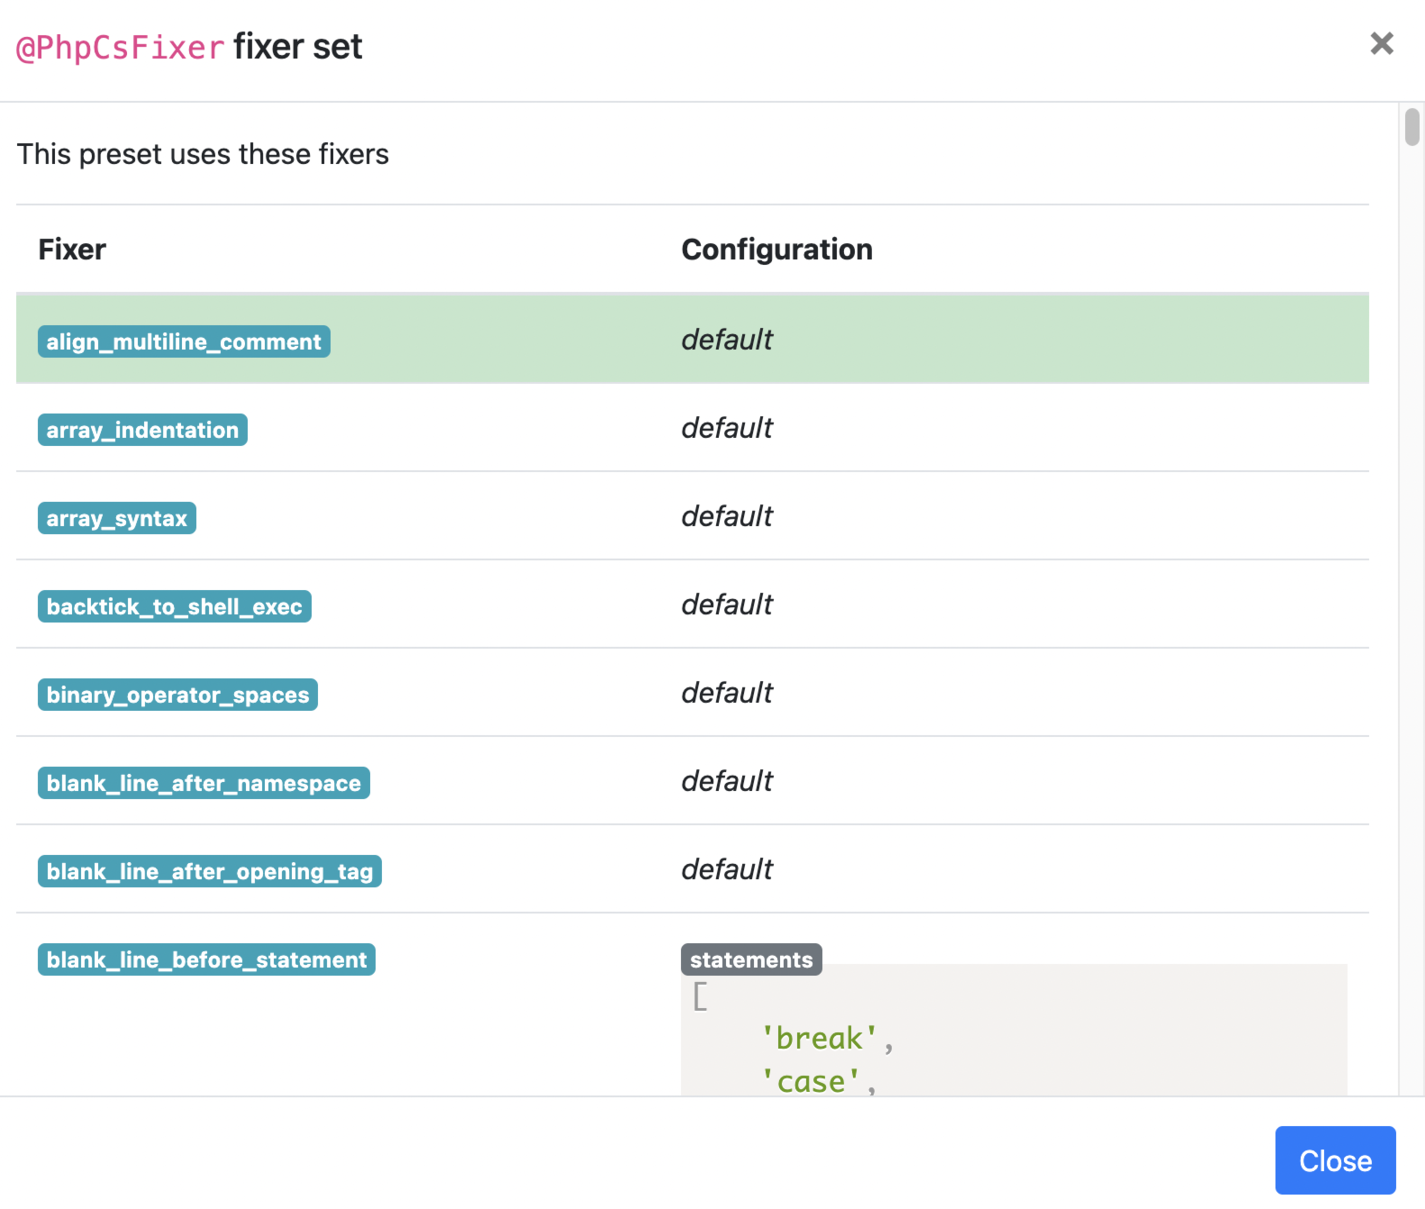
Here's a sample `pint.json` file:
```bash
{ "preset": "laravel", "rules": { "simplified_null_return": true, "braces": false, "new_with_braces": { "anonymous_class": false, "named_class": false } } }
```
Note that you can only disable rules from an existing preset. You can't specify one or two rules and expect Pint to only check for those rules.
You can read more about [Pint in the Laravel docs](https://laravel.com/docs/9.x/pint).
## PHP insights
[PHP Insights](https://phpinsights.com/) is a code quality analysis tool that checks for code quality, coding style, complexity, and architecture. Just like Pint, it's also opinionated, so you'll have to customize it to fit your needs.
### Installation
You can install PHP Insights with the following command:
```bash
composer require nunomaduro/phpinsights --dev
```
### Usage
You can run PHP Insights by executing the following:
```bash
./vendor/bin/phpinsights
```
If you want to be able to call insights using artisan and configure it, then you have to add its config to your project:
```bash
php artisan vendor:publish --provider="NunoMaduro\PhpInsights\Application\Adapters\Laravel\InsightsServiceProvider"
```
This would then allow you to execute Insights with `php artisan insights`, which should give you a nicely formatted report across four areas of your code:
- Code
- Complexity
- Architecture
- Style
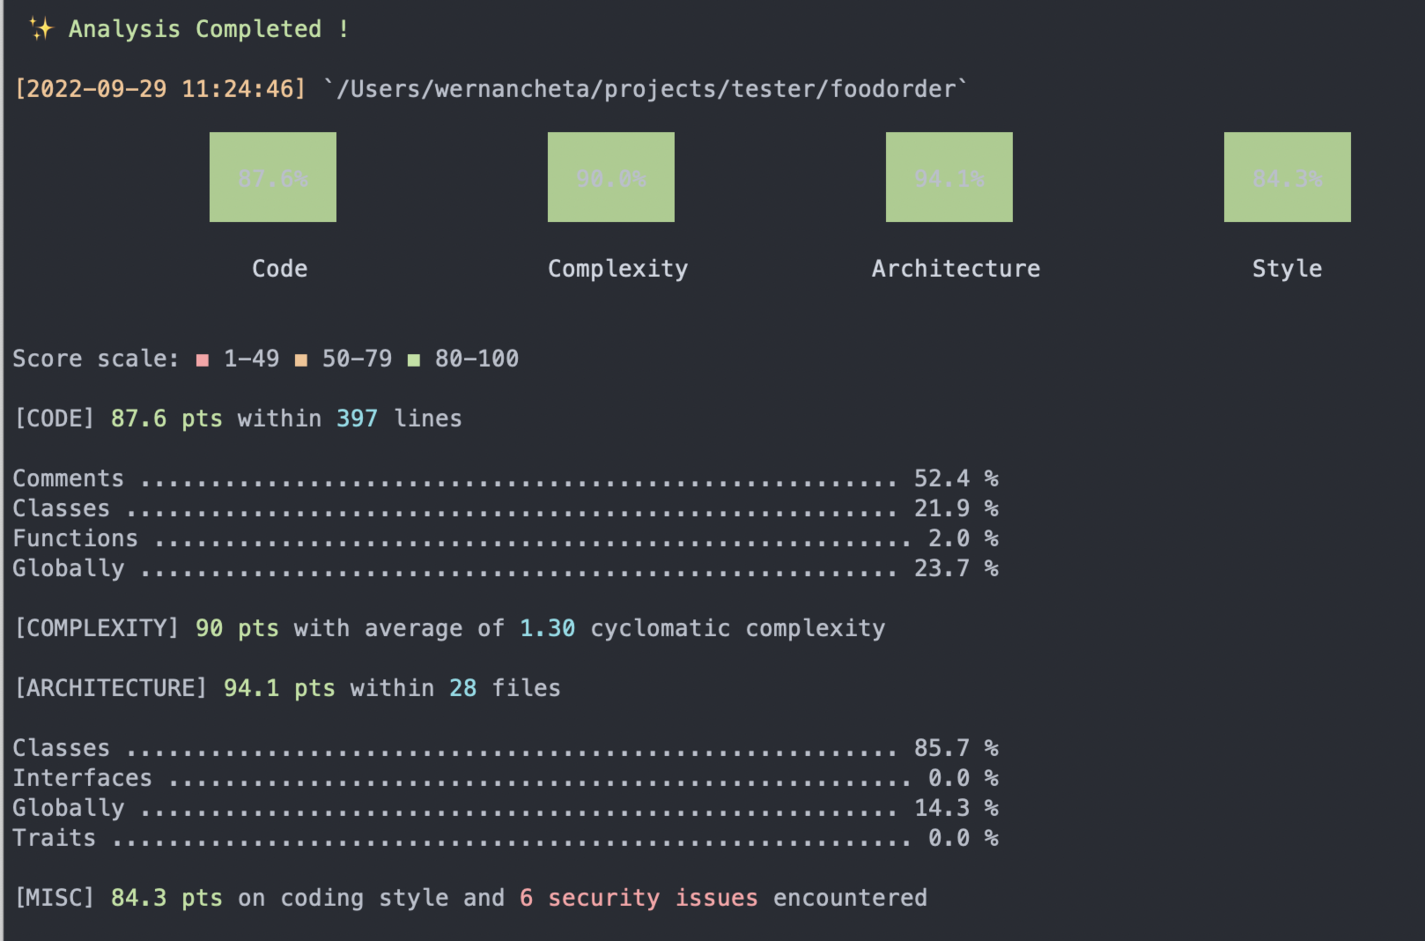
You can also specify which files you want to check. For example, you only want to check for controllers:
```bash
php artisan insights app/Http/Controllers
```
This can also be a specific file:
```bash
php artisan insights app/Http/Controllers/CartController.php
```
If you want your issues automatically fixed, use the following:
```bash
php artisan insights --fix
```
PHP Insights also checks a fifth area: security issues found in your dependencies. Note that it's only checking for dependencies and not your actual code. Therefore, it won’t highlight [OWASP](https://owasp.org/) issues for you. Nevertheless, this is a pretty useful addition to a code-analysis tool so that you can address it as soon as possible.

### Configuration
To configure PHP Insights, update the `config/insights.php` file.
Just like Pint, you can only override the rules applied to the `preset` specified. By default, it uses `laravel`, but it also supports `symfony`, `magento2`, and `drupal`:
```php
return [ 'preset' => 'laravel', ]
```
Next, you can either add or remove certain rules from the preset:
```php
[ Classes::class => [ ForbiddenFinalClasses::class, ], ], 'remove' => [ DeclareStrictTypesSniff::class, DisallowMixedTypeHintSniff::class, ], ];
```
PHP Insights supports sniffs from [PHP CodeSniffer](https://github.com/squizlabs/PHP_CodeSniffer) and fixers from [PHP CS Fixer](https://github.com/FriendsOfPHP/PHP-CS-Fixer). This allows you to add any sniff or fixer as long as it implements `PHP_CodeSniffer\Sniffs\Sniff` or `PhpCsFixer\Fixer\FixerInterface`.
If you go through the imports in the `config/insights.php` file, you'll see that it mostly uses rules from `NunoMaduro\PhpInsights` and `SlevomatCodingStandard\Sniffs`. The former is PHP Insight's in-house insights and the latter is the sniffs from the [Slevomat coding standard](https://github.com/slevomat/coding-standard). In most cases, you'll only ever reach for those two.
Here's a list of rules you can use:
- [Slevomat coding standard sniffs](https://github.com/slevomat/coding-standard/tree/master/SlevomatCodingStandard/Sniffs)
- [CodeSniffer sniffs](https://github.com/squizlabs/PHP_CodeSniffer/tree/master/src/Sniffs)
- [CodeSniffer standards](https://github.com/squizlabs/PHP_CodeSniffer/tree/master/src/Standards)
- [PHP Insights insights](https://github.com/nunomaduro/phpinsights/tree/master/src/Domain/Insights)
- [PHP Insights sniffs](https://github.com/nunomaduro/phpinsights/tree/master/src/Domain/Sniffs)
However, you can just as easily use the documentation to look for classes to import:
- [Code](https://phpinsights.com/insights/code.html)
- [Architecture](https://phpinsights.com/insights/architecture.html)
- [Style](https://phpinsights.com/insights/style.html)
For example, you don't care that imports are alphabetically arranged. The corresponding sniff for that is under the [namespaces folder → AlphabeticallySortedUsesSniff](https://github.com/slevomat/coding-standard/blob/master/SlevomatCodingStandard/Sniffs/Namespaces/AlphabeticallySortedUsesSniff.php). You can then remove it like so:
```php
[ AlphabeticallySortedUsesSniff::class, ] ];
```
You can learn more about [PHP Insights](https://phpinsights.com/) on their website.
## PHPStan
[PHPStan](https://phpstan.org/) is a static analysis tool for PHP. Larastan is a package built on top of [PHPStan](https://phpstan.org/) to make it easier to integrate with Laravel projects. PHPStan works by "sniffing" the code using the various rulesets applied to it and determine if it follows the standards. However, Larastan doesn't fully follow the definition of "static analysis" since it has to boot the application's container and resolve the types that can only be computed at runtime. This is why Larastan is called a "code analysis" tool rather than a "static analysis" tool.
### Installation
Larastan requires PHP 8 and Laravel 9, so if you have a project that uses an older version, you'll need to update your dependencies first before using it. Execute the following command to install it:
```bash
composer require nunomaduro/larastan --dev
```
Then, create a `phpstan.neon` file at the root of your project directory. Add the following config to it:
```txt
includes: - ./vendor/nunomaduro/larastan/extension.neon parameters: paths: - app/ # Level 9 is the highest level level: 5
```
The `includes` directive includes the base configuration required by PHPStan. It contains everything required by PHPStan to work with Laravel, as well as some default rules for checking your code.
### Usage
To analyze your code, run the following command:
```bash
./vendor/bin/phpstan analyse
```
Something like the following will be returned; it should show the file name and the line:
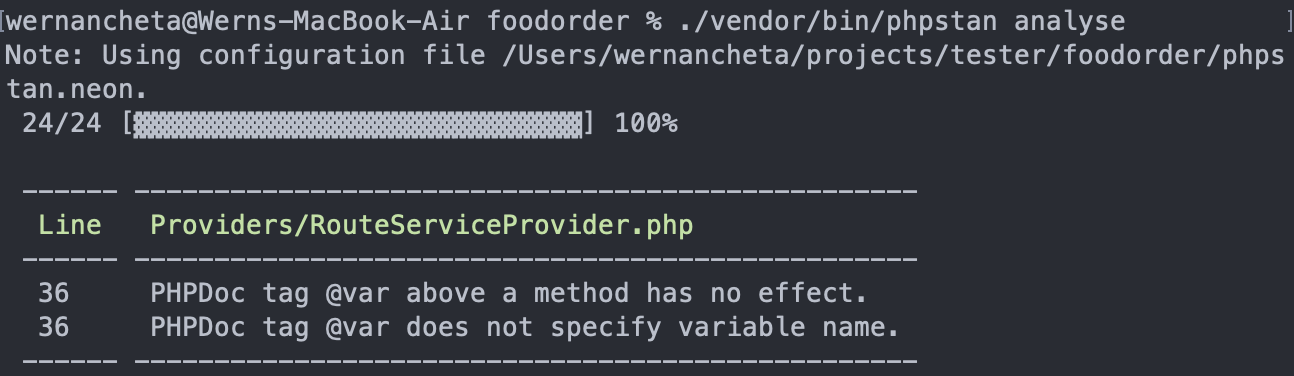
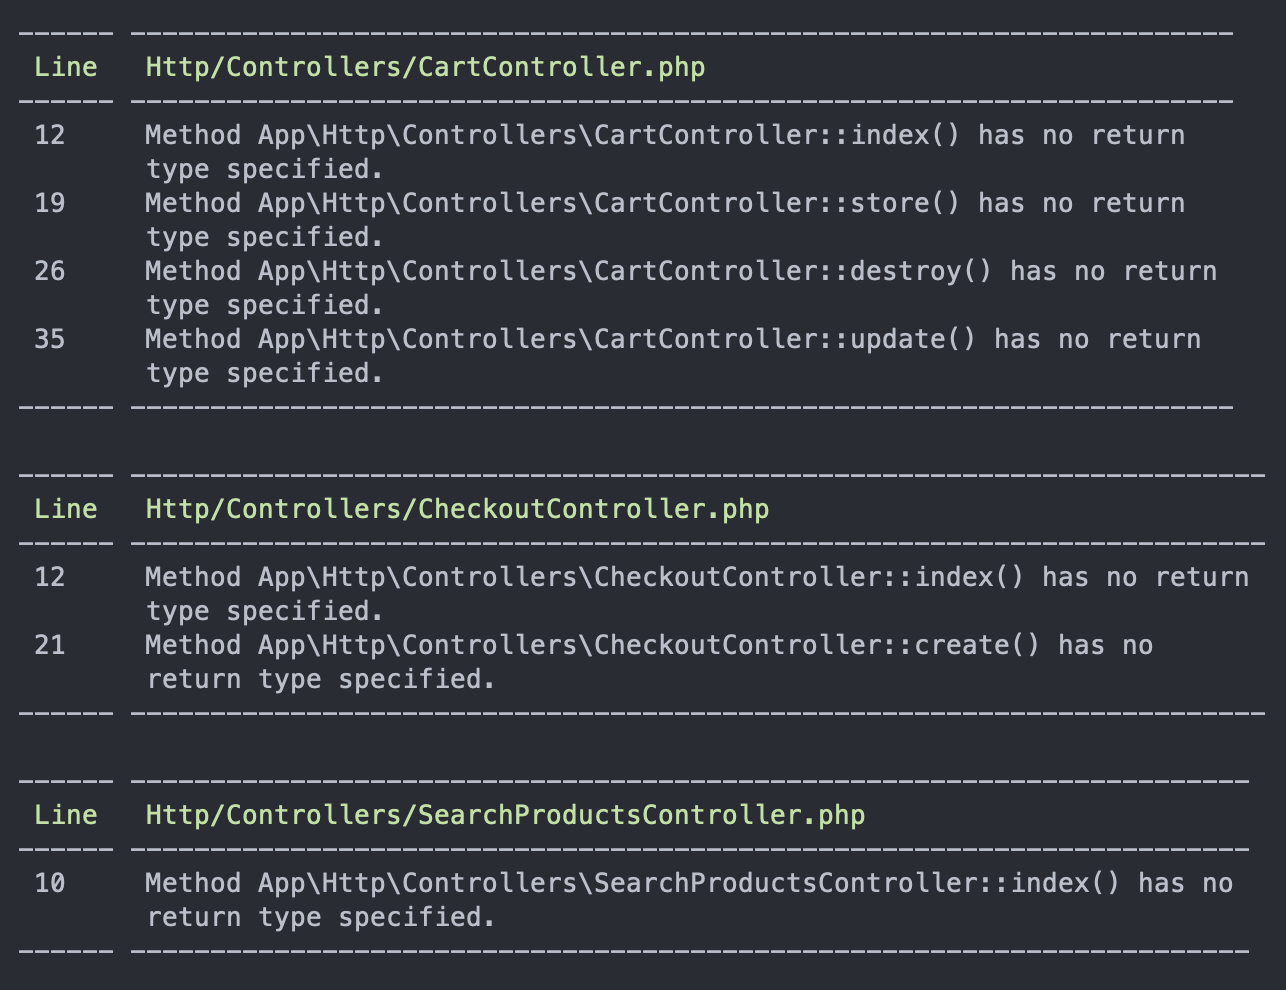
That's the only issue we get since the `level` is only set to `5`. Try playing around with this value in the `phpstan.neon` file by increasing it in increments of `1`. Here's what it looks like when it’s increased to `6`:
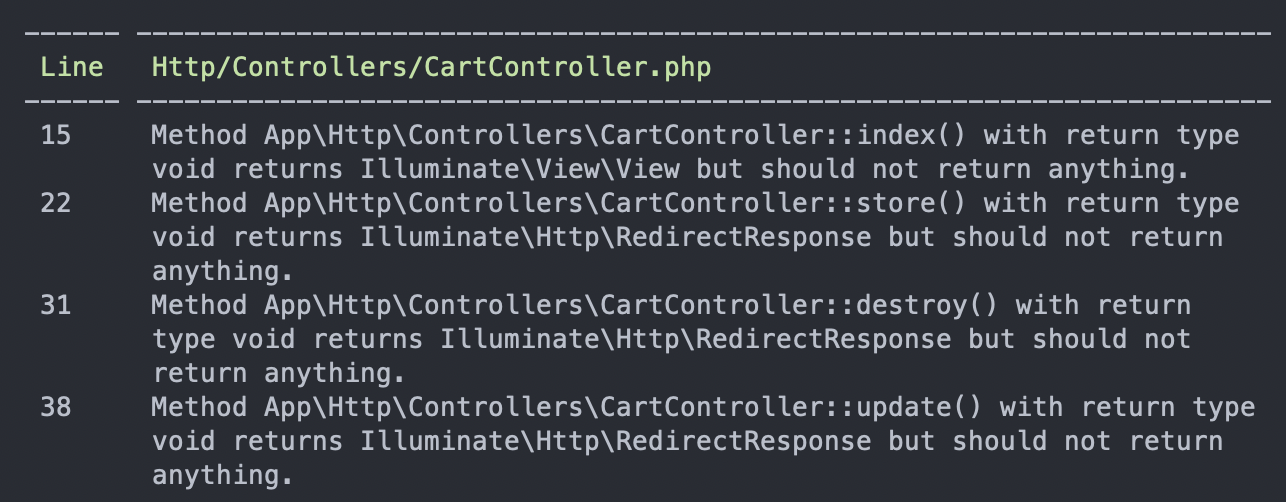
If you try to trigger a different error by using an incorrect type, it detects what the correct type should be:
```php
get(); return view('cart', compact('cart_items')); } public function store(CartService $cart): void { $cart->add(request('id')); return redirect('/cart'); } public function destroy(CartService $cart): void { $id = request('id'); $cart->remove($id); return redirect('/cart'); } public function update(CartService $cart): void { $cart->update(request('id'), request('qty')); return redirect('/cart'); }
```
This is where the type loading kicks in. With just static analysis, PHPStan won't really know what type these should be:
With PHPStan, you can also specify the folder or file you want to analyze:
```bash
./vendor/bin/phpstan analyse app/Http/Controllers ./vendor/bin/phpstan analyse app/Http/Controllers/CheckoutController.php
```
You can also easily switch the rule level:
```bash
./vendor/bin/phpstan analyse -l 1
```
### Configuration
In the `phpstan.neon` file, the directories you want to analyze can be specified. For example, you're only interested in analyzing controllers, models, and services:
```php
parameters: paths: - app/Http/Controllers - app/Models - app/Services
```
We've briefly touched on the rule level earlier. This can have a value between `0` to `9`. PHPStan is mostly concerned about return types, so the kinds of issues you'll see will mostly relate to type checks. You can read more about the [rule levels here](https://phpstan.org/user-guide/rule-levels).
Be sure to check out the [PHPStan config reference](https://phpstan.org/config-reference) to learn more about the available configuration options.
In addition to the checks that PHPStan provides, Larastan has checks specific to Laravel. You can check out the [rules](https://github.com/nunomaduro/larastan/blob/master/docs/rules.md) doc for that.
For relatively new projects adopting PHPStan, this would return fewer issues. However, for older projects, it can be overwhelming to deal with all the issues. Therefore, it's good to start with level 1 and then progressively increase the level as you deal with the easier issues.
If the issues gets too overwhelming, you can always generate a baseline file:
```bash
./vendor/bin/phpstan analyse --generate-baseline
```
This generates a `phpstan-baseline.neon` file at the root of your project directory. Include it on your `phpstan.neon` file:
```bash
includes: - ./vendor/nunomaduro/larastan/extension.neon - ./phpstan-baseline.neon
```
If you check the contents of the file, you'll see that it ignores all the errors returned on the current rule level. This effectively allows you to run subsequent analysis on new code only. If you try to run the `analyse` command now, it will return no issues. Use this sparingly, and make sure you've already dealt with the most crucial issues.
A big part of making static analyzers like PHPStan really useful is their ability to extend PHP's type system via [custom doc types](https://phpstan.org/writing-php-code/phpdoc-types). We won't be covering that in this article, but adding those doc types will provide more context to PHPStan so that it can understand your codebase better and make more informed decisions regarding the issues plaguing your codebase. These doc types are particularly useful if you're not already using PHP 8. Here's a quick example:
```php
class Student { /** @readonly */ public float $grade; } (new Student())->grade = 80.5;
```
In the above code, we used the annotation `@readonly` to indicate that the `$grade` should be a read-only property. This language feature wasn't added until PHP 8.1, so it's extremely useful for providing more info to PHPStan if the project is using something older than PHP 8.1.
You can learn more about [PHPStan](https://phpstan.org/) and [Larastan](https://github.com/nunomaduro/larastan) on their GitHub and website.
## Psalm
[Psalm](https://psalm.dev/) is a static analysis tool for PHP. Much like PHPStan is to Larastan, Psalm has a plugin called [Laravel Psalm](https://github.com/psalm/psalm-plugin-laravel) that allows you to easily use it in Laravel projects.
### Installation
The first step is installing Psalm:
```bash
composer require --dev vimeo/psalm
```
Next, generate its config file. This creates a `psalm.xml` file in the root of your project directory:
```bash
./vendor/bin/psalm --init
```
Once that's done, you can now install the Laravel Psalm plugin and enable it:
```bash
composer require --dev psalm/plugin-laravel ./vendor/bin/psalm-plugin enable psalm/plugin-laravel
```
### Usage
You can run Psalm using the following command:
```bash
./vendor/bin/psalm
```
By default, Psalm doesn't show you the details of the issues that it finds:
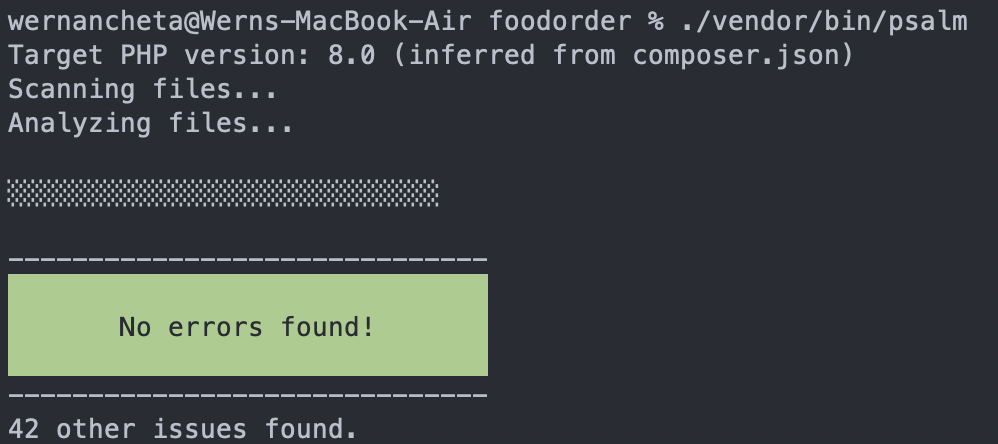
To show the details of the issues it found, use the following:
```bash
./vendor/bin/psalm --show-info=true
```
You'll then get something like this:
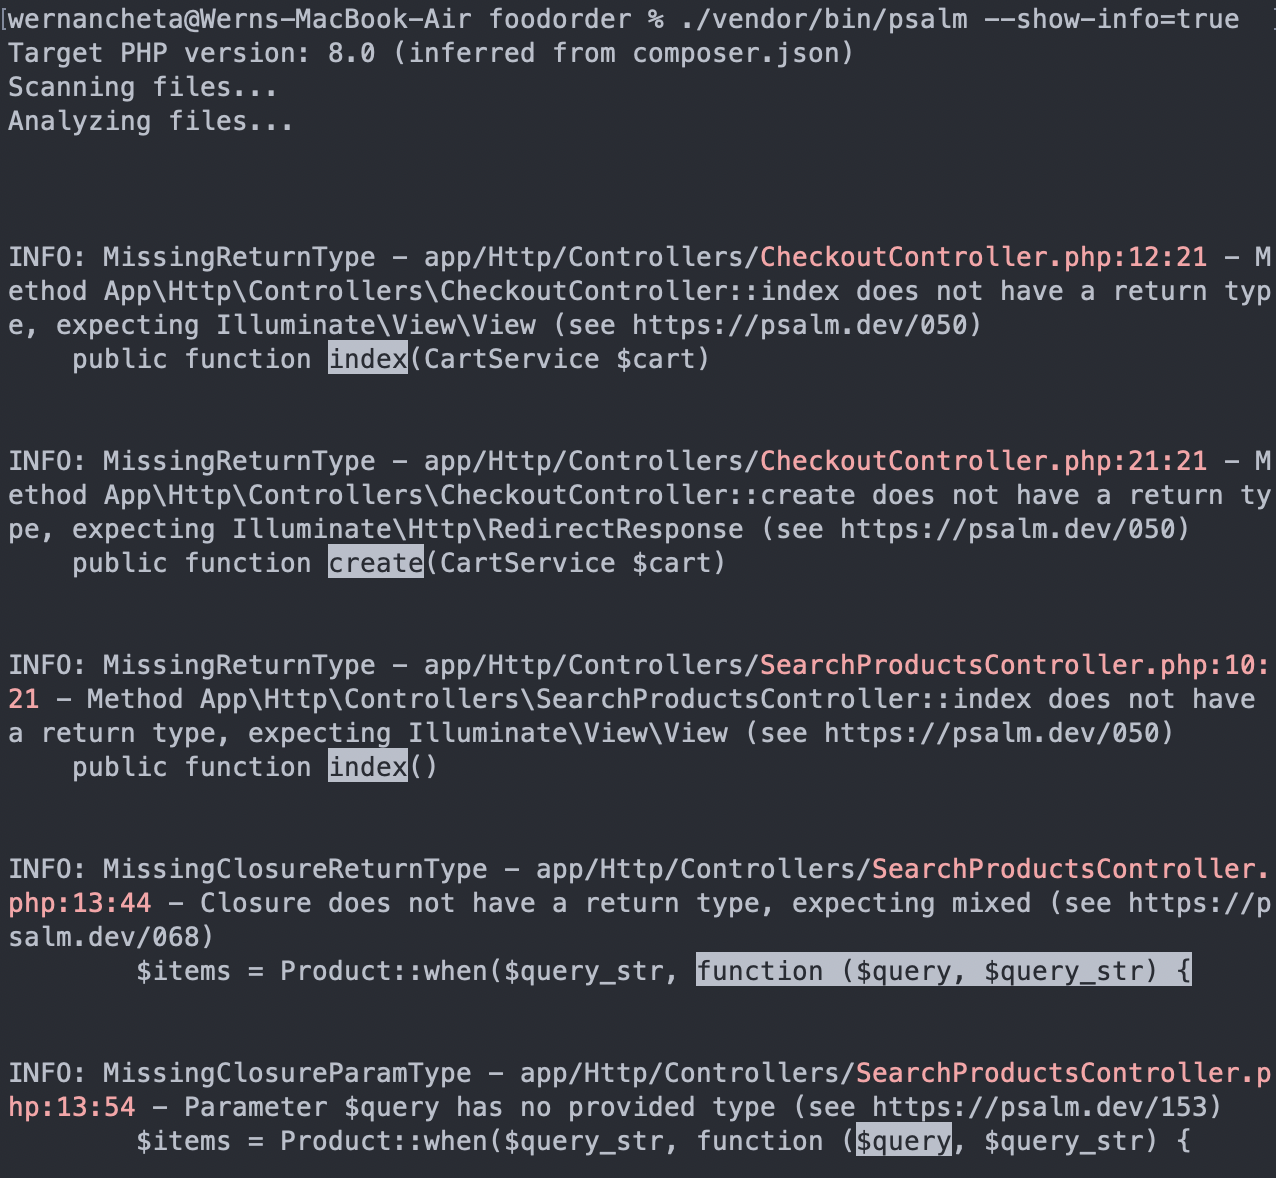
As you can see from the screenshot above, it mostly checks for types, just like PHPStan.
To automatically fix the issues, set the `--alter` and `--issues` options and specify which issues you want to fix. If you want to fix all the issues detected, then set it to `all`:
```bash
./vendor/bin/psalm --alter --issues=all
```
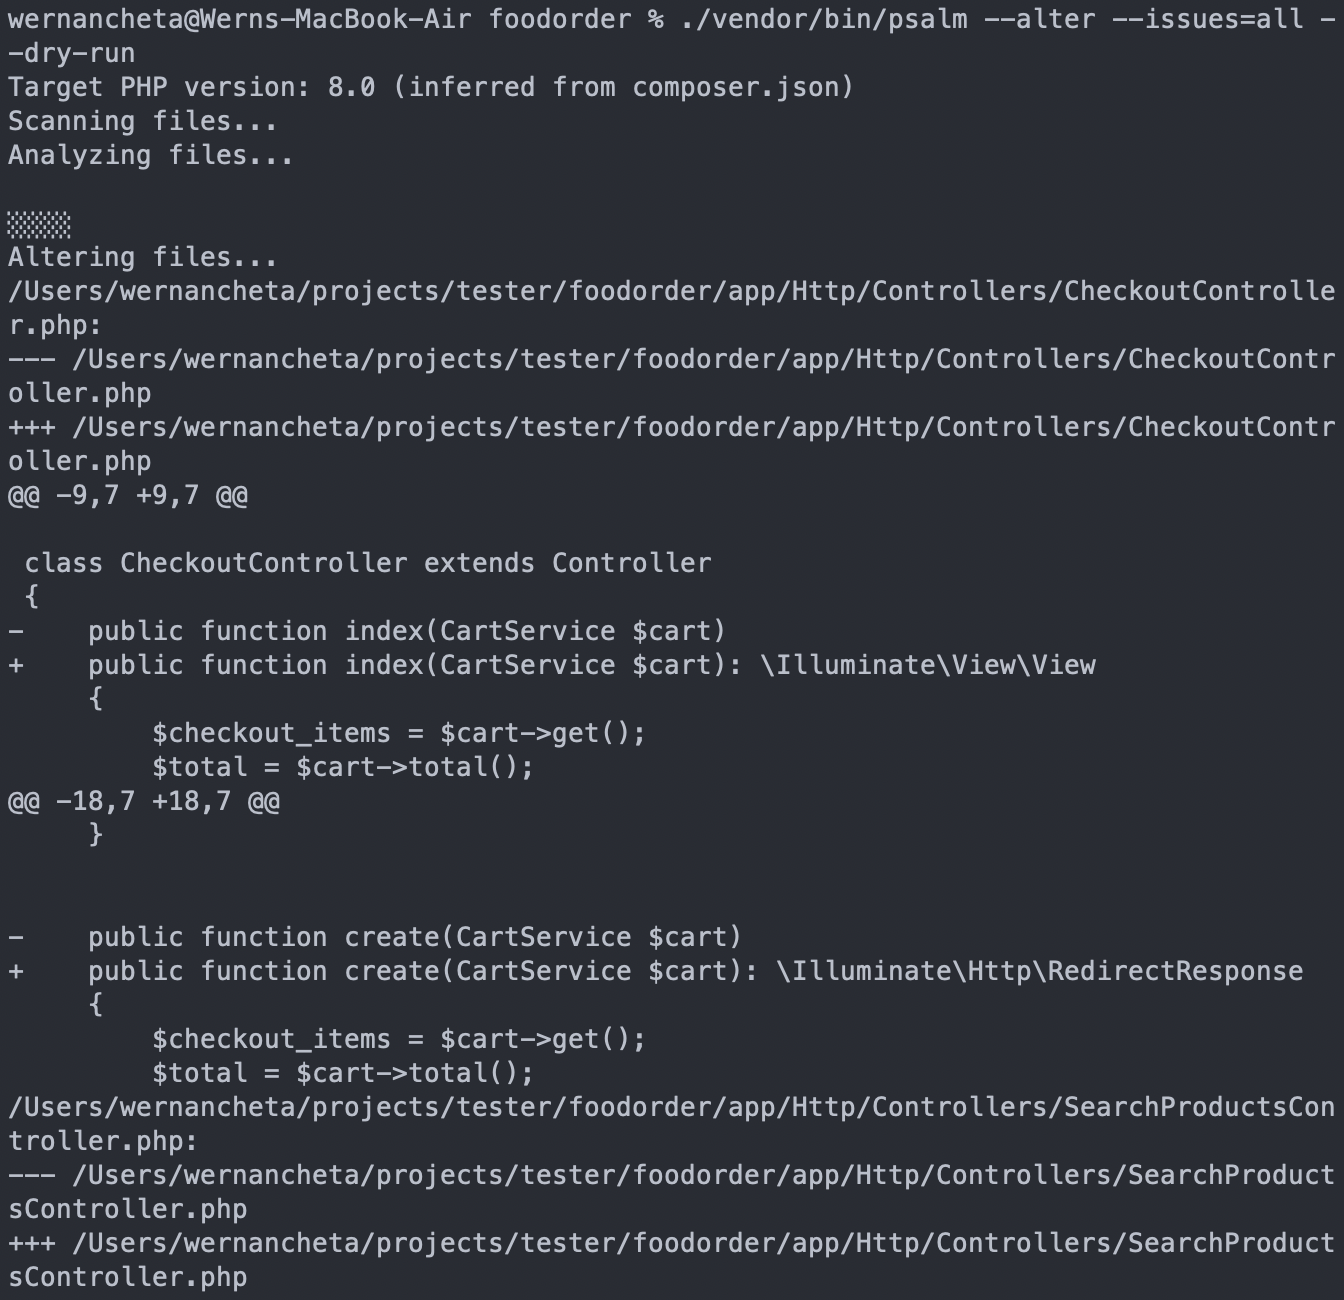
You can execute the above command in a new project without getting into problems. However, for old projects, you'll most likely have issues that will break functionality once they’re fixed by Psalm. For these, you can supply the `--dry-run` option.
```bash
./vendor/bin/psalm --alter --issues=all --dry-run
```
This will show you the fixes it will be making to your code, so you'll already have an idea whether it will break something:
If you want to specify the issues you want to check for, you can do so by specifying the [supported fixes](https://psalm.dev/docs/manipulating_code/fixing/#supported-fixes) as comma-separated values:
```bash
./vendor/bin/psalm --alter --issues=MissingReturnType,UnusedMethod,UnusedProperty
```
Psalm also comes with a [taint analysis feature](https://psalm.dev/docs/security_analysis/). This checks for the usual suspects when it comes to security vulnerabilities, such as SQL injection and insecure HTML output. Run the taint analysis tool like so:
```bash
./vendor/bin/psalm --taint-analysis
```
### Configuration
To configure Psalm, you need to update the `psalm.xml` file at the root of your project directory. By default, it looks like this:
```xml
```
`` allows you to specify which directories Psalm should check. By default, it checks for the `app`, `database/factories` and `database/seeders` directory. As expected, it's set to ignore the `vendor` directory.
You can also ignore specific directories by supplying them under ``. For example, you want to include everything inside the `app` directory but exclude HTTP middleware:
```xml
```
Specific files can also be ignored:
```xml
```
Just like PHPStan, Psalm also has different levels of strictness, with `1` being the strictest and `8` being more relaxed. By default, it uses level `2`. You can read more about the various levels here: [Error Levels](https://psalm.dev/docs/running_psalm/error_levels/).
Even though level 8 is very permissive, there some things are always treated as errors, including [DuplicateArrayKey](https://psalm.dev/docs/running_psalm/issues/DuplicateArrayKey/), [ImpurePropertyAssignment](https://psalm.dev/docs/running_psalm/issues/ImpurePropertyAssignment/), and [InvalidGlobal](https://psalm.dev/docs/running_psalm/issues/InvalidGlobal/). Basically, these are practices that should be avoided regardless of how relaxed your coding standards are. The strictness level can be specified using the `errorLevel` attribute:
```xml
```
You can also suppress specific issues via the config file. For example, you don't want the [InvalidMethodCall](https://psalm.dev/docs/running_psalm/issues/InvalidMethodCall/) issue to be triggered at all:
```xml
```
Just like PHPStan, Psalm also supports [custom docblock annotations](https://psalm.dev/docs/annotating_code/supported_annotations/) so that it can further understand your codebase.
You can find more information about how to configure Psalm in their [Configuration docs](https://psalm.dev/docs/running_psalm/configuration/).
## Enlightn
[Enlightn](https://www.laravel-enlightn.com/) scans your code to check whether it follows best practices in [performance](https://www.laravel-enlightn.com/docs/performance/), [security](https://www.laravel-enlightn.com/docs/security/), and [reliability](https://www.laravel-enlightn.com/docs/reliability/). It's a paid tool, but it also has free checks you can use. At the time of writing, it has 64 checks in the free version and 128 checks in the paid version. For the purposes of this article, we'll only be using the free version.
### Installation
You can install Enlightn with the following command:
```bash
composer require enlightn/enlightn --dev
```
Then publish its config:
```bash
php artisan vendor:publish --tag=enlightn
```
### Usage
You can then run Enlightn using artisan:
```bash
php artisan enlightn
```
It does take a bit of time compared to the other tools, but here's what the output looks like:
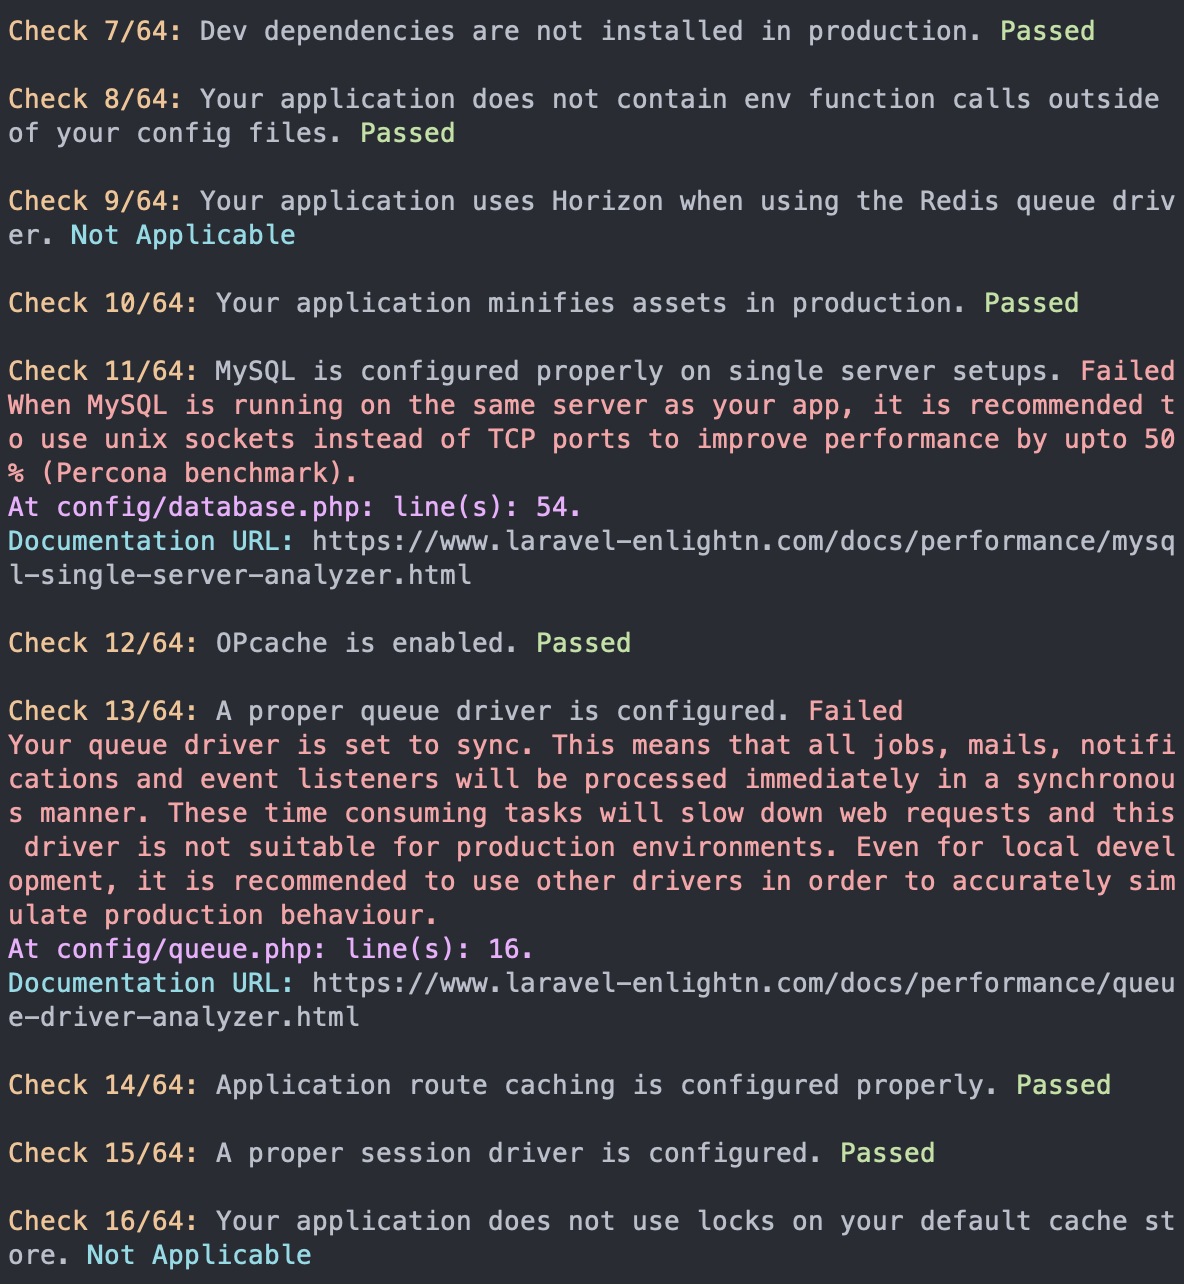
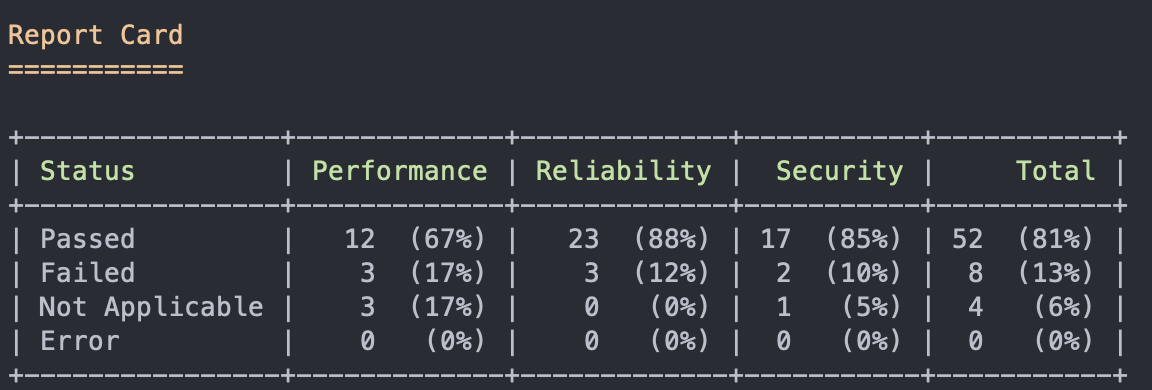
The results are grouped into three sections: performance, security, and reliability. It outputs the issue along with the result. The result can have three values: `passed`, `failed`, or `not applicable`. There's also a fourth value, `error`, which happens when Enlightn encounters an error while trying to run a specific check.
The checks are all Laravel-specific and ensure you're not missing any best practices that need to be addressed. While some of these checks may be obvious to some (e.g., minifying assets in production), it's useful that these checks are automated. We're only human after all, and we might miss things even if we've been coding for many years.
At the end of the report, it shows the percentage of passed, failed, not applicable, and errors in each of the three areas:
You can also view the report in a web UI, but you need to [create an Enlightn account](https://www.laravel-enlightn.com/register). Once registered, [create a new project](https://www.laravel-enlightn.com/projects). Then, in your project, view the API token. Update your `.env` file with the Enlightn credentials config:
```php
ENLIGHTN_USERNAME="YOUR ENLIGHTN EMAIL" ENLIGHTN_API_TOKEN="YOUR PROJECT API TOKEN"
```
Don't forget to refresh the config:
```php
php artisan config:cache
```
Once that's done, run the enlightn command with the `--report` option:
```php
php artisan enlightn --report
```
This should give you the URL where you can view the report, which looks like this:
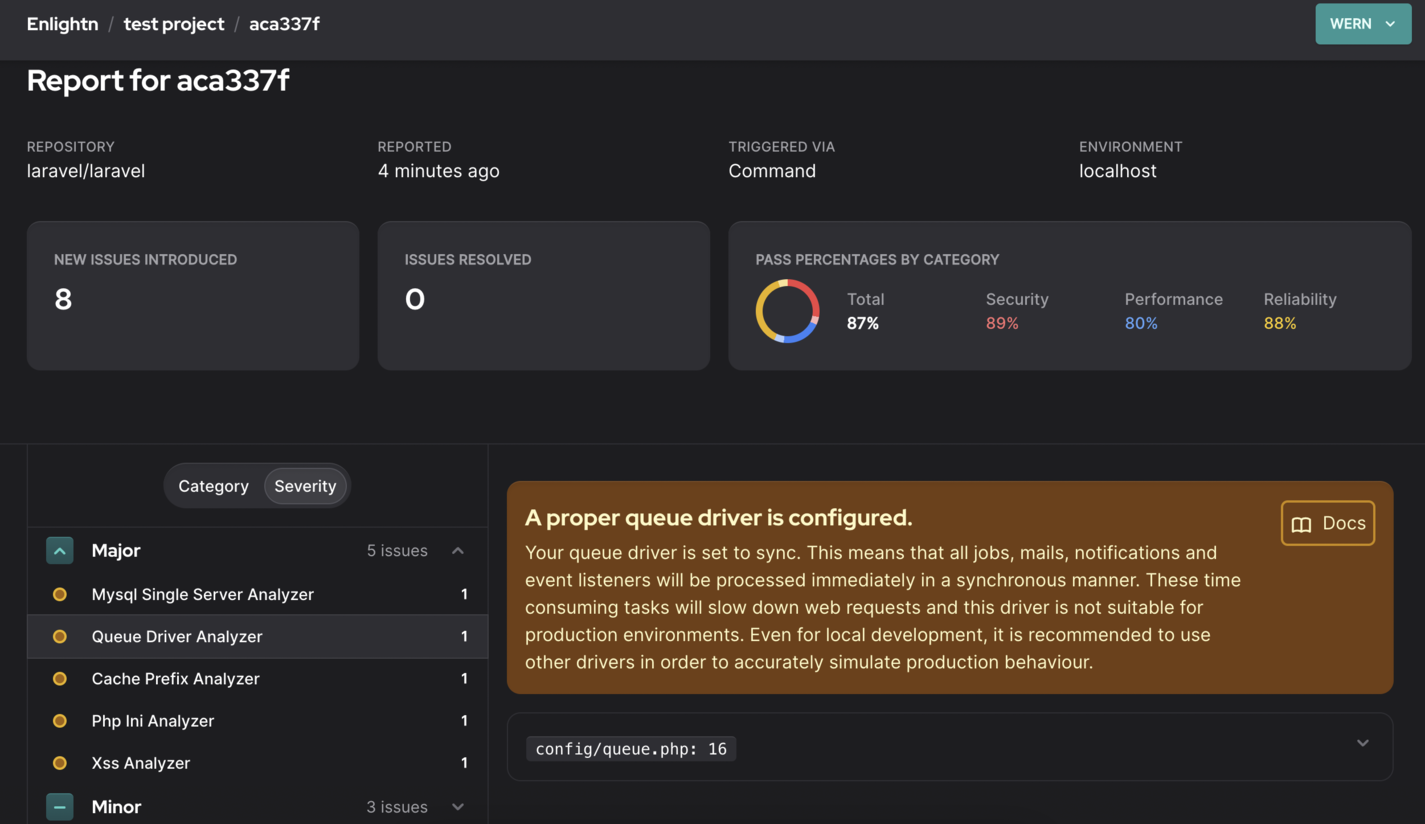
It presents the issues nicely with all the information and documentation links required for you to resolve it.
You can read more about [how to use Enlightn](https://www.laravel-enlightn.com/docs/getting-started/usage.html) in their docs.
### Configuration
You can configure Enlightn by updating the `config/enlightn.php` file.
By default, Enlightn scans the `app`, `migrations`, and `seeders` folders. If you only want to scan controllers, use the following:
```php
'base_path' => [ app_path('Http/Controllers'), ],
```
If the issues get too overwhelming, and you'd rather not fix them at this point in time, you can also generate a baseline:
```bash
php artisan enlightn:baseline
```
This works the same way as the baseline in PHPStan and Psalm. It updates the `config/enlightn.php` file so that it ignores all the existing issues. Thus, all subsequent runs will have no issues, so only newly written code will be checked for issues. Take note of how the `dont_report` and `ignore_errors` changes before and after running `php artisan enlightn:baseline`, so you’ll know which checks have been disabled.
You can read more about [how to configure Enlightn](https://www.laravel-enlightn.com/docs/getting-started/configuration.html) in their docs.
## Text-editor integration
Running the tools via the command-line isn't that bad. It provides valuable feedback on how to improve your code. However, wouldn't it be nice if this functionality were already integrated with the text-editor or IDE you're using? With IDEs specifically created for PHP development, such as PhpStorm, [you already get this for free](https://www.jetbrains.com/help/phpstorm/php-code-quality-tools.html). I understand that everyone isn’t lucky enough to have their company pay for development tools like PhpStorm, though. PhpStorm isn't low-cost, so we'll be going through alternative text-editors instead. Note that we won't be going through all the text-editors, so you'll have to find plugins for your text-editor or IDE of choice if they're not covered below. Additionally, note that although these plugins offer faster feedback when using static analysis in your projects, don’t expect them to operate in real time. They have to scan the whole codebase, so some delay is to be expected, even for IDEs like PHPStorm.
### VS Code
For VS Code, you can use the following extensions to check for code quality in real time as you're typing the code:
- [PHP Static Analysis](https://marketplace.visualstudio.com/items?itemName=breezelin.phpstan) - static analysis via PhpStan.
- [PHP Sniffer](https://marketplace.visualstudio.com/items?itemName=wongjn.php-sniffer) - code style linter and formatter via PHP\_CodeSniffer.
- [Psalm](https://marketplace.visualstudio.com/items?itemName=getpsalm.psalm-vscode-plugin) - the official VS Code plugin for adding Psalm support.
### Vim
Support for code quality tools are provided by the [ALE](https://github.com/dense-analysis/ale) plugin. These are supported for PHP:
- php-cs-fixer
- Laravel Pint
- PhpStan
- Psalm
- PHP Mess Detector
### Sublime Text
For Sublime Text, the following tools are available:
- [Sublime-phpcs](https://github.com/benmatselby/sublime-phpcs) - adds support for PHP\_CodeSniffer, PHP Code Beautifier, PHP CS Fixer, PHP Linter, and PHP Mess Detector.
- Psalm - support for Psalm can be added via the [LSP plugin](https://github.com/sublimelsp/LSP). More information about it can be found in [Psalm's documentation](https://psalm.dev/docs/running_psalm/language_server/).
## Continuous integration
The real power of using PHP code-quality tools is when it’s added to your continuous integration process, which means it automatically checks the code every time someone makes a push or pull request to your project repo. In this section, we'll be looking at how to do just that. [GitHub actions](https://github.com/features/actions) is available for free so we'll use it for demo purposes. Note that there are some [limits to private repos](https://github.com/pricing), so set your test repo to public if you can.
To keep things simple, we'll only add steps for checking the code and running the tool. Thus, the developers who pushed the changes will receive some feedback on what's wrong with their code. They can then fix the issues and push their changes until no issues are detected.
You can add the workflows below by creating a `.github/workflows` folder in the root of your project directory. Then, create a file for adding the workflow (e.g., `static-analysis.yml`).
The workflows below follow the same general steps. Only the commands for the specific tool changes. Here are the general steps to perform within a workflow:
1. Declare the name of the workflow:
```bash
name: Laravel Pint CI GitHub Action
```
1. Set the event that triggers the action to execute. In this case, we want to execute it every time the repo receives a pull request or new code is pushed:
```bash
on: [push, pull_request]
```
1. Specify the jobs and the steps to execute. It uses the following format:
```bash
[Name of job]: runs-on: [operating system] steps: - name: [Name of the task] - uses: [Name of another workflow] or run: [Command to execute]
```
In the workflows below, we always need to check the code. This is how the runner gets access to the repo:
```bash
- name: Checkout code uses: actions/checkout@v3
```
Next, we also need to set up PHP, Composer, and Laravel:
```bash
- name: Setup PHP with PECL extension uses: shivammathur/setup-php@v2 with: php-version: '8.1' - name: Composer install run: composer install -q --no-ansi --no-interaction --no-scripts --no-suggest --no-progress --prefer-dist - name: Copy .env run: php -r "file_exists('.env') || copy('.env.example', '.env');" - name: Generate key run: php artisan key:generate - name: Directory Permissions run: chmod -R 777 storage bootstrap/cache
```
Once those are all done, execute the command for the code quality tool:
```bash
- name: Run Pint run: ./vendor/bin/pint --test
```
If you're new to GitHub actions, I recommend reading the [Quickstart for GitHub Actions](https://docs.github.com/en/actions/quickstart) guide.
Note that in the workflows below, the initial setup for checking the code, setting up PHP, Composer, and Laravel is omitted to avoid repetition. Therefore, don't forget to include them if you plan to try these out on your own.
### Laravel Pint
Here's the workflow for Laravel Pint. In this case, we're using a [ready-made action](https://github.com/aglipanci/laravel-pint-action). Since Laravel Pint is so simple, we can get away with using something like this. Instead of `run`, you supply the name of the action. You can find these on [GitHub Marketplace](https://github.com/marketplace?type=actions) or simply search for "\[name of code quality tool\] github action" on Google:
```bash
name: Laravel Pint CI GitHub Action on: [pull_request, push] jobs: pint: runs-on: ubuntu-latest steps: - name: Run Laravel Pint uses: aglipanci/laravel-pint-action@0.1.0 with: preset: laravel verboseMode: true testMode: true
```
The options can then be supplied using `with`. In this case, we're using `laravel` preset, `verboseMode: true` to display more details, and `testMode: true` so that it shows the errors but doesn’t fix them. There's no point in fixing them unless you also commit the changes back to your repo. I'll leave that for you to figure out.
### PHP Insights
In the CI environment, you no longer need to do the initial setup since the PHP Insights config is already in your repo. All you have to do is run the `php artisan insights` command. However, this time, you'll also need to set a minimum level for each check because, if you just run `php artisan insights` as-is, it won't return an error code. It will simply proceed with the next step. We want it to fail and stop the execution if it doesn't meet the minimum that we've set:
```bash
name: PHP Insights CI GitHub Action on: [push, pull_request] jobs: phpinsights: runs-on: ubuntu-latest steps: - name: Run PHP Insights run: php artisan insights --no-interaction --min-quality=70 --min-complexity=80 --min-architecture=75 --min-style=95
```
### PHPStan
It's assumed that you already have a `phpstan.neon` file in your repo, so it will use this config file when you run the following:
`./vendor/bin/phpstan analyse`:
```bash
name: Larastan CI GitHub Action on: [pull_request, push] jobs: phpstan: name: Larastan runs-on: ubuntu-latest steps: - name: Run Phpstan run: ./vendor/bin/phpstan analyse
```
### Psalm
It's also assumed that you already have the `psalm.xml` file in your repo, so there's no need supply extra configuration options when using Psalm in a CI environment:
```bash
name: Psalm CI GitHub Action on: [pull_request, push] jobs: psalm: name: Psalm runs-on: ubuntu-latest steps: - name: Run Psalm run: ./vendor/bin/psalm --show-info=true
```
### Enlightn
As discussed earlier, Enlightn checks more than just the code. It also checks things like the database and PHP configuration, which is why it's recommended to run Enlightn on the production server at least once. Alternatively, run it every time you make changes to the software that runs your web application (e.g., upgrading PHP versions or updating the PHP configuration). These kinds of tests are relatively useless in a CI environment if they don't have the same configuration as your production server.
Here's how to run Enlightn on a CI environment:
```bash
name: Enlightn CI GitHub Action on: [pull_request, push] jobs: phpinsights: runs-on: ubuntu-latest steps: - name: Run Enlightn run: php artisan enlightn --ci --report env: ENLIGHTN_USERNAME: '${{ secrets.ENLIGHTN_USERNAME }}' ENLIGHTN_API_TOKEN: '${{ secrets.ENLIGHTN_API_TOKEN }}'
```
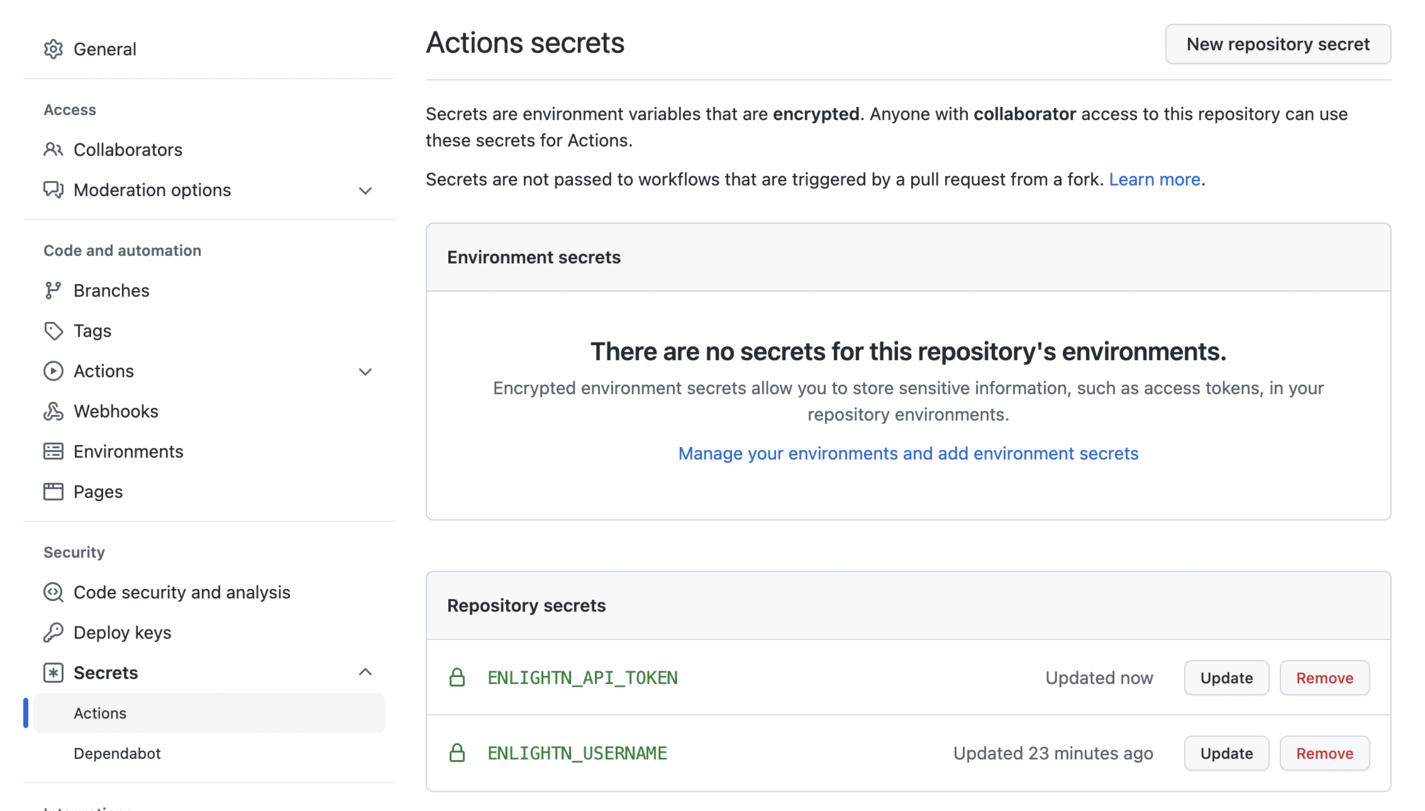
In the above workflow, we used the `--report` option and that requires us to have the `ENLIGHTN_USERNAME` and `ENLIGHTN_API_TOKEN` in our environment variables. Since we can't directly add them to our `.env` file for security reasons, we need to use [Actions Secrets](https://docs.github.com/en/actions/security-guides/encrypted-secrets). You can add secrets on this page: [`https://github.com/yourGitHubUsername/yourRepoName/settings/secrets/actions`](https://github.com/anchetaWern/food-order-gh-action-test/settings/secrets/actions). Click on the **New repository secret** button to add your secret:
## Conclusion
That's it! In this article, we've gone through five tools you can use in Laravel projects to ensure code quality and best practices are followed. We've covered how to use each tool from the command-line and text-editor, as well as add it to your continuous integration process.
There's no right or wrong answers when it comes to choosing tools to adopt on your projects. Each tool has its strengths.
Laravel Pint is the friendliest when it comes to Laravel since it's the official tool supported by Laravel for code quality analysis. This makes it the easiest one to get started using.
PHP Insight's strength is its ability to analyze code in four different aspects: code, complexity, architecture, and style. Among the tools we've covered today, it has the most checks available, and your own checks can be added.
PHPStan and Psalm's strength is in their type-checking, so you can probably use them interchangeably. If you're still using PHP 7 for your projects and want to upgrade your codebase to use some of the PHP 8 features and new syntax, as well as make it more modern, then PHPStan is the way to go. You'll also get some security benefits when using Psalm because of its taint checks.
Enlightn's strength is the detection of bad practices across three different areas: performance, security, and reliability. Although most of the really useful checks are under their paid plan, their free plan provides a ton of value. Their documentation is quite detailed, and they provide documentation for the checks under their "pro" plan. This means we can actually do manual auditing on our code.
You don't have to choose between the tools; you can set them all up in your project. Although they may have some overlap, each does one thing well. You might decide to start with Laravel Pint and later on switch to a combination of PHP Insights, PHPStan, and Enlightn. Alternatively, you could stick to Laravel Psalm if you only need to migrate your codebase to PHP 8 and check for security issues.
---
## Try Honeybadger for FREE
Intelligent logging, error tracking, and Just Enough APM™ in one dev-friendly platform. Find and fix problems before users notice.
[Start free trial](https://app.honeybadger.io/users/sign_up)
[See plans and pricing](https://www.honeybadger.io/plans/)